The Cairo Book
By the Cairo Community and its contributors. Special thanks to StarkWare through OnlyDust, and Voyager for supporting the creation of this book.
This version of the text assumes you’re using Cairo version 2.11.4 and Starknet Foundry version 0.39.0. See the Installation section of Chapter 1 to install or update Cairo and Starknet Foundry.
While reading this book, if you want to experiment with Cairo code and see how it compiles into Sierra (Intermediate Representation) and CASM (Cairo Assembly), you can use the cairovm.codes playground.
This book is open source. Find a typo or want to contribute? Check out the book's GitHub repository.
Foreword
Zero-knowledge proofs have emerged as a transformative technology in the blockchain space, offering solutions for both privacy and scalability challenges. Among these, STARKs (Scalable Transparent ARguments of Knowledge) stand out as a particularly powerful innovation. Unlike traditional proof systems, STARKs rely solely on collision-resistant hash functions, making them post-quantum secure and eliminating the need for trusted setups.
However, writing general-purpose programs that can generate cryptographic proofs has historically been a significant challenge. Developers needed deep expertise in cryptography and complex mathematical concepts to create verifiable computations, making it impractical for mainstream adoption.
This is where Cairo comes in. As a general-purpose programming language designed specifically for creating provable programs, Cairo abstracts away the underlying cryptographic complexities while maintaining the full power of STARKs. Strongly inspired by Rust, Cairo has been built to help you create provable programs without requiring specific knowledge of its underlying architecture, allowing you to focus on the program logic itself.
Blockchain developers that want to deploy contracts on Starknet will use the Cairo programming language to code their smart contracts. This allows the Starknet OS to generate execution traces for transactions to be proved by a prover, which is then verified on Ethereum L1 prior to updating the state root of Starknet.
However, Cairo is not only for blockchain developers. As a general purpose programming language, it can be used for any computation that would benefit from being proved on one computer and verified on other machines. Powered by a Rust VM, and a next-generation prover, the execution and proof generation of Cairo programs is blazingly fast - making Cairo the best tool for building provable applications.
This book is designed for developers with a basic understanding of programming concepts. It is a friendly and approachable text intended to help you level up your knowledge of Cairo, but also help you develop your programming skills in general. So, dive in and get ready to learn all there is to know about Cairo!
Acknowledgements
This book would not have been possible without the help of the Cairo community. We would like to thank every contributor for their contributions to this book!
We would like to thank the Rust community for the Rust Book, which has been a great source of inspiration for this book. Many examples and explanations have been adapted from the Rust Book to fit the Cairo programming language, as the two languages share many similarities.
Introduction
What is Cairo?
Cairo is a programming language designed to leverage the power of mathematical proofs for computational integrity. Just as C.S. Lewis defined integrity as "doing the right thing, even when no one is watching," Cairo enables programs to prove they've done the right computation, even when executed on untrusted machines.
The language is built on STARK technology, a modern evolution of PCP (Probabilistically Checkable Proofs) that transforms computational claims into constraint systems. While Cairo's ultimate purpose is to generate these mathematical proofs that can be verified efficiently and with absolute certainty.
What Can You Do with It?
Cairo enables a paradigm shift in how we think about trusted computation. Its primary application today is Starknet, a Layer 2 scaling solution for Ethereum that addresses one of blockchain's fundamental challenges: scalability without sacrificing security.
In the traditional blockchain model, every participant must verify every computation. Starknet changes this by using Cairo's proof system: computations are executed off-chain by a prover who generates a STARK proof, which is then verified by an Ethereum smart contract. This verification requires significantly less computational power than re-executing the computations, enabling massive scalability while maintaining security.
However, Cairo's potential extends beyond blockchain. Any scenario where computational integrity needs to be verified efficiently can benefit from Cairo's verifiable computation capabilities.
Who Is This Book For?
This book caters to three main audiences, each with their own learning path:
-
General-Purpose Developers: If you're interested in Cairo for its verifiable computation capabilities outside of blockchain, you'll want to focus on chapters 1-12. These chapters cover the core language features and programming concepts without diving deep into smart contract specifics.
-
New Smart Contract Developers: If you're new to both Cairo and smart contracts, we recommend reading the book front to back. This will give you a solid foundation in both the language fundamentals and smart contract development principles.
-
Experienced Smart Contract Developers: If you're already familiar with smart contract development in other languages, or Rust, you might want to follow this focused path:
- Chapters 1-3 for Cairo basics
- Chapter 8 for Cairo's trait and generics system
- Skip to Chapter 15 for smart contract development
- Reference other chapters as needed
Regardless of your background, this book assumes basic programming knowledge such as variables, functions, and common data structures. While prior experience with Rust can be helpful (as Cairo shares many similarities), it's not required.
References
- Cairo CPU Architecture: https://eprint.iacr.org/2021/1063
- Cairo, Sierra and Casm: https://medium.com/nethermind-eth/under-the-hood-of-cairo-1-0-exploring-sierra-7f32808421f5
- State of non determinism: https://twitter.com/PapiniShahar/status/1638203716535713798
Getting Started
Let’s start your Cairo journey! There’s a lot to learn, but every journey starts somewhere. In this chapter, we’ll discuss:
- Installing Scarb, which is Cairo's build toolchain and package manager, on Linux, macOS, and Windows.
- Installing Starknet Foundry, which is the default test runnner when creating a Cairo project.
- Writing a program that prints
Hello, world!. - Using basic Scarb commands to create a project and execute a program.
Getting Help
If you have any questions about Starknet or Cairo, you can ask them in the Starknet Discord server. The community is friendly and always willing to help.
Interacting with the Starknet AI Agent
Starknet proposes its own AI agent designed to assist with Cairo and Starknet-related questions. This AI agent is trained on the Cairo book and the Starknet documentation, using Retrieval-Augmented Generation (RAG) to efficiently retrieve information and provide accurate assistance.
You can find the Starknet Agent on the Starknet Agent website.
Installation
The first step is to install Cairo. We'll download Cairo through starkup, a command line tool for managing Cairo versions and associated tools. You'll need an internet connection for the download.
The following steps install the latest stable version of the Cairo compiler through a binary called Scarb. Scarb bundles the Cairo compiler and the Cairo language server together in an easy-to-install package so that you can start writing Cairo code right away.
Scarb is also Cairo's package manager and is heavily inspired by Cargo, Rust's build system and package manager.
Scarb handles a lot of tasks for you, such as building your code (either pure Cairo or Starknet contracts), downloading the libraries your code depends on, building those libraries, and provides LSP support for the VSCode Cairo 1 extension.
As you write more complex Cairo programs, you might add dependencies, and if you start a project using Scarb, managing external code and dependencies will be a lot easier to do.
Starknet Foundry is a toolchain for Cairo programs and Starknet smart contract development. It supports many features, including writing and running tests with advanced features, deploying contracts, interacting with the Starknet network, and more.
Let's start by installing starkup, which will help us manage Cairo, Scarb, and Starknet Foundry.
Installing starkup on Linux or MacOs
If you're using Linux or macOS, open a terminal and enter the following command:
curl --proto '=https' --tlsv1.2 -sSf https://sh.starkup.dev | sh
The command downloads a script and starts the installation of the starkup tool, which installs the latest stable version of Cairo and related toolings. You might be prompted for your password. If the install is successful, the following line will appear:
starkup: Installation complete.
After installation, starkup will automatically install the latest stable versions of Cairo, Scarb, and Starknet Foundry. You can verify the installations by running the following commands in a new terminal session:
$ scarb --version
scarb 2.11.4 (c0ef5ec6a 2025-04-09)
cairo: 2.11.4 (https://crates.io/crates/cairo-lang-compiler/2.11.4)
sierra: 1.7.0

$ snforge --version
snforge 0.39.0
We'll describe Starknet Foundry in more detail in Chapter 10 for Cairo programs testing and in Chapter 18 when discussing Starknet smart contract testing and security in the second part of the book.
Installing the VSCode Extension
Cairo has a VSCode extension that provides syntax highlighting, code completion, and other useful features. You can install it from the VSCode Marketplace.
Once installed, go into the extension settings, and make sure to tick the Enable Language Server and Enable Scarb options.
Hello, World
Now that you’ve installed Cairo through Scarb, it’s time to write your first Cairo program.
It’s traditional when learning a new language to write a little program that
prints the text Hello, world! to the screen, so we’ll do the same here!
Note: This book assumes basic familiarity with the command line. Cairo makes no specific demands about your editing or tooling or where your code lives, so if you prefer to use an integrated development environment (IDE) instead of the command line, feel free to use your favorite IDE. The Cairo team has developed a VSCode extension for the Cairo language that you can use to get the features from the language server and code highlighting. See Appendix F for more details.
Creating a Project Directory
You’ll start by making a directory to store your Cairo code. It doesn’t matter to Cairo where your code lives, but for the exercises and projects in this book, we suggest making a cairo_projects directory in your home directory and keeping all your projects there.
Open a terminal and enter the following commands to make a cairo_projects directory.
For Linux, macOS, and PowerShell on Windows, enter this:
mkdir ~/cairo_projects
cd ~/cairo_projects
For Windows CMD, enter this:
> mkdir "%USERPROFILE%\cairo_projects"
> cd /d "%USERPROFILE%\cairo_projects"
Note: From now on, for each example shown in the book, we assume that you will be working from a Scarb project directory. If you are not using Scarb, and try to run the examples from a different directory, you might need to adjust the commands accordingly or create a Scarb project.
Creating a Project with Scarb
Let’s create a new project using Scarb.
Navigate to your cairo_projects directory (or wherever you decided to store your code). Then run the following:
scarb new hello_world
Scarb will ask you about the dependencies you want to add. You will be given two options :
? Which test runner do you want to set up? ›
❯ Starknet Foundry (default)
  Cairo Test
In general, we'll prefer using the first one ❯ Starknet Foundry (default).
This creates a new directory and project called hello_world. We’ve named our project hello_world, and Scarb creates its files in a directory of the same name.
Go into the hello_world directory with the command cd hello_world. You’ll see that Scarb has generated three files and two directory for us: a Scarb.toml file, a src directory with a lib.cairo file inside and a tests directory containing a test_contract.cairo file. For now, we can remove this tests directory.
It has also initialized a new Git repository along with a .gitignore file
Note: Git is a common version control system. You can stop using version control system by using the
--no-vcsflag. Runscarb new --helpto see the available options.
Open Scarb.toml in your text editor of choice. It should look similar to the code in Listing 1-1.
Filename: Scarb.toml
[package]
name = "hello_world"
version = "0.1.0"
edition = "2024_07"

# See more keys and their definitions at https://docs.swmansion.com/scarb/docs/reference/manifest.html

[dependencies]
starknet = "2.11.4"

[dev-dependencies]
snforge_std = "0.39.0"
assert_macros = "2.11.4"

[[target.starknet-contract]]
sierra = true

[scripts]
test = "snforge test"

# ...
Listing 1-1: Contents of Scarb.toml generated by scarb new
This file is in the TOML (Tom’s Obvious, Minimal Language) format, which is Scarb’s configuration format.
The first line, [package], is a section heading that indicates that the following statements are configuring a package. As we add more information to this file, we’ll add other sections.
The next three lines set the configuration information Scarb needs to compile your program: the name of the package and the version of Scarb to use, and the edition of the prelude to use. The prelude is the collection of the most commonly used items that are automatically imported into every Cairo program. You can learn more about the prelude in Appendix D.
The [dependencies] section, is the start of a section for you to list any of your project’s dependencies. In Cairo, packages of code are referred to as crates. We won’t need any other crates for this project.
The [dev-dependencies] section is about dependencies that are required for development, but are not needed for the actual production build of the project. snforge_std and assert_macros are two examples of such dependencies. If you want to test your project without using Starknet Foundry, you can use cairo_test.
The [[target.starknet-contract]] section allows to build Starknet smart contracts. We can remove it for now.
The [script] section allows to define custom scripts. By default, there is one script for running tests using snforge with the scarb test command. We can also remove it for now.
Starknet Foundry also have more options, check out Starknet Foundry documentation for more information.
By default, using Starknet Foundry adds the starknet dependency and the [[target.starknet-contract]] section, so that you can build contracts for Starknet out of the box. We will start with only Cairo programs, so you can edit your Scarb.toml file to the following:
Filename: Scarb.toml
[package]
name = "hello_world"
version = "0.1.0"
edition = "2024_07"

[dependencies]
Listing 1-2: Contents of modified Scarb.toml
The other file created by Scarb is src/lib.cairo, let's delete all the content and put in the following content, we will explain the reason later.
mod hello_world;
Then create a new file called src/hello_world.cairo and put the following code in it:
Filename: src/hello_world.cairo
fn main() {
    println!("Hello, World!");
}
We have just created a file called lib.cairo, which contains a module declaration referencing another module named hello_world, as well as the file hello_world.cairo, containing the implementation details of the hello_world module.
Scarb requires your source files to be located within the src directory.
The top-level project directory is reserved for README files, license information, configuration files, and any other non-code-related content. Scarb ensures a designated location for all project components, maintaining a structured organization.
If you started a project that doesn’t use Scarb, you can convert it to a project that does use Scarb. Move the project code into the src directory and create an appropriate Scarb.toml file. You can also use scarb init command to generate the src folder and the Scarb.toml it contains.
├── Scarb.toml
├── src
│   ├── lib.cairo
│   └── hello_world.cairo
A sample Scarb project structure
Building a Scarb Project
From your hello_world directory, build your project by entering the following command:
$ scarb build
   Compiling hello_world v0.1.0 (listings/ch01-getting-started/no_listing_01_hello_world/Scarb.toml)
    Finished `dev` profile target(s) in 8 seconds
This command creates a hello_world.sierra.json file in target/dev, let's ignore the sierra file for now.
If you have installed Cairo correctly, you should be able to run the main function of your program with the scarb cairo-run command and see the following output:
$ scarb cairo-run
   Compiling hello_world v0.1.0 (listings/ch01-getting-started/no_listing_01_hello_world/Scarb.toml)
    Finished `dev` profile target(s) in 15 seconds
     Running hello_world
Hello, World!
Run completed successfully, returning []
Regardless of your operating system, the string Hello, world! should be printed to
the terminal.
If Hello, world! did print, congratulations! You’ve officially written a Cairo
program. That makes you a Cairo programmer — welcome!
Anatomy of a Cairo Program
Let’s review this “Hello, world!” program in detail. Here’s the first piece of the puzzle:
fn main() {

}
These lines define a function named main. The main function is special: it
is always the first code that runs in every executable Cairo program. Here, the
first line declares a function named main that has no parameters and returns
nothing. If there were parameters, they would go inside the parentheses ().
The function body is wrapped in {}. Cairo requires curly brackets around all
function bodies. It’s good style to place the opening curly bracket on the same
line as the function declaration, adding one space in between.
Note: If you want to stick to a standard style across Cairo projects, you can use the automatic formatter tool available with
scarb fmtto format your code in a particular style (more onscarb fmtin Appendix F). The Cairo team has included this tool with the standard Cairo distribution, ascairo-runis, so it should already be installed on your computer!
The body of the main function holds the following code:
println!("Hello, World!");
This line does all the work in this little program: it prints text to the screen. There are four important details to notice here.
First, Cairo style is to indent with four spaces, not a tab.
Second, println! calls a Cairo macro. If it had called a function instead, it would be entered as println (without the !).
We’ll discuss Cairo macros in more detail in the "Macros" chapter. For now, you just need to know that using a ! means that you’re calling a macro instead of a normal function and that macros don’t always follow the same rules as functions.
Third, you see the "Hello, world!" string. We pass this string as an argument to println!, and the string is printed to the screen.
Fourth, we end the line with a semicolon (;), which indicates that this
expression is over and the next one is ready to begin. Most lines of Cairo code
end with a semicolon.
Summary
Let’s recap what we’ve learned so far about Scarb:
- We can install one or multiple Scarb versions, either the latest stable or a specific one, using asdf.
- We can create a project using
scarb new. - We can build a project using
scarb buildto generate the compiled Sierra code. - We can execute a Cairo program using the
scarb cairo-runcommand.
An additional advantage of using Scarb is that the commands are the same no matter which operating system you’re working on. So, at this point, we’ll no longer provide specific instructions for Linux and macOS versus Windows.
You’re already off to a great start on your Cairo journey! This is a great time to build a more substantial program to get used to reading and writing Cairo code.
Proving That A Number Is Prime
Let’s dive into Cairo by working through a hands-on project together! This section introduces you to key Cairo concepts and the process of generating zero-knowledge proofs locally, a powerful feature enabled by Cairo in combination with the Stwo prover. You’ll learn about functions, control flow, executable targets, Scarb workflows, and how to prove a statement — all while practicing the fundamentals of Cairo programming. In later chapters, we’ll explore these ideas in more depth.
For this project, we’ll implement a classic mathematical problem suited for zero-knowledge proofs: proving that a number is prime. This is the ideal project to introduce you to the concept of zero-knowledge proofs in Cairo, because while finding prime numbers is a complex task, proving that a number is prime is straightforward.
Here’s how it works: the program will take an input number from the user and check whether it’s prime using a trial division algorithm. Then, we’ll use Scarb to execute the program and generate a proof that the primality check was performed correctly, so that anyone can verify your proof to trust that you found a prime number. The user will input a number, and we’ll output whether it’s prime, followed by generating and verifying a proof.
Setting Up a New Project
To get started, ensure you have Scarb 2.11.4 or later installed (see Installation for details). We’ll use Scarb to create and manage our Cairo project.
Open a terminal in your projects directory and create a new Scarb project:
scarb new prime_prover
cd prime_prover
The scarb new command creates a new directory called prime_prover with a basic project structure. Let’s examine the generated Scarb.toml file:
Filename: Scarb.toml
[package]
name = "prime_prover"
version = "0.1.0"
edition = "2024_07"

[dependencies]

[dev-dependencies]
cairo_test = "2.11.4"
This is a minimal manifest file for a Cairo project. However, since we want to create an executable program that we can prove, we need to modify it. Update Scarb.toml to define an executable target and include the cairo_execute plugin:
Filename: Scarb.toml
[package]
name = "prime_prover"
version = "0.1.0"
edition = "2024_07"

[[target.executable]]

[cairo]
enable-gas = false

[dependencies]
cairo_execute = "2.11.4"
Here’s what we’ve added:
[[target.executable]]specifies that this package compiles to a Cairo executable (not a library or Starknet contract).[cairo] enable-gas = falsedisables gas tracking, which is required for executable targets since gas is specific to Starknet contracts.[dependencies] cairo_execute = "2.11.4"adds the plugin needed to execute and prove our program.
Now, check the generated src/lib.cairo, which is a simple placeholder. Since we’re building an executable, we’ll replace this with a function annotated with #[executable] to define our entry point.
Writing the Prime-Checking Logic
Let’s write a program to check if a number is prime. A number is prime if it’s greater than 1 and divisible only by 1 and itself. We’ll implement a simple trial division algorithm and mark it as executable. Replace the contents of src/lib.cairo with the following:
Filename: src/lib.cairo
/// Checks if a number is prime
///
/// # Arguments
///
/// * `n` - The number to check
///
/// # Returns
///
/// * `true` if the number is prime
/// * `false` if the number is not prime
fn is_prime(n: u32) -> bool {
    if n <= 1 {
        return false;
    }
    if n == 2 {
        return true;
    }
    if n % 2 == 0 {
        return false;
    }
    let mut i = 3;
    let mut is_prime = true;
    loop {
        if i * i > n {
            break;
        }
        if n % i == 0 {
            is_prime = false;
            break;
        }
        i += 2;
    }
    is_prime
}

// Executable entry point
#[executable]
fn main(input: u32) -> bool {
    is_prime(input)
}
Let’s break this down:
The is_prime function:
- Takes a
u32input (an unsigned 32-bit integer) and returns abool. - Checks edge cases: numbers ≤ 1 are not prime, 2 is prime, even numbers > 2 are not prime.
- Uses a loop to test odd divisors up to the square root of
n. If no divisors are found, the number is prime.
The main function:
- Marked with
#[executable], indicating it’s the entry point for our program. - Takes a u32 input from the user and returns a bool indicating whether it’s prime.
- Calls is_prime to perform the check.
This is a straightforward implementation, but it’s perfect for demonstrating proving in Cairo.
Executing the Program
Now let’s run the program with Scarb to test it. Use the scarb execute command and provide an input number as an argument:
scarb execute -p prime_prover --print-program-output --arguments 17
-p prime_proverspecifies the package name (matches Scarb.toml).--print-program-outputdisplays the result.--arguments 17passes the number 17 as input.
You should see output like this:
$ scarb execute -p prime_prover --print-program-output --arguments 17
   Compiling prime_prover v0.1.0 (listings/ch01-getting-started/prime_prover/Scarb.toml)
    Finished `dev` profile target(s) in 2 seconds
   Executing prime_prover
Program output:
0
1
Saving output to: target/execute/prime_prover/execution2
The output represents whether the program executed successfully and the result of the program. Here, 0 indicates success (no panic), and 1 represents true (17 is prime). Try a few more numbers:
$ scarb execute -p prime_prover --print-program-output --arguments 4
[0, 0]  # 4 is not prime
$ scarb execute -p prime_prover --print-program-output --arguments 23
[0, 1]  # 23 is prime
The execution creates a folder under ./target/execute/prime_prover/execution1/ containing files like air_public_input.json, air_private_input.json, trace.bin, and memory.bin. These are the artifacts needed for proving.
Generating a Zero-Knowledge Proof
Now for the exciting part: proving that the primality check was computed correctly without revealing the input! Cairo 2.10 integrates the Stwo prover via Scarb, allowing us to generate a proof directly. Run:
$ scarb prove --execution-id 1
     Proving prime_prover
warn: soundness of proof is not yet guaranteed by Stwo, use at your own risk
Saving proof to: target/execute/prime_prover/execution1/proof/proof.json
--execution_id 1 points to the first execution (from the execution1 folder).
This command generates a proof.json file in ./target/execute/prime_prover/execution1/proof/. The proof demonstrates that the program executed correctly for some input, producing a true or false output.
Verifying the Proof
To ensure the proof is valid, verify it with:
$ scarb verify --execution-id 1
   Verifying prime_prover
    Verified proof successfully
If successful, you’ll see a confirmation message. This verifies that the computation (primality check) was performed correctly, aligning with the public inputs, without needing to re-run the program.
Improving the Program: Handling Input Errors
Currently, our program assumes the input is a valid u32. What if we want to handle larger numbers or invalid inputs? Cairo’s u32 has a maximum value of 2^32 - 1 (4,294,967,295), and inputs must be provided as integers. Let’s modify the program to use u128 and add a basic check. Update src/lib.cairo:
Filename: src/lib.cairo
/// Checks if a number is prime
///
/// # Arguments
///
/// * `n` - The number to check
///
/// # Returns
///
/// * `true` if the number is prime
/// * `false` if the number is not prime
fn is_prime(n: u128) -> bool {
    if n <= 1 {
        return false;
    }
    if n == 2 {
        return true;
    }
    if n % 2 == 0 {
        return false;
    }
    let mut i = 3;
    let mut is_prime = true;
    loop {
        if i * i > n {
            break;
        }
        if n % i == 0 {
            is_prime = false;
            break;
        }
        i += 2;
    }
    is_prime
}

#[executable]
fn main(input: u128) -> bool {
    if input > 1000000 { // Arbitrary limit for demo purposes
        panic!("Input too large, must be <= 1,000,000");
    }
    is_prime(input)
}
Changed u32 to u128 for a larger range (up to 2^128 - 1).
Added a check to panic if the input exceeds 1,000,000 (for simplicity; adjust as needed).
Test it:
$ scarb execute -p prime_prover --print-program-output --arguments 1000001
   Compiling prime_prover v0.1.0 (listings/ch01-getting-started/prime_prover2/Scarb.toml)
    Finished `dev` profile target(s) in 2 seconds
   Executing prime_prover
Program output:
1
Saving output to: target/execute/prime_prover/execution2
error: Panicked with "Input too large, must be <= 1,000,000".
If we pass a number greater than 1,000,000, the program will panic - and thus, no proof can be generated. As such, it's not possible to verify a proof for a panicked execution.
Summary
Congratulations! You’ve built a Cairo program to check primality, executed it with Scarb, and generated and verified a zero-knowledge proof using the Stwo prover. This project introduced you to:
- Defining executable targets in Scarb.toml.
- Writing functions and control flow in Cairo.
- Using
scarb executeto run programs and generate execution traces. - Proving and verifying computations with
scarb proveandscarb verify.
In the next chapters, you’ll dive deeper into Cairo’s syntax (Chapter 2), ownership (Chapter 4), and other features. For now, experiment with different inputs or modify the primality check — can you optimize it further?
Common Programming Concepts
This chapter covers concepts that appear in almost every programming language and how they work in Cairo. Many programming languages have much in common at their core. None of the concepts presented in this chapter are unique to Cairo, but we’ll discuss them in the context of Cairo and explain the conventions around using these concepts.
Specifically, you’ll learn about variables, basic types, functions, comments, and control flow. These foundations will be in every Cairo program, and learning them early will give you a strong core to start from.
Variables and Mutability
Cairo uses an immutable memory model, meaning that once a memory cell is written to, it can't be overwritten but only read from. To reflect this immutable memory model, variables in Cairo are immutable by default. However, the language abstracts this model and gives you the option to make your variables mutable. Let’s explore how and why Cairo enforces immutability, and how you can make your variables mutable.
When a variable is immutable, once a value is bound to a name, you can’t change
that value. To illustrate this, generate a new project called variables in
your cairo_projects directory by using scarb new variables.
Then, in your new variables directory, open src/lib.cairo and replace its code with the following code, which won’t compile just yet:
Filename: src/lib.cairo
fn main() {
    let x = 5;
    println!("The value of x is: {}", x);
    x = 6;
    println!("The value of x is: {}", x);
}
Save and run the program using scarb cairo-run. You should receive an error message
regarding an immutability error, as shown in this output:
$ scarb cairo-run
   Compiling no_listing_01_variables_are_immutable v0.1.0 (listings/ch02-common-programming-concepts/no_listing_01_variables_are_immutable/Scarb.toml)
error: Cannot assign to an immutable variable.
 --> listings/ch02-common-programming-concepts/no_listing_01_variables_are_immutable/src/lib.cairo:6:5
    x = 6;
    ^***^

error: could not compile `no_listing_01_variables_are_immutable` due to previous error
error: `scarb metadata` exited with error
This example shows how the compiler helps you find errors in your programs. Compiler errors can be frustrating, but they only mean your program isn’t safely doing what you want it to do yet; they do not mean that you’re not a good programmer! Experienced Caironautes still get compiler errors.
You received the error message Cannot assign to an immutable variable.
because you tried to assign a second value to the immutable x variable.
It’s important that we get compile-time errors when we attempt to change a value that’s designated as immutable because this specific situation can lead to bugs. If one part of our code operates on the assumption that a value will never change and another part of our code changes that value, it’s possible that the first part of the code won’t do what it was designed to do. The cause of this kind of bug can be difficult to track down after the fact, especially when the second piece of code changes the value only sometimes.
Cairo, unlike most other languages, has immutable memory. This makes a whole class of bugs impossible, because values will never change unexpectedly. This makes code easier to reason about.
But mutability can be very useful, and can make code more convenient to write.
Although variables are immutable by default, you can make them mutable by
adding mut in front of the variable name. Adding mut also conveys
intent to future readers of the code by indicating that other parts of the code
will be changing the value associated to this variable.
However, you might be wondering at this point what exactly happens when a variable
is declared as mut, as we previously mentioned that Cairo's memory is immutable.
The answer is that the value is immutable, but the variable isn't. The value
associated to the variable can be changed. Assigning to a mutable variable in Cairo
is essentially equivalent to redeclaring it to refer to another value in another memory cell,
but the compiler handles that for you, and the keyword mut makes it explicit.
Upon examining the low-level Cairo Assembly code, it becomes clear that
variable mutation is implemented as syntactic sugar, which translates mutation operations
into a series of steps equivalent to variable shadowing. The only difference is that at the Cairo
level, the variable is not redeclared so its type cannot change.
For example, let’s change src/lib.cairo to the following:
fn main() {
    let mut x = 5;
    println!("The value of x is: {}", x);
    x = 6;
    println!("The value of x is: {}", x);
}
When we run the program now, we get this:
$ scarb cairo-run
   Compiling no_listing_02_adding_mut v0.1.0 (listings/ch02-common-programming-concepts/no_listing_02_adding_mut/Scarb.toml)
    Finished `dev` profile target(s) in 4 seconds
     Running no_listing_02_adding_mut
The value of x is: 5
The value of x is: 6
Run completed successfully, returning []
We’re allowed to change the value bound to x from 5 to 6 when mut is
used. Ultimately, deciding whether to use mutability or not is up to you and
depends on what you think is clearest in that particular situation.
Constants
Like immutable variables, constants are values that are bound to a name and are not allowed to change, but there are a few differences between constants and variables.
First, you aren’t allowed to use mut with constants. Constants aren’t just
immutable by default—they’re always immutable. You declare constants using the
const keyword instead of the let keyword, and the type of the value must
be annotated. We’ll cover types and type annotations in the next section,
“Data Types”, so don’t worry about the details
right now. Just know that you must always annotate the type.
Constant variables can be declared with any usual data type, including structs, enums and fixed-size arrays.
Constants can only be declared in the global scope, which makes them useful for values that many parts of code need to know about.
The last difference is that constants may natively be set only to a constant expression, not the result of a value that could only be computed at runtime.
Here’s an example of constants declaration:
struct AnyStruct {
    a: u256,
    b: u32,
}

enum AnyEnum {
    A: felt252,
    B: (usize, u256),
}

const ONE_HOUR_IN_SECONDS: u32 = 3600;
const STRUCT_INSTANCE: AnyStruct = AnyStruct { a: 0, b: 1 };
const ENUM_INSTANCE: AnyEnum = AnyEnum::A('any enum');
const BOOL_FIXED_SIZE_ARRAY: [bool; 2] = [true, false];
Nonetheless, it is possible to use the consteval_int! macro to create a const variable that is the result of some computation:
const ONE_HOUR_IN_SECONDS: u32 = consteval_int!(60 * 60);
We will dive into more detail about macros in the dedicated section.
Cairo's naming convention for constants is to use all uppercase with underscores between words.
Constants are valid for the entire time a program runs, within the scope in which they were declared. This property makes constants useful for values in your application domain that multiple parts of the program might need to know about, such as the maximum number of points any player of a game is allowed to earn, or the speed of light.
Naming hardcoded values used throughout your program as constants is useful in conveying the meaning of that value to future maintainers of the code. It also helps to have only one place in your code you would need to change if the hardcoded value needed to be updated in the future.
Shadowing
Variable shadowing refers to the declaration of a
new variable with the same name as a previous variable. Caironautes say that the
first variable is shadowed by the second, which means that the second
variable is what the compiler will see when you use the name of the variable.
In effect, the second variable overshadows the first, taking any uses of the
variable name to itself until either it itself is shadowed or the scope ends.
We can shadow a variable by using the same variable’s name and repeating the
use of the let keyword as follows:
fn main() {
    let x = 5;
    let x = x + 1;
    {
        let x = x * 2;
        println!("Inner scope x value is: {}", x);
    }
    println!("Outer scope x value is: {}", x);
}
This program first binds x to a value of 5. Then it creates a new variable
x by repeating let x =, taking the original value and adding 1 so the
value of x is then 6. Then, within an inner scope created with the curly
brackets, the third let statement also shadows x and creates a new
variable, multiplying the previous value by 2 to give x a value of 12.
When that scope is over, the inner shadowing ends and x returns to being 6.
When we run this program, it will output the following:
$ scarb cairo-run
   Compiling no_listing_03_shadowing v0.1.0 (listings/ch02-common-programming-concepts/no_listing_03_shadowing/Scarb.toml)
    Finished `dev` profile target(s) in 4 seconds
     Running no_listing_03_shadowing
Inner scope x value is: 12
Outer scope x value is: 6
Run completed successfully, returning []
Shadowing is different from marking a variable as mut because we’ll get a
compile-time error if we accidentally try to reassign to this variable without
using the let keyword. By using let, we can perform a few transformations
on a value but have the variable be immutable after those transformations have
been completed.
Another distinction between mut and shadowing is that when we use the let keyword again,
we are effectively creating a new variable, which allows us to change the type of the
value while reusing the same name. As mentioned before, variable shadowing and mutable variables
are equivalent at the lower level.
The only difference is that by shadowing a variable, the compiler will not complain
if you change its type. For example, say our program performs a type conversion between the
u64 and felt252 types.
fn main() {
    let x: u64 = 2;
    println!("The value of x is {} of type u64", x);
    let x: felt252 = x.into(); // converts x to a felt, type annotation is required.
    println!("The value of x is {} of type felt252", x);
}
The first x variable has a u64 type while the second x variable has a felt252 type.
Shadowing thus spares us from having to come up with different names, such as x_u64
and x_felt252; instead, we can reuse the simpler x name. However, if we try to use
mut for this, as shown here, we’ll get a compile-time error:
fn main() {
    let mut x: u64 = 2;
    println!("The value of x is: {}", x);
    x = 5_u8;
    println!("The value of x is: {}", x);
}
The error says we were expecting a u64 (the original type) but we got a different type:
$ scarb cairo-run
   Compiling no_listing_05_mut_cant_change_type v0.1.0 (listings/ch02-common-programming-concepts/no_listing_05_mut_cant_change_type/Scarb.toml)
error: Unexpected argument type. Expected: "core::integer::u64", found: "core::integer::u8".
 --> listings/ch02-common-programming-concepts/no_listing_05_mut_cant_change_type/src/lib.cairo:6:9
    x = 5_u8;
        ^**^

error: could not compile `no_listing_05_mut_cant_change_type` due to previous error
error: `scarb metadata` exited with error
Now that we’ve explored how variables work, let’s look at more data types they can have.
Data Types
Every value in Cairo is of a certain data type, which tells Cairo what kind of data is being specified so it knows how to work with that data. This section covers two subsets of data types: scalars and compounds.
Keep in mind that Cairo is a statically typed language, which means that it must know the types of all variables at compile time. The compiler can usually infer the desired type based on the value and its usage. In cases when many types are possible, we can use a conversion method where we specify the desired output type.
fn main() {
    let x: felt252 = 3;
    let y: u32 = x.try_into().unwrap();
}
You’ll see different type annotations for other data types.
Scalar Types
A scalar type represents a single value. Cairo has three primary scalar types: felts, integers, and booleans. You may recognize these from other programming languages. Let’s jump into how they work in Cairo.
Felt Type
In Cairo, if you don't specify the type of a variable or argument, its type defaults to a field element, represented by the keyword felt252. In the context of Cairo, when we say “a field element” we mean an integer in the range \( 0 \leq x < P \),
where \( P \) is a very large prime number currently equal to \( {2^{251}} + 17 \cdot {2^{192}} + 1 \). When adding, subtracting, or multiplying, if the result falls outside the specified range of the prime number, an overflow (or underflow) occurs, and an appropriate multiple of \( P \) is added or subtracted to bring the result back within the range (i.e., the result is computed \( \mod P \) ).
The most important difference between integers and field elements is division: Division of field elements (and therefore division in Cairo) is unlike regular CPUs division, where
integer division \( \frac{x}{y} \) is defined as \( \left\lfloor \frac{x}{y} \right\rfloor \)
where the integer part of the quotient is returned (so you get \( \frac{7}{3} = 2 \)) and it may or may not satisfy the equation \( \frac{x}{y} \cdot y == x \),
depending on the divisibility of x by y.
In Cairo, the result of \( \frac{x}{y} \) is defined to always satisfy the equation \( \frac{x}{y} \cdot y == x \). If y divides x as integers, you will get the expected result in Cairo (for example \( \frac{6}{2} \) will indeed result in 3).
But when y does not divide x, you may get a surprising result: for example, since \( 2 \cdot \frac{P + 1}{2} = P + 1 \equiv 1 \mod P \), the value of \( \frac{1}{2} \) in Cairo is \( \frac{P + 1}{2} \) (and not 0 or 0.5), as it satisfies the above equation.
Integer Types
The felt252 type is a fundamental type that serves as the basis for creating all types in the core library.
However, it is highly recommended for programmers to use the integer types instead of the felt252 type whenever possible, as the integer types come with added security features that provide extra protection against potential vulnerabilities in the code, such as overflow and underflow checks. By using these integer types, programmers can ensure that their programs are more secure and less susceptible to attacks or other security threats.
An integer is a number without a fractional component. This type declaration indicates the number of bits the programmer can use to store the integer.
Table 3-1 shows the built-in integer types in Cairo. We can use any of these variants to declare the type of an integer value.
| Length | Unsigned |
|---|---|
| 8-bit | u8 |
| 16-bit | u16 |
| 32-bit | u32 |
| 64-bit | u64 |
| 128-bit | u128 |
| 256-bit | u256 |
| 32-bit | usize |
Each variant has an explicit size. Note that for now, the usize type is just an alias for u32; however, it might be useful when in the future Cairo can be compiled to MLIR.
As variables are unsigned, they can't contain a negative number. This code will cause the program to panic:
fn sub_u8s(x: u8, y: u8) -> u8 {
    x - y
}

fn main() {
    sub_u8s(1, 3);
}
All integer types previously mentioned fit into a felt252, except for u256 which needs 4 more bits to be stored. Under the hood, u256 is basically a struct with 2 fields: u256 {low: u128, high: u128}.
Cairo also provides support for signed integers, starting with the prefix i. These integers can represent both positive and negative values, with sizes ranging from i8 to i128.
Each signed variant can store numbers from \( -({2^{n - 1}}) \) to \( {2^{n - 1}} - 1 \) inclusive, where n is the number of bits that variant uses. So an i8 can store numbers from \( -({2^7}) \) to \( {2^7} - 1 \), which equals -128 to 127.
You can write integer literals in any of the forms shown in Table 3-2. Note
that number literals that can be multiple numeric types allow a type suffix,
such as 57_u8, to designate the type.
It is also possible to use a visual separator _ for number literals, in order to improve code readability.
| Numeric literals | Example |
|---|---|
| Decimal | 98222 |
| Hex | 0xff |
| Octal | 0o04321 |
| Binary | 0b01 |
So how do you know which type of integer to use? Try to estimate the max value your int can have and choose the good size.
The primary situation in which you’d use usize is when indexing some sort of collection.
Numeric Operations
Cairo supports the basic mathematical operations you’d expect for all the integer
types: addition, subtraction, multiplication, division, and remainder. Integer
division truncates toward zero to the nearest integer. The following code shows
how you’d use each numeric operation in a let statement:
fn main() {
    // addition
    let sum = 5_u128 + 10_u128;

    // subtraction
    let difference = 95_u128 - 4_u128;

    // multiplication
    let product = 4_u128 * 30_u128;

    // division
    let quotient = 56_u128 / 32_u128; //result is 1
    let quotient = 64_u128 / 32_u128; //result is 2

    // remainder
    let remainder = 43_u128 % 5_u128; // result is 3
}
Each expression in these statements uses a mathematical operator and evaluates to a single value, which is then bound to a variable.
Appendix B contains a list of all operators that Cairo provides.
The Boolean Type
As in most other programming languages, a Boolean type in Cairo has two possible
values: true and false. Booleans are one felt252 in size. The Boolean type in
Cairo is specified using bool. For example:
fn main() {
    let t = true;

    let f: bool = false; // with explicit type annotation
}
When declaring a bool variable, it is mandatory to use either true or false literals as value. Hence, it is not allowed to use integer literals (i.e. 0 instead of false) for bool declarations.
The main way to use Boolean values is through conditionals, such as an if
expression. We’ll cover how if expressions work in Cairo in the "Control Flow" section.
String Types
Cairo doesn't have a native type for strings but provides two ways to handle them: short strings using simple quotes and ByteArray using double quotes.
Short strings
A short string is an ASCII string where each character is encoded on one byte (see the ASCII table). For example:
'a'is equivalent to0x61'b'is equivalent to0x62'c'is equivalent to0x630x616263is equivalent to'abc'.
Cairo uses the felt252 for short strings. As the felt252 is on 251 bits, a short string is limited to 31 characters (31 * 8 = 248 bits, which is the maximum multiple of 8 that fits in 251 bits).
You can choose to represent your short string with an hexadecimal value like 0x616263 or by directly writing the string using simple quotes like 'abc', which is more convenient.
Here are some examples of declaring short strings in Cairo:
fn main() {
    let my_first_char = 'C';
    let my_first_char_in_hex = 0x43;

    let my_first_string = 'Hello world';
    let my_first_string_in_hex = 0x48656C6C6F20776F726C64;

    let long_string: ByteArray = "this is a string which has more than 31 characters";
}
Byte Array Strings
Cairo's Core Library provides a ByteArray type for handling strings and byte sequences longer than short strings. This type is particularly useful for longer strings or when you need to perform operations on the string data.
The ByteArray in Cairo is implemented as a combination of two parts:
- An array of
bytes31words, where each word contains 31 bytes of data. - A pending
felt252word that acts as a buffer for bytes that haven't yet filled a completebytes31word.
This design enables efficient handling of byte sequences while aligning with Cairo's memory model and basic types. Developers interact with ByteArray through its provided methods and operators, abstracting away the internal implementation details.
Unlike short strings, ByteArray strings can contain more than 31 characters and are written using double quotes:
fn main() {
    let my_first_char = 'C';
    let my_first_char_in_hex = 0x43;

    let my_first_string = 'Hello world';
    let my_first_string_in_hex = 0x48656C6C6F20776F726C64;

    let long_string: ByteArray = "this is a string which has more than 31 characters";
}
Compound Types
The Tuple Type
A tuple is a general way of grouping together a number of values with a variety of types into one compound type. Tuples have a fixed length: once declared, they cannot grow or shrink in size.
We create a tuple by writing a comma-separated list of values inside parentheses. Each position in the tuple has a type, and the types of the different values in the tuple don’t have to be the same. We’ve added optional type annotations in this example:
fn main() {
    let tup: (u32, u64, bool) = (10, 20, true);
}
The variable tup binds to the entire tuple because a tuple is considered a
single compound element. To get the individual values out of a tuple, we can
use pattern matching to destructure a tuple value, like this:
fn main() {
    let tup = (500, 6, true);

    let (x, y, z) = tup;

    if y == 6 {
        println!("y is 6!");
    }
}
This program first creates a tuple and binds it to the variable tup. It then
uses a pattern with let to take tup and turn it into three separate
variables, x, y, and z. This is called destructuring because it breaks
the single tuple into three parts. Finally, the program prints y is 6! as the value of
y is 6.
We can also declare the tuple with value and types, and destructure it at the same time. For example:
fn main() {
    let (x, y): (felt252, felt252) = (2, 3);
}
The Unit Type ()
A unit type is a type which has only one value ().
It is represented by a tuple with no elements.
Its size is always zero, and it is guaranteed to not exist in the compiled code.
You might be wondering why you would even need a unit type? In Cairo, everything is an expression, and an expression that returns nothing actually returns () implicitly.
The Fixed Size Array Type
Another way to have a collection of multiple values is with a fixed size array. Unlike a tuple, every element of a fixed size array must have the same type.
We write the values in a fixed-size array as a comma-separated list inside square brackets. The array’s type is written using square brackets with the type of each element, a semicolon, and then the number of elements in the array, like so:
fn main() {
    let arr1: [u64; 5] = [1, 2, 3, 4, 5];
}
In the type annotation [u64; 5], u64 specifies the type of each element, while 5 after the semicolon defines the array's length. This syntax ensures that the array always contains exactly 5 elements of type u64.
Fixed size arrays are useful when you want to hardcode a potentially long sequence of data directly in your program. This type of array must not be confused with the Array<T> type, which is a similar collection type provided by the core library that is allowed to grow in size. If you're unsure whether to use a fixed size array or the Array<T> type, chances are that you are looking for the Array<T> type.
Because their size is known at compile-time, fixed-size arrays don't require runtime memory management, which makes them more efficient than dynamically-sized arrays. Overall, they're more useful when you know the number of elements will not need to change. For example, they can be used to efficiently store lookup tables that won't change during runtime. If you were using the names of the month in a program, you would probably use a fixed size array rather than an Array<T> because you know it will always contain 12 elements:
    let months = [
        'January', 'February', 'March', 'April', 'May', 'June', 'July', 'August', 'September',
        'October', 'November', 'December',
    ];
You can also initialize an array to contain the same value for each element by specifying the initial value, followed by a semicolon, and then the length of the array in square brackets, as shown here:
let a = [3; 5];
The array named a will contain 5 elements that will all be set to the value 3 initially. This is the same as writing let a = [3, 3, 3, 3, 3]; but in a more concise way.
Accessing Fixed Size Arrays Elements
As a fixed-size array is a data structure known at compile time, it's content is represented as a sequence of values in the program bytecode. Accessing an element of that array will simply read that value from the program bytecode efficiently.
We have two different ways of accessing fixed size array elements:
- Deconstructing the array into multiple variables, as we did with tuples.
fn main() {
    let my_arr = [1, 2, 3, 4, 5];

    // Accessing elements of a fixed-size array by deconstruction
    let [a, b, c, _, _] = my_arr;
    println!("c: {}", c); // c: 3
}
- Converting the array to a Span, that supports indexing. This operation is free and doesn't incur any runtime cost.
fn main() {
    let my_arr = [1, 2, 3, 4, 5];

    // Accessing elements of a fixed-size array by index
    let my_span = my_arr.span();
    println!("my_span[2]: {}", my_span[2]); // my_span[2]: 3
}
Note that if we plan to repeatedly access the array, then it makes sense to call .span() only once and keep it available throughout the accesses.
Type Conversion
Cairo addresses conversion between types by using the try_into and into methods provided by the TryInto and Into traits from the core library. There are numerous implementations of these traits within the standard library for conversion between types, and they can be implemented for custom types as well.
Into
The Into trait allows for a type to define how to convert itself into another type. It can be used for type conversion when success is guaranteed, such as when the source type is smaller than the destination type.
To perform the conversion, call var.into() on the source value to convert it to another type. The new variable's type must be explicitly defined, as demonstrated in the example below.
fn main() {
    let my_u8: u8 = 10;
    let my_u16: u16 = my_u8.into();
    let my_u32: u32 = my_u16.into();
    let my_u64: u64 = my_u32.into();
    let my_u128: u128 = my_u64.into();

    let my_felt252 = 10;
    // As a felt252 is smaller than a u256, we can use the into() method
    let my_u256: u256 = my_felt252.into();
    let my_other_felt252: felt252 = my_u8.into();
    let my_third_felt252: felt252 = my_u16.into();
}
TryInto
Similar to Into, TryInto is a generic trait for converting between types. Unlike Into, the TryInto trait is used for fallible conversions, and as such, returns Option<T>. An example of a fallible conversion is when the target type might not fit the source value.
Also similar to Into is the process to perform the conversion; just call var.try_into() on the source value to convert it to another type. The new variable's type also must be explicitly defined, as demonstrated in the example below.
fn main() {
    let my_u256: u256 = 10;

    // Since a u256 might not fit in a felt252, we need to unwrap the Option<T> type
    let my_felt252: felt252 = my_u256.try_into().unwrap();
    let my_u128: u128 = my_felt252.try_into().unwrap();
    let my_u64: u64 = my_u128.try_into().unwrap();
    let my_u32: u32 = my_u64.try_into().unwrap();
    let my_u16: u16 = my_u32.try_into().unwrap();
    let my_u8: u8 = my_u16.try_into().unwrap();

    let my_large_u16: u16 = 2048;
    let my_large_u8: u8 = my_large_u16.try_into().unwrap(); // panics with 'Option::unwrap failed.'
}
Functions
Functions are prevalent in Cairo code. You’ve already seen one of the most
important functions in the language: the main function, which is the entry
point of many programs. You’ve also seen the fn keyword, which allows you to
declare new functions.
Cairo code uses snake case as the conventional style for function and variable names, in which all letters are lowercase and underscores separate words. Here’s a program that contains an example function definition:
fn another_function() {
    println!("Another function.");
}

fn main() {
    println!("Hello, world!");
    another_function();
}
We define a function in Cairo by entering fn followed by a function name and a
set of parentheses. The curly brackets tell the compiler where the function
body begins and ends.
We can call any function we’ve defined by entering its name followed by a set
of parentheses. Because another_function is defined in the program, it can be
called from inside the main function. Note that we defined another_function
before the main function in the source code; we could have defined it after
as well. Cairo doesn’t care where you define your functions, only that they’re
defined somewhere in a scope that can be seen by the caller.
Let’s start a new project with Scarb named functions to explore functions
further. Place the another_function example in src/lib.cairo and run it. You
should see the following output:
$ scarb cairo-run
   Compiling no_listing_15_functions v0.1.0 (listings/ch02-common-programming-concepts/no_listing_15_functions/Scarb.toml)
    Finished `dev` profile target(s) in 4 seconds
     Running no_listing_15_functions
Hello, world!
Another function.
Run completed successfully, returning []
The lines execute in the order in which they appear in the main function.
First the Hello, world! message prints, and then another_function is called
and its message is printed.
Parameters
We can define functions to have parameters, which are special variables that are part of a function’s signature. When a function has parameters, you can provide it with concrete values for those parameters. Technically, the concrete values are called arguments, but in casual conversation, people tend to use the words parameter and argument interchangeably for either the variables in a function’s definition or the concrete values passed in when you call a function.
In this version of another_function we add a parameter:
fn main() {
    another_function(5);
}

fn another_function(x: felt252) {
    println!("The value of x is: {}", x);
}
Try running this program; you should get the following output:
$ scarb cairo-run
   Compiling no_listing_16_single_param v0.1.0 (listings/ch02-common-programming-concepts/no_listing_16_single_param/Scarb.toml)
    Finished `dev` profile target(s) in 4 seconds
     Running no_listing_16_single_param
The value of x is: 5
Run completed successfully, returning []
The declaration of another_function has one parameter named x. The type of
x is specified as felt252. When we pass 5 in to another_function, the
println! macro puts 5 where the pair of curly brackets containing x was in the format string.
In function signatures, you must declare the type of each parameter. This is a deliberate decision in Cairo’s design: requiring type annotations in function definitions means the compiler almost never needs you to use them elsewhere in the code to figure out what type you mean. The compiler is also able to give more helpful error messages if it knows what types the function expects.
When defining multiple parameters, separate the parameter declarations with commas, like this:
fn main() {
    print_labeled_measurement(5, "h");
}

fn print_labeled_measurement(value: u128, unit_label: ByteArray) {
    println!("The measurement is: {value}{unit_label}");
}
This example creates a function named print_labeled_measurement with two
parameters. The first parameter is named value and is a u128. The second is
named unit_label and is of type ByteArray - Cairo's internal type to represent string literals. The function then prints text containing both the value and the unit_label.
Let’s try running this code. Replace the program currently in your functions
project’s src/lib.cairo file with the preceding example and run it using scarb cairo-run:
$ scarb cairo-run
   Compiling no_listing_17_multiple_params v0.1.0 (listings/ch02-common-programming-concepts/no_listing_17_multiple_params/Scarb.toml)
    Finished `dev` profile target(s) in 5 seconds
     Running no_listing_17_multiple_params
The measurement is: 5h
Run completed successfully, returning []
Because we called the function with 5 as the value for value and "h" as the value for unit_label, the program output contains those values.
Named Parameters
In Cairo, named parameters allow you to specify the names of arguments when you call a function. This makes the function calls more readable and self-descriptive.
If you want to use named parameters, you need to specify the name of the parameter and the value you want to pass to it. The syntax is parameter_name: value. If you pass a variable that has the same name as the parameter, you can simply write :parameter_name instead of parameter_name: variable_name.
Here is an example:
fn foo(x: u8, y: u8) {}

fn main() {
    let first_arg = 3;
    let second_arg = 4;
    foo(x: first_arg, y: second_arg);
    let x = 1;
    let y = 2;
    foo(:x, :y)
}
Statements and Expressions
Function bodies are made up of a series of statements optionally ending in an expression. So far, the functions we’ve covered haven’t included an ending expression, but you have seen an expression as part of a statement. Because Cairo is an expression-based language, this is an important distinction to understand. Other languages don’t have the same distinctions, so let’s look at what statements and expressions are and how their differences affect the bodies of functions.
- Statements are instructions that perform some action and do not return a value.
- Expressions evaluate to a resultant value. Let’s look at some examples.
We’ve actually already used statements and expressions. Creating a variable and
assigning a value to it with the let keyword is a statement. In Listing 2-1,
let y = 6; is a statement.
fn main() {
    let y = 6;
}
Listing 2-1: A main function declaration containing one statement
Function definitions are also statements; the entire preceding example is a statement in itself.
Statements do not return values. Therefore, you can’t assign a let statement
to another variable, as the following code tries to do; you’ll get an error:
fn main() {
    let x = (let y = 6);
}
When you run this program, the error you’ll get looks like this:
$ scarb cairo-run
   Compiling no_listing_18_statements_dont_return_values v0.1.0 (listings/ch02-common-programming-concepts/no_listing_20_statements_dont_return_values/Scarb.toml)
error: Missing token TerminalRParen.
 --> listings/ch02-common-programming-concepts/no_listing_20_statements_dont_return_values/src/lib.cairo:3:14
    let x = (let y = 6);
             ^

error: Missing token TerminalSemicolon.
 --> listings/ch02-common-programming-concepts/no_listing_20_statements_dont_return_values/src/lib.cairo:3:14
    let x = (let y = 6);
             ^

error: Missing token TerminalSemicolon.
 --> listings/ch02-common-programming-concepts/no_listing_20_statements_dont_return_values/src/lib.cairo:3:23
    let x = (let y = 6);
                      ^

error: Skipped tokens. Expected: statement.
 --> listings/ch02-common-programming-concepts/no_listing_20_statements_dont_return_values/src/lib.cairo:3:23
    let x = (let y = 6);
                      ^^

warn[E0001]: Unused variable. Consider ignoring by prefixing with `_`.
 --> listings/ch02-common-programming-concepts/no_listing_20_statements_dont_return_values/src/lib.cairo:3:9
    let x = (let y = 6);
        ^

warn[E0001]: Unused variable. Consider ignoring by prefixing with `_`.
 --> listings/ch02-common-programming-concepts/no_listing_20_statements_dont_return_values/src/lib.cairo:3:18
    let x = (let y = 6);
                 ^

error: could not compile `no_listing_18_statements_dont_return_values` due to previous error
error: `scarb metadata` exited with error
The let y = 6 statement does not return a value, so there isn’t anything for
x to bind to. This is different from what happens in other languages, such as
C and Ruby, where the assignment returns the value of the assignment. In those
languages, you can write x = y = 6 and have both x and y have the value
6; that is not the case in Cairo.
Expressions evaluate to a value and make up most of the rest of the code that
you’ll write in Cairo. Consider a math operation, such as 5 + 6, which is an
expression that evaluates to the value 11. Expressions can be part of
statements: in Listing 2-1, the 6 in the statement let y = 6; is an
expression that evaluates to the value 6.
Calling a function is an expression since it always evaluates to a value: the function's explicit return value, if specified, or the 'unit' type () otherwise.
A new scope block created with curly brackets is an expression, for example:
fn main() {
    let y = {
        let x = 3;
        x + 1
    };

    println!("The value of y is: {}", y);
}
This expression:
    let y = {
        let x = 3;
        x + 1
    };
is a block that, in this case, evaluates to 4. That value gets bound to y
as part of the let statement. Note that the x + 1 line doesn’t have a
semicolon at the end, which is unlike most of the lines you’ve seen so far.
Expressions do not include ending semicolons. If you add a semicolon to the end
of an expression, you turn it into a statement, and it will then not return a
value. Keep this in mind as you explore function return values and expressions
next.
Functions with Return Values
Functions can return values to the code that calls them. We don’t name return
values, but we must declare their type after an arrow (->). In Cairo, the
return value of the function is synonymous with the value of the final
expression in the block of the body of a function. You can return early from a
function by using the return keyword and specifying a value, but most
functions return the last expression implicitly. Here’s an example of a
function that returns a value:
fn five() -> u32 {
    5
}

fn main() {
    let x = five();
    println!("The value of x is: {}", x);
}
There are no function calls, or even let statements in the five
function—just the number 5 by itself. That’s a perfectly valid function in
Cairo. Note that the function’s return type is specified too, as -> u32. Try
running this code; the output should look like this:
$ scarb cairo-run
   Compiling no_listing_20_function_return_values v0.1.0 (listings/ch02-common-programming-concepts/no_listing_22_function_return_values/Scarb.toml)
    Finished `dev` profile target(s) in 4 seconds
     Running no_listing_20_function_return_values
The value of x is: 5
Run completed successfully, returning []
The 5 in five is the function’s return value, which is why the return type
is u32. Let’s examine this in more detail. There are two important bits:
first, the line let x = five(); shows that we’re using the return value of a
function to initialize a variable. Because the function five returns a 5,
that line is the same as the following:
let x = 5;
Second, the five function has no parameters and defines the type of the
return value, but the body of the function is a lonely 5 with no semicolon
because it’s an expression whose value we want to return.
Let’s look at another example:
fn main() {
    let x = plus_one(5);

    println!("The value of x is: {}", x);
}

fn plus_one(x: u32) -> u32 {
    x + 1
}
Running this code will print x = 6. But if we place a
semicolon at the end of the line containing x + 1, changing it from an
expression to a statement, we’ll get an error:
fn main() {
    let x = plus_one(5);

    println!("The value of x is: {}", x);
}

fn plus_one(x: u32) -> u32 {
    x + 1;
}
$ scarb cairo-run
   Compiling no_listing_22_function_return_invalid v0.1.0 (listings/ch02-common-programming-concepts/no_listing_24_function_return_invalid/Scarb.toml)
error: Unexpected return type. Expected: "core::integer::u32", found: "()".
 --> listings/ch02-common-programming-concepts/no_listing_24_function_return_invalid/src/lib.cairo:9:28
fn plus_one(x: u32) -> u32 {
                           ^

error: could not compile `no_listing_22_function_return_invalid` due to previous error
error: `scarb metadata` exited with error
The main error message, Unexpected return type, reveals the core issue with this
code. The definition of the function plus_one says that it will return an
u32, but statements don’t evaluate to a value, which is expressed by (),
the unit type. Therefore, nothing is returned, which contradicts the function
definition and results in an error.
Const Functions
Functions that can be evaluated at compile time can be marked as const using the const fn syntax. This allows the function to be called from a constant context and interpreted by the compiler at compile time.
Declaring a function as const restricts the types that arguments and the return type may use, and limits the function body to constant expressions.
Several functions in the core library are marked as const. Here's an example from the core library showing the pow function implemented as a const fn:
use core::num::traits::Pow;

const BYTE_MASK: u16 = 2_u16.pow(8) - 1;

fn main() {
    let my_value = 12345;
    let first_byte = my_value & BYTE_MASK;
    println!("first_byte: {}", first_byte);
}
In this example, pow is a const function, allowing it to be used in a constant expression to define mask at compile time. Here's a snippet of how pow is defined in the core library using const fn:
Note that declaring a function as const has no effect on existing uses; it only imposes restrictions for constant contexts.
Comments
All programmers strive to make their code easy to understand, but sometimes extra explanation is warranted. In these cases, programmers leave comments in their source code that the compiler will ignore but people reading the source code may find useful.
Here’s a simple comment:
// hello, world
In Cairo, the idiomatic comment style starts a comment with two slashes, and the comment continues until the end of the line. For comments that extend beyond a single line, you’ll need to include // on each line, like this:
// So we’re doing something complicated here, long enough that we need
// multiple lines of comments to do it! Whew! Hopefully, this comment will
// explain what’s going on.
Comments can also be placed at the end of lines containing code:
fn main() -> felt252 {
    1 + 4 // return the sum of 1 and 4
}
But you’ll more often see them used in this format, with the comment on a separate line above the code it’s annotating:
fn main() -> felt252 {
    // this function performs a simple addition
    1 + 4
}
Item-level Documentation
Item-level documentation comments refer to specific items such as functions, implementations, traits, etc. They are prefixed with three slashes (///). These comments provide a detailed description of the item, examples of usage, and any conditions that might cause a panic. In case of functions, the comments may also include separate sections for parameter and return value descriptions.
/// Returns the sum of `arg1` and `arg2`.
/// `arg1` cannot be zero.
///
/// # Panics
///
/// This function will panic if `arg1` is `0`.
///
/// # Examples
///
/// ```
/// let a: felt252 = 2;
/// let b: felt252 = 3;
/// let c: felt252 = add(a, b);
/// assert(c == a + b, "Should equal a + b");
/// ```
fn add(arg1: felt252, arg2: felt252) -> felt252 {
    assert(arg1 != 0, 'Cannot be zero');
    arg1 + arg2
}
Module Documentation
Module documentation comments provide an overview of the entire module, including its purpose and examples of use. These comments are meant to be placed above the module they're describing and are prefixed with //!. This type of documentation gives a broad understanding of what the module does and how it can be used.
//! # my_module and implementation
//!
//! This is an example description of my_module and some of its features.
//!
//! # Examples
//!
//! ```
//! mod my_other_module {
//!   use path::to::my_module;
//!
//!   fn foo() {
//!     my_module.bar();
//!   }
//! }
//! ```
mod my_module { // rest of implementation...
}
Control Flow
The ability to run some code depending on whether a condition is true and to run some code repeatedly while a condition is true are basic building blocks in most programming languages. The most common constructs that let you control the flow of execution of Cairo code are if expressions and loops.
if Expressions
An if expression allows you to branch your code depending on conditions. You provide a condition and then state, “If this condition is met, run this block of code. If the condition is not met, do not run this block of code.”
Create a new project called branches in your cairo_projects directory to explore the if expression. In the src/lib.cairo file, input the following:
fn main() {
    let number = 3;

    if number == 5 {
        println!("condition was true and number = {}", number);
    } else {
        println!("condition was false and number = {}", number);
    }
}
All if expressions start with the keyword if, followed by a condition. In this case, the condition checks whether or not the variable number has a value equal to 5. We place the block of code to execute if the condition is true immediately after the condition inside curly brackets.
Optionally, we can also include an else expression, which we chose to do here, to give the program an alternative block of code to execute should the condition evaluate to false. If you don’t provide an else expression and the condition is false, the program will just skip the if block and move on to the next bit of code.
Try running this code; you should see the following output:
$ scarb cairo-run
   Compiling no_listing_24_if v0.1.0 (listings/ch02-common-programming-concepts/no_listing_27_if/Scarb.toml)
    Finished `dev` profile target(s) in 4 seconds
     Running no_listing_24_if
condition was false and number = 3
Run completed successfully, returning []
Let’s try changing the value of number to a value that makes the condition true to see what happens:
let number = 5;
$ scarb cairo-run
condition was true and number = 5
Run completed successfully, returning []
It’s also worth noting that the condition in this code must be a bool. If the condition isn’t a bool, we’ll get an error. For example, try running the following code:
fn main() {
    let number = 3;

    if number {
        println!("number was three");
    }
}
The if condition evaluates to a value of 3 this time, and Cairo throws an error:
$ scarb build
   Compiling no_listing_28_bis_if_not_bool v0.1.0 (listings/ch02-common-programming-concepts/no_listing_28_bis_if_not_bool/Scarb.toml)
error: Mismatched types. The type `core::bool` cannot be created from a numeric literal.
 --> listings/ch02-common-programming-concepts/no_listing_28_bis_if_not_bool/src/lib.cairo:4:18
    let number = 3;
                 ^

error: could not compile `no_listing_28_bis_if_not_bool` due to previous error
The error indicates that Cairo inferred the type of number to be a bool
based on its later use as a condition of the if statement. It tries to create
a bool from the value 3, but Cairo doesn't support instantiating a bool
from a numeric literal anyway - you can only use true or false to create a
bool. Unlike languages such as Ruby and JavaScript, Cairo will not
automatically try to convert non-Boolean types to a Boolean. If we want the if
code block to run only when a number is not equal to 0, for example, we can
change the if expression to the following:
fn main() {
    let number = 3;

    if number != 0 {
        println!("number was something other than zero");
    }
}
Running this code will print number was something other than zero.
Handling Multiple Conditions with else if
You can use multiple conditions by combining if and else in an else if expression. For example:
fn main() {
    let number = 3;

    if number == 12 {
        println!("number is 12");
    } else if number == 3 {
        println!("number is 3");
    } else if number - 2 == 1 {
        println!("number minus 2 is 1");
    } else {
        println!("number not found");
    }
}
This program has four possible paths it can take. After running it, you should see the following output:
$ scarb cairo-run
   Compiling no_listing_25_else_if v0.1.0 (listings/ch02-common-programming-concepts/no_listing_30_else_if/Scarb.toml)
    Finished `dev` profile target(s) in 4 seconds
     Running no_listing_25_else_if
number is 3
Run completed successfully, returning []
When this program executes, it checks each if expression in turn and executes the first body for which the condition evaluates to true. Note that even though number - 2 == 1 is true, we don’t see the output number minus 2 is 1 nor do we see the number not found text from the else block. That’s because Cairo only executes the block for the first true condition, and once it finds one, it doesn’t even check the rest. Using too many else if expressions can clutter your code, so if you have more than one, you might want to refactor your code. Chapter 6 describes a powerful Cairo branching construct called match for these cases.
Using if in a let Statement
Because if is an expression, we can use it on the right side of a let statement to assign the outcome to a variable.
fn main() {
    let condition = true;
    let number = if condition {
        5
    } else {
        6
    };

    if number == 5 {
        println!("condition was true and number is {}", number);
    }
}
$ scarb cairo-run
   Compiling no_listing_26_if_let v0.1.0 (listings/ch02-common-programming-concepts/no_listing_31_if_let/Scarb.toml)
    Finished `dev` profile target(s) in 4 seconds
     Running no_listing_26_if_let
condition was true and number is 5
Run completed successfully, returning []
The number variable will be bound to a value based on the outcome of the if expression, which will be 5 here.
Repetition with Loops
It’s often useful to execute a block of code more than once. For this task, Cairo provides a simple loop syntax, which will run through the code inside the loop body to the end and then start immediately back at the beginning. To experiment with loops, let’s create a new project called loops.
Cairo has three kinds of loops: loop, while, and for. Let’s try each one.
Repeating Code with loop
The loop keyword tells Cairo to execute a block of code over and over again forever or until you explicitly tell it to stop.
As an example, change the src/lib.cairo file in your loops directory to look like this:
fn main() {
    loop {
        println!("again!");
    }
}
When we run this program, we’ll see again! printed over and over continuously until either the program runs out of gas or we stop the program manually. Most terminals support the keyboard shortcut ctrl-c to interrupt a program that is stuck in a continual loop. Give it a try:
$ scarb cairo-run --available-gas=20000000
   Compiling loops v0.1.0 (file:///projects/loops)
    Finished release target(s) in 0 seconds
     Running loops
again!
again!
again!
^Cagain!
The symbol ^C represents where you pressed ctrl-c. You may or may not see the word again! printed after the ^C, depending on where the code was in the loop when it received the interrupt signal.
Note: Cairo prevents us from running program with infinite loops by including a gas meter. The gas meter is a mechanism that limits the amount of computation that can be done in a program. By setting a value to the
--available-gasflag, we can set the maximum amount of gas available to the program. Gas is a unit of measurement that expresses the computation cost of an instruction. When the gas meter runs out, the program will stop. In the previous case, we set the gas limit high enough for the program to run for quite some time.
It is particularly important in the context of smart contracts deployed on Starknet, as it prevents from running infinite loops on the network. If you're writing a program that needs to run a loop, you will need to execute it with the
--available-gasflag set to a value that is large enough to run the program.
Now, try running the same program again, but this time with the --available-gas flag set to 200000 instead of 2000000000000. You will see the program only prints again! 3 times before it stops, as it ran out of gas to keep executing the loop.
Fortunately, Cairo also provides a way to break out of a loop using code. You can place the break keyword within the loop to tell the program when to stop executing the loop.
fn main() {
    let mut i: usize = 0;
    loop {
        if i > 10 {
            break;
        }
        println!("i = {}", i);
        i += 1;
    }
}
The continue keyword tells the program to go to the next iteration of the loop and to skip the rest of the code in this iteration.
Let's add a continue statement to our loop to skip the println! statement when i is equal to 5.
fn main() {
    let mut i: usize = 0;
    loop {
        if i > 10 {
            break;
        }
        if i == 5 {
            i += 1;
            continue;
        }
        println!("i = {}", i);
        i += 1;
    }
}
Executing this program will not print the value of i when it is equal to 5.
Returning Values from Loops
One of the uses of a loop is to retry an operation you know might fail, such
as checking whether an operation has succeeded. You might also need to pass
the result of that operation out of the loop to the rest of your code. To do
this, you can add the value you want returned after the break expression you
use to stop the loop; that value will be returned out of the loop so you can
use it, as shown here:
fn main() {
    let mut counter = 0;

    let result = loop {
        if counter == 10 {
            break counter * 2;
        }
        counter += 1;
    };

    println!("The result is {}", result);
}
Before the loop, we declare a variable named counter and initialize it to
0. Then we declare a variable named result to hold the value returned from
the loop. On every iteration of the loop, we check whether the counter is equal to 10, and then add 1 to the counter variable.
When the condition is met, we use the break keyword with the value counter * 2. After the loop, we use a
semicolon to end the statement that assigns the value to result. Finally, we
print the value in result, which in this case is 20.
Conditional Loops with while
A program will often need to evaluate a condition within a loop.
While the condition is true, the loop runs.
When the condition ceases to be true, the program calls break, stopping the loop.
It’s possible to implement behavior like this using a combination of loop, if, else, and break; you could try that now in a program, if you’d like.
However, this pattern is so common that Cairo has a built-in language construct for it, called a while loop.
In Listing 2-2, we use while to loop the program three times, counting down each time after printing the value of number, and then, after the loop, print a message and exit.
fn main() {
    let mut number = 3;

    while number != 0 {
        println!("{number}!");
        number -= 1;
    }

    println!("LIFTOFF!!!");
}
Listing 2-2: Using a while loop to run code while a condition holds true.
This construct eliminates a lot of nesting that would be necessary if you used loop, if, else, and break, and it’s clearer.
While a condition evaluates to true, the code runs; otherwise, it exits the loop.
Looping Through a Collection with for
You can also use the while construct to loop over the elements of a collection, such as an array. For example, the loop in Listing 2-3 prints each element in the array a.
fn main() {
    let a = [10, 20, 30, 40, 50].span();
    let mut index = 0;

    while index < 5 {
        println!("the value is: {}", a[index]);
        index += 1;
    }
}
Listing 2-3: Looping through each element of a collection using a while loop
Here, the code counts up through the elements in the array. It starts at index 0, and then loops until it reaches the final index in the array (that is, when index < 5 is no longer true). Running this code will print every element in the array:
$ scarb cairo-run
   Compiling no_listing_45_iter_loop_while v0.1.0 (listings/ch02-common-programming-concepts/no_listing_45_iter_loop_while/Scarb.toml)
    Finished `dev` profile target(s) in 4 seconds
     Running no_listing_45_iter_loop_while
the value is: 10
the value is: 20
the value is: 30
the value is: 40
the value is: 50
Run completed successfully, returning []
All five array values appear in the terminal, as expected. Even though index will reach a value of 5 at some point, the loop stops executing before trying to fetch a sixth value from the array.
However, this approach is error prone; we could cause the program to panic if the index value or test condition is incorrect. For example, if you changed the definition of the a array to have four elements but forgot to update the condition to while index < 4, the code would panic. It’s also slow, because the compiler adds runtime code to perform the conditional check of whether the index is within the bounds of the array on every iteration through the loop.
As a more concise alternative, you can use a for loop and execute some code for each item in a collection. A for loop looks like the code in Listing 2-4.
fn main() {
    let a = [10, 20, 30, 40, 50].span();

    for element in a {
        println!("the value is: {element}");
    }
}
Listing 2-4: Looping through each element of a collection using a for loop
When we run this code, we’ll see the same output as in Listing 2-3. More importantly, we’ve now increased the safety of the code and eliminated the chance of bugs that might result from going beyond the end of the array or not going far enough and missing some items.
Using the for loop, you wouldn’t need to remember to change any other code if you changed the number of values in the array, as you would with the method used in Listing 2-3.
The safety and conciseness of for loops make them the most commonly used loop construct in Cairo. Even in situations in which you want to run some code a certain number of times, as in the countdown example that used a while loop in Listing 2-2. Another way to run code a certain number of times would be to use a Range, provided by the core library, which generates all numbers in sequence starting from one number and ending before another number.
Here’s how you can use a Range to count from 1 to 3:
fn main() {
    for number in 1..4_u8 {
        println!("{number}!");
    }
    println!("Go!!!");
}
This code is a bit nicer, isn’t it?
Equivalence Between Loops and Recursive Functions
Loops and recursive functions are two common ways to repeat a block of code multiple times. The loop keyword is used to create an infinite loop that can be broken by using the break keyword.
fn main() -> felt252 {
    let mut x: felt252 = 0;
    loop {
        if x == 2 {
            break;
        } else {
            x += 1;
        }
    }
    x
}
Loops can be transformed into recursive functions by calling the function within itself. Here is an example of a recursive function that mimics the behavior of the loop example above.
fn main() -> felt252 {
    recursive_function(0)
}

fn recursive_function(mut x: felt252) -> felt252 {
    if x == 2 {
        x
    } else {
        recursive_function(x + 1)
    }
}
In both cases, the code block will run indefinitely until the condition x == 2 is met, at which point the value of x will be displayed.
In Cairo, loops and recursions are not only conceptually equivalent: they are also compiled down to similar low-level representations. To understand this, we can compile both examples to Sierra, and analyze the Sierra Code generated by the Cairo compiler for both examples. Add the following in your Scarb.toml file:
[lib]
sierra-text = true
Then, run scarb build to compile both examples. You will find that the Sierra code generated for both examples is extremely similar, as the loop is compiled to a recursive function in the Sierra statements.
Note: For our example, our findings came from understanding the statements section in Sierra that shows the execution traces of the two programs. If you are curious to learn more about Sierra, check out Exploring Sierra.
Summary
You made it! This was a sizable chapter: you learned about variables, data types, functions, comments,
if expressions and loops! To practice with the concepts discussed in this chapter,
try building programs to do the following:
- Generate the n-th Fibonacci number.
- Compute the factorial of a number n.
Now, we’ll review the common collection types in Cairo in the next chapter.
Common Collections
Cairo provides a set of common collection types that can be used to store and manipulate data. These collections are designed to be efficient, flexible, and easy to use. This section introduces the primary collection types available in Cairo: Arrays and Dictionaries.
Arrays
An array is a collection of elements of the same type. You can create and use array methods by using the ArrayTrait trait from the core library.
An important thing to note is that arrays have limited modification options. Arrays are, in fact, queues whose values can't be modified. This has to do with the fact that once a memory slot is written to, it cannot be overwritten, but only read from it. You can only append items to the end of an array and remove items from the front.
Creating an Array
Creating an array is done with the ArrayTrait::new() call. Here's an example of creating an array and appending 3 elements to it:
fn main() {
    let mut a = ArrayTrait::new();
    a.append(0);
    a.append(1);
    a.append(2);
}
When required, you can pass the expected type of items inside the array when instantiating the array like this, or explicitly define the type of the variable.
let mut arr = ArrayTrait::<u128>::new();
let mut arr:Array<u128> = ArrayTrait::new();
Updating an Array
Adding Elements
To add an element to the end of an array, you can use the append() method:
fn main() {
    let mut a = ArrayTrait::new();
    a.append(0);
    a.append(1);
    a.append(2);
}
Removing Elements
You can only remove elements from the front of an array by using the pop_front() method.
This method returns an Option that can be unwrapped, containing the removed element, or None if the array is empty.
fn main() {
    let mut a = ArrayTrait::new();
    a.append(10);
    a.append(1);
    a.append(2);

    let first_value = a.pop_front().unwrap();
    println!("The first value is {}", first_value);
}
The above code will print The first value is 10 as we remove the first element that was added.
In Cairo, memory is immutable, which means that it is not possible to modify the elements of an array once they've been added. You can only add elements to the end of an array and remove elements from the front of an array. These operations do not require memory mutation, as they involve updating pointers rather than directly modifying the memory cells.
Reading Elements from an Array
To access array elements, you can use get() or at() array methods that return different types. Using arr.at(index) is equivalent to using the subscripting operator arr[index].
get() Method
The get function returns an Option<Box<@T>>, which means it returns an option to a Box type (Cairo's smart-pointer type) containing a snapshot to the element at the specified index if that element exists in the array. If the element doesn't exist, get returns None. This method is useful when you expect to access indices that may not be within the array's bounds and want to handle such cases gracefully without panics. Snapshots will be explained in more detail in the "References and Snapshots" chapter.
Here is an example with the get() method:
fn main() -> u128 {
    let mut arr = ArrayTrait::<u128>::new();
    arr.append(100);
    let index_to_access =
        1; // Change this value to see different results, what would happen if the index doesn't exist?
    match arr.get(index_to_access) {
        Some(x) => {
            *x
                .unbox() // Don't worry about * for now, if you are curious see Chapter 4.2 #desnap operator
            // It basically means "transform what get(idx) returned into a real value"
        },
        None => { panic!("out of bounds") },
    }
}
at() Method
The at function, and its equivalent the subscripting operator, on the other hand, directly return a snapshot to the element at the specified index using the unbox() operator to extract the value stored in a box. If the index is out of bounds, a panic error occurs. You should only use at when you want the program to panic if the provided index is out of the array's bounds, which can prevent unexpected behavior.
fn main() {
    let mut a = ArrayTrait::new();
    a.append(0);
    a.append(1);

    // using the `at()` method
    let first = *a.at(0);
    assert!(first == 0);
    // using the subscripting operator
    let second = *a[1];
    assert!(second == 1);
}
In this example, the variable named first will get the value 0 because that
is the value at index 0 in the array. The variable named second will get
the value 1 from index 1 in the array.
In summary, use at when you want to panic on out-of-bounds access attempts, and use get when you prefer to handle such cases gracefully without panicking.
Size-related Methods
To determine the number of elements in an array, use the len() method. The return value is of type usize.
If you want to check if an array is empty or not, you can use the is_empty() method, which returns true if the array is empty and false otherwise.
array! Macro
Sometimes, we need to create arrays with values that are already known at compile time. The basic way of doing that is redundant. You would first declare the array and then append each value one by one. array! is a simpler way of doing this task by combining the two steps.
At compile-time, the compiler will expand the macro to generate the code that appends the items sequentially.
Without array!:
    let mut arr = ArrayTrait::new();
    arr.append(1);
    arr.append(2);
    arr.append(3);
    arr.append(4);
    arr.append(5);
With array!:
let arr = array![1, 2, 3, 4, 5];
Storing Multiple Types with Enums
If you want to store elements of different types in an array, you can use an Enum to define a custom data type that can hold multiple types. Enums will be explained in more detail in the "Enums and Pattern Matching" chapter.
#[derive(Copy, Drop)]
enum Data {
    Integer: u128,
    Felt: felt252,
    Tuple: (u32, u32),
}

fn main() {
    let mut messages: Array<Data> = array![];
    messages.append(Data::Integer(100));
    messages.append(Data::Felt('hello world'));
    messages.append(Data::Tuple((10, 30)));
}
Span
Span is a struct that represents a snapshot of an Array. It is designed to provide safe and controlled access to the elements of an array without modifying the original array. Span is particularly useful for ensuring data integrity and avoiding borrowing issues when passing arrays between functions or when performing read-only operations, as introduced in "References and Snapshots".
All methods provided by Array can also be used with Span, except for the append() method.
Turning an Array into Span
To create a Span of an Array, call the span() method:
fn main() {
    let mut array: Array<u8> = ArrayTrait::new();
    array.span();
}
Dictionaries
Cairo provides in its core library a dictionary-like type. The Felt252Dict<T> data type represents a collection of key-value pairs where each key is unique and associated with a corresponding value. This type of data structure is known differently across different programming languages such as maps, hash tables, associative arrays and many others.
The Felt252Dict<T> type is useful when you want to organize your data in a certain way for which using an Array<T> and indexing doesn't suffice. Cairo dictionaries also allow the programmer to easily simulate the existence of mutable memory when there is none.
Basic Use of Dictionaries
It is normal in other languages when creating a new dictionary to define the data types of both key and value. In Cairo, the key type is restricted to felt252, leaving only the possibility to specify the value data type, represented by T in Felt252Dict<T>.
The core functionality of a Felt252Dict<T> is implemented in the trait Felt252DictTrait which includes all basic operations. Among them we can find:
insert(felt252, T) -> ()to write values to a dictionary instance andget(felt252) -> Tto read values from it.
These functions allow us to manipulate dictionaries like in any other language. In the following example, we create a dictionary to represent a mapping between individuals and their balance:
use core::dict::Felt252Dict;

fn main() {
    let mut balances: Felt252Dict<u64> = Default::default();

    balances.insert('Alex', 100);
    balances.insert('Maria', 200);

    let alex_balance = balances.get('Alex');
    assert!(alex_balance == 100, "Balance is not 100");

    let maria_balance = balances.get('Maria');
    assert!(maria_balance == 200, "Balance is not 200");
}
We can create a new instance of Felt252Dict<u64> by using the default method of the Default trait and add two individuals, each one with their own balance, using the insert method. Finally, we check the balance of our users with the get method. These methods are defined in the Felt252DictTrait trait in the core library.
Throughout the book we have talked about how Cairo's memory is immutable, meaning you can only write to a memory cell once but the Felt252Dict<T> type represents a way to overcome this obstacle. We will explain how this is implemented later on in "Dictionaries Underneath".
Building upon our previous example, let us show a code example where the balance of the same user changes:
use core::dict::Felt252Dict;

fn main() {
    let mut balances: Felt252Dict<u64> = Default::default();

    // Insert Alex with 100 balance
    balances.insert('Alex', 100);
    // Check that Alex has indeed 100 associated with him
    let alex_balance = balances.get('Alex');
    assert!(alex_balance == 100, "Alex balance is not 100");

    // Insert Alex again, this time with 200 balance
    balances.insert('Alex', 200);
    // Check the new balance is correct
    let alex_balance_2 = balances.get('Alex');
    assert!(alex_balance_2 == 200, "Alex balance is not 200");
}
Notice how in this example we added the 'Alex' individual twice, each time using a different balance and each time that we checked for its balance it had the last value inserted! Felt252Dict<T> effectively allows us to "rewrite" the stored value for any given key.
Before heading on and explaining how dictionaries are implemented it is worth mentioning that once you instantiate a Felt252Dict<T>, behind the scenes all keys have their associated values initialized as zero. This means that if for example, you tried to get the balance of an inexistent user you will get 0 instead of an error or an undefined value. This also means there is no way to delete data from a dictionary. Something to take into account when incorporating this structure into your code.
Until this point, we have seen all the basic features of Felt252Dict<T> and how it mimics the same behavior as the corresponding data structures in any other language, that is, externally of course. Cairo is at its core a non-deterministic Turing-complete programming language, very different from any other popular language in existence, which as a consequence means that dictionaries are implemented very differently as well!
In the following sections, we are going to give some insights about Felt252Dict<T> inner mechanisms and the compromises that were taken to make them work. After that, we are going to take a look at how to use dictionaries with other data structures as well as use the entry method as another way to interact with them.
Dictionaries Underneath
One of the constraints of Cairo's non-deterministic design is that its memory system is immutable, so in order to simulate mutability, the language implements Felt252Dict<T> as a list of entries. Each of the entries represents a time when a dictionary was accessed for reading/updating/writing purposes. An entry has three fields:
- A
keyfield that identifies the key for this key-value pair of the dictionary. - A
previous_valuefield that indicates which previous value was held atkey. - A
new_valuefield that indicates the new value that is held atkey.
If we try implementing Felt252Dict<T> using high-level structures we would internally define it as Array<Entry<T>> where each Entry<T> has information about what key-value pair it represents and the previous and new values it holds. The definition of Entry<T> would be:
struct Entry<T> {
    key: felt252,
    previous_value: T,
    new_value: T,
}
For each time we interact with a Felt252Dict<T>, a new Entry<T> will be registered:
- A
getwould register an entry where there is no change in state, and previous and new values are stored with the same value. - An
insertwould register a newEntry<T>where thenew_valuewould be the element being inserted, and theprevious_valuethe last element inserted before this. In case it is the first entry for a certain key, then the previous value will be zero.
The use of this entry list shows how there isn't any rewriting, just the creation of new memory cells per Felt252Dict<T> interaction. Let's show an example of this using the balances dictionary from the previous section and inserting the users 'Alex' and 'Maria':
use core::dict::Felt252Dict;

struct Entry<T> {
    key: felt252,
    previous_value: T,
    new_value: T,
}

fn main() {
    let mut balances: Felt252Dict<u64> = Default::default();
    balances.insert('Alex', 100_u64);
    balances.insert('Maria', 50_u64);
    balances.insert('Alex', 200_u64);
    balances.get('Maria');
}
These instructions would then produce the following list of entries:
| key | previous | new |
|---|---|---|
| Alex | 0 | 100 |
| Maria | 0 | 50 |
| Alex | 100 | 200 |
| Maria | 50 | 50 |
Notice that since 'Alex' was inserted twice, it appears twice and the previous and current values are set properly. Also reading from 'Maria' registered an entry with no change from previous to current values.
This approach to implementing Felt252Dict<T> means that for each read/write operation, there is a scan for the whole entry list in search of the last entry with the same key. Once the entry has been found, its new_value is extracted and used on the new entry to be added as the previous_value. This means that interacting with Felt252Dict<T> has a worst-case time complexity of O(n) where n is the number of entries in the list.
If you pour some thought into alternate ways of implementing Felt252Dict<T> you'd surely find them, probably even ditching completely the need for a previous_value field, nonetheless, since Cairo is not your normal language this won't work.
One of the purposes of Cairo is, with the STARK proof system, to generate proofs of computational integrity. This means that you need to verify that program execution is correct and inside the boundaries of Cairo restrictions. One of those boundary checks consists of "dictionary squashing" and that requires information on both previous and new values for every entry.
Squashing Dictionaries
To verify that the proof generated by a Cairo program execution that used a Felt252Dict<T> is correct, we need to check that there wasn't any illegal tampering with the dictionary. This is done through a method called squash_dict that reviews each entry of the entry list and checks that access to the dictionary remains coherent throughout the execution.
The process of squashing is as follows: given all entries with certain key k, taken in the same order as they were inserted, verify that the ith entry new_value is equal to the ith + 1 entry previous_value.
For example, given the following entry list:
| key | previous | new |
|---|---|---|
| Alex | 0 | 150 |
| Maria | 0 | 100 |
| Charles | 0 | 70 |
| Maria | 100 | 250 |
| Alex | 150 | 40 |
| Alex | 40 | 300 |
| Maria | 250 | 190 |
| Alex | 300 | 90 |
After squashing, the entry list would be reduced to:
| key | previous | new |
|---|---|---|
| Alex | 0 | 90 |
| Maria | 0 | 190 |
| Charles | 0 | 70 |
In case of a change on any of the values of the first table, squashing would have failed during runtime.
Dictionary Destruction
If you run the examples from "Basic Use of Dictionaries" section, you'd notice that there was never a call to squash dictionary, but the program compiled successfully nonetheless. What happened behind the scene was that squash was called automatically via the Felt252Dict<T> implementation of the Destruct<T> trait. This call occurred just before the balance dictionary went out of scope.
The Destruct<T> trait represents another way of removing instances out of scope apart from Drop<T>. The main difference between these two is that Drop<T> is treated as a no-op operation, meaning it does not generate new CASM while Destruct<T> does not have this restriction. The only type which actively uses the Destruct<T> trait is Felt252Dict<T>, for every other type Destruct<T> and Drop<T> are synonyms. You can read more about these traits in Drop and Destruct section of Appendix C.
Later in "Dictionaries as Struct Members" section, we will have a hands-on example where we implement the Destruct<T> trait for a custom type.
More Dictionaries
Up to this point, we have given a comprehensive overview of the functionality of Felt252Dict<T> as well as how and why it is implemented in a certain way. If you haven't understood all of it, don't worry because in this section we will have some more examples using dictionaries.
We will start by explaining the entry method which is part of a dictionary basic functionality included in Felt252DictTrait<T> which we didn't mention at the beginning. Soon after, we will see examples of how to use Felt252Dict<T> with other complex types such as Array<T>.
Entry and Finalize
In the "Dictionaries Underneath" section, we explained how Felt252Dict<T> internally worked. It was a list of entries for each time the dictionary was accessed in any manner. It would first find the last entry given a certain key and then update it accordingly to whatever operation it was executing. The Cairo language gives us the tools to replicate this ourselves through the entry and finalize methods.
The entry method comes as part of Felt252DictTrait<T> with the purpose of creating a new entry given a certain key. Once called, this method takes ownership of the dictionary and returns the entry to update. The method signature is as follows:
fn entry(self: Felt252Dict<T>, key: felt252) -> (Felt252DictEntry<T>, T) nopanic
The first input parameter takes ownership of the dictionary while the second one is used to create the appropriate entry. It returns a tuple containing a Felt252DictEntry<T>, which is the type used by Cairo to represent dictionary entries, and a T representing the value held previously.
The nopanic notation simply indicates that the function is guaranteed to never panic.
The next thing to do is to update the entry with the new value. For this, we use the finalize method which inserts the entry and returns ownership of the dictionary:
fn finalize(self: Felt252DictEntry<T>, new_value: T) -> Felt252Dict<T>
This method receives the entry and the new value as parameters, and returns the updated dictionary.
Let us see an example using entry and finalize. Imagine we would like to implement our own version of the get method from a dictionary. We should then do the following:
- Create the new entry to add using the
entrymethod. - Insert back the entry where the
new_valueequals theprevious_value. - Return the value.
Implementing our custom get would look like this:
use core::dict::{Felt252Dict, Felt252DictEntryTrait};

fn custom_get<T, +Felt252DictValue<T>, +Drop<T>, +Copy<T>>(
    ref dict: Felt252Dict<T>, key: felt252,
) -> T {
    // Get the new entry and the previous value held at `key`
    let (entry, prev_value) = dict.entry(key);

    // Store the value to return
    let return_value = prev_value;

    // Update the entry with `prev_value` and get back ownership of the dictionary
    dict = entry.finalize(prev_value);

    // Return the read value
    return_value
}
The ref keyword means that the ownership of the variable will be given back at the end of
the function. This concept will be explained in more detail in the "References and Snapshots" section.
Implementing the insert method would follow a similar workflow, except for inserting a new value when finalizing. If we were to implement it, it would look like the following:
use core::dict::{Felt252Dict, Felt252DictEntryTrait};

fn custom_insert<T, +Felt252DictValue<T>, +Destruct<T>, +Drop<T>>(
    ref dict: Felt252Dict<T>, key: felt252, value: T,
) {
    // Get the last entry associated with `key`
    // Notice that if `key` does not exist, `_prev_value` will
    // be the default value of T.
    let (entry, _prev_value) = dict.entry(key);

    // Insert `entry` back in the dictionary with the updated value,
    // and receive ownership of the dictionary
    dict = entry.finalize(value);
}
As a finalizing note, these two methods are implemented in a similar way to how insert and get are implemented for Felt252Dict<T>. This code shows some example usage:
use core::dict::{Felt252Dict, Felt252DictEntryTrait};

fn custom_get<T, +Felt252DictValue<T>, +Drop<T>, +Copy<T>>(
    ref dict: Felt252Dict<T>, key: felt252,
) -> T {
    // Get the new entry and the previous value held at `key`
    let (entry, prev_value) = dict.entry(key);

    // Store the value to return
    let return_value = prev_value;

    // Update the entry with `prev_value` and get back ownership of the dictionary
    dict = entry.finalize(prev_value);

    // Return the read value
    return_value
}

fn custom_insert<T, +Felt252DictValue<T>, +Destruct<T>, +Drop<T>>(
    ref dict: Felt252Dict<T>, key: felt252, value: T,
) {
    // Get the last entry associated with `key`
    // Notice that if `key` does not exist, `_prev_value` will
    // be the default value of T.
    let (entry, _prev_value) = dict.entry(key);

    // Insert `entry` back in the dictionary with the updated value,
    // and receive ownership of the dictionary
    dict = entry.finalize(value);
}

fn main() {
    let mut dict: Felt252Dict<u64> = Default::default();

    custom_insert(ref dict, '0', 100);

    let val = custom_get(ref dict, '0');

    assert!(val == 100, "Expecting 100");
}
Dictionaries of Types not Supported Natively
One restriction of Felt252Dict<T> that we haven't talked about is the trait Felt252DictValue<T>.
This trait defines the zero_default method which is the one that gets called when a value does not exist in the dictionary.
This is implemented by some common data types, such as most unsigned integers, bool and felt252 - but it is not implemented for more complex types such as arrays, structs (including u256), and other types from the core library.
This means that making a dictionary of types not natively supported is not a straightforward task, because you would need to write a couple of trait implementations in order to make the data type a valid dictionary value type.
To compensate this, you can wrap your type inside a Nullable<T>.
Nullable<T> is a smart pointer type that can either point to a value or be null in the absence of value. It is usually used in Object Oriented Programming Languages when a reference doesn't point anywhere. The difference with Option is that the wrapped value is stored inside a Box<T> data type. The Box<T> type is a smart pointer that allows us to use a dedicated boxed_segment memory segment for our data, and access this segment using a pointer that can only be manipulated in one place at a time. See Smart Pointers Chapter for more information.
Let's show using an example. We will try to store a Span<felt252> inside a dictionary. For that, we will use Nullable<T> and Box<T>. Also, we are storing a Span<T> and not an Array<T> because the latter does not implement the Copy<T> trait which is required for reading from a dictionary.
use core::dict::Felt252Dict;
use core::nullable::{NullableTrait, match_nullable, FromNullableResult};

fn main() {
    // Create the dictionary
    let mut d: Felt252Dict<Nullable<Span<felt252>>> = Default::default();

    // Create the array to insert
    let a = array![8, 9, 10];

    // Insert it as a `Span`
    d.insert(0, NullableTrait::new(a.span()));

//...
In this code snippet, the first thing we did was to create a new dictionary d. We want it to hold a Nullable<Span>. After that, we created an array and filled it with values.
The last step is inserting the array as a span inside the dictionary. Notice that we do this using the new function of the NullableTrait.
Once the element is inside the dictionary, and we want to get it, we follow the same steps but in reverse order. The following code shows how to achieve that:
//...

    // Get value back
    let val = d.get(0);

    // Search the value and assert it is not null
    let span = match match_nullable(val) {
        FromNullableResult::Null => panic!("No value found"),
        FromNullableResult::NotNull(val) => val.unbox(),
    };

    // Verify we are having the right values
    assert!(*span.at(0) == 8, "Expecting 8");
    assert!(*span.at(1) == 9, "Expecting 9");
    assert!(*span.at(2) == 10, "Expecting 10");
}
Here we:
- Read the value using
get. - Verified it is non-null using the
match_nullablefunction. - Unwrapped the value inside the box and asserted it was correct.
The complete script would look like this:
use core::dict::Felt252Dict;
use core::nullable::{NullableTrait, match_nullable, FromNullableResult};

fn main() {
    // Create the dictionary
    let mut d: Felt252Dict<Nullable<Span<felt252>>> = Default::default();

    // Create the array to insert
    let a = array![8, 9, 10];

    // Insert it as a `Span`
    d.insert(0, NullableTrait::new(a.span()));

    // Get value back
    let val = d.get(0);

    // Search the value and assert it is not null
    let span = match match_nullable(val) {
        FromNullableResult::Null => panic!("No value found"),
        FromNullableResult::NotNull(val) => val.unbox(),
    };

    // Verify we are having the right values
    assert!(*span.at(0) == 8, "Expecting 8");
    assert!(*span.at(1) == 9, "Expecting 9");
    assert!(*span.at(2) == 10, "Expecting 10");
}
Using Arrays inside Dictionaries
In the previous section, we explored how to store and retrieve complex types inside a dictionary using Nullable<T> and Box<T>. Now, let's take a look at how to store an array inside a dictionary and dynamically modify its contents.
Storing arrays in dictionaries in Cairo is slightly different from storing other types. This is because arrays are more complex data structures that require special handling to avoid issues with memory copying and references.
First, let's look at how to create a dictionary and insert an array into it. This process is pretty straightforward and follows a similar pattern to inserting other types of data:
use core::dict::Felt252Dict;

fn main() {
    let arr = array![20, 19, 26];
    let mut dict: Felt252Dict<Nullable<Array<u8>>> = Default::default();
    dict.insert(0, NullableTrait::new(arr));
    println!("Array inserted successfully.");
}
However, attempting to read an array from the dictionary using the get method will result in a compiler error. This is because get tries to copy the array in memory, which is not possible for arrays (as we've already mentioned in the previous section, Array<T> does not implement the Copy<T> trait):
use core::nullable::{match_nullable, FromNullableResult};
use core::dict::Felt252Dict;

fn main() {
    let arr = array![20, 19, 26];
    let mut dict: Felt252Dict<Nullable<Array<u8>>> = Default::default();
    dict.insert(0, NullableTrait::new(arr));
    println!("Array: {:?}", get_array_entry(ref dict, 0));
}

fn get_array_entry(ref dict: Felt252Dict<Nullable<Array<u8>>>, index: felt252) -> Span<u8> {
    let val = dict.get(0); // This will cause a compiler error
    let arr = match match_nullable(val) {
        FromNullableResult::Null => panic!("No value!"),
        FromNullableResult::NotNull(val) => val.unbox(),
    };
    arr.span()
}
$ scarb cairo-run
   Compiling no_listing_15_dict_of_array_attempt_get v0.1.0 (listings/ch03-common-collections/no_listing_15_dict_of_array_attempt_get/Scarb.toml)
error: Trait has no implementation in context: core::traits::Copy::<core::nullable::Nullable::<core::array::Array::<core::integer::u8>>>.
 --> listings/ch03-common-collections/no_listing_15_dict_of_array_attempt_get/src/lib.cairo:13:20
    let val = dict.get(0); // This will cause a compiler error
                   ^*^

error: could not compile `no_listing_15_dict_of_array_attempt_get` due to previous error
error: `scarb metadata` exited with error
To correctly read an array from the dictionary, we need to use dictionary entries. This allows us to get a reference to the array value without copying it:
fn get_array_entry(ref dict: Felt252Dict<Nullable<Array<u8>>>, index: felt252) -> Span<u8> {
    let (entry, _arr) = dict.entry(index);
    let mut arr = _arr.deref_or(array![]);
    let span = arr.span();
    dict = entry.finalize(NullableTrait::new(arr));
    span
}
Note: We must convert the array to a
Spanbefore finalizing the entry, because callingNullableTrait::new(arr)moves the array, thus making it impossible to return it from the function.
To modify the stored array, such as appending a new value, we can use a similar approach. The following append_value function demonstrates this:
fn append_value(ref dict: Felt252Dict<Nullable<Array<u8>>>, index: felt252, value: u8) {
    let (entry, arr) = dict.entry(index);
    let mut unboxed_val = arr.deref_or(array![]);
    unboxed_val.append(value);
    dict = entry.finalize(NullableTrait::new(unboxed_val));
}
In the append_value function, we access the dictionary entry, dereference the array, append the new value, and finalize the entry with the updated array.
Note: Removing an item from a stored array can be implemented in a similar manner.
Below is the complete example demonstrating the creation, insertion, reading, and modification of an array in a dictionary:
use core::nullable::NullableTrait;
use core::dict::{Felt252Dict, Felt252DictEntryTrait};

fn append_value(ref dict: Felt252Dict<Nullable<Array<u8>>>, index: felt252, value: u8) {
    let (entry, arr) = dict.entry(index);
    let mut unboxed_val = arr.deref_or(array![]);
    unboxed_val.append(value);
    dict = entry.finalize(NullableTrait::new(unboxed_val));
}

fn get_array_entry(ref dict: Felt252Dict<Nullable<Array<u8>>>, index: felt252) -> Span<u8> {
    let (entry, _arr) = dict.entry(index);
    let mut arr = _arr.deref_or(array![]);
    let span = arr.span();
    dict = entry.finalize(NullableTrait::new(arr));
    span
}

fn main() {
    let arr = array![20, 19, 26];
    let mut dict: Felt252Dict<Nullable<Array<u8>>> = Default::default();
    dict.insert(0, NullableTrait::new(arr));
    println!("Before insertion: {:?}", get_array_entry(ref dict, 0));

    append_value(ref dict, 0, 30);

    println!("After insertion: {:?}", get_array_entry(ref dict, 0));
}
Understanding Cairo's Ownership system
Cairo is a language built around a linear type system that allows us to statically ensure that in every Cairo program, a value is used exactly once. This linear type system helps prevent runtime errors by ensuring that operations that could cause such errors, such as writing twice to a memory cell, are detected at compile time. This is achieved by implementing an ownership system and forbidding copying and dropping values by default. In this chapter, we’ll talk about Cairo's ownership system as well as references and snapshots.
Ownership Using a Linear Type System
Cairo uses a linear type system. In such a type system, any value (a basic type, a struct, an enum) must be used and must only be used once. 'Used' here means that the value is either destroyed or moved.
Destruction can happen in several ways:
- a variable goes out of scope.
- a struct is destructured.
- explicit destruction using
destruct().
Moving a value simply means passing that value to another function.
This results in somewhat similar constraints to the Rust ownership model, but there are some differences. In particular, the Rust ownership model exists (in part) to avoid data races and concurrent mutable access to a memory value. This is obviously impossible in Cairo since the memory is immutable. Instead, Cairo leverages its linear type system for two main purposes:
- Ensuring that all code is provable and thus verifiable.
- Abstracting away the immutable memory of the Cairo VM.
Ownership
In Cairo, ownership applies to variables and not to values. A value can safely be referred to by many different variables (even if they are mutable variables), as the value itself is always immutable. Variables however can be mutable, so the compiler must ensure that constant variables aren't accidentally modified by the programmer. This makes it possible to talk about ownership of a variable: the owner is the code that can read (and write if mutable) the variable.
This means that variables (not values) follow similar rules to Rust values:
- Each variable in Cairo has an owner.
- There can only be one owner at a time.
- When the owner goes out of scope, the variable is destroyed.
Now that we’re past basic Cairo syntax, we won’t include all the fn main() { code in examples, so if you’re following along, make sure to put the following examples inside a main function manually. As a result, our examples will be a bit more concise, letting us focus on the actual details rather than boilerplate code.
Variable Scope
As a first example of the linear type system, we’ll look at the scope of some variables. A scope is the range within a program for which an item is valid. Take the following variable:
let s = 'hello';
The variable s refers to a short string. The variable is valid from the point at
which it’s declared until the end of the current scope. Listing 4-1 shows a
program with comments annotating where the variable s would be valid.
//TAG: ignore_fmt
fn main() {
    { // s is not valid here, it’s not yet declared
        let s = 'hello'; // s is valid from this point forward
        // do stuff with s
    } // this scope is now over, and s is no longer valid
}
Listing 4-1: A variable and the scope in which it is valid
In other words, there are two important points in time here:
- When
scomes into scope, it is valid. - It remains valid until it goes out of scope.
At this point, the relationship between scopes and when variables are valid is similar to that in other programming languages. Now we’ll build on top of this understanding by using the Array type we introduced in the previous "Arrays" section.
Moving values
As said earlier, moving a value simply means passing that value to another function. When that happens, the variable referring to that value in the original scope is destroyed and can no longer be used, and a new variable is created to hold the same value.
Arrays are an example of a complex type that is moved when passing it to another function. Here is a short reminder of what an array looks like:
fn main() {
    let mut arr: Array<u128> = array![];
    arr.append(1);
    arr.append(2);
}
How does the type system ensure that the Cairo program never tries to write to the same memory cell twice? Consider the following code, where we try to remove the front of the array twice:
fn foo(mut arr: Array<u128>) {
    arr.pop_front();
}

fn main() {
    let arr: Array<u128> = array![];
    foo(arr);
    foo(arr);
}
In this case, we try to pass the same value (the array in the arr variable) to both function calls. This means our code tries to remove the first element twice, which would try to write to the same memory cell twice - which is forbidden by the Cairo VM, leading to a runtime error.
Thankfully, this code does not actually compile. Once we have passed the array to the foo function, the variable arr is no longer usable. We get this compile-time error, telling us that we would need Array to implement the Copy Trait:
$ scarb cairo-run
   Compiling no_listing_02_pass_array_by_value v0.1.0 (listings/ch04-understanding-ownership/no_listing_02_pass_array_by_value/Scarb.toml)
warn: Unhandled `#[must_use]` type `core::option::Option::<core::integer::u128>`
 --> listings/ch04-understanding-ownership/no_listing_02_pass_array_by_value/src/lib.cairo:3:5
    arr.pop_front();
    ^*************^

error: Variable was previously moved.
 --> listings/ch04-understanding-ownership/no_listing_02_pass_array_by_value/src/lib.cairo:9:9
    foo(arr);
        ^*^
note: variable was previously used here:
  --> listings/ch04-understanding-ownership/no_listing_02_pass_array_by_value/src/lib.cairo:8:9
    foo(arr);
        ^*^
note: Trait has no implementation in context: core::traits::Copy::<core::array::Array::<core::integer::u128>>.

error: could not compile `no_listing_02_pass_array_by_value` due to previous error
error: `scarb metadata` exited with error
The Copy Trait
The Copy trait allows simple types to be duplicated by copying felts, without allocating new memory segments. This contrasts with Cairo's default "move" semantics, which transfer ownership of values to ensure memory safety and prevent issues like multiple writes to the same memory cell. Copy is implemented for types where duplication is safe and efficient, bypassing the need for move semantics. Types like Array and Felt252Dict cannot implement Copy, as manipulating them in different scopes is forbidden by the type system.
All basic types previously described in "Data Types" implement by default the Copy trait.
While Arrays and Dictionaries can't be copied, custom types that don't contain either of them can be.
You can implement the Copy trait on your type by adding the #[derive(Copy)] annotation to your type definition. However, Cairo won't allow a type to be annotated with Copy if the type itself or any of its components doesn't implement the Copy trait.
#[derive(Copy, Drop)]
struct Point {
    x: u128,
    y: u128,
}

fn main() {
    let p1 = Point { x: 5, y: 10 };
    foo(p1);
    foo(p1);
}

fn foo(p: Point) { // do something with p
}
In this example, we can pass p1 twice to the foo function because the Point type implements the Copy trait. This means that when we pass p1 to foo, we are actually passing a copy of p1, so p1 remains valid. In ownership terms, this means that the ownership of p1 remains with the main function.
If you remove the Copy trait derivation from the Point type, you will get a compile-time error when trying to compile the code.
Don't worry about the Struct keyword. We will introduce this in Chapter 5.
Destroying Values - Example with FeltDict
The other way linear types can be used is by being destroyed. Destruction must ensure that the 'resource' is now correctly released. In Rust, for example, this could be closing the access to a file, or locking a mutex.
In Cairo, one type that has such behaviour is Felt252Dict. For provability, dicts must be 'squashed' when they are destructed.
This would be very easy to forget, so it is enforced by the type system and the compiler.
No-op Destruction: the Drop Trait
You may have noticed that the Point type in the previous example also implements the Drop trait.
For example, the following code will not compile, because the struct A is not moved or destroyed before it goes out of scope:
struct A {}

fn main() {
    A {}; // error: Variable not dropped.
}
However, types that implement the Drop trait are automatically destroyed when going out of scope. This destruction does nothing, it is a no-op - simply a hint to the compiler that this type can safely be destroyed once it's no longer useful. We call this "dropping" a value.
At the moment, the Drop implementation can be derived for all types, allowing them to be dropped when going out of scope, except for dictionaries (Felt252Dict) and types containing dictionaries.
For example, the following code compiles:
#[derive(Drop)]
struct A {}

fn main() {
    A {}; // Now there is no error.
}
Destruction with a Side-effect: the Destruct Trait
When a value is destroyed, the compiler first tries to call the drop method on that type. If it doesn't exist, then the compiler tries to call destruct instead. This method is provided by the Destruct trait.
As said earlier, dictionaries in Cairo are types that must be "squashed" when destructed, so that the sequence of access can be proven. This is easy for developers to forget, so instead dictionaries implement the Destruct trait to ensure that all dictionaries are squashed when going out of scope.
As such, the following example will not compile:
use core::dict::Felt252Dict;

struct A {
    dict: Felt252Dict<u128>,
}

fn main() {
    A { dict: Default::default() };
}
If you try to run this code, you will get a compile-time error:
$ scarb cairo-run
   Compiling no_listing_06_no_destruct_compile_fails v0.1.0 (listings/ch04-understanding-ownership/no_listing_06_no_destruct_compile_fails/Scarb.toml)
error: Variable not dropped.
 --> listings/ch04-understanding-ownership/no_listing_06_no_destruct_compile_fails/src/lib.cairo:9:5
    A { dict: Default::default() };
    ^****************************^
note: Trait has no implementation in context: core::traits::Drop::<no_listing_06_no_destruct_compile_fails::A>.
note: Trait has no implementation in context: core::traits::Destruct::<no_listing_06_no_destruct_compile_fails::A>.

error: could not compile `no_listing_06_no_destruct_compile_fails` due to previous error
error: `scarb metadata` exited with error
When A goes out of scope, it can't be dropped as it implements neither the Drop (as it contains a dictionary and can't derive(Drop)) nor the Destruct trait. To fix this, we can derive the Destruct trait implementation for the A type:
use core::dict::Felt252Dict;

#[derive(Destruct)]
struct A {
    dict: Felt252Dict<u128>,
}

fn main() {
    A { dict: Default::default() }; // No error here
}
Now, when A goes out of scope, its dictionary will be automatically squashed, and the program will compile.
Copy Array Data with clone
If we do want to deeply copy the data of an Array, we can use a common method called clone. We’ll discuss method syntax in a dedicated section in Chapter 5, but because methods are a common feature in many programming languages, you’ve probably seen them before.
Here’s an example of the clone method in action.
fn main() {
    let arr1: Array<u128> = array![];
    let arr2 = arr1.clone();
}
When you see a call to clone, you know that some arbitrary code is being executed and that code may be expensive. It’s a visual indicator that something different is going on.
In this case, the value arr1 refers to is being copied, resulting in new memory cells being used, and a new variable arr2 is created, referring to the new copied value.
Return Values and Scope
Returning values is equivalent to moving them. Listing 4-2 shows an example of a function that returns some value, with similar annotations as those in Listing 4-1.
Filename: src/lib.cairo
#[derive(Drop)]
struct A {}

fn main() {
    let a1 = gives_ownership();           // gives_ownership moves its return
                                          // value into a1

    let a2 = A {};                        // a2 comes into scope

    let a3 = takes_and_gives_back(a2);    // a2 is moved into
                                          // takes_and_gives_back, which also
                                          // moves its return value into a3

} // Here, a3 goes out of scope and is dropped. a2 was moved, so nothing
  // happens. a1 goes out of scope and is dropped.

fn gives_ownership() -> A {               // gives_ownership will move its
                                          // return value into the function
                                          // that calls it

    let some_a = A {};                    // some_a comes into scope

    some_a                                // some_a is returned and
                                          // moves ownership to the calling
                                          // function
}

// This function takes an instance some_a of A and returns it
fn takes_and_gives_back(some_a: A) -> A { // some_a comes into scope

    some_a                                // some_a is returned and
                                          // moves ownership to the calling
                                          // function
}
Listing 4-2: Moving return values
While this works, moving into and out of every function is a bit tedious. What if we want to let a function use a value but not move the value? It’s quite annoying that anything we pass in also needs to be passed back if we want to use it again, in addition to any data resulting from the body of the function that we might want to return as well.
Cairo does let us return multiple values using a tuple, as shown in Listing 4-3.
Filename: src/lib.cairo
fn main() {
    let arr1: Array<u128> = array![];

    let (arr2, len) = calculate_length(arr1);
}

fn calculate_length(arr: Array<u128>) -> (Array<u128>, usize) {
    let length = arr.len(); // len() returns the length of an array

    (arr, length)
}
Listing 4-3: Returning many values
But this is too much ceremony and a lot of work for a concept that should be common. Luckily for us, Cairo has two features for passing a value without destroying or moving it, called references and snapshots.
References and Snapshots
The issue with the tuple code in previous Listing 4-3 is that we have to return the
Array to the calling function so we can still use the Array after the
call to calculate_length, because the Array was moved into
calculate_length.
Snapshots
In the previous chapter, we talked about how Cairo's ownership system prevents us from using a variable after we've moved it, protecting us from potentially writing twice to the same memory cell. However, it's not very convenient. Let's see how we can retain ownership of the variable in the calling function using snapshots.
In Cairo, a snapshot is an immutable view of a value at a certain point in the execution of the program. Recall that memory is immutable, so modifying a variable actually fills a new memory cell. The old memory cell still exists, and snapshots are variables that refer to that "old" value. In this sense, snapshots are a view "into the past".
Here is how you would define and use a calculate_area function that takes a snapshot of a Rectangle struct as a parameter instead of taking ownership of the underlying value. In this example, the calculate_area function returns the area of the Rectangle passed as a snapshot. Since we’re passing it as an immutable view, we can be sure that calculate_area will not mutate the Rectangle, and ownership remains in the main function.
Filename: src/lib.cairo
#[derive(Drop)]
struct Rectangle {
    height: u64,
    width: u64,
}

fn main() {
    let mut rec = Rectangle { height: 3, width: 10 };
    let first_snapshot = @rec; // Take a snapshot of `rec` at this point in time
    rec.height = 5; // Mutate `rec` by changing its height
    let first_area = calculate_area(first_snapshot); // Calculate the area of the snapshot
    let second_area = calculate_area(@rec); // Calculate the current area
    println!("The area of the rectangle when the snapshot was taken is {}", first_area);
    println!("The current area of the rectangle is {}", second_area);
}

fn calculate_area(rec: @Rectangle) -> u64 {
    *rec.height * *rec.width
}
Note: Accessing fields of a snapshot (e.g.,
rec.height) yields snapshots of those fields, which we desnap with*to get the values. This works here becauseu64implementsCopy. You’ll learn more about desnapping in the next section.
The output of this program is:
$ scarb cairo-run
warn: `scarb cairo-run` will be deprecated soon
help: use `scarb execute` instead
   Compiling no_listing_09_snapshots v0.1.0 (listings/ch04-understanding-ownership/no_listing_09_snapshots/Scarb.toml)
    Finished `dev` profile target(s) in 2 seconds
     Running no_listing_09_snapshots
The area of the rectangle when the snapshot was taken is 30
The current area of the rectangle is 50
Run completed successfully, returning []
First, notice that all the tuple code in the variable declaration and the function return value is gone. Second, note that we pass @rec into calculate_area and, in its definition, we take @Rectangle rather than Rectangle.
Let’s take a closer look at the function call here:
let second_length = calculate_length(@arr1); // Calculate the current length of the array
The @rec syntax lets us create a snapshot of the value in rec. Because a snapshot is an immutable view of a value at a specific point in execution, the usual rules of the linear type system are not enforced. In particular, snapshot variables always implement the Drop trait, never the Destruct trait, even dictionary snapshots.
It’s worth noting that @T is not a pointer—snapshots are passed by value to functions, just like regular variables. This means that the size of @T is the same as the size of T, and when you pass @rec to calculate_area, the entire struct (in this case, a Rectangle with two u64 fields) is copied to the function’s stack. For large data structures, this copying can be avoided by using Box<T>—provided that there's no need to mutate the value, which we’ll explore in Chapter 12, but for now, understand that snapshots rely on this by-value mechanism.
Similarly, the signature of the function uses @ to indicate that the type of the parameter arr is a snapshot. Let’s add some explanatory annotations:
fn calculate_area(
    rec_snapshot: @Rectangle // rec_snapshot is a snapshot of a Rectangle
) -> u64 {
    *rec_snapshot.height * *rec_snapshot.width
} // Here, rec_snapshot goes out of scope and is dropped.
// However, because it is only a view of what the original `rec` contains, the original `rec` can still be used.
The scope in which the variable rec_snapshot is valid is the same as any function parameter’s scope, but the underlying value of the snapshot is not dropped when rec_snapshot stops being used. When functions have snapshots as parameters instead of the actual values, we won’t need to return the values in order to give back ownership of the original value, because we never had it.
Desnap Operator
To convert a snapshot back into a regular variable, you can use the desnap operator *, which serves as the opposite of the @ operator.
Only Copy types can be desnapped. However, in the general case, because the value is not modified, the new variable created by the desnap operator reuses the old value, and so desnapping is a completely free operation, just like Copy.
In the following example, we want to calculate the area of a rectangle, but we don't want to take ownership of the rectangle in the calculate_area function, because we might want to use the rectangle again after the function call. Since our function doesn't mutate the rectangle instance, we can pass the snapshot of the rectangle to the function, and then transform the snapshots back into values using the desnap operator *.
#[derive(Drop)]
struct Rectangle {
    height: u64,
    width: u64,
}

fn main() {
    let rec = Rectangle { height: 3, width: 10 };
    let area = calculate_area(@rec);
    println!("Area: {}", area);
}

fn calculate_area(rec: @Rectangle) -> u64 {
    // As rec is a snapshot to a Rectangle, its fields are also snapshots of the fields types.
    // We need to transform the snapshots back into values using the desnap operator `*`.
    // This is only possible if the type is copyable, which is the case for u64.
    // Here, `*` is used for both multiplying the height and width and for desnapping the snapshots.
    *rec.height * *rec.width
}
But, what happens if we try to modify something we’re passing as a snapshot? Try the code in Listing 4-4. Spoiler alert: it doesn’t work!
Filename: src/lib.cairo
#[derive(Copy, Drop)]
struct Rectangle {
    height: u64,
    width: u64,
}

fn main() {
    let rec = Rectangle { height: 3, width: 10 };
    flip(@rec);
}

fn flip(rec: @Rectangle) {
    let temp = rec.height;
    rec.height = rec.width;
    rec.width = temp;
}
Listing 4-4: Attempting to modify a snapshot value
Here’s the error:
$ scarb cairo-run
   Compiling listing_04_04 v0.1.0 (listings/ch04-understanding-ownership/listing_04_attempt_modifying_snapshot/Scarb.toml)
error: Invalid left-hand side of assignment.
 --> listings/ch04-understanding-ownership/listing_04_attempt_modifying_snapshot/src/lib.cairo:15:5
    rec.height = rec.width;
    ^********^

error: Invalid left-hand side of assignment.
 --> listings/ch04-understanding-ownership/listing_04_attempt_modifying_snapshot/src/lib.cairo:16:5
    rec.width = temp;
    ^*******^

error: could not compile `listing_04_04` due to previous error
error: `scarb metadata` exited with error
The compiler prevents us from modifying values associated to snapshots.
Mutable References
We can achieve the behavior we want in Listing 4-4 by using a mutable reference instead of a snapshot. Mutable references are actually mutable values passed to a function that are implicitly returned at the end of the function, returning ownership to the calling context. By doing so, they allow you to mutate the value passed while keeping ownership of it by returning it automatically at the end of the execution.
In Cairo, a parameter can be passed as mutable reference using the ref modifier.
Note: In Cairo, a parameter can only be passed as mutable reference using the
refmodifier if the variable is declared as mutable withmut.
In Listing 4-5, we use a mutable reference to modify the value of the height and width fields of the Rectangle instance in the flip function.
#[derive(Drop)]
struct Rectangle {
    height: u64,
    width: u64,
}

fn main() {
    let mut rec = Rectangle { height: 3, width: 10 };
    flip(ref rec);
    println!("height: {}, width: {}", rec.height, rec.width);
}

fn flip(ref rec: Rectangle) {
    let temp = rec.height;
    rec.height = rec.width;
    rec.width = temp;
}
Listing 4-5: Use of a mutable reference to modify a value
First, we change rec to be mut. Then we pass a mutable reference of rec into flip with ref rec, and update the function signature to accept a mutable reference with ref rec: Rectangle. This makes it very clear that the flip function will mutate the value of the Rectangle instance passed as parameter.
Unlike snapshots, mutable references allow mutation, but like snapshots, ref arguments are not pointers—they are also passed by value. When you pass ref rec, the entire Rectangle type is copied to the function’s stack, regardless of whether it implements Copy. This ensures the function operates on its own local version of the data, which is then implicitly returned to the caller. To avoid this copying for large types, Cairo provides the Box<T> type introduced in Chapter 12 as an alternative, but for this example, the ref modifier suits our needs perfectly.
The output of the program is:
$ scarb cairo-run
   Compiling listing_04_05 v0.1.0 (listings/ch04-understanding-ownership/listing_05_mutable_reference/Scarb.toml)
    Finished `dev` profile target(s) in 3 seconds
     Running listing_04_05
height: 10, width: 3
Run completed successfully, returning []
As expected, the height and width fields of the rec variable have been swapped.
Small Recap
Let’s recap what we’ve discussed about the linear type system, ownership, snapshots, and references:
- At any given time, a variable can only have one owner.
- You can pass a variable by-value, by-snapshot, or by-reference to a function.
- If you pass-by-value, ownership of the variable is transferred to the function.
- If you want to keep ownership of the variable and know that your function won’t mutate it, you can pass it as a snapshot with
@. - If you want to keep ownership of the variable and know that your function will mutate it, you can pass it as a mutable reference with
ref.
Using Structs to Structure Related Data
A struct, or structure, is a custom data type that lets you package together and name multiple related values that make up a meaningful group. If you’re familiar with an object-oriented language, a struct is like an object’s data attributes. In this chapter, we’ll compare and contrast tuples with structs to build on what you already know and demonstrate when structs are a better way to group data.
We’ll demonstrate how to define and instantiate structs. We’ll discuss how to define associated functions, especially the kind of associated functions called methods, to specify behavior associated with a struct type. Structs and enums (discussed in the next chapter) are the building blocks for creating new types in your program’s domain to take full advantage of Cairo's compile-time type checking.
Defining and Instantiating Structs
Structs are similar to tuples, discussed in the Data Types section, in that both hold multiple related values. Like tuples, the pieces of a struct can be different types. Unlike with tuples, in a struct you’ll name each piece of data so it’s clear what the values mean. Adding these names means that structs are more flexible than tuples: you don’t have to rely on the order of the data to specify or access the values of an instance.
To define a struct, we enter the keyword struct and name the entire struct. A struct’s name should describe the significance of the pieces of data being grouped together. Then, inside curly brackets, we define the names and types of the pieces of data, which we call fields. For example, Listing 5-1 shows a struct that stores information about a user account.
Filename: src/lib.cairo
#[derive(Drop)]
struct User {
    active: bool,
    username: ByteArray,
    email: ByteArray,
    sign_in_count: u64,
}
Listing 5-1: A User struct definition
To use a struct after we’ve defined it, we create an instance of that struct by specifying concrete values for each of the fields. We create an instance by stating the name of the struct and then add curly brackets containing key: value pairs, where the keys are the names of the fields and the values are the data we want to store in those fields. We don’t have to specify the fields in the same order in which we declared them in the struct. In other words, the struct definition is like a general template for the type, and instances fill in that template with particular data to create values of the type.
For example, we can declare two particular users as shown in Listing 5-2.
Filename: src/lib.cairo
#[derive(Drop)]
struct User {
    active: bool,
    username: ByteArray,
    email: ByteArray,
    sign_in_count: u64,
}

fn main() {
    let user1 = User {
        active: true, username: "someusername123", email: "someone@example.com", sign_in_count: 1,
    };
    let user2 = User {
        sign_in_count: 1, username: "someusername123", active: true, email: "someone@example.com",
    };
}
Listing 5-2: Creating two instances of the User struct
To get a specific value from a struct, we use dot notation. For example, to access user1's email address, we use user1.email. If the instance is mutable, we can change a value by using the dot notation and assigning into a particular field. Listing 5-3 shows how to change the value in the email field of a mutable User instance.
Filename: src/lib.cairo
#[derive(Drop)]
struct User {
    active: bool,
    username: ByteArray,
    email: ByteArray,
    sign_in_count: u64,
}
fn main() {
    let mut user1 = User {
        active: true, username: "someusername123", email: "someone@example.com", sign_in_count: 1,
    };
    user1.email = "anotheremail@example.com";
}

fn build_user(email: ByteArray, username: ByteArray) -> User {
    User { active: true, username: username, email: email, sign_in_count: 1 }
}

fn build_user_short(email: ByteArray, username: ByteArray) -> User {
    User { active: true, username, email, sign_in_count: 1 }
}
Listing 5-3: Changing the value in the email field of a User instance
Note that the entire instance must be mutable; Cairo doesn’t allow us to mark only certain fields as mutable.
As with any expression, we can construct a new instance of the struct as the last expression in the function body to implicitly return that new instance.
Listing 5-4 shows a build_user function that returns a User instance with the given email and username. The active field gets the value of true, and the sign_in_count gets a value of 1.
Filename: src/lib.cairo
#[derive(Drop)]
struct User {
    active: bool,
    username: ByteArray,
    email: ByteArray,
    sign_in_count: u64,
}
fn main() {
    let mut user1 = User {
        active: true, username: "someusername123", email: "someone@example.com", sign_in_count: 1,
    };
    user1.email = "anotheremail@example.com";
}

fn build_user(email: ByteArray, username: ByteArray) -> User {
    User { active: true, username: username, email: email, sign_in_count: 1 }
}

fn build_user_short(email: ByteArray, username: ByteArray) -> User {
    User { active: true, username, email, sign_in_count: 1 }
}
Listing 5-4: A build_user function that takes an email and username and returns a User instance.
It makes sense to name the function parameters with the same name as the struct fields, but having to repeat the email and username field names and variables is a bit tedious. If the struct had more fields, repeating each name would get even more annoying. Luckily, there’s a convenient shorthand!
Using the Field Init Shorthand
Because the parameter names and the struct field names are exactly the same in Listing 5-4, we can use the field init shorthand syntax to rewrite build_user so it behaves exactly the same but doesn’t have the repetition of username and email, as shown in Listing 5-5.
Filename: src/lib.cairo
#[derive(Drop)]
struct User {
    active: bool,
    username: ByteArray,
    email: ByteArray,
    sign_in_count: u64,
}
fn main() {
    let mut user1 = User {
        active: true, username: "someusername123", email: "someone@example.com", sign_in_count: 1,
    };
    user1.email = "anotheremail@example.com";
}

fn build_user(email: ByteArray, username: ByteArray) -> User {
    User { active: true, username: username, email: email, sign_in_count: 1 }
}

fn build_user_short(email: ByteArray, username: ByteArray) -> User {
    User { active: true, username, email, sign_in_count: 1 }
}
Listing 5-5: A build_user function that uses field init shorthand because the username and email parameters have the same name as struct fields.
Here, we’re creating a new instance of the User struct, which has a field named email. We want to set the email field’s value to the value in the email parameter of the build_user function. Because the email field and the email parameter have the same name, we only need to write email rather than email: email.
Creating Instances from Other Instances with Struct Update Syntax
It’s often useful to create a new instance of a struct that includes most of the values from another instance, but changes some. You can do this using struct update syntax.
First, in Listing 5-6 we show how to create a new User instance in user2
regularly, without the update syntax. We set a new value for email but
otherwise use the same values from user1 that we created in Listing 5-2.
Filename: src/lib.cairo
#[derive(Drop)]
struct User {
    active: bool,
    username: ByteArray,
    email: ByteArray,
    sign_in_count: u64,
}

fn main() {
    // --snip--

    let user1 = User {
        email: "someone@example.com", username: "someusername123", active: true, sign_in_count: 1,
    };

    let user2 = User {
        active: user1.active,
        username: user1.username,
        email: "another@example.com",
        sign_in_count: user1.sign_in_count,
    };
}
Listing 5-6: Creating a new User instance using all but one of the values from user1
Using struct update syntax, we can achieve the same effect with less code, as
shown in Listing 5-7. The syntax .. specifies that the remaining fields not
explicitly set should have the same value as the fields in the given instance.
Filename: src/lib.cairo
use core::byte_array;
#[derive(Drop)]
struct User {
    active: bool,
    username: ByteArray,
    email: ByteArray,
    sign_in_count: u64,
}

fn main() {
    // --snip--

    let user1 = User {
        email: "someone@example.com", username: "someusername123", active: true, sign_in_count: 1,
    };

    let user2 = User { email: "another@example.com", ..user1 };
}
Listing 5-7: Using struct update syntax to set a new
email value for a User instance but to use the rest of the values from user1
The code in Listing 5-7 also creates an instance of user2 that has a
different value for email but has the same values for the username,
active, and sign_in_count fields as user1. The ..user1 part must come last
to specify that any remaining fields should get their values from the
corresponding fields in user1, but we can choose to specify values for as
many fields as we want in any order, regardless of the order of the fields in
the struct’s definition.
Note that the struct update syntax uses = like an assignment; this is because it moves the data,
just as we saw in the "Moving Values" section. In this example, we can no
longer use user1 as a whole after creating user2 because the ByteArray in the
username field of user1 was moved into user2. If we had given user2 new
ByteArray values for both email and username, and thus only used the
active and sign_in_count values from user1, then user1 would still be
valid after creating user2. Both active and sign_in_count are types that
implement the Copy trait, so the behavior we discussed in the "Copy Trait" section would apply.
An Example Program Using Structs
To understand when we might want to use structs, let’s write a program that calculates the area of a rectangle. We’ll start by using single variables, and then refactor the program until we’re using structs instead.
Let’s make a new project with Scarb called rectangles that will take the width and height of a rectangle specified in pixels and calculate the area of the rectangle. Listing 5-8 shows a short program with one way of doing exactly that in our project’s src/lib.cairo.
Filename: src/lib.cairo
fn main() {
    let width = 30;
    let height = 10;
    let area = area(width, height);
    println!("Area is {}", area);
}

fn area(width: u64, height: u64) -> u64 {
    width * height
}
Listing 5-8: Calculating the area of a rectangle specified by separate width and height variables.
Now run the program with scarb cairo-run:
$ scarb cairo-run
   Compiling listing_04_06_no_struct v0.1.0 (listings/ch05-using-structs-to-structure-related-data/listing_03_no_struct/Scarb.toml)
    Finished `dev` profile target(s) in 3 seconds
     Running listing_04_06_no_struct
Area is 300
Run completed successfully, returning []
This code succeeds in figuring out the area of the rectangle by calling the area function with each dimension, but we can do more to make this code clear and readable.
The issue with this code is evident in the signature of area:
fn area(width: u64, height: u64) -> u64 {
The area function is supposed to calculate the area of one rectangle, but the function we wrote has two parameters, and it’s not clear anywhere in our program that the parameters are related. It would be more readable and more manageable to group width and height together. We’ve already discussed one way we might do that in the Tuple Section of Chapter 2.
Refactoring with Tuples
Listing 5-9 shows another version of our program that uses tuples.
Filename: src/lib.cairo
fn main() {
    let rectangle = (30, 10);
    let area = area(rectangle);
    println!("Area is {}", area);
}

fn area(dimension: (u64, u64)) -> u64 {
    let (x, y) = dimension;
    x * y
}
Listing 5-9: Specifying the width and height of the rectangle with a tuple.
In one way, this program is better. Tuples let us add a bit of structure, and we’re now passing just one argument. But in another way, this version is less clear: tuples don’t name their elements, so we have to index into the parts of the tuple, making our calculation less obvious.
Mixing up the width and height wouldn’t matter for the area calculation, but if we want to calculate the difference, it would matter! We would have to keep in mind that width is the tuple index 0 and height is the tuple index 1. This would be even harder for someone else to figure out and keep in mind if they were to use our code. Because we haven’t conveyed the meaning of our data in our code, it’s now easier to introduce errors.
Refactoring with Structs: Adding More Meaning
We use structs to add meaning by labeling the data. We can transform the tuple we’re using into a struct with a name for the whole as well as names for the parts.
Filename: src/lib.cairo
struct Rectangle {
    width: u64,
    height: u64,
}

fn main() {
    let rectangle = Rectangle { width: 30, height: 10 };
    let area = area(rectangle);
    println!("Area is {}", area);
}

fn area(rectangle: Rectangle) -> u64 {
    rectangle.width * rectangle.height
}
Listing 5-10: Defining a Rectangle struct.
Here we’ve defined a struct and named it Rectangle. Inside the curly brackets, we defined the fields as width and height, both of which have type u64. Then, in main, we created a particular instance of Rectangle that has a width of 30 and a height of 10. Our area function is now defined with one parameter, which we’ve named rectangle which is of type Rectangle struct. We can then access the fields of the instance with dot notation, and it gives descriptive names to the values rather than using the tuple index values of 0 and 1.
Conversions of Custom Types
We've already described how to perform type conversion on in-built types, see Data Types > Type Conversion. In this section, we will see how to define conversions for custom types.
Note: conversion can be defined for compound types, e.g. tuples, too.
Into
Defining a conversion for a custom type using the Into trait will typically require specification of the type to convert into, as the compiler is unable to determine this most of the time. However this is a small trade-off considering we get the functionality for free.
// Compiler automatically imports the core library, so you can omit this import
use core::traits::Into;

#[derive(Drop, PartialEq)]
struct Rectangle {
    width: u64,
    height: u64,
}

#[derive(Drop)]
struct Square {
    side_length: u64,
}

impl SquareIntoRectangle of Into<Square, Rectangle> {
    fn into(self: Square) -> Rectangle {
        Rectangle { width: self.side_length, height: self.side_length }
    }
}

fn main() {
    let square = Square { side_length: 5 };
    // Compiler will complain if you remove the type annotation
    let result: Rectangle = square.into();
    let expected = Rectangle { width: 5, height: 5 };
    assert!(
        result == expected,
        "A square is always convertible to a rectangle with the same width and height!",
    );
}
TryInto
Defining a conversion for TryInto is similar to defining it for Into.
// Compiler automatically imports the core library, so you can omit this import
use core::traits::TryInto;

#[derive(Drop)]
struct Rectangle {
    width: u64,
    height: u64,
}

#[derive(Drop, PartialEq)]
struct Square {
    side_length: u64,
}

impl RectangleIntoSquare of TryInto<Rectangle, Square> {
    fn try_into(self: Rectangle) -> Option<Square> {
        if self.height == self.width {
            Some(Square { side_length: self.height })
        } else {
            None
        }
    }
}

fn main() {
    let rectangle = Rectangle { width: 8, height: 8 };
    let result: Square = rectangle.try_into().unwrap();
    let expected = Square { side_length: 8 };
    assert!(
        result == expected,
        "Rectangle with equal width and height should be convertible to a square.",
    );

    let rectangle = Rectangle { width: 5, height: 8 };
    let result: Option<Square> = rectangle.try_into();
    assert!(
        result.is_none(),
        "Rectangle with different width and height should not be convertible to a square.",
    );
}
Method Syntax
Methods are similar to functions: we declare them with the fn keyword and a name, they can have parameters and a return value, and they contain some code that’s run when the method is called from somewhere else. Unlike functions, methods are defined within the context of a struct (or an enum which we cover in Chapter 6), and their first parameter is always self, which represents the instance of the type the method is being called on.
Defining Methods
Let’s change the area function that has a Rectangle instance as a parameter and instead make an area method defined on the Rectangle struct, as shown in Listing 5-11
#[derive(Copy, Drop)]
struct Rectangle {
    width: u64,
    height: u64,
}

trait RectangleTrait {
    fn area(self: @Rectangle) -> u64;
}

impl RectangleImpl of RectangleTrait {
    fn area(self: @Rectangle) -> u64 {
        (*self.width) * (*self.height)
    }
}

fn main() {
    let rect1 = Rectangle { width: 30, height: 50 };
    println!("Area is {}", rect1.area());
}
Listing 5-11: Defining an area method on the Rectangle struct.
To define the function within the context of Rectangle, we start an impl (implementation) block for a trait RectangleTrait that defines the methods that can be called on a Rectangle instance. As impl blocks can only be defined for traits and not types, we need to define this trait first - but it's not meant to be used for anything else.
Everything within this impl block will be associated with the Rectangle type. Then we move the area function within the impl curly brackets and change the first (and in this case, only) parameter to be self in the signature and everywhere within the body. In main, where we called the area function and passed rect1 as an argument, we can instead use method syntax to call the area method on our Rectangle instance. The method syntax goes after an instance: we add a dot followed by the method name, parentheses, and any arguments.
In the signature for area, we use self: @Rectangle instead of rectangle: @Rectangle.
Methods must have a parameter named self, for their first parameter, and the type of self indicates the type that method can be called on. Methods can take ownership of self, but self can also be passed by snapshot or by reference, just like any other parameter.
There is no direct link between a type and a trait. Only the type of the
selfparameter of a method defines the type from which this method can be called. That means, it is technically possible to define methods on multiple types in a same trait (mixingRectangleandCirclemethods, for example). But this is not a recommended practice as it can lead to confusion.
The main reason for using methods instead of functions, in addition to providing method syntax, is for organization. We’ve put all the things we can do with an instance of a type in one impl block rather than making future users of our code search for capabilities of Rectangle in various places in the library we provide.
The generate_trait Attribute
If you are familiar with Rust, you may find Cairo's approach confusing because methods cannot be defined directly on types. Instead, you must define a trait and an implementation of this trait associated with the type for which the method is intended. However, defining a trait and then implementing it to define methods on a specific type is verbose, and unnecessary: the trait itself will not be reused.
So, to avoid defining useless traits, Cairo provides the #[generate_trait] attribute to add above a trait implementation, which tells the compiler to generate the corresponding trait definition for you, and let's you focus on the implementation only. Both approaches are equivalent, but it's considered a best practice to not explicitly define traits in this case.
The previous example can also be written as follows:
#[derive(Copy, Drop)]
struct Rectangle {
    width: u64,
    height: u64,
}

#[generate_trait]
impl RectangleImpl of RectangleTrait {
    fn area(self: @Rectangle) -> u64 {
        (*self.width) * (*self.height)
    }
}

fn main() {
    let rect1 = Rectangle { width: 30, height: 50 };
    println!("Area is {}", rect1.area());
}
Let's use this #[generate_trait] in the following chapters to make our code cleaner.
Snapshots and References
As the area method does not modify the calling instance, self is declared as a snapshot of a Rectangle instance with the @ snapshot operator. But, of course, we can also define some methods receiving a mutable reference of this instance, to be able to modify it.
Let's write a new method scale which resizes a rectangle of a factor given as parameter:
#[generate_trait]
impl RectangleImpl of RectangleTrait {
    fn area(self: @Rectangle) -> u64 {
        (*self.width) * (*self.height)
    }
    fn scale(ref self: Rectangle, factor: u64) {
        self.width *= factor;
        self.height *= factor;
    }
}

fn main() {
    let mut rect2 = Rectangle { width: 10, height: 20 };
    rect2.scale(2);
    println!("The new size is (width: {}, height: {})", rect2.width, rect2.height);
}
It is also possible to define a method which takes ownership of the instance by using just self as the first parameter but it is rare. This technique is usually used when the method transforms self into something else and you want to prevent the caller from using the original instance after the transformation.
Look at the Understanding Ownership chapter for more details about these important notions.
Methods with Several Parameters
Let’s practice using methods by implementing another method on the Rectangle struct. This time we want to write the method can_hold which accepts another instance of Rectangle and returns true if this rectangle can fit completely within self; otherwise, it should return false.
#[generate_trait]
impl RectangleImpl of RectangleTrait {
    fn area(self: @Rectangle) -> u64 {
        *self.width * *self.height
    }

    fn scale(ref self: Rectangle, factor: u64) {
        self.width *= factor;
        self.height *= factor;
    }

    fn can_hold(self: @Rectangle, other: @Rectangle) -> bool {
        *self.width > *other.width && *self.height > *other.height
    }
}

fn main() {
    let rect1 = Rectangle { width: 30, height: 50 };
    let rect2 = Rectangle { width: 10, height: 40 };
    let rect3 = Rectangle { width: 60, height: 45 };

    println!("Can rect1 hold rect2? {}", rect1.can_hold(@rect2));
    println!("Can rect1 hold rect3? {}", rect1.can_hold(@rect3));
}
Here, we expect that rect1 can hold rect2 but not rect3.
Associated functions
We call associated functions all functions that are defined inside an impl block that are associated to a specific type. While this is not enforced by the compiler, it is a good practice to keep associated functions related to the same type in the same impl block - for example, all functions related to Rectangle will be grouped in the same impl block for RectangleTrait.
Methods are a special kind of associated function, but we can also define associated functions that don’t have self as their first parameter (and thus are not methods) because they don’t need an instance of the type to work with, but are still associated with that type.
Associated functions that aren’t methods are often used for constructors that
will return a new instance of the type. These are often called new, but
new isn’t a special name and isn’t built into the language. For example, we
could choose to provide an associated function named square that would have
one dimension parameter and use that as both width and height, thus making it
easier to create a square Rectangle rather than having to specify the same
value twice:
Let's create the function new which creates a Rectangle from a width and a height, square which creates a square Rectangle from a size and avg which computes the average of two Rectangle instances:
#[generate_trait]
impl RectangleImpl of RectangleTrait {
    fn area(self: @Rectangle) -> u64 {
        (*self.width) * (*self.height)
    }

    fn new(width: u64, height: u64) -> Rectangle {
        Rectangle { width, height }
    }

    fn square(size: u64) -> Rectangle {
        Rectangle { width: size, height: size }
    }

    fn avg(lhs: @Rectangle, rhs: @Rectangle) -> Rectangle {
        Rectangle {
            width: ((*lhs.width) + (*rhs.width)) / 2, height: ((*lhs.height) + (*rhs.height)) / 2,
        }
    }
}

fn main() {
    let rect1 = RectangleTrait::new(30, 50);
    let rect2 = RectangleTrait::square(10);

    println!(
        "The average Rectangle of {:?} and {:?} is {:?}",
        @rect1,
        @rect2,
        RectangleTrait::avg(@rect1, @rect2),
    );
}
To call the square associated function, we use the :: syntax with the struct name;
let sq = RectangleTrait::square(3); is an example. This function is namespaced by
the trait: the :: syntax is used for both associated functions and
namespaces created by modules. We’ll discuss modules in Chapter
7.
Note that the avg function could also be written as a method with self as the first rectangle. In this case, instead of using the method with RectangleTrait::avg(@rect1, @rect2), it would be called with rect1.avg(rect2).
Multiple Traits and impl Blocks
Each struct is allowed to have multiple trait and impl blocks. For example,
the following code is equivalent to the code shown in the Methods with several parameters section, which has each method in its own trait and impl blocks.
#[generate_trait]
impl RectangleCalcImpl of RectangleCalc {
    fn area(self: @Rectangle) -> u64 {
        (*self.width) * (*self.height)
    }
}

#[generate_trait]
impl RectangleCmpImpl of RectangleCmp {
    fn can_hold(self: @Rectangle, other: @Rectangle) -> bool {
        *self.width > *other.width && *self.height > *other.height
    }
}
There’s no strong reason to separate these methods into multiple trait and impl
blocks here, but this is valid syntax.
Enums and Pattern Matching
In this chapter, we’ll look at enumerations, also referred to as enums.
Enums allow you to define a type by enumerating its possible variants. First,
we’ll define and use an enum to show how an enum can encode meaning along with
data. Next, we’ll explore a particularly useful enum, called Option, which
expresses that a value can be either something or nothing. Finally, we’ll look at
how pattern matching in the match expression makes it easy to run different
code for different values of an enum.
Enums
Enums, short for "enumerations," are a way to define a custom data type that consists of a fixed set of named values, called variants. Enums are useful for representing a collection of related values where each value is distinct and has a specific meaning.
Enum Variants and Values
Here's a simple example of an enum:
#[derive(Drop)]
enum Direction {
    North,
    East,
    South,
    West,
}
In this example, we've defined an enum called Direction with four variants: North, East, South, and West. The naming convention is to use PascalCase for enum variants. Each variant represents a distinct value of the Direction type. In this particular example, variants don't have any associated value. One variant can be instantiated using this syntax:
#[derive(Drop)]
enum Direction {
    North,
    East,
    South,
    West,
}

fn main() {
    let direction = Direction::North;
}
Now let's imagine that our variants have associated values, that store the exact degree of the direction. We can define a new Direction enum:
#[derive(Drop)]
enum Direction {
    North: u128,
    East: u128,
    South: u128,
    West: u128,
}

fn main() {
    let direction = Direction::North(10);
}
and instantiate it as follows:
#[derive(Drop)]
enum Direction {
    North: u128,
    East: u128,
    South: u128,
    West: u128,
}

fn main() {
    let direction = Direction::North(10);
}
In this code, each variant is associated with a u128 value, representing the direction in degrees. In the next example, we will see that it is also possible to associate different data types with each variant.
It's easy to write code that acts differently depending on the variant of an enum instance, in this example to run specific code according to a direction. You can learn more about it in the Match Control Flow Construct section.
Enums Combined with Custom Types
Enums can also be used to store more interesting custom data associated with each variant. For example:
#[derive(Drop)]
enum Message {
    Quit,
    Echo: felt252,
    Move: (u128, u128),
}
In this example, the Message enum has three variants: Quit, Echo, and Move, all with different types:
Quitdoesn't have any associated value.Echois a singlefelt252.Moveis a tuple of twou128values.
You could even use a Struct or another enum you defined inside one of your enum variants.
Trait Implementations for Enums
In Cairo, you can define traits and implement them for your custom enums. This allows you to define methods and behaviors associated with the enum. Here's an example of defining a trait and implementing it for the previous Message enum:
trait Processing {
    fn process(self: Message);
}

impl ProcessingImpl of Processing {
    fn process(self: Message) {
        match self {
            Message::Quit => { println!("quitting") },
            Message::Echo(value) => { println!("echoing {}", value) },
            Message::Move((x, y)) => { println!("moving from {} to {}", x, y) },
        }
    }
}
In this example, we implemented the Processing trait for Message. Here is how it could be used to process a Quit message:
#[derive(Drop)]
enum Message {
    Quit,
    Echo: felt252,
    Move: (u128, u128),
}

trait Processing {
    fn process(self: Message);
}

impl ProcessingImpl of Processing {
    fn process(self: Message) {
        match self {
            Message::Quit => { println!("quitting") },
            Message::Echo(value) => { println!("echoing {}", value) },
            Message::Move((x, y)) => { println!("moving from {} to {}", x, y) },
        }
    }
}
fn main() {
    let msg: Message = Message::Quit;
    msg.process(); // prints "quitting"
}
The Option Enum and Its Advantages
The Option enum is a standard Cairo enum that represents the concept of an optional value. It has two variants: Some: T and None. Some: T indicates that there's a value of type T, while None represents the absence of a value.
enum Option<T> {
    Some: T,
    None,
}
The Option enum is helpful because it allows you to explicitly represent the possibility of a value being absent, making your code more expressive and easier to reason about. Using Option can also help prevent bugs caused by using uninitialized or unexpected null values.
To give you an example, here is a function which returns the index of the first element of an array with a given value, or None if the element is not present.
We are demonstrating two approaches for the above function:
- Recursive approach with
find_value_recursive. - Iterative approach with
find_value_iterative.
fn find_value_recursive(mut arr: Span<felt252>, value: felt252, index: usize) -> Option<usize> {
    match arr.pop_front() {
        Some(index_value) => { if (*index_value == value) {
            return Some(index);
        } },
        None => { return None; },
    };

    find_value_recursive(arr, value, index + 1)
}

fn find_value_iterative(mut arr: Span<felt252>, value: felt252) -> Option<usize> {
    let mut result = None;
    let mut index = 0;

    while let Some(array_value) = arr.pop_front() {
        if (*array_value == value) {
            result = Some(index);
            break;
        };

        index += 1;
    };

    result
}
Enums can be useful in many situations, especially when using the match flow construct that we just used. We will describe it in the next section.
Other enums are used very often, such as the Result enum, allowing to handle errors gracefully. We will explain the Result enum in detail in the "Error Handling" chapter.
The Match Control Flow Construct
Cairo has an extremely powerful control flow construct called match that allows you to compare a value against a series of patterns and then execute code based on which pattern matches. Patterns can be made up of literal values, variable names, wildcards, and many other things. The power of match comes from the expressiveness of the patterns and the fact that the compiler confirms that all possible cases are handled.
Think of a match expression as being like a coin-sorting machine: coins slide down a track with variously sized holes along it, and each coin falls through the first hole it encounters that it fits into. In the same way, values go through each pattern in a match, and at the first pattern the value “fits”, the value falls into the associated code block to be used during execution.
Speaking of coins, let’s use them as an example using match! We can write a function that takes an unknown US coin and, in a similar way as the counting machine, determines which coin it is and returns its value in cents, as shown in Listing 6-1.
enum Coin {
    Penny,
    Nickel,
    Dime,
    Quarter,
}

fn value_in_cents(coin: Coin) -> felt252 {
    match coin {
        Coin::Penny => 1,
        Coin::Nickel => 5,
        Coin::Dime => 10,
        Coin::Quarter => 25,
    }
}
Listing 6-1: An enum and a match expression that has the variants of the enum as its patterns
Let’s break down the match expression in the value_in_cents function. First, we list the match keyword followed by an expression, which in this case is the value coin. This seems very similar to a conditional expression used with the if statement, but there’s a big difference: with if, the condition needs to evaluate to a boolean value, but here it can be any type. The type of coin in this example is the Coin enum that we defined on the first line.
Next are the match arms. An arm has two parts: a pattern and some code. The first arm here has a pattern that is the value Coin::Penny and then the => operator that separates the pattern and the code to run. The code in this case is just the value 1. Each arm is separated from the next with a comma.
When the match expression executes, it compares the resultant value against the pattern of each arm, in the order they are given. If a pattern matches the value, the code associated with that pattern is executed. If that pattern doesn’t match the value, execution continues to the next arm, much as in a coin-sorting machine. We can have as many arms as we need: in the above example, our match has four arms.
The code associated with each arm is an expression, and the resultant value of the expression in the matching arm is the value that gets returned for the entire match expression.
We don’t typically use curly brackets if the match arm code is short, as it is in our example where each arm just returns a value. If you want to run multiple lines of code in a match arm, you must use curly brackets, with a comma following the arm. For example, the following code prints “Lucky penny!” every time the method is called with a Coin::Penny, but still returns the last value of the block, 1:
fn value_in_cents(coin: Coin) -> felt252 {
    match coin {
        Coin::Penny => {
            println!("Lucky penny!");
            1
        },
        Coin::Nickel => 5,
        Coin::Dime => 10,
        Coin::Quarter => 25,
    }
}
Patterns That Bind to Values
Another useful feature of match arms is that they can bind to the parts of the values that match the pattern. This is how we can extract values out of enum variants.
As an example, let’s change one of our enum variants to hold data inside it. From 1999 through 2008, the United States minted quarters with different designs for each of the 50 states on one side. No other coins got state designs, so only quarters have this extra value. We can add this information to our enum by changing the Quarter variant to include a UsState value stored inside it, which we’ve done in Listing 6-2.
#[derive(Drop, Debug)] // Debug so we can inspect the state in a minute
enum UsState {
    Alabama,
    Alaska,
}

#[derive(Drop)]
enum Coin {
    Penny,
    Nickel,
    Dime,
    Quarter: UsState,
}
Listing 6-2: A Coin enum in which the Quarter variant also holds a UsState value
Let’s imagine that a friend is trying to collect all 50 state quarters. While we sort our loose change by coin type, we’ll also call out the name of the state associated with each quarter so that if it’s one our friend doesn’t have, they can add it to their collection.
In the match expression for this code, we add a variable called state to the pattern that matches values of the variant Coin::Quarter. When a Coin::Quarter matches, the state variable will bind to the value of that quarter’s state. Then we can use state in the code for that arm, like so:
fn value_in_cents(coin: Coin) -> felt252 {
    match coin {
        Coin::Penny => 1,
        Coin::Nickel => 5,
        Coin::Dime => 10,
        Coin::Quarter(state) => {
            println!("State quarter from {:?}!", state);
            25
        },
    }
}
Because state is an UsState enum which implements the Debug trait, we can print state value with println! macro.
Note:
{:?}is a special formatting syntax that allows to print a debug form of the parameter passed to theprintln!macro. You can find more information about it in Appendix C.
If we were to call value_in_cents(Coin::Quarter(UsState::Alaska)), coin would be Coin::Quarter(UsState::Alaska). When we compare that value with each of the match arms, none of them match until we reach Coin::Quarter(state). At that point, the binding for state will be the value UsState::Alaska. We can then use that binding in println! macro, thus getting the inner state value out of the Coin enum variant for Quarter.
Matching with Option<T>
In the previous section, we wanted to get the inner T value out of the Some case when using Option<T>; we can also handle Option<T> using match, as we did with the Coin enum! Instead of comparing coins, we’ll compare the variants of Option<T>, but the way the match expression works remains the same.
Let’s say we want to write a function that takes an Option<u8> and, if there’s a value inside, adds 1 to that value. If there is no value inside, the function should return the None value and not attempt to perform any operations.
This function is very easy to write, thanks to match, and will look like Listing 6-3.
fn plus_one(x: Option<u8>) -> Option<u8> {
    match x {
        Some(val) => Some(val + 1),
        None => None,
    }
}

fn main() {
    let five: Option<u8> = Some(5);
    let six: Option<u8> = plus_one(five);
    let none = plus_one(None);
}
Listing 6-3: A function that uses a match expression on an Option<u8>
Let’s examine the first execution of plus_one in more detail. When we call plus_one(five), the variable x in the body of plus_one will have the value Some(5). We then compare that against each match arm:
Some(val) => Some(val + 1),
Does Some(5) value match the pattern Some(val)? It does! We have the same variant. The val binds to the value contained in Some, so val takes the value 5. The code in the match arm is then executed, so we add 1 to the value of val and create a new Some value with our total 6 inside. Because the first arm matched, no other arms are compared.
Now let’s consider the second call of plus_one in our main function, where x is None. We enter the match and compare to the first arm:
Some(val) => Some(val + 1),
The Some(val) value doesn’t match the pattern None, so we continue to the next arm:
None => None,
It matches! There’s no value to add to, so the matching construct ends and returns the None value on the right side of =>.
Combining match and enums is useful in many situations. You’ll see this pattern a lot in Cairo code: match against an enum, bind a variable to the data inside, and then execute code based on it. It’s a bit tricky at first, but once you get used to it, you’ll wish you had it in all languages. It’s consistently a user favorite.
Matches Are Exhaustive
There’s one other aspect of match we need to discuss: the arms’ patterns must cover all possibilities. Consider this version of our plus_one function, which has a bug and won’t compile:
fn plus_one(x: Option<u8>) -> Option<u8> {
    match x {
        Some(val) => Some(val + 1),
    }
}
We didn’t handle the None case, so this code will cause a bug.
Luckily, it’s a bug Cairo knows how to catch. If we try to compile this code, we’ll get this error:
$ scarb cairo-run
   Compiling no_listing_08_missing_match_arm v0.1.0 (listings/ch06-enums-and-pattern-matching/no_listing_09_missing_match_arm/Scarb.toml)
error: Missing match arm: `None` not covered.
 --> listings/ch06-enums-and-pattern-matching/no_listing_09_missing_match_arm/src/lib.cairo:5:5
    match x {
    ^*******^

error: could not compile `no_listing_08_missing_match_arm` due to previous error
error: `scarb metadata` exited with error
Cairo knows that we didn’t cover every possible case, and even knows which pattern we forgot! Matches in Cairo are exhaustive: we must exhaust every last possibility in order for the code to be valid. Especially in the case of Option<T>, when Cairo prevents us from forgetting to explicitly handle the None case, it protects us from assuming that we have a value when we might have null, thus making the billion-dollar mistake discussed earlier impossible.
Catch-all with the _ Placeholder
Using enums, we can also take special actions for a few particular values, but for all other values take one default action.
_ is a special pattern that matches any value and does not bind to that value.
You can use it by simply adding a new arm with _ as the pattern for the last arm of the match expression.
Imagine we have a vending machine that only accepts Dime coins.
We want to have a function that processes inserted coins and returns true only if the coin is accepted.
Here's a vending_machine_accept function that implements this logic:
fn vending_machine_accept(coin: Coin) -> bool {
    match coin {
        Coin::Dime => true,
        _ => false,
    }
}
This example also meets the exhaustiveness requirement because we’re explicitly ignoring all other values in the last arm; we haven’t forgotten anything.
There's no catch-all pattern in Cairo that allows you to use the value of the pattern.
Multiple Patterns with the | Operator
In match expressions, you can match multiple patterns using the | syntax, which is the pattern or operator.
For example, in the following code we modified the vending_machine_accept function to accept both Dime and Quarter coins in a single arm:
fn vending_machine_accept(coin: Coin) -> bool {
    match coin {
        Coin::Dime | Coin::Quarter => true,
        _ => false,
    }
}
Matching Tuples
It is possible to match tuples.
Let's introduce a new DayType enum:
#[derive(Drop)]
enum DayType {
    Week,
    Weekend,
    Holiday,
}
Now, let's suppose that our vending machine accepts any coin on weekdays, but only accepts quarters and dimes on weekends and holidays.
We can modify the vending_machine_accept function to accept a tuple of a Coin and a Weekday and return true only if the given coin is accepted on the specified day:
fn vending_machine_accept(c: (DayType, Coin)) -> bool {
    match c {
        (DayType::Week, _) => true,
        (_, Coin::Dime) | (_, Coin::Quarter) => true,
        (_, _) => false,
    }
}
Writing (_, _) for the last arm of a tuple matching pattern might feel superfluous. Hence, we can use the _ => syntax if we want, for example, that our vending machine only accepts quarters on weekdays:
fn vending_week_machine(c: (DayType, Coin)) -> bool {
    match c {
        (DayType::Week, Coin::Quarter) => true,
        _ => false,
    }
}
Matching felt252 and Integer Variables
You can also match felt252 and integer variables. This is useful when you want to match against a range of values.
However, there are some restrictions:
- Only integers that fit into a single
felt252are supported (i.e.u256is not supported). - The first arm must be 0.
- Each arm must cover a sequential segment, contiguously with other arms.
Imagine we’re implementing a game where you roll a six-sided die to get a number between 0 and 5. If you have 0, 1 or 2 you win. If you have 3, you can roll again. For all other values you lose.
Here's a match that implements that logic:
fn roll(value: u8) {
    match value {
        0 | 1 | 2 => println!("you won!"),
        3 => println!("you can roll again!"),
        _ => println!("you lost..."),
    }
}
These restrictions are planned to be relaxed in future versions of Cairo.
Concise Control Flow with if let and while let
if let
The if let syntax lets you combine if and let into a less verbose way to handle values that match one pattern while ignoring the rest. Consider the program in Listing 6-4 that matches on an Some<u8> value in the config_max variable but only wants to execute code if the value is Some variant.
fn main() {
    let config_max = Some(5);
    match config_max {
        Some(max) => println!("The maximum is configured to be {}", max),
        _ => (),
    }
}
Listing 6-4: A match that only cares about executing
code when the value is Some
If the value is Some, we print out the value in the Some variant by binding
the value to the variable max in the pattern. We don’t want to do anything
with the None value. To satisfy the match expression, we have to add _ => () after processing just one variant, which is annoying boilerplate code to
add.
Instead, we could write this in a shorter way using if let. The following
code behaves the same as the match in Listing 6-4:
fn main() {
    let number = Some(5);
    if let Some(max) = number {
        println!("The maximum is configured to be {}", max);
    }
}
The syntax if let takes a pattern and an expression separated by an equal
sign. It works the same way as a match, where the expression is given to the
match and the pattern is its first arm. In this case, the pattern is
Some(max), and max binds to the value inside Some. We can then
use max in the body of the if let block in the same way we used max in
the corresponding match arm. The code in the if let block isn’t run if the
value doesn’t match the pattern.
Using if let means less typing, less indentation, and less boilerplate code.
However, you lose the exhaustive checking that match enforces. Choosing
between match and if let depends on what you’re doing in your particular
situation and whether gaining conciseness is an appropriate trade-off for
losing exhaustive checking.
In other words, you can think of if let as syntactic sugar for a match that
runs code when the value matches one pattern and then ignores all other values.
We can include an else with an if let. The block of code that goes with else
is the same as the block of code that would go with the _ case in the match
expression. Recall the Coin enum definition in Listing 6-2,
where the Quarter variant also held a UsState value. If we wanted to count
all non-quarter coins we see while also announcing the state of the quarters,
we could do that with a match expression, like this:
#[derive(Drop)]
enum Coin {
    Penny,
    Nickel,
    Dime,
    Quarter,
}

fn main() {
    let coin = Coin::Quarter;
    let mut count = 0;
    match coin {
        Coin::Quarter => println!("You got a quarter!"),
        _ => count += 1,
    }
}
Or we could use an if let and else expression, like this:
#[derive(Drop)]
enum Coin {
    Penny,
    Nickel,
    Dime,
    Quarter,
}

fn main() {
    let coin = Coin::Quarter;
    let mut count = 0;
    if let Coin::Quarter = coin {
        println!("You got a quarter!");
    } else {
        count += 1;
    }
    println!("{}", count);
}
If you have a situation in which your program has logic that is too verbose to
express using match, remember that if let is in your Cairo toolbox as well.
while let
The while let syntax is similar to the if let syntax, but it allows you to loop over a collection of values and execute a block of code for each value that matches a specified pattern. In the case below, the pattern is Some(x), which matches any Some variant of the Option enum.
fn main() {
    let mut arr = array![1, 2, 3, 4, 5, 6, 7, 8, 9];
    let mut sum = 0;
    while let Some(value) = arr.pop_front() {
        sum += value;
    }
    println!("{}", sum);
}
Using while let provides a more concise and idiomatic way of writing this loop compared to a traditional while loop with explicit pattern matching or handling of the Option type. However, as with if let, you lose the exhaustive checking that a match expression provides, so you need to be careful to handle any remaining cases outside the while let loop if necessary.
Managing Cairo Projects with Packages, Crates and Modules
As you write large programs, organizing your code will become increasingly important. By grouping related functionality and separating code with distinct features, you’ll clarify where to find code that implements a particular feature and where to go to change how a feature works.
The programs we’ve written so far have been in one module in one file. As a project grows, you should organize code by splitting it into multiple modules and then multiple files. As a package grows, you can extract parts into separate crates that become external dependencies. This chapter covers all these techniques.
We’ll also discuss encapsulating implementation details, which lets you reuse code at a higher level: once you’ve implemented an operation, other code can call your code without having to know how the implementation works.
A related concept is scope: the nested context in which code is written has a set of names that are defined as “in scope”. When reading, writing, and compiling code, programmers and compilers need to know whether a particular name at a particular spot refers to a variable, function, struct, enum, module, constant, or other item and what that item means. You can create scopes and change which names are in or out of scope. You can’t have two items with the same name in the same scope.
Cairo has a number of features that allow you to manage your code’s organization. These features, sometimes collectively referred to as the module system, include:
- Packages: A Scarb feature that lets you build, test, and share crates.
- Crates: A tree of modules that corresponds to a single compilation unit. It has a root directory, and a root module defined at the lib.cairo file under this directory.
- Modules and use: Let you control the organization and scope of items.
- Paths: A way of naming an item, such as a struct, function, or module.
In this chapter, we’ll cover all these features, discuss how they interact, and explain how to use them to manage scope. By the end, you should have a solid understanding of the module system and be able to work with scopes like a pro!
Packages and Crates
What is a Crate?
A crate is a subset of a package that is used in the actual Cairo compilation. This includes:
- The package source code, identified by the package name and the crate root, which is the main entry point of the package.
- A subset of the package metadata that identifies crate-level settings of the Cairo compiler, for example, the
editionfield in the Scarb.toml file.
Crates can contain modules, and the modules may be defined in other files that get compiled with the crate, as will be discussed in the subsequent sections.
What is the Crate Root?
The crate root is the lib.cairo source file that the Cairo compiler starts from and makes up the root module of your crate. We’ll explain modules in depth in the "Defining Modules to Control Scope" chapter.
What is a Package?
A Cairo package is a directory (or equivalent) containing:
- A Scarb.toml manifest file with a
[package]section. - Associated source code.
This definition implies that a package might contain other packages, with a corresponding Scarb.toml file for each package.
Creating a Package with Scarb
You can create a new Cairo package using the Scarb command-line tool. To create a new package, run the following command:
scarb new my_package
This command will generate a new package directory named my_package with the following structure:
my_package/
├── Scarb.toml
└── src
    └── lib.cairo
- src/ is the main directory where all the Cairo source files for the package will be stored.
- lib.cairo is the default root module of the crate, which is also the main entry point of the package.
- Scarb.toml is the package manifest file, which contains metadata and configuration options for the package, such as dependencies, package name, version, and authors. You can find documentation about it on the Scarb reference.
[package]
name = "my_package"
version = "0.1.0"
edition = "2024_07"

[dependencies]
# foo = { path = "vendor/foo" }
As you develop your package, you may want to organize your code into multiple Cairo source files. You can do this by creating additional .cairo files within the src directory or its subdirectories.
Defining Modules to Control Scope
In this section, we’ll talk about modules and other parts of the module system,
namely paths that allow you to name items and the use keyword that brings a
path into scope.
First, we’re going to start with a list of rules for easy reference when you’re organizing your code in the future. Then we’ll explain each of the rules in detail.
Modules Cheat Sheet
Here we provide a quick reference on how modules, paths and the use keyword
work in the compiler, and how most developers organize their
code. We’ll be going through examples of each of these rules throughout this
chapter, but this is a great place to refer to as a reminder of how modules
work. You can create a new Scarb project with scarb new backyard to follow along.
-
Start from the crate root: When compiling a crate, the compiler first looks in the crate root file (src/lib.cairo) for code to compile.
-
Declaring modules: In the crate root file, you can declare new modules; say, you declare a “garden” module with
mod garden;. The compiler will look for the module’s code in these places:-
Inline, within curly brackets that replace the semicolon following
mod garden.// crate root file (src/lib.cairo) mod garden { // code defining the garden module goes here } -
In the file src/garden.cairo.
-
-
Declaring submodules: In any file other than the crate root, you can declare submodules. For example, you might declare
mod vegetables;in src/garden.cairo. The compiler will look for the submodule’s code within the directory named for the parent module in these places:-
Inline, directly following
mod vegetables, within curly brackets instead of the semicolon.// src/garden.cairo file mod vegetables { // code defining the vegetables submodule goes here } -
In the file src/garden/vegetables.cairo.
-
-
Paths to code in modules: Once a module is part of your crate, you can refer to code in that module from anywhere else in that same crate, using the path to the code. For example, an
Asparagustype in thevegetablessubmodule would be found atcrate::garden::vegetables::Asparagus. -
Private vs public: Code within a module is private from its parent modules by default. This means that it may only be accessed by the current module and its descendants. To make a module public, declare it with
pub modinstead ofmod. To make items within a public module public as well, usepubbefore their declarations. Cairo also provides thepub(crate)keyword, allowing an item or module to be only visible within the crate in which the definition is included. -
The
usekeyword: Within a scope, theusekeyword creates shortcuts to items to reduce repetition of long paths. In any scope that can refer tocrate::garden::vegetables::Asparagus, you can create a shortcut withuse crate::garden::vegetables::Asparagus;and from then on you only need to writeAsparagusto make use of that type in the scope.
Here we create a crate named backyard that illustrates these rules. The
crate’s directory, also named backyard, contains these files and directories:
backyard/
├── Scarb.toml
└── src
    ├── garden
    │   └── vegetables.cairo
    ├── garden.cairo
    └── lib.cairo
The crate root file in this case is src/lib.cairo, and it contains:
Filename: src/lib.cairo
pub mod garden;
use crate::garden::vegetables::Asparagus;

fn main() {
    let plant = Asparagus {};
    println!("I'm growing {:?}!", plant);
}
The pub mod garden; line imports the garden module. Using pub to make garden publicly accessible, or pub(crate) if you really want to make garden only available for your crate, is optional to run our program here, as the main function resides in the same module as pub mod garden; declaration. Nevertheless, not declaring garden as pub will make it not accessible from any other package.
This line tells the compiler to include the code it finds in src/garden.cairo, which is:
Filename: src/garden.cairo
pub mod vegetables;
Here, pub mod vegetables; means the code in src/garden/vegetables.cairo is included too. That code is:
#[derive(Drop, Debug)]
pub struct Asparagus {}
The line use crate::garden::vegetables::Asparagus; lets us bring the Asparagus type into scope,
so we can use it in the main function.
Now let’s get into the details of these rules and demonstrate them in action!
Grouping Related Code in Modules
Modules let us organize code within a crate for readability and easy reuse. Modules also allow us to control the privacy of items, because code within a module is private by default. Private items are internal implementation details not available for outside use. We can choose to make modules and the items within them public, which exposes them to allow external code to use and depend on them.
As an example, let’s write a library crate that provides the functionality of a restaurant. We’ll define the signatures of functions but leave their bodies empty to concentrate on the organization of the code, rather than the implementation of a restaurant.
In the restaurant industry, some parts of a restaurant are referred to as front of house and others as back of house. Front of house is where customers are; this encompasses where the hosts seat customers, servers take orders and payment, and bartenders make drinks. Back of house is where the chefs and cooks work in the kitchen, dishwashers clean up, and managers do administrative work.
To structure our crate in this way, we can organize its functions into nested
modules. Create a new package named restaurant by running scarb new restaurant; then enter the code in Listing 7-1 into src/lib.cairo to
define some modules and function signatures. Here’s the front of house section:
Filename: src/lib.cairo
mod front_of_house {
    mod hosting {
        fn add_to_waitlist() {}

        fn seat_at_table() {}
    }

    mod serving {
        fn take_order() {}

        fn serve_order() {}

        fn take_payment() {}
    }
}
Listing 7-1: A front_of_house module containing other modules that then contain functions
We define a module with the mod keyword followed by the name of the module
(in this case, front_of_house). The body of the module then goes inside curly
brackets. Inside modules, we can place other modules, as in this case with the
modules hosting and serving. Modules can also hold definitions for other
items, such as structs, enums, constants, traits, and functions.
By using modules, we can group related definitions together and name why they’re related. Programmers using this code can navigate the code based on the groups rather than having to read through all the definitions, making it easier to find the definitions relevant to them. Programmers adding new functionality to this code would know where to place the code to keep the program organized.
Earlier, we mentioned that src/lib.cairo is called the crate root. The reason for this name is that the content of this file forms a module named after the crate name at the root of the crate’s module structure, known as the module tree.
Listing 7-2 shows the module tree for the structure in Listing 7-1.
restaurant
 └── front_of_house
     ├── hosting
     │   ├── add_to_waitlist
     │   └── seat_at_table
     └── serving
         ├── take_order
         ├── serve_order
         └── take_payment
Listing 7-2: The module tree for the code in Listing 7-1
This tree shows how some of the modules nest inside one another; for example,
hosting nests inside front_of_house. The tree also shows that some modules
are siblings to each other, meaning they’re defined in the same module;
hosting and serving are siblings defined within front_of_house. If module
A is contained inside module B, we say that module A is the child of module B
and that module B is the parent of module A. Notice that the entire module
tree is rooted under the explicit name of the crate restaurant.
The module tree might remind you of the filesystem’s directory tree on your computer; this is a very apt comparison! Just like directories in a filesystem, you use modules to organize your code. And just like files in a directory, we need a way to find our modules.
Paths for Referring to an Item in the Module Tree
To show Cairo where to find an item in a module tree, we use a path in the same way we use a path when navigating a filesystem. To call a function, we need to know its path.
A path can take two forms:
- An absolute path is the full path starting from a crate root. The absolute path begins with the crate name.
- A relative path starts from the current module.
Both absolute and relative paths are followed by one or more identifiers separated by double colons (::).
To illustrate this notion let's take back our example Listing 7-1 for the restaurant we used in the last chapter. We have a crate named restaurant in which we have a module named front_of_house that contains a module named hosting. The hosting module contains a function named add_to_waitlist. We want to call the add_to_waitlist function from the eat_at_restaurant function. We need to tell Cairo the path to the add_to_waitlist function so it can find it.
Filename: src/lib.cairo
mod front_of_house {
    mod hosting {
        fn add_to_waitlist() {}

        fn seat_at_table() {}
    }

    mod serving {
        fn take_order() {}

        fn serve_order() {}

        fn take_payment() {}
    }
}


pub fn eat_at_restaurant() {
    // Absolute path
    crate::front_of_house::hosting::add_to_waitlist();

    // Relative path
    front_of_house::hosting::add_to_waitlist();
}
Listing 7-3: Calling the add_to_waitlist function using absolute and relative paths
The eat_at_restaurant function is part of our library's public API, so we mark it with the pub keyword. We’ll go into more detail about pub in the "Exposing Paths with the pub Keyword" section.
The first time we call the add_to_waitlist function in eat_at_restaurant,
we use an absolute path. The add_to_waitlist function is defined in the same
crate as eat_at_restaurant. In Cairo, absolute paths start from the crate root, which you need to refer to by using the crate name. You can imagine a filesystem with the same structure: we’d specify the path /front_of_house/hosting/add_to_waitlist to run the add_to_waitlist program; using the crate name to start from the crate root is like using a slash (/) to start from the filesystem root in your shell.
The second time we call add_to_waitlist, we use a relative path. The path starts with front_of_house, the name of the module defined at the same level of the module tree as eat_at_restaurant. Here the filesystem equivalent would be using the path ./front_of_house/hosting/add_to_waitlist. Starting with a module name means that the path is relative to the current module.
Let’s try to compile Listing 7-3 and find out why it won’t compile yet! We get the following error:
$ scarb cairo-run
   Compiling listing_07_02 v0.1.0 (listings/ch07-managing-cairo-projects-with-packages-crates-and-modules/listing_02_paths/Scarb.toml)
error: Item `listing_07_02::front_of_house::hosting` is not visible in this context.
 --> listings/ch07-managing-cairo-projects-with-packages-crates-and-modules/listing_02_paths/src/lib.cairo:22:28
    crate::front_of_house::hosting::add_to_waitlist();
                           ^*****^

error: Item `listing_07_02::front_of_house::hosting::add_to_waitlist` is not visible in this context.
 --> listings/ch07-managing-cairo-projects-with-packages-crates-and-modules/listing_02_paths/src/lib.cairo:22:37
    crate::front_of_house::hosting::add_to_waitlist();
                                    ^*************^

error: Item `listing_07_02::front_of_house::hosting` is not visible in this context.
 --> listings/ch07-managing-cairo-projects-with-packages-crates-and-modules/listing_02_paths/src/lib.cairo:25:21
    front_of_house::hosting::add_to_waitlist();
                    ^*****^

error: Item `listing_07_02::front_of_house::hosting::add_to_waitlist` is not visible in this context.
 --> listings/ch07-managing-cairo-projects-with-packages-crates-and-modules/listing_02_paths/src/lib.cairo:25:30
    front_of_house::hosting::add_to_waitlist();
                             ^*************^

error: could not compile `listing_07_02` due to previous error
error: `scarb metadata` exited with error
The error messages say that module hosting and the add_to_waitlist function are not visible. In other words, we have the correct paths for the hosting module and the add_to_waitlist function, but Cairo won’t let us use them because it doesn’t have access to them. In Cairo, all items (functions, methods, structs, enums, modules, and constants) are private to parent modules by default. If you want to make an item like a function or struct private, you put it in a module.
Items in a parent module can’t use the private items inside child modules, but items in child modules can use the items in their ancestor modules. This is because child modules wrap and hide their implementation details, but the child modules can see the context in which they’re defined. To continue with our metaphor, think of the privacy rules as being like the back office of a restaurant: what goes on in there is private to restaurant customers, but office managers can see and do everything in the restaurant they operate.
Cairo chose to have the module system function this way so that hiding inner implementation details is the default. That way, you know which parts of the inner code you can change without breaking outer code. However, Cairo does give you the option to expose inner parts of child modules’ code to outer ancestor modules by using the pub keyword to make an item public.
Exposing Paths with the pub Keyword
Let’s return to the previous error that told us the hosting module and the add_to_waitlist function are not visible. We want the eat_at_restaurant function in the parent module to have access to the add_to_waitlist function in the child module, so we mark the hosting module with the pub keyword, as shown in Listing 7-4.
Filename: src/lib.cairo
mod front_of_house {
    pub mod hosting {
        fn add_to_waitlist() {}
    }
}

pub fn eat_at_restaurant() {
    // Absolute path
    crate::front_of_house::hosting::add_to_waitlist();

    // Relative path
    front_of_house::hosting::add_to_waitlist();
}
Listing 7-4: Declaring the hosting module as pub to use it from eat_at_restaurant
Unfortunately, the code in Listing 7-4 still results in an error.
What happened? Adding the pub keyword in front of mod hosting; makes the module public. With this change, if we can access front_of_house, we can access hosting. But the contents of hosting are still private; making the module public doesn’t make its contents public. The pub keyword on a module only lets code in its ancestor modules refer to it, not access its inner code. Because modules are containers, there’s not much we can do by only making the module public; we need to go further and choose to make one or more of the items within the module public as well.
Let’s also make the add_to_waitlist function public by adding the pub keyword before its definition, as in Listing 7-5.
Filename: src/lib.cairo
mod front_of_house {
    pub mod hosting {
        pub fn add_to_waitlist() {}
    }
}

pub fn eat_at_restaurant() {
    // Absolute path
    crate::front_of_house::hosting::add_to_waitlist(); // ✅ Compiles

    // Relative path
    front_of_house::hosting::add_to_waitlist(); // ✅ Compiles
}
Listing 7-5: Declaring the hosting module as pub to use it from eat_at_restaurant
Now the code will compile! To see why adding the pub keyword lets us use these paths in add_to_waitlist with respect to the privacy rules, let’s look at the absolute and the relative paths.
In the absolute path, we start with the crate root, the root of our crate’s module tree. The front_of_house module is defined in the crate root. While front_of_house isn’t public, because the eat_at_restaurant function is defined in the same module as front_of_house (that is, front_of_house and eat_at_restaurant are siblings), we can refer to front_of_house from eat_at_restaurant. Next is the hosting module marked with pub. We can access the parent module of hosting, so we can access hosting itself. Finally, the add_to_waitlist function is marked with pub and we can access its parent module, so this function call works!
In the relative path, the logic is the same as the absolute path except for the first step: rather than starting from the crate root, the path starts from front_of_house. The front_of_house module is defined within the same module as eat_at_restaurant, so the relative path starting from the module in which eat_at_restaurant is defined works. Then, because hosting and add_to_waitlist are marked with pub, the rest of the path works, and this function call is valid!
Starting Relative Paths with super
We can construct relative paths that begin in the parent module, rather than the current module or the crate root, by using super at the start of the path. This is like starting a filesystem path with the .. syntax. Using super allows us to reference an item that we know is in the parent module, which can make rearranging the module tree easier when the module is closely related to the parent, but the parent might be moved elsewhere in the module tree someday.
Consider the code in Listing 7-6 that models the situation in which a chef fixes an incorrect order and personally brings it out to the customer. The function fix_incorrect_order defined in the back_of_house module calls the function deliver_order defined in the parent module by specifying the path to deliver_order starting with super:
Filename: src/lib.cairo
fn deliver_order() {}

mod back_of_house {
    fn fix_incorrect_order() {
        cook_order();
        super::deliver_order();
    }

    fn cook_order() {}
}
Listing 7-6: Calling a function using a relative path starting with super
Here you can see directly that you access a parent's module easily using super, which wasn't the case previously.
Note that the back_of_house is kept private, as external users are not supposed to interact with the back of house directly.
Making Structs and Enums Public
We can also use pub to designate structs and enums as public, but there are a few extra details to consider when using pub with structs and enums.
- If we use
pubbefore a struct definition, we make the struct public, but the struct’s fields will still be private. We can make each field public or not on a case-by-case basis. - In contrast, if we make an enum public, all of its variants are then public. We only need the
pubbefore theenumkeyword.
There’s one more situation involving pub that we haven’t covered, and that is our last module system feature: the use keyword. We’ll cover use by itself first, and then we’ll show how to combine pub and use.
Bringing Paths into Scope with the use Keyword
Having to write out the paths to call functions can feel inconvenient and repetitive. Fortunately, there’s a way to simplify this process: we can create a shortcut to a path with the use keyword once, and then use the shorter name everywhere else in the scope.
In Listing 7-7, we bring the crate::front_of_house::hosting module into the
scope of the eat_at_restaurant function so we only have to specify
hosting::add_to_waitlist to call the add_to_waitlist function in
eat_at_restaurant.
Filename: src/lib.cairo
// section "Defining Modules to Control Scope"

mod front_of_house {
    pub mod hosting {
        pub fn add_to_waitlist() {}
    }
}

use crate::front_of_house::hosting;

pub fn eat_at_restaurant() {
    hosting::add_to_waitlist(); // ✅ Shorter path
}
Listing 7-7: Bringing a module into scope with use
Adding use and a path in a scope is similar to creating a symbolic link in the filesystem. By adding use crate::front_of_house::hosting; in the crate root, hosting is now a valid name in that scope, just as though the hosting module had been defined in the crate root.
Note that use only creates the shortcut for the particular scope in which the use occurs. Listing 7-8 moves the eat_at_restaurant function into a new child module named customer, which is then a different scope than the use
statement, so the function body won’t compile:
Filename: src/lib.cairo
mod front_of_house {
    pub mod hosting {
        pub fn add_to_waitlist() {}
    }
}

use crate::front_of_house::hosting;

mod customer {
    pub fn eat_at_restaurant() {
        hosting::add_to_waitlist();
    }
}
Listing 7-8: A use statement only applies in the scope it’s in.
The compiler error shows that the shortcut no longer applies within the customer module:
$ scarb build
   Compiling listing_07_05 v0.1.0 (listings/ch07-managing-cairo-projects-with-packages-crates-and-modules/listing_07_use_and_scope/Scarb.toml)
warn: Unused import: `listing_07_05::hosting`
 --> listings/ch07-managing-cairo-projects-with-packages-crates-and-modules/listing_07_use_and_scope/src/lib.cairo:10:28
use crate::front_of_house::hosting;
                           ^*****^

error: Identifier not found.
 --> listings/ch07-managing-cairo-projects-with-packages-crates-and-modules/listing_07_use_and_scope/src/lib.cairo:14:9
        hosting::add_to_waitlist();
        ^*****^

error: could not compile `listing_07_05` due to previous error
Creating Idiomatic use Paths
In Listing 7-7, you might have wondered why we specified use crate::front_of_house::hosting
and then called hosting::add_to_waitlist in eat_at_restaurant rather than specifying the use path all the way out to
the add_to_waitlist function to achieve the same result, as in Listing 7-9.
Filename: src/lib.cairo
mod front_of_house {
pub mod hosting {
pub fn add_to_waitlist() {}
}
}
use crate::front_of_house::hosting::add_to_waitlist;
pub fn eat_at_restaurant() {
add_to_waitlist();
}
Listing 7-9: Bringing the add_to_waitlist function into scope with use, which is unidiomatic
Although both Listing 7-7 and 7-9 accomplish the same task, Listing 7-7 is
the idiomatic way to bring a function into scope with use. Bringing the
function’s parent module into scope with use means we have to specify the
parent module when calling the function. Specifying the parent module when
calling the function makes it clear that the function isn’t locally defined
while still minimizing repetition of the full path. The code in Listing 7-9 is
unclear as to where add_to_waitlist is defined.
On the other hand, when bringing in structs, enums, traits, and other items with use, it’s idiomatic to specify the full path. Listing 7-10 shows the idiomatic way to bring the core library’s BitSize trait into the scope, allowing to call bits method to retrieve the size in bits of a type.
use core::num::traits::BitSize;
fn main() {
let u8_size: usize = BitSize::<u8>::bits();
println!("A u8 variable has {} bits", u8_size)
}
Listing 7-10: Bringing BitSize trait into scope in an idiomatic way
There’s no strong reason behind this idiom: it’s just the convention that has emerged in the Rust community, and folks have gotten used to reading and writing Rust code this way. As Cairo shares many idioms with Rust, we follow this convention as well.
The exception to this idiom is if we’re bringing two items with the same name
into scope with use statements, because Cairo doesn’t allow that.
Providing New Names with the as Keyword
There’s another solution to the problem of bringing two types of the same name
into the same scope with use: after the path, we can specify as and a new
local name, or alias, for the type. Listing 7-11 shows how you can rename an import with as:
Filename: src/lib.cairo
use core::array::ArrayTrait as Arr;
fn main() {
let mut arr = Arr::new(); // ArrayTrait was renamed to Arr
arr.append(1);
}
Listing 7-11: Renaming a trait when it’s brought into scope with the as keyword
Here, we brought ArrayTrait into scope with the alias Arr. We can now access the trait's methods with the Arr identifier.
Importing Multiple Items from the Same Module
When you want to import multiple items (like functions, structs or enums)
from the same module in Cairo, you can use curly braces {} to list all of
the items that you want to import. This helps to keep your code clean and easy
to read by avoiding a long list of individual use statements.
The general syntax for importing multiple items from the same module is:
use module::{item1, item2, item3};
Here is an example where we import three structures from the same module:
// Assuming we have a module called `shapes` with the structures `Square`, `Circle`, and `Triangle`.
mod shapes {
#[derive(Drop)]
pub struct Square {
pub side: u32,
}
#[derive(Drop)]
pub struct Circle {
pub radius: u32,
}
#[derive(Drop)]
pub struct Triangle {
pub base: u32,
pub height: u32,
}
}
// We can import the structures `Square`, `Circle`, and `Triangle` from the `shapes` module like
// this:
use shapes::{Square, Circle, Triangle};
// Now we can directly use `Square`, `Circle`, and `Triangle` in our code.
fn main() {
let sq = Square { side: 5 };
let cr = Circle { radius: 3 };
let tr = Triangle { base: 5, height: 2 };
// ...
}
Listing 7-12: Importing multiple items from the same module
Re-exporting Names in Module Files
When we bring a name into scope with the use keyword, the name available in
the new scope can be imported as if it had been defined in that code’s scope.
This technique is called re-exporting because we’re bringing an item into scope,
but also making that item available for others to bring into their scope, with the pub keyword.
For example, let's re-export the add_to_waitlist function in the restaurant example:
Filename: src/lib.cairo
mod front_of_house {
pub mod hosting {
pub fn add_to_waitlist() {}
}
}
pub use crate::front_of_house::hosting;
fn eat_at_restaurant() {
hosting::add_to_waitlist();
}
Listing 7-13: Making a name available for any code to use from a new scope with pub use
Before this change, external code would have to call the add_to_waitlist
function by using the path restaurant::front_of_house::hosting::add_to_waitlist().
Now that this pub use has re-exported the hosting module from the root module, external code
can now use the path restaurant::hosting::add_to_waitlist() instead.
Re-exporting is useful when the internal structure of your code is different
from how programmers calling your code would think about the domain. For
example, in this restaurant metaphor, the people running the restaurant think
about “front of house” and “back of house.” But customers visiting a restaurant
probably won’t think about the parts of the restaurant in those terms. With
pub use, we can write our code with one structure but expose a different
structure. Doing so makes our library well organized for programmers working on
the library and programmers calling the library.
Using External Packages in Cairo with Scarb
You might need to use external packages to leverage the functionality provided by the community. Scarb allows you to use dependencies by cloning packages from their Git repositories. To use an external package in your project with Scarb, simply declare the Git repository URL of the dependency you want to add in a dedicated [dependencies] section in your Scarb.toml configuration file. Note that the URL might correspond to the main branch, or any specific commit, branch or tag. For this, you will have to pass an extra rev, branch, or tag field, respectively. For example, the following code imports the main branch of alexandria_math crate from alexandria package:
[dependencies]
alexandria_math = { git = "https://github.com/keep-starknet-strange/alexandria.git" }
while the following code imports a specific branch (which is deprecated and should not be used):
[dependencies]
alexandria_math = { git = "https://github.com/keep-starknet-strange/alexandria.git", branch = "cairo-v2.3.0-rc0" }
If you want to import multiple packages in your project, you need to create only one [dependencies] section and list all the desired packages beneath it. You can also specify development dependencies by declaring a [dev-dependencies] section.
After that, simply run scarb build to fetch all external dependencies and compile your package with all the dependencies included.
Note that it is also possible to add dependencies with the scarb add command, which will automatically edit the Scarb.toml file for you. For development dependencies, just use the scarb add --dev command.
To remove a dependency, simply remove the corresponding line from your Scarb.toml file, or use the scarb rm command.
The Glob Operator
If we want to bring all public items defined in a path into scope, we can
specify that path followed by the * glob operator:
#![allow(unused)] fn main() { use core::num::traits::*; }
This use statement brings all public items defined in core::num::traits into
the current scope. Be careful when using the glob operator! Glob can make it
harder to tell what names are in scope and where a name used in your program
was defined.
The glob operator is often used when testing to bring everything under test
into the tests module; we’ll talk about that in the “How to Write
Tests” section in Chapter 10.
Separating Modules into Different Files
So far, all the examples in this chapter defined multiple modules in one file. When modules get large, you might want to move their definitions to a separate file to make the code easier to navigate.
For example, let’s start from the code in Listing 7-7 that had multiple restaurant modules. We’ll extract modules into files instead of having all the modules defined in the crate root file. In this case, the crate root file is src/lib.cairo.
First, we’ll extract the front_of_house module to its own file. Remove the
code inside the curly brackets for the front_of_house module, leaving only
the mod front_of_house; declaration, so that src/lib.cairo contains the code
shown in Listing 7-14. Note that this won’t compile until we create the
src/front_of_house.cairo file.
Filename: src/lib.cairo
mod front_of_house;
use crate::front_of_house::hosting;
fn eat_at_restaurant() {
hosting::add_to_waitlist();
}
Listing 7-14: Declaring the front_of_house module whose body will be in src/front_of_house.cairo
Next, place the code that was in the curly brackets into a new file named
src/front_of_house.cairo, as shown in Listing 7-15. The compiler knows to look
in this file because it came across the module declaration in the crate root
with the name front_of_house.
Filename: src/front_of_house.cairo
pub mod hosting {
pub fn add_to_waitlist() {}
}
Listing 7-15: Definitions inside the front_of_house module in src/front_of_house.cairo
Note that you only need to load a file using a mod declaration once in your
module tree. Once the compiler knows the file is part of the project (and knows
where in the module tree the code resides because of where you’ve put the mod
statement), other files in your project should refer to the loaded file’s code
using a path to where it was declared, as covered in the "Paths for Referring to an Item in the Module Tree" chapter.
In other words, mod is not an “include” operation that you may have seen in other
programming languages.
Next, we’ll extract the hosting module to its own file. The process is a bit
different because hosting is a child module of front_of_house, not of the
root module. We’ll place the file for hosting in a new directory that will be
named for its ancestors in the module tree, in this case src/front_of_house/.
To start moving hosting, we change src/front_of_house.cairo to contain only the
declaration of the hosting module:
Filename: src/front_of_house.cairo
pub mod hosting;
Then we create a src/front_of_house directory and a file hosting.cairo to
contain the definitions made in the hosting module:
Filename: src/front_of_house/hosting.cairo
pub fn add_to_waitlist() {}
If we instead put hosting.cairo in the src directory, the compiler would
expect the hosting.cairo code to be in a hosting module declared in the crate
root, and not declared as a child of the front_of_house module. The
compiler’s rules for which files to check for which modules’ code means the
directories and files more closely match the module tree.
We’ve moved each module’s code to a separate file, and the module tree remains
the same. The function calls in eat_at_restaurant will work without any
modification, even though the definitions live in different files. This
technique lets you move modules to new files as they grow in size.
Note that the use crate::front_of_house::hosting; statement in
src/lib.cairo also hasn’t changed, nor does use have any impact on what files
are compiled as part of the crate. The mod keyword declares modules, and Cairo
looks in a file with the same name as the module for the code that goes into
that module.
Summary
Cairo lets you split a package into multiple crates and a crate into modules
so you can refer to items defined in one module from another module. You can do
this by specifying absolute or relative paths. These paths can be brought into
scope with a use statement so you can use a shorter path for multiple uses of
the item in that scope. Module code is private by default.
Generic Types and Traits
Every programming language has tools for effectively handling the duplication of concepts. In Cairo, one such tool is generics: abstract stand-ins for concrete types or other properties. We can express the behavior of generics or how they relate to other generics without knowing what will be in their place when compiling and running the code.
Functions can take parameters of some generic type, instead of a concrete type like u32 or bool, in the same way a function takes parameters with unknown values to run the same code on multiple concrete values. In fact, we’ve already used generics in Chapter 6 with Option<T>.
In this chapter, you’ll explore how to define your own types, functions, and traits with generics.
Generics allow us to replace specific types with a placeholder that represents multiple types to remove code duplication. Upon compilation, the compiler creates a new definition for each concrete type that replaces a generic type, reducing development time for the programmer, but code duplication at compile level still exists. This may be of importance if you are writing Starknet contracts and using a generic for multiple types which will cause contract size to increment.
Then you’ll learn how to use traits to define behavior in a generic way. You can combine traits with generic types to constrain a generic type to accept only those types that have a particular behavior, as opposed to just any type.
Removing Duplication by Extracting a Function
Generics allow us to replace specific types with a placeholder that represents multiple types to remove code duplication. Before diving into generics syntax, let’s first look at how to remove duplication in a way that doesn’t involve generic types by extracting a function that replaces specific values with a placeholder that represents multiple values. Then we’ll apply the same technique to extract a generic function! By learning how to identify duplicated code that can be extracted into a function, you'll start to recognize instances where generics can be used to reduce duplication.
We begin with a short program that finds the largest number in an array of u8:
fn main() {
let mut number_list: Array<u8> = array![34, 50, 25, 100, 65];
let mut largest = number_list.pop_front().unwrap();
while let Some(number) = number_list.pop_front() {
if number > largest {
largest = number;
}
}
println!("The largest number is {}", largest);
}
We store an array of u8 in the variable number_list and extract the first number in the array in a variable named largest. We then iterate through all the numbers in the array, and if the current number is greater than the number stored in largest, we update the value of largest. However, if the current number is less than or equal to the largest number seen so far, the variable doesn’t change, and the code moves on to the next number in the list. After considering all the numbers in the array, largest should contain the largest number, which in this case is 100.
We've now been tasked with finding the largest number in two different arrays of numbers. To do so, we can choose to duplicate the previous code and use the same logic at two different places in the program, as follows:
fn main() {
let mut number_list: Array<u8> = array![34, 50, 25, 100, 65];
let mut largest = number_list.pop_front().unwrap();
while let Some(number) = number_list.pop_front() {
if number > largest {
largest = number;
}
}
println!("The largest number is {}", largest);
let mut number_list: Array<u8> = array![102, 34, 255, 89, 54, 2, 43, 8];
let mut largest = number_list.pop_front().unwrap();
while let Some(number) = number_list.pop_front() {
if number > largest {
largest = number;
}
}
println!("The largest number is {}", largest);
}
Although this code works, duplicating code is tedious and error-prone. We also have to remember to update the code in multiple places when we want to change it.
To eliminate this duplication, we’ll create an abstraction by defining a function that operates on any array of u8 passed in a parameter. This solution makes our code clearer and lets us express the concept of finding the largest number in an array abstractly.
To do that, we extract the code that finds the largest number into a function named largest. Then we call the function to find the largest number in the two arrays. We could also use the function on any other array of u8 values we might have in the future.
fn largest(ref number_list: Array<u8>) -> u8 {
let mut largest = number_list.pop_front().unwrap();
while let Some(number) = number_list.pop_front() {
if number > largest {
largest = number;
}
}
largest
}
fn main() {
let mut number_list = array![34, 50, 25, 100, 65];
let result = largest(ref number_list);
println!("The largest number is {}", result);
let mut number_list = array![102, 34, 255, 89, 54, 2, 43, 8];
let result = largest(ref number_list);
println!("The largest number is {}", result);
}
The largest function has a parameter called number_list, passed by reference, which represents any concrete array of u8 values we might pass into the function. As a result, when we call the function, the code runs on the specific values that we pass in.
In summary, here are the steps we took to change the code:
- Identify duplicate code.
- Extract the duplicate code into the body of the function and specify the inputs and return values of that code in the function signature.
- Update the two instances of duplicated code to call the function instead.
Next, we’ll use these same steps with generics to reduce code duplication. In the same way that the function body can operate on an abstract Array<T> instead of specific u8 values, generics allow code to operate on abstract types.
Generic Data Types
We use generics to create definitions for item declarations, such as structs and functions, which we can then use with many different concrete data types. In Cairo, we can use generics when defining functions, structs, enums, traits, implementations and methods. In this chapter, we are going to take a look at how to effectively use generic types with all of them.
Generics allow us to write reusable code that works with many types, thus avoiding code duplication, while enhancing code maintainability.
Generic Functions
Making a function generic means it can operate on different types, avoiding the need for multiple, type-specific implementations. This leads to significant code reduction and increases the flexibility of the code.
When defining a function that uses generics, we place the generics in the function signature, where we would usually specify the data types of the parameter and return value. For example, imagine we want to create a function which given two Array of items, will return the largest one. If we need to perform this operation for lists of different types, then we would have to redefine the function each time. Luckily we can implement the function once using generics and move on to other tasks.
// Specify generic type T between the angulars
fn largest_list<T>(l1: Array<T>, l2: Array<T>) -> Array<T> {
if l1.len() > l2.len() {
l1
} else {
l2
}
}
fn main() {
let mut l1 = array![1, 2];
let mut l2 = array![3, 4, 5];
// There is no need to specify the concrete type of T because
// it is inferred by the compiler
let l3 = largest_list(l1, l2);
}
The largest_list function compares two lists of the same type and returns the one with more elements and drops the other. If you compile the previous code, you will notice that it will fail with an error saying that there are no traits defined for dropping an array of a generic type. This happens because the compiler has no way to guarantee that an Array<T> is droppable when executing the main function. In order to drop an array of T, the compiler must first know how to drop T. This can be fixed by specifying in the function signature of largest_list that T must implement the Drop trait. The correct function definition of largest_list is as follows:
fn largest_list<T, impl TDrop: Drop<T>>(l1: Array<T>, l2: Array<T>) -> Array<T> {
if l1.len() > l2.len() {
l1
} else {
l2
}
}
The new largest_list function includes in its definition the requirement that whatever generic type is placed there, it must be droppable. This is what we call trait bounds. The main function remains unchanged, the compiler is smart enough to deduce which concrete type is being used and if it implements the Drop trait.
Constraints for Generic Types
When defining generic types, it is useful to have information about them. Knowing which traits a generic type implements allows us to use it more effectively in a function's logic at the cost of constraining the generic types that can be used with the function. We saw an example of this previously by adding the TDrop implementation as part of the generic arguments of largest_list. While TDrop was added to satisfy the compiler's requirements, we can also add constraints to benefit our function logic.
Imagine that we want, given a list of elements of some generic type T, to find the smallest element among them. Initially, we know that for an element of type T to be comparable, it must implement the PartialOrd trait. The resulting function would be:
// Given a list of T get the smallest one
// The PartialOrd trait implements comparison operations for T
fn smallest_element<T, impl TPartialOrd: PartialOrd<T>>(list: @Array<T>) -> T {
// This represents the smallest element through the iteration
// Notice that we use the desnap (*) operator
let mut smallest = *list[0];
// The index we will use to move through the list
let mut index = 1;
// Iterate through the whole list storing the smallest
while index < list.len() {
if *list[index] < smallest {
smallest = *list[index];
}
index = index + 1;
}
smallest
}
fn main() {
let list: Array<u8> = array![5, 3, 10];
// We need to specify that we are passing a snapshot of `list` as an argument
let s = smallest_element(@list);
assert!(s == 3);
}
The smallest_element function uses a generic type T that implements the PartialOrd trait, takes a snapshot of an Array<T> as a parameter and returns a copy of the smallest element. Because the parameter is of type @Array<T>, we no longer need to drop it at the end of the execution and so we are not required to implement the Drop trait for T as well. Why does it not compile then?
When indexing on list, the value results in a snap of the indexed element, and unless PartialOrd is implemented for @T we need to desnap the element using *. The * operation requires a copy from @T to T, which means that T needs to implement the Copy trait. After copying an element of type @T to T, there are now variables with type T that need to be dropped, requiring T to implement the Drop trait as well. We must then add both Drop and Copy traits implementation for the function to be correct. After updating the smallest_element function the resulting code would be:
fn smallest_element<T, impl TPartialOrd: PartialOrd<T>, impl TCopy: Copy<T>, impl TDrop: Drop<T>>(
list: @Array<T>,
) -> T {
let mut smallest = *list[0];
let mut index = 1;
while index < list.len() {
if *list[index] < smallest {
smallest = *list[index];
}
index = index + 1;
}
smallest
}
Anonymous Generic Implementation Parameter (+ Operator)
Until now, we have always specified a name for each implementation of the required generic trait: TPartialOrd for PartialOrd<T>, TDrop for Drop<T>, and TCopy for Copy<T>.
However, most of the time, we don't use the implementation in the function body; we only use it as a constraint. In these cases, we can use the + operator to specify that the generic type must implement a trait without naming the implementation. This is referred to as an anonymous generic implementation parameter.
For example, +PartialOrd<T> is equivalent to impl TPartialOrd: PartialOrd<T>.
We can rewrite the smallest_element function signature as follows:
fn smallest_element<T, +PartialOrd<T>, +Copy<T>, +Drop<T>>(list: @Array<T>) -> T {
let mut smallest = *list[0];
let mut index = 1;
loop {
if index >= list.len() {
break smallest;
}
if *list[index] < smallest {
smallest = *list[index];
}
index = index + 1;
}
}
Structs
We can also define structs to use a generic type parameter for one or more fields using the <> syntax, similar to function definitions. First, we declare the name of the type parameter inside the angle brackets just after the name of the struct. Then we use the generic type in the struct definition where we would otherwise specify concrete data types. The next code example shows the definition Wallet<T> which has a balance field of type T.
#[derive(Drop)]
struct Wallet<T> {
balance: T,
}
fn main() {
let w = Wallet { balance: 3 };
}
The above code derives the Drop trait for the Wallet type automatically. It is equivalent to writing the following code:
struct Wallet<T> {
balance: T,
}
impl WalletDrop<T, +Drop<T>> of Drop<Wallet<T>>;
fn main() {
let w = Wallet { balance: 3 };
}
We avoid using the derive macro for Drop implementation of Wallet and instead define our own WalletDrop implementation. Notice that we must define, just like functions, an additional generic type for WalletDrop saying that T implements the Drop trait as well. We are basically saying that the struct Wallet<T> is droppable as long as T is also droppable.
Finally, if we want to add a field to Wallet representing its address and we want that field to be different than T but generic as well, we can simply add another generic type between the <>:
#[derive(Drop)]
struct Wallet<T, U> {
balance: T,
address: U,
}
fn main() {
let w = Wallet { balance: 3, address: 14 };
}
We add to the Wallet struct definition a new generic type U and then assign this type to the new field member address. Notice that the derive attribute for the Drop trait works for U as well.
Enums
As we did with structs, we can define enums to hold generic data types in their variants. For example the Option<T> enum provided by the Cairo core library:
enum Option<T> {
Some: T,
None,
}
The Option<T> enum is generic over a type T and has two variants: Some, which holds one value of type T and None that doesn't hold any value. By using the Option<T> enum, it is possible for us to express the abstract concept of an optional value and because the value has a generic type T we can use this abstraction with any type.
Enums can use multiple generic types as well, like the definition of the Result<T, E> enum that the core library provides:
enum Result<T, E> {
Ok: T,
Err: E,
}
The Result<T, E> enum has two generic types, T and E, and two variants: Ok which holds the value of type T and Err which holds the value of type E. This definition makes it convenient to use the Result enum anywhere we have an operation that might succeed (by returning a value of type T) or fail (by returning a value of type E).
Generic Methods
We can implement methods on structs and enums, and use the generic types in their definitions, too. Using our previous definition of Wallet<T> struct, we define a balance method for it:
#[derive(Copy, Drop)]
struct Wallet<T> {
balance: T,
}
trait WalletTrait<T> {
fn balance(self: @Wallet<T>) -> T;
}
impl WalletImpl<T, +Copy<T>> of WalletTrait<T> {
fn balance(self: @Wallet<T>) -> T {
return *self.balance;
}
}
fn main() {
let w = Wallet { balance: 50 };
assert!(w.balance() == 50);
}
We first define WalletTrait<T> trait using a generic type T which defines a method that returns the value of the field balance from Wallet. Then we give an implementation for the trait in WalletImpl<T>. Note that you need to include a generic type in both definitions of the trait and the implementation.
We can also specify constraints on generic types when defining methods on the type. We could, for example, implement methods only for Wallet<u128> instances rather than Wallet<T>. In the code example, we define an implementation for wallets which have a concrete type of u128 for the balance field.
#[derive(Copy, Drop)]
struct Wallet<T> {
balance: T,
}
/// Generic trait for wallets
trait WalletTrait<T> {
fn balance(self: @Wallet<T>) -> T;
}
impl WalletImpl<T, +Copy<T>> of WalletTrait<T> {
fn balance(self: @Wallet<T>) -> T {
return *self.balance;
}
}
/// Trait for wallets of type u128
trait WalletReceiveTrait {
fn receive(ref self: Wallet<u128>, value: u128);
}
impl WalletReceiveImpl of WalletReceiveTrait {
fn receive(ref self: Wallet<u128>, value: u128) {
self.balance += value;
}
}
fn main() {
let mut w = Wallet { balance: 50 };
assert!(w.balance() == 50);
w.receive(100);
assert!(w.balance() == 150);
}
The new method receive increments the size of balance of any instance of a Wallet<u128>. Notice that we changed the main function making w a mutable variable in order for it to be able to update its balance. If we were to change the initialization of w by changing the type of balance the previous code wouldn't compile.
Cairo allows us to define generic methods inside generic traits as well. Using the past implementation from Wallet<U, V> we are going to define a trait that picks two wallets of different generic types and creates a new one with a generic type of each. First, let's rewrite the struct definition:
struct Wallet<T, U> {
balance: T,
address: U,
}
Next, we are going to naively define the mixup trait and implementation:
// This does not compile!
trait WalletMixTrait<T1, U1> {
fn mixup<T2, U2>(self: Wallet<T1, U1>, other: Wallet<T2, U2>) -> Wallet<T1, U2>;
}
impl WalletMixImpl<T1, U1> of WalletMixTrait<T1, U1> {
fn mixup<T2, U2>(self: Wallet<T1, U1>, other: Wallet<T2, U2>) -> Wallet<T1, U2> {
Wallet { balance: self.balance, address: other.address }
}
}
We are creating a trait WalletMixTrait<T1, U1> with the mixup<T2, U2> method which given an instance of Wallet<T1, U1> and Wallet<T2, U2> creates a new Wallet<T1, U2>. As mixup signature specifies, both self and other are getting dropped at the end of the function, which is why this code does not compile. If you have been following from the start until now you would know that we must add a requirement for all the generic types specifying that they will implement the Drop trait for the compiler to know how to drop instances of Wallet<T, U>. The updated implementation is as follows:
trait WalletMixTrait<T1, U1> {
fn mixup<T2, +Drop<T2>, U2, +Drop<U2>>(
self: Wallet<T1, U1>, other: Wallet<T2, U2>,
) -> Wallet<T1, U2>;
}
impl WalletMixImpl<T1, +Drop<T1>, U1, +Drop<U1>> of WalletMixTrait<T1, U1> {
fn mixup<T2, +Drop<T2>, U2, +Drop<U2>>(
self: Wallet<T1, U1>, other: Wallet<T2, U2>,
) -> Wallet<T1, U2> {
Wallet { balance: self.balance, address: other.address }
}
}
We add the requirements for T1 and U1 to be droppable on WalletMixImpl declaration. Then we do the same for T2 and U2, this time as part of mixup signature. We can now try the mixup function:
fn main() {
let w1: Wallet<bool, u128> = Wallet { balance: true, address: 10 };
let w2: Wallet<felt252, u8> = Wallet { balance: 32, address: 100 };
let w3 = w1.mixup(w2);
assert!(w3.balance);
assert!(w3.address == 100);
}
We first create two instances: one of Wallet<bool, u128> and the other of Wallet<felt252, u8>. Then, we call mixup and create a new Wallet<bool, u8> instance.
Traits in Cairo
A trait defines a set of methods that can be implemented by a type. These methods can be called on instances of the type when this trait is implemented. A trait combined with a generic type defines functionality a particular type has and can share with other types. We can use traits to define shared behavior in an abstract way. We can use trait bounds to specify that a generic type can be any type that has certain behavior.
Note: Traits are similar to a feature often called interfaces in other languages, although with some differences.
While traits can be written to not accept generic types, they are most useful when used with generic types. We already covered generics in the previous chapter, and we will use them in this chapter to demonstrate how traits can be used to define shared behavior for generic types.
Defining a Trait
A type’s behavior consists of the methods we can call on that type. Different types share the same behavior if we can call the same methods on all of those types. Trait definitions are a way to group method signatures together to define a set of behaviors necessary to accomplish some purpose.
For example, let’s say we have a struct NewsArticle that holds a news story in a particular location. We can define a trait Summary that describes the behavior of something that can summarize the NewsArticle type.
#[derive(Drop, Clone)]
struct NewsArticle {
headline: ByteArray,
location: ByteArray,
author: ByteArray,
content: ByteArray,
}
pub trait Summary {
fn summarize(self: @NewsArticle) -> ByteArray;
}
impl NewsArticleSummary of Summary {
fn summarize(self: @NewsArticle) -> ByteArray {
format!("{:?} by {:?} ({:?})", self.headline, self.author, self.location)
}
}
Listing 8-1: A Summary trait that consists of the behavior provided by a summarize method
In Listing 8-1, we declare a trait using the trait keyword and then the trait’s name, which is Summary in this case.
We’ve also declared the trait as pub so that crates depending on this crate can make use of this trait too, as we’ll see in a few examples.
Inside the curly brackets, we declare the method signatures that describe the behaviors of the types that implement this trait, which in this case is fn summarize(self: @NewsArticle) -> ByteArray;. After the method signature, instead of providing an implementation within curly brackets, we use a semicolon.
Note: the
ByteArraytype is the type used to represent strings in Cairo.
As the trait is not generic, the self parameter is not generic either and is of type @NewsArticle. This means that the summarize method can only be called on instances of NewsArticle.
Now, consider that we want to make a media aggregator library crate named aggregator that can display summaries of data that might be stored in a NewsArticle or Tweet instance. To do this, we need a summary from each type, and we’ll request that summary by calling a summarize method on an instance of that type. By defining the Summary trait on generic type T, we can implement the summarize method on any type we want to be able to summarize.
mod aggregator {
pub trait Summary<T> {
fn summarize(self: @T) -> ByteArray;
}
#[derive(Drop)]
pub struct NewsArticle {
pub headline: ByteArray,
pub location: ByteArray,
pub author: ByteArray,
pub content: ByteArray,
}
impl NewsArticleSummary of Summary<NewsArticle> {
fn summarize(self: @NewsArticle) -> ByteArray {
format!("{} by {} ({})", self.headline, self.author, self.location)
}
}
#[derive(Drop)]
pub struct Tweet {
pub username: ByteArray,
pub content: ByteArray,
pub reply: bool,
pub retweet: bool,
}
impl TweetSummary of Summary<Tweet> {
fn summarize(self: @Tweet) -> ByteArray {
format!("{}: {}", self.username, self.content)
}
}
}
use aggregator::{Summary, NewsArticle, Tweet};
fn main() {
let news = NewsArticle {
headline: "Cairo has become the most popular language for developers",
location: "Worldwide",
author: "Cairo Digger",
content: "Cairo is a new programming language for zero-knowledge proofs",
};
let tweet = Tweet {
username: "EliBenSasson",
content: "Crypto is full of short-term maximizing projects. \n @Starknet and @StarkWareLtd are about long-term vision maximization.",
reply: false,
retweet: false,
}; // Tweet instantiation
println!("New article available! {}", news.summarize());
println!("New tweet! {}", tweet.summarize());
}
Listing 8-2: A Summary trait that consists of the behavior provided by a summarize method for a generic type
Each type implementing this trait must provide its own custom behavior for the body of the method. The compiler will enforce that any type that implements the Summary trait will have the method summarize defined with this signature exactly.
A trait can have multiple methods in its body: the method signatures are listed one per line and each line ends in a semicolon.
Implementing a Trait on a Type
Now that we’ve defined the desired signatures of the Summary trait’s methods,
we can implement it on the types in our media aggregator. The following code shows
an implementation of the Summary trait on the NewsArticle struct that uses
the headline, the author, and the location to create the return value of
summarize. For the Tweet struct, we define summarize as the username
followed by the entire text of the tweet, assuming that tweet content is
already limited to 280 characters.
mod aggregator {
pub trait Summary<T> {
fn summarize(self: @T) -> ByteArray;
}
#[derive(Drop)]
pub struct NewsArticle {
pub headline: ByteArray,
pub location: ByteArray,
pub author: ByteArray,
pub content: ByteArray,
}
impl NewsArticleSummary of Summary<NewsArticle> {
fn summarize(self: @NewsArticle) -> ByteArray {
format!("{} by {} ({})", self.headline, self.author, self.location)
}
}
#[derive(Drop)]
pub struct Tweet {
pub username: ByteArray,
pub content: ByteArray,
pub reply: bool,
pub retweet: bool,
}
impl TweetSummary of Summary<Tweet> {
fn summarize(self: @Tweet) -> ByteArray {
format!("{}: {}", self.username, self.content)
}
}
}
use aggregator::{Summary, NewsArticle, Tweet};
fn main() {
let news = NewsArticle {
headline: "Cairo has become the most popular language for developers",
location: "Worldwide",
author: "Cairo Digger",
content: "Cairo is a new programming language for zero-knowledge proofs",
};
let tweet = Tweet {
username: "EliBenSasson",
content: "Crypto is full of short-term maximizing projects. \n @Starknet and @StarkWareLtd are about long-term vision maximization.",
reply: false,
retweet: false,
}; // Tweet instantiation
println!("New article available! {}", news.summarize());
println!("New tweet! {}", tweet.summarize());
}
Listing 8-3: Implementation of the Summary trait on NewsArticle and Tweet
Implementing a trait on a type is similar to implementing regular methods. The
difference is that after impl, we put a name for the implementation,
then use the of keyword, and then specify the name of the trait we are writing the implementation for.
If the implementation is for a generic type, we place the generic type name in the angle brackets after the trait name.
Note that for the trait method to be accessible, there must be an implementation of that trait visible from the scope where the method is called. If the trait is pub and the implementation is not, and the implementation is not visible in the scope where the trait method is called, this will cause a compilation error.
Within the impl block, we put the method signatures
that the trait definition has defined. Instead of adding a semicolon after each
signature, we use curly brackets and fill in the method body with the specific
behavior that we want the methods of the trait to have for the particular type.
Now that the library has implemented the Summary trait on NewsArticle and
Tweet, users of the crate can call the trait methods on instances of
NewsArticle and Tweet in the same way we call regular methods. The only
difference is that the user must bring the trait into scope as well as the
types. Here’s an example of how a crate could use our aggregator crate:
mod aggregator {
pub trait Summary<T> {
fn summarize(self: @T) -> ByteArray;
}
#[derive(Drop)]
pub struct NewsArticle {
pub headline: ByteArray,
pub location: ByteArray,
pub author: ByteArray,
pub content: ByteArray,
}
impl NewsArticleSummary of Summary<NewsArticle> {
fn summarize(self: @NewsArticle) -> ByteArray {
format!("{} by {} ({})", self.headline, self.author, self.location)
}
}
#[derive(Drop)]
pub struct Tweet {
pub username: ByteArray,
pub content: ByteArray,
pub reply: bool,
pub retweet: bool,
}
impl TweetSummary of Summary<Tweet> {
fn summarize(self: @Tweet) -> ByteArray {
format!("{}: {}", self.username, self.content)
}
}
}
use aggregator::{Summary, NewsArticle, Tweet};
fn main() {
let news = NewsArticle {
headline: "Cairo has become the most popular language for developers",
location: "Worldwide",
author: "Cairo Digger",
content: "Cairo is a new programming language for zero-knowledge proofs",
};
let tweet = Tweet {
username: "EliBenSasson",
content: "Crypto is full of short-term maximizing projects. \n @Starknet and @StarkWareLtd are about long-term vision maximization.",
reply: false,
retweet: false,
}; // Tweet instantiation
println!("New article available! {}", news.summarize());
println!("New tweet! {}", tweet.summarize());
}
This code prints the following:
$ scarb cairo-run
Compiling no_listing_15_traits v0.1.0 (listings/ch08-generic-types-and-traits/no_listing_15_traits/Scarb.toml)
Finished `dev` profile target(s) in 3 seconds
Running no_listing_15_traits
New article available! Cairo has become the most popular language for developers by Cairo Digger (Worldwide)
New tweet! EliBenSasson: Crypto is full of short-term maximizing projects.
@Starknet and @StarkWareLtd are about long-term vision maximization.
Run completed successfully, returning []
Other crates that depend on the aggregator crate can also bring the Summary trait into scope to implement Summary on their own types.
Default Implementations
Sometimes it’s useful to have default behavior for some or all of the methods in a trait instead of requiring implementations for all methods on every type. Then, as we implement the trait on a particular type, we can keep or override each method’s default behavior.
In Listing 8-5 we specify a default string for the summarize method of the Summary trait instead of only defining the method signature, as we did in Listing 8-2.
Filename: src/lib.cairo
mod aggregator {
pub trait Summary<T> {
fn summarize(self: @T) -> ByteArray {
"(Read more...)"
}
}
#[derive(Drop)]
pub struct NewsArticle {
pub headline: ByteArray,
pub location: ByteArray,
pub author: ByteArray,
pub content: ByteArray,
}
impl NewsArticleSummary of Summary<NewsArticle> {}
#[derive(Drop)]
pub struct Tweet {
pub username: ByteArray,
pub content: ByteArray,
pub reply: bool,
pub retweet: bool,
}
impl TweetSummary of Summary<Tweet> {
fn summarize(self: @Tweet) -> ByteArray {
format!("{}: {}", self.username, self.content)
}
}
}
use aggregator::{Summary, NewsArticle};
fn main() {
let news = NewsArticle {
headline: "Cairo has become the most popular language for developers",
location: "Worldwide",
author: "Cairo Digger",
content: "Cairo is a new programming language for zero-knowledge proofs",
};
println!("New article available! {}", news.summarize());
}
Listing 8-5: Defining a Summary trait with a default implementation of the summarize method
To use a default implementation to summarize instances of NewsArticle, we specify an empty impl block with impl NewsArticleSummary of Summary<NewsArticle> {}.
Even though we’re no longer defining the summarize method on NewsArticle directly, we’ve provided a default implementation and specified that NewsArticle implements the Summary trait. As a result, we can still call the summarize method on an instance of NewsArticle, like this:
mod aggregator {
pub trait Summary<T> {
fn summarize(self: @T) -> ByteArray {
"(Read more...)"
}
}
#[derive(Drop)]
pub struct NewsArticle {
pub headline: ByteArray,
pub location: ByteArray,
pub author: ByteArray,
pub content: ByteArray,
}
impl NewsArticleSummary of Summary<NewsArticle> {}
#[derive(Drop)]
pub struct Tweet {
pub username: ByteArray,
pub content: ByteArray,
pub reply: bool,
pub retweet: bool,
}
impl TweetSummary of Summary<Tweet> {
fn summarize(self: @Tweet) -> ByteArray {
format!("{}: {}", self.username, self.content)
}
}
}
use aggregator::{Summary, NewsArticle};
fn main() {
let news = NewsArticle {
headline: "Cairo has become the most popular language for developers",
location: "Worldwide",
author: "Cairo Digger",
content: "Cairo is a new programming language for zero-knowledge proofs",
};
println!("New article available! {}", news.summarize());
}
This code prints New article available! (Read more...).
Creating a default implementation doesn’t require us to change anything about the previous implementation of Summary on Tweet. The reason is that the syntax for overriding a default implementation is the same as the syntax for implementing a trait method that doesn’t have a default implementation.
Default implementations can call other methods in the same trait, even if those other methods don’t have a default implementation. In this way, a trait can provide a lot of useful functionality and only require implementors to specify a small part of it. For example, we could define the Summary trait to have a summarize_author method whose implementation is required, and then define a summarize method that has a default implementation that calls the summarize_author method:
mod aggregator {
pub trait Summary<T> {
fn summarize(
self: @T,
) -> ByteArray {
format!("(Read more from {}...)", Self::summarize_author(self))
}
fn summarize_author(self: @T) -> ByteArray;
}
#[derive(Drop)]
pub struct Tweet {
pub username: ByteArray,
pub content: ByteArray,
pub reply: bool,
pub retweet: bool,
}
impl TweetSummary of Summary<Tweet> {
fn summarize_author(self: @Tweet) -> ByteArray {
format!("@{}", self.username)
}
}
}
use aggregator::{Summary, Tweet};
fn main() {
let tweet = Tweet {
username: "EliBenSasson",
content: "Crypto is full of short-term maximizing projects. \n @Starknet and @StarkWareLtd are about long-term vision maximization.",
reply: false,
retweet: false,
};
println!("1 new tweet: {}", tweet.summarize());
}
To use this version of Summary, we only need to define summarize_author when we implement the trait on a type:
mod aggregator {
pub trait Summary<T> {
fn summarize(
self: @T,
) -> ByteArray {
format!("(Read more from {}...)", Self::summarize_author(self))
}
fn summarize_author(self: @T) -> ByteArray;
}
#[derive(Drop)]
pub struct Tweet {
pub username: ByteArray,
pub content: ByteArray,
pub reply: bool,
pub retweet: bool,
}
impl TweetSummary of Summary<Tweet> {
fn summarize_author(self: @Tweet) -> ByteArray {
format!("@{}", self.username)
}
}
}
use aggregator::{Summary, Tweet};
fn main() {
let tweet = Tweet {
username: "EliBenSasson",
content: "Crypto is full of short-term maximizing projects. \n @Starknet and @StarkWareLtd are about long-term vision maximization.",
reply: false,
retweet: false,
};
println!("1 new tweet: {}", tweet.summarize());
}
After we define summarize_author, we can call summarize on instances of the Tweet struct, and the default implementation of summarize will call the definition of summarize_author that we’ve provided. Because we’ve implemented summarize_author, the Summary trait has given us the behavior of the summarize method without requiring us to write any more code.
mod aggregator {
pub trait Summary<T> {
fn summarize(
self: @T,
) -> ByteArray {
format!("(Read more from {}...)", Self::summarize_author(self))
}
fn summarize_author(self: @T) -> ByteArray;
}
#[derive(Drop)]
pub struct Tweet {
pub username: ByteArray,
pub content: ByteArray,
pub reply: bool,
pub retweet: bool,
}
impl TweetSummary of Summary<Tweet> {
fn summarize_author(self: @Tweet) -> ByteArray {
format!("@{}", self.username)
}
}
}
use aggregator::{Summary, Tweet};
fn main() {
let tweet = Tweet {
username: "EliBenSasson",
content: "Crypto is full of short-term maximizing projects. \n @Starknet and @StarkWareLtd are about long-term vision maximization.",
reply: false,
retweet: false,
};
println!("1 new tweet: {}", tweet.summarize());
}
This code prints 1 new tweet: (Read more from @EliBenSasson...).
Note that it isn’t possible to call the default implementation from an overriding implementation of that same method.
Managing and Using External Trait
To use traits methods, you need to make sure the correct traits/implementation(s) are imported. In some cases you might need to import not only the trait but also the implementation if they are declared in separate modules.
If CircleGeometry implementation was in a separate module/file named circle, then to define boundary method on Circle struct, we'd need to import ShapeGeometry trait in the circle module.
If the code were to be organized into modules like in Listing 8-6 where the implementation of a trait is defined in a different module than the trait itself, explicitly importing the relevant trait or implementation would be required.
// Here T is an alias type which will be provided during implementation
pub trait ShapeGeometry<T> {
fn boundary(self: T) -> u64;
fn area(self: T) -> u64;
}
mod rectangle {
// Importing ShapeGeometry is required to implement this trait for Rectangle
use super::ShapeGeometry;
#[derive(Copy, Drop)]
pub struct Rectangle {
pub height: u64,
pub width: u64,
}
// Implementation RectangleGeometry passes in <Rectangle>
// to implement the trait for that type
impl RectangleGeometry of ShapeGeometry<Rectangle> {
fn boundary(self: Rectangle) -> u64 {
2 * (self.height + self.width)
}
fn area(self: Rectangle) -> u64 {
self.height * self.width
}
}
}
mod circle {
// Importing ShapeGeometry is required to implement this trait for Circle
use super::ShapeGeometry;
#[derive(Copy, Drop)]
pub struct Circle {
pub radius: u64,
}
// Implementation CircleGeometry passes in <Circle>
// to implement the imported trait for that type
impl CircleGeometry of ShapeGeometry<Circle> {
fn boundary(self: Circle) -> u64 {
(2 * 314 * self.radius) / 100
}
fn area(self: Circle) -> u64 {
(314 * self.radius * self.radius) / 100
}
}
}
use rectangle::Rectangle;
use circle::Circle;
fn main() {
let rect = Rectangle { height: 5, width: 7 };
println!("Rectangle area: {}", ShapeGeometry::area(rect)); //35
println!("Rectangle boundary: {}", ShapeGeometry::boundary(rect)); //24
let circ = Circle { radius: 5 };
println!("Circle area: {}", ShapeGeometry::area(circ)); //78
println!("Circle boundary: {}", ShapeGeometry::boundary(circ)); //31
}
Listing 8-6: Implementing an external trait
Note that in Listing 8-6, CircleGeometry and RectangleGeometry implementations don't need to be declared as pub. Indeed, ShapeGeometry trait, which is public, is used to print the result in the main function. The compiler will find the appropriate implementation for the ShapeGeometry public trait, regardless of the implementation visibility.
Impl Aliases
Implementations can be aliased when imported. This is most useful when you want to instantiate generic implementations with concrete types. For example, let's say we define a trait Two that is used to return the value 2 for a type T. We can write a trivial generic implementation of Two for all types that implement the One trait, simply by adding twice the value of one and returning it. However, in our public API, we may only want to expose the Two implementation for the u8 and u128 types.
trait Two<T> {
fn two() -> T;
}
mod one_based {
pub impl TwoImpl<
T, +Copy<T>, +Drop<T>, +Add<T>, impl One: core::num::traits::One<T>,
> of super::Two<T> {
fn two() -> T {
One::one() + One::one()
}
}
}
pub impl U8Two = one_based::TwoImpl<u8>;
pub impl U128Two = one_based::TwoImpl<u128>;
Listing 8-7: Using impl aliases to instantiate generic impls with concrete types
We can define the generic implementation in a private module, use an impl alias to instantiate the generic implementation for these two concrete types, and make these two implementations public, while keeping the generic implementation private and unexposed. This way, we can avoid code duplication using the generic implementation, while keeping the public API clean and simple.
Negative Impls
Note: This is still an experimental feature and can only be used if
experimental-features = ["negative_impls"]is enabled in your Scarb.toml file, under the[package]section.
Negative implementations, also known as negative traits or negative bounds, are a mechanism that allows you to express that a type does not implement a certain trait when defining the implementation of a trait over a generic type. Negative impls enable you to write implementations that are applicable only when another implementation does not exist in the current scope.
For example, let's say we have a trait Producer and a trait Consumer, and we want to define a generic behavior where all types implement the Consumer trait by default. However, we want to ensure that no type can be both a Consumer and a Producer. We can use negative impls to express this restriction.
In Listing 8-8, we define a ProducerType that implements the Producer trait, and two other types, AnotherType and AThirdType, which do not implement the Producer trait. We then use negative impls to create a default implementation of the Consumer trait for all types that do not implement the Producer trait.
#[derive(Drop)]
struct ProducerType {}
#[derive(Drop, Debug)]
struct AnotherType {}
#[derive(Drop, Debug)]
struct AThirdType {}
trait Producer<T> {
fn produce(self: T) -> u32;
}
trait Consumer<T> {
fn consume(self: T, input: u32);
}
impl ProducerImpl of Producer<ProducerType> {
fn produce(self: ProducerType) -> u32 {
42
}
}
impl TConsumerImpl<T, +core::fmt::Debug<T>, +Drop<T>, -Producer<T>> of Consumer<T> {
fn consume(self: T, input: u32) {
println!("{:?} consumed value: {}", self, input);
}
}
fn main() {
let producer = ProducerType {};
let another_type = AnotherType {};
let third_type = AThirdType {};
let production = producer.produce();
// producer.consume(production); Invalid: ProducerType does not implement Consumer
another_type.consume(production);
third_type.consume(production);
}
Listing 8-8: Using negative impls to enforce that a type cannot implement both Producer and Consumer traits simultaneously
In the main function, we create instances of ProducerType, AnotherType, and AThirdType. We then call the produce method on the producer instance and pass the result to the consume method on the another_type and third_type instances. Finally, we try to call the consume method on the producer instance, which results in a compile-time error because ProducerType does not implement the Consumer trait.
Constraint traits on associated items
Currently, associated items are considered an experimental feature. In order to use them, you need to add the following to your
Scarb.tomlunder the[package]section:experimental-features = ["associated_item_constraints"].
In some cases, you may want to constrain the associated items of a trait based on the type of the generic parameter. You can do this using the [AssociatedItem: ConstrainedValue] syntax after a trait bound.
Let's say you want to implement an extend method for collections. This method takes an iterator and add its elements to the collection. To ensure type safety, we want the iterator's elements to match the collection's element type. We can achieve this by constraining the Iterator::Item associated type to match the collection's type.
In Listing 8-9, we implement this by defining a trait Extend<T, A> and use [Item: A] as a constraint on the extend function's trait bound. Additionally, we use the Destruct trait to ensure that the iterator is consumed, and show an example implementation for Extend<Array<T>, T>.
trait Extend<T, A> {
fn extend<I, +core::iter::Iterator<I>[Item: A], +Destruct<I>>(ref self: T, iterator: I);
}
impl ArrayExtend<T, +Drop<T>> of Extend<Array<T>, T> {
fn extend<I, +core::iter::Iterator<I>[Item: T], +Destruct<I>>(ref self: Array<T>, iterator: I) {
for item in iterator {
self.append(item);
}
}
}
Listing 8-9: Using associated items constraints to ensure that a type matches the associated type of another type
TypeEqual Trait for type equality constraints
The TypeEqual trait from the core::metaprogramming module lets you create constraints based on type equality. In most of the cases, you don't need +TypeEqual and you can achieve the same using only generic arguments and associated type constraints, but TypeEqual can be useful in some advanced scenarios.
The first use case is implementing a trait for all types that match certain conditions, except for specific types. We do this using a negative implementation on the TypeEqual trait.
In Listing 8-10, we create a SafeDefault trait and implement it for any type T that implements Default. However, we exclude the SensitiveData type using -TypeEqual<T, SensitiveData>.
trait SafeDefault<T> {
fn safe_default() -> T;
}
#[derive(Drop, Default)]
struct SensitiveData {
secret: felt252,
}
// Implement SafeDefault for all types EXCEPT SensitiveData
impl SafeDefaultImpl<
T, +Default<T>, -core::metaprogramming::TypeEqual<T, SensitiveData>,
> of SafeDefault<T> {
fn safe_default() -> T {
Default::default()
}
}
fn main() {
let _safe: u8 = SafeDefault::safe_default();
let _unsafe: SensitiveData = Default::default(); // Allowed
// This would cause a compile error:
// let _dangerous: SensitiveData = SafeDefault::safe_default();
}
Listing 8-10: Using the TypeEqual trait to exclude a specific type from an implementation
The second use case is ensuring that two types are equal, particularly useful when working with associated types.
In Listing 8-11, we show this with a StateMachine trait that has an associated type State. We create two types, TA and TB, both using StateCounter as their State. Then we implement a combine function that works only when both state machines have the same state type, using the bound TypeEqual<A::State, B::State>.
trait StateMachine {
type State;
fn transition(ref state: Self::State);
}
#[derive(Copy, Drop)]
struct StateCounter {
counter: u8,
}
impl TA of StateMachine {
type State = StateCounter;
fn transition(ref state: StateCounter) {
state.counter += 1;
}
}
impl TB of StateMachine {
type State = StateCounter;
fn transition(ref state: StateCounter) {
state.counter *= 2;
}
}
fn combine<
impl A: StateMachine,
impl B: StateMachine,
+core::metaprogramming::TypeEqual<A::State, B::State>,
>(
ref self: A::State,
) {
A::transition(ref self);
B::transition(ref self);
}
fn main() {
let mut initial = StateCounter { counter: 0 };
combine::<TA, TB>(ref initial);
}
Listing 8-11: Using the TypeEqual trait to ensure two types have matching associated types
Error handling
In this chapter, we will explore various error handling techniques provided by Cairo, which not only allow you to address potential issues in your code, but also make it easier to create programs that are adaptable and maintainable. By examining different approaches to managing errors, such as pattern matching with the Result enum, using the ? operator for more ergonomic error propagation, and employing the unwrap or expect methods for handling recoverable errors, you'll gain a deeper understanding of Cairo's error handling features. These concepts are crucial for building robust applications that can effectively handle unexpected situations, ensuring your code is ready for production.
Unrecoverable Errors with panic
In Cairo, unexpected issues may arise during program execution, resulting in runtime errors. While the panic function from the core library doesn't provide a resolution for these errors, it does acknowledge their occurrence and terminates the program. There are two primary ways that a panic can be triggered in Cairo: inadvertently, through actions causing the code to panic (e.g., accessing an array beyond its bounds), or deliberately, by invoking the panic function.
When a panic occurs, it leads to an abrupt termination of the program. The panic function takes an array as an argument, which can be used to provide an error message and performs an unwind process where all variables are dropped and dictionaries squashed to ensure the soundness of the program to safely terminate the execution.
Here is how we can call panic from inside a program and return the error code 2:
Filename: src/lib.cairo
fn main() {
let mut data = array![2];
if true {
panic(data);
}
println!("This line isn't reached");
}
Running the program will produce the following output:
$ scarb cairo-run
Compiling no_listing_01_panic v0.1.0 (listings/ch09-error-handling/no_listing_01_panic/Scarb.toml)
Finished `dev` profile target(s) in 4 seconds
Running no_listing_01_panic
Run panicked with [2, ].
As you can notice in the output, the call to println! macro is never reached, as the program terminates after encountering the panic statement.
An alternative and more idiomatic approach to panic in Cairo would be to use the panic_with_felt252 function. This function serves as an abstraction of the array-defining process and is often preferred due to its clearer and more concise expression of intent. By using panic_with_felt252, developers can panic in a one-liner by providing a felt252 error message as an argument, making the code more readable and maintainable.
Let's consider an example:
use core::panic_with_felt252;
fn main() {
panic_with_felt252(2);
}
Executing this program will yield the same error message as before. In that case, if there is no need for an array and multiple values to be returned within the error, panic_with_felt252 is a more succinct alternative.
panic! Macro
panic! macro can be really helpful. The previous example returning the error code 2 shows how convenient panic! macro is. There is no need to create an array and pass it as an argument like with the panic function.
fn main() {
if true {
panic!("2");
}
println!("This line isn't reached");
}
Unlike the panic_with_felt252 function, using panic! allows the input, which is ultimately the panic error, to be a literal longer than 31 bytes. This is because panic! takes a string as a parameter. For example, the following line of code will successfully compile:
panic!("the error for panic! macro is not limited to 31 characters anymore");
nopanic Notation
You can use the nopanic notation to indicate that a function will never panic. Only nopanic functions can be called in a function annotated as nopanic.
Here is an example:
fn function_never_panic() -> felt252 nopanic {
42
}
This function will always return 42 and is guaranteed to never panic. Conversely, the following function is not guaranteed to never panic:
fn function_never_panic() nopanic {
assert(1 == 1, 'what');
}
If you try to compile this function that includes code that may panic, you will get the following error:
$ scarb cairo-run
Compiling no_listing_04_nopanic_wrong v0.1.0 (listings/ch09-error-handling/no_listing_05_nopanic_wrong/Scarb.toml)
error: Function is declared as nopanic but calls a function that may panic.
--> listings/ch09-error-handling/no_listing_05_nopanic_wrong/src/lib.cairo:4:12
assert(1 == 1, 'what');
^****^
error: Function is declared as nopanic but calls a function that may panic.
--> listings/ch09-error-handling/no_listing_05_nopanic_wrong/src/lib.cairo:4:5
assert(1 == 1, 'what');
^********************^
error: could not compile `no_listing_04_nopanic_wrong` due to previous error
error: `scarb metadata` exited with error
Note that there are two functions that may panic here, assert and equality with ==. We usually don't use assert function in practice and use assert! macro instead. We will discuss assert! macro in more detail in the Testing Cairo Programs chapter.
panic_with Attribute
You can use the panic_with attribute to mark a function that returns an Option or Result. This attribute takes two arguments, which are the data that is passed as the panic reason as well as the name for a wrapping function. It will create a wrapper for your annotated function which will panic if the function returns None or Err, with the given data as the panic error.
Example:
#[panic_with('value is 0', wrap_not_zero)]
fn wrap_if_not_zero(value: u128) -> Option<u128> {
if value == 0 {
None
} else {
Some(value)
}
}
fn main() {
wrap_if_not_zero(0); // this returns None
wrap_not_zero(0); // this panics with 'value is 0'
}
Recoverable Errors with Result
Most errors aren’t serious enough to require the program to stop entirely. Sometimes, when a function fails, it’s for a reason that you can easily interpret and respond to. For example, if you try to add two large integers and the operation overflows because the sum exceeds the maximum representable value, you might want to return an error or a wrapped result instead of causing undefined behavior or terminating the process.
The Result Enum
Recall from Generic data types section in Chapter 8 that the Result enum is defined as having two variants, Ok and Err, as follows:
enum Result<T, E> {
Ok: T,
Err: E,
}
The Result<T, E> enum has two generic types, T and E, and two variants: Ok which holds the value of type T and Err which holds the value of type E. This definition makes it convenient to use the Result enum anywhere we have an operation that might succeed (by returning a value of type T) or fail (by returning a value of type E).
The ResultTrait
The ResultTrait trait provides methods for working with the Result<T, E> enum, such as unwrapping values, checking whether the Result is Ok or Err, and panicking with a custom message. The ResultTraitImpl implementation defines the logic of these methods.
trait ResultTrait<T, E> {
fn expect<+Drop<E>>(self: Result<T, E>, err: felt252) -> T;
fn unwrap<+Drop<E>>(self: Result<T, E>) -> T;
fn expect_err<+Drop<T>>(self: Result<T, E>, err: felt252) -> E;
fn unwrap_err<+Drop<T>>(self: Result<T, E>) -> E;
fn is_ok(self: @Result<T, E>) -> bool;
fn is_err(self: @Result<T, E>) -> bool;
}
The expect and unwrap methods are similar in that they both attempt to extract the value of type T from a Result<T, E> when it is in the Ok variant. If the Result is Ok(x), both methods return the value x. However, the key difference between the two methods lies in their behavior when the Result is in the Err variant. The expect method allows you to provide a custom error message (as a felt252 value) that will be used when panicking, giving you more control and context over the panic. On the other hand, the unwrap method panics with a default error message, providing less information about the cause of the panic.
The expect_err and unwrap_err methods have the exact opposite behavior. If the Result is Err(x), both methods return the value x. However, the key difference between the two methods is in case of Ok(). The expect_err method allows you to provide a custom error message (as a felt252 value) that will be used when panicking, giving you more control and context over the panic. On the other hand, the unwrap_err method panics with a default error message, providing less information about the cause of the panic.
A careful reader may have noticed the <+Drop<T>> and <+Drop<E>> in the first four methods signatures. This syntax represents generic type constraints in the Cairo language, as seen in the previous chapter. These constraints indicate that the associated functions require an implementation of the Drop trait for the generic types T and E, respectively.
Finally, the is_ok and is_err methods are utility functions provided by the ResultTrait trait to check the variant of a Result enum value.
is_oktakes a snapshot of aResult<T, E>value and returnstrueif theResultis theOkvariant, meaning the operation was successful. If theResultis theErrvariant, it returnsfalse.is_errtakes a snapshot of aResult<T, E>value and returnstrueif theResultis theErrvariant, meaning the operation encountered an error. If theResultis theOkvariant, it returnsfalse.
These methods are helpful when you want to check the success or failure of an operation without consuming the Result value, allowing you to perform additional operations or make decisions based on the variant without unwrapping it.
You can find the implementation of the ResultTrait here.
It is always easier to understand with examples. Have a look at this function signature:
fn u128_overflowing_add(a: u128, b: u128) -> Result<u128, u128>;
It takes two u128 integers, a and b, and returns a Result<u128, u128> where the Ok variant holds the sum if the addition does not overflow, and the Err variant holds the overflowed value if the addition does overflow.
Now, we can use this function elsewhere. For instance:
fn u128_checked_add(a: u128, b: u128) -> Option<u128> {
match u128_overflowing_add(a, b) {
Ok(r) => Some(r),
Err(r) => None,
}
}
Here, it accepts two u128 integers, a and b, and returns an Option<u128>. It uses the Result returned by u128_overflowing_add to determine the success or failure of the addition operation. The match expression checks the Result from u128_overflowing_add. If the result is Ok(r), it returns Some(r) containing the sum. If the result is Err(r), it returns None to indicate that the operation has failed due to overflow. The function does not panic in case of an overflow.
Let's take another example:
fn parse_u8(s: felt252) -> Result<u8, felt252> {
match s.try_into() {
Some(value) => Ok(value),
None => Err('Invalid integer'),
}
}
In this example, the parse_u8 function takes a felt252 and tries to convert it into a u8 integer using the try_into method. If successful, it returns Ok(value), otherwise it returns Err('Invalid integer').
Our two test cases are:
fn parse_u8(s: felt252) -> Result<u8, felt252> {
match s.try_into() {
Some(value) => Ok(value),
None => Err('Invalid integer'),
}
}
#[cfg(test)]
mod tests {
use super::*;
#[test]
fn test_felt252_to_u8() {
let number: felt252 = 5;
// should not panic
let res = parse_u8(number).unwrap();
}
#[test]
#[should_panic]
fn test_felt252_to_u8_panic() {
let number: felt252 = 256;
// should panic
let res = parse_u8(number).unwrap();
}
}
Don't worry about the #[cfg(test)] attribute for now. We'll explain in more detail its meaning in the next Testing Cairo Programs chapter.
#[test] attribute means the function is a test function, and #[should_panic] attribute means this test will pass if the test execution panics.
The first one tests a valid conversion from felt252 to u8, expecting the unwrap method not to panic. The second test function attempts to convert a value that is out of the u8 range, expecting the unwrap method to panic with the error message Invalid integer.
The ? Operator
The last operator we will talk about is the ? operator. The ? operator is used for more idiomatic and concise error handling. When you use the ? operator on a Result or Option type, it will do the following:
- If the value is
Ok(x)orSome(x), it will return the inner valuexdirectly. - If the value is
Err(e)orNone, it will propagate the error orNoneby immediately returning from the function.
The ? operator is useful when you want to handle errors implicitly and let the calling function deal with them.
Here is an example:
fn do_something_with_parse_u8(input: felt252) -> Result<u8, felt252> {
let input_to_u8: u8 = parse_u8(input)?;
// DO SOMETHING
let res = input_to_u8 - 1;
Ok(res)
}
We can see that do_something_with_parse_u8 function takes a felt252 value as input and calls parse_u8 function. The ? operator is used to propagate the error, if any, or unwrap the successful value.
And with a little test case:
fn parse_u8(s: felt252) -> Result<u8, felt252> {
match s.try_into() {
Some(value) => Ok(value),
None => Err('Invalid integer'),
}
}
fn do_something_with_parse_u8(input: felt252) -> Result<u8, felt252> {
let input_to_u8: u8 = parse_u8(input)?;
// DO SOMETHING
let res = input_to_u8 - 1;
Ok(res)
}
#[cfg(test)]
mod tests {
use super::*;
#[test]
fn test_function_2() {
let number: felt252 = 258;
match do_something_with_parse_u8(number) {
Ok(value) => println!("Result: {}", value),
Err(e) => println!("Error: {}", e),
}
}
}
The console will print the error Invalid Integer.
Summary
We saw that recoverable errors can be handled in Cairo using the Result enum, which has two variants: Ok and Err. The Result<T, E> enum is generic, with types T and E representing the successful and error values, respectively. The ResultTrait provides methods for working with Result<T, E>, such as unwrapping values, checking if the result is Ok or Err, and panicking with custom messages.
To handle recoverable errors, a function can return a Result type and use pattern matching to handle the success or failure of an operation. The ? operator can be used to implicitly handle errors by propagating the error or unwrapping the successful value. This allows for more concise and clear error handling, where the caller is responsible for managing errors raised by the called function.
Testing Cairo Programs
Correctness in our programs is the extent to which our code does what we intend it to do. Cairo is designed with a high degree of concern about the correctness of programs, but correctness is complex and not easy to prove. Cairo's linear type system shoulders a huge part of this burden, but the type system cannot catch everything. As such, Cairo includes support for writing tests.
Testing is a complex skill: although we can’t cover every detail about how to write good tests in one chapter, we’ll discuss the mechanics of Cairo's testing facilities. We’ll talk about the annotations and macros available to you when writing your tests, the default behavior and options provided for running your tests, and how to organize tests into unit tests and integration tests.
How To Write Tests
The Anatomy of a Test Function
Tests are Cairo functions that verify that the non-test code is functioning in the expected manner. The bodies of test functions typically perform these three actions:
- Set up any needed data or state.
- Run the code you want to test.
- Assert the results are what you expect.
Let’s look at the features Cairo provides for writing tests that take these actions, which include:
#[test]attribute.assert!macro.assert_eq!,assert_ne!,assert_lt!,assert_le!,assert_gt!andassert_ge!macros. In order to use them, you will need to addassert_macros = "2.8.2"as a dev dependency.#[should_panic]attribute.
Note: Make sure to select Starknet Foundry as a test runner when creating your project.
The Anatomy of a Test Function
At its simplest, a test in Cairo is a function that’s annotated with the #[test] attribute. Attributes are metadata about pieces of Cairo code; one example is the #[derive()] attribute we used with structs in Chapter 5. To change a function into a test function, add #[test] on the line before fn. When you run your tests with the scarb test command, Scarb runs Starknet Foundry's test runner binary that runs the annotated functions and reports on whether each test function passes or fails.
Let's create a new project called adder using Scarb with the command scarb new adder. Remove the tests folder.
adder
├── Scarb.toml
└── src
└── lib.cairo
In lib.cairo, let's remove the existing content and add a tests module containing the first test, as shown in Listing 10-1.
Filename: src/lib.cairo
pub fn add(left: usize, right: usize) -> usize {
left + right
}
#[cfg(test)]
mod tests {
use super::*;
#[test]
fn it_works() {
let result = add(2, 2);
assert_eq!(result, 4);
}
}
Listing 10-1: A simple test function
Note the #[test] annotation: this attribute indicates this is a test function, so the test runner knows to treat this function as a test. We might also have non-test functions to help set up common scenarios or perform common operations, so we always need to indicate which functions are tests.
We use the #[cfg(test)] attribute for the tests module, so that the compiler knows the code it contains needs to be compiled only when running tests. This is actually not an option: if you put a simple test with the #[test] attribute in a lib.cairo file, it will not compile. We will talk more about the #[cfg(test)] attribute in the next Test Organization section.
The example function body uses the assert_eq! macro, which contains the result of adding 2 and 2, which equals 4. This assertion serves as an example of the format for a typical test. We'll explain in more detail how assert_eq! works later in this chapter. Let’s run it to see that this test passes.
The scarb test command runs all tests found in our project, and shows the following output:
$ scarb test
Running test listing_10_01 (snforge test)
Compiling snforge_scarb_plugin v0.31.0 (git+https://github.com/foundry-rs/starknet-foundry.git?tag=v0.31.0#72ea785ca354e9e506de3e5d687da9fb2c1b3c67)
Blocking waiting for file lock on build directory
Finished `release` profile [optimized] target(s) in 0.90s
Compiling test(listings/ch10-testing-cairo-programs/listing_10_01/Scarb.toml)
Finished `dev` profile target(s) in 6 seconds
Collected 2 test(s) from listing_10_01 package
Running 2 test(s) from src/
[PASS] listing_10_01::tests::it_works (gas: ~1)
[PASS] listing_10_01::other_tests::exploration (gas: ~1)
Tests: 2 passed, 0 failed, 0 skipped, 0 ignored, 0 filtered out
scarb test compiled and ran the test. We see the line Collected 1 test(s) from adder package followed by the line Running 1 test(s) from src/. The next line shows the name of the test function, called it_works, and that the result of running that test is ok. The test runner also provides an estimation of the gas consumption. The overall summary shows that all the tests passed, and the portion that reads 1 passed; 0 failed totals the number of tests that passed or failed.
It’s possible to mark a test as ignored so it doesn’t run in a particular instance; we’ll cover that in the Ignoring Some Tests Unless Specifically Requested section later in this chapter. Because we haven’t done that here, the summary shows 0 ignored. We can also pass an argument to the scarb test command to run only a test whose name matches a string; this is called filtering and we’ll cover that in the Running Single Tests section. Since we haven’t filtered the tests being run, the end of the summary shows 0 filtered out.
Let’s start to customize the test to our own needs. First change the name of the it_works function to a different name, such as exploration, like so:
#[test]
fn exploration() {
let result = 2 + 2;
assert_eq!(result, 4);
}
Then run scarb test again. The output now shows exploration instead of it_works:
$ scarb test
Running test listing_10_01 (snforge test)
Compiling snforge_scarb_plugin v0.31.0 (git+https://github.com/foundry-rs/starknet-foundry.git?tag=v0.31.0#72ea785ca354e9e506de3e5d687da9fb2c1b3c67)
Blocking waiting for file lock on build directory
Finished `release` profile [optimized] target(s) in 0.90s
Compiling test(listings/ch10-testing-cairo-programs/listing_10_01/Scarb.toml)
Finished `dev` profile target(s) in 6 seconds
Collected 2 test(s) from listing_10_01 package
Running 2 test(s) from src/
[PASS] listing_10_01::tests::it_works (gas: ~1)
[PASS] listing_10_01::other_tests::exploration (gas: ~1)
Tests: 2 passed, 0 failed, 0 skipped, 0 ignored, 0 filtered out
Now we’ll add another test, but this time we’ll make a test that fails! Tests fail when something in the test function panics. Each test is run in a new thread, and when the main thread sees that a test thread has died, the test is marked as failed. Enter the new test as a function named another, so your src/lib.cairo file looks like in Listing 10-2.
Filename: src/lib.cairo
#[cfg(test)]
mod tests {
#[test]
fn exploration() {
let result = 2 + 2;
assert_eq!(result, 4);
}
#[test]
fn another() {
let result = 2 + 2;
assert!(result == 6, "Make this test fail");
}
}
Listing 10-2: Adding a second test in lib.cairo that will fail
Run scarb test and you will see the following output:
Collected 2 test(s) from adder package
Running 2 test(s) from src/
[FAIL] adder::tests::another
Failure data:
"Make this test fail"
[PASS] adder::tests::exploration (gas: ~1)
Tests: 1 passed, 1 failed, 0 skipped, 0 ignored, 0 filtered out
Failures:
adder::tests::another
Instead of [PASS], the line adder::tests::another shows [FAIL]. A new section appears between the individual results and the summary. It displays the detailed reason for each test failure. In this case, we get the details that another failed because it panicked with "Make this test fail" error.
After that, the summary line is displayed: we had one test pass and one test fail. At the end, we see a list of the failing tests.
Now that you've seen what the test results look like in different scenarios, let’s look at some functions that are useful in tests.
Checking Results with the assert! Macro
The assert! macro, provided by Cairo, is useful when you want to ensure that some condition in a test evaluates to true. We give the assert! macro the first argument that evaluates to a boolean. If the value is true, nothing happens and the test passes. If the value is false, the assert! macro calls panic() to cause the test to fail with a message we defined as the second argument. Using the assert! macro helps us check that our code is functioning in the way we intended.
Remember in Chapter 5, we used a Rectangle struct and a can_hold method, which are repeated here in Listing 10-3. Let’s put this code in the src/lib.cairo file, then write some tests for it using the assert! macro.
Filename: src/lib.cairo
#[derive(Drop)]
struct Rectangle {
width: u64,
height: u64,
}
trait RectangleTrait {
fn can_hold(self: @Rectangle, other: @Rectangle) -> bool;
}
impl RectangleImpl of RectangleTrait {
fn can_hold(self: @Rectangle, other: @Rectangle) -> bool {
*self.width > *other.width && *self.height > *other.height
}
}
Listing 10-3: Using the Rectangle struct and its can_hold method from Chapter 5
The can_hold method returns a bool, which means it’s a perfect use case for the assert! macro. We can write a test that exercises the can_hold method by creating a Rectangle instance that has a width of 8 and a height of 7 and asserting that it can hold another Rectangle instance that has a width of 5 and a height of 1.
#[derive(Drop)]
struct Rectangle {
width: u64,
height: u64,
}
trait RectangleTrait {
fn can_hold(self: @Rectangle, other: @Rectangle) -> bool;
}
impl RectangleImpl of RectangleTrait {
fn can_hold(self: @Rectangle, other: @Rectangle) -> bool {
*self.width > *other.width && *self.height > *other.height
}
}
#[cfg(test)]
mod tests {
use super::*;
#[test]
fn larger_can_hold_smaller() {
let larger = Rectangle { height: 7, width: 8 };
let smaller = Rectangle { height: 1, width: 5 };
assert!(larger.can_hold(@smaller), "rectangle cannot hold");
}
}
#[cfg(test)]
mod tests2 {
use super::*;
#[test]
fn smaller_cannot_hold_larger() {
let larger = Rectangle { height: 7, width: 8 };
let smaller = Rectangle { height: 1, width: 5 };
assert!(!smaller.can_hold(@larger), "rectangle cannot hold");
}
}
Note the use super::*; line inside the tests module. The tests module is
a regular module that follows the usual visibility rules we covered in Chapter
7 in the “Paths for Referring to an Item in the Module
Tree”
section. Because the tests module is an inner module, we need to bring the
code under test in the outer module into the scope of the inner module. We use
a glob here, so anything we define in the outer module is available to this
tests module.
We’ve named our test larger_can_hold_smaller, and we’ve created the two Rectangle instances that we need. Then we called the assert! macro and passed it the result of calling larger.can_hold(@smaller). This expression is supposed to return true, so our test should pass. Let’s find out!
$ scarb test
Running test listing_10_03 (snforge test)
Compiling snforge_scarb_plugin v0.31.0 (git+https://github.com/foundry-rs/starknet-foundry.git?tag=v0.31.0#72ea785ca354e9e506de3e5d687da9fb2c1b3c67)
Finished `release` profile [optimized] target(s) in 1.04s
Compiling test(listings/ch10-testing-cairo-programs/listing_10_03/Scarb.toml)
Finished `dev` profile target(s) in 5 seconds
Collected 2 test(s) from listing_10_03 package
Running 2 test(s) from src/
[PASS] listing_10_03::tests::larger_can_hold_smaller (gas: ~1)
[PASS] listing_10_03::tests2::smaller_cannot_hold_larger (gas: ~1)
Tests: 2 passed, 0 failed, 0 skipped, 0 ignored, 0 filtered out
It does pass! Let’s add another test, this time asserting that a smaller rectangle cannot hold a larger rectangle:
Filename: src/lib.cairo
#[derive(Drop)]
struct Rectangle {
width: u64,
height: u64,
}
trait RectangleTrait {
fn can_hold(self: @Rectangle, other: @Rectangle) -> bool;
}
impl RectangleImpl of RectangleTrait {
fn can_hold(self: @Rectangle, other: @Rectangle) -> bool {
*self.width > *other.width && *self.height > *other.height
}
}
#[cfg(test)]
mod tests {
use super::*;
#[test]
fn larger_can_hold_smaller() {
let larger = Rectangle { height: 7, width: 8 };
let smaller = Rectangle { height: 1, width: 5 };
assert!(larger.can_hold(@smaller), "rectangle cannot hold");
}
}
#[cfg(test)]
mod tests2 {
use super::*;
#[test]
fn smaller_cannot_hold_larger() {
let larger = Rectangle { height: 7, width: 8 };
let smaller = Rectangle { height: 1, width: 5 };
assert!(!smaller.can_hold(@larger), "rectangle cannot hold");
}
}
Listing 10-4: Adding another test in lib.cairo that will pass
Because the correct result of the can_hold method, in this case, is false, we need to negate that result before we pass it to the assert! macro. As a result, our test will pass if can_hold returns false:
$ scarb test
Running test listing_10_03 (snforge test)
Compiling snforge_scarb_plugin v0.31.0 (git+https://github.com/foundry-rs/starknet-foundry.git?tag=v0.31.0#72ea785ca354e9e506de3e5d687da9fb2c1b3c67)
Finished `release` profile [optimized] target(s) in 1.04s
Compiling test(listings/ch10-testing-cairo-programs/listing_10_03/Scarb.toml)
Finished `dev` profile target(s) in 5 seconds
Collected 2 test(s) from listing_10_03 package
Running 2 test(s) from src/
[PASS] listing_10_03::tests::larger_can_hold_smaller (gas: ~1)
[PASS] listing_10_03::tests2::smaller_cannot_hold_larger (gas: ~1)
Tests: 2 passed, 0 failed, 0 skipped, 0 ignored, 0 filtered out
Two tests that pass! Now let’s see what happens to our test results when we introduce a bug in our code. We’ll change the implementation of the can_hold method by replacing the > sign with a < sign when it compares the widths:
impl RectangleImpl of RectangleTrait {
fn can_hold(self: @Rectangle, other: @Rectangle) -> bool {
*self.width < *other.width && *self.height > *other.height
}
}
Running the tests now produces the following:
$ scarb test
Running test no_listing_01_wrong_can_hold_impl (snforge test)
Compiling snforge_scarb_plugin v0.31.0 (git+https://github.com/foundry-rs/starknet-foundry.git?tag=v0.31.0#72ea785ca354e9e506de3e5d687da9fb2c1b3c67)
Blocking waiting for file lock on build directory
Finished `release` profile [optimized] target(s) in 1.11s
Compiling test(listings/ch10-testing-cairo-programs/no_listing_01_wrong_can_hold_impl/Scarb.toml)
Finished `dev` profile target(s) in 6 seconds
Collected 0 test(s) from no_listing_01_wrong_can_hold_impl package
Running 0 test(s) from src/
Tests: 0 passed, 0 failed, 0 skipped, 0 ignored, 0 filtered out
Our tests caught the bug! Because larger.width is 8 and smaller.width is 5, the comparison of the widths in can_hold now returns false (8 is not less than 5) in the larger_can_hold_smaller test. Notice that the smaller_cannot_hold_larger test still passes: to make this test fail, the height comparison should also be modified in can_hold method, replacing the > sign with a < sign.
Testing Equality and Comparisons with the assert_xx! Macros
assert_eq! and assert_ne! Macros
A common way to verify functionality is to test for equality between the result
of the code under test and the value you expect the code to return. You could
do this using the assert! macro and passing it an expression using the ==
operator. However, this is such a common test that the standard library
provides a pair of macros — assert_eq! and assert_ne! — to perform this test
more conveniently. These macros compare two arguments for equality or
inequality, respectively. They’ll also print the two values if the assertion
fails, which makes it easier to see why the test failed; conversely, the
assert! macro only indicates that it got a false value for the ==
expression, without printing the values that led to the false value.
In Listing 10-5, we write a function named add_two that adds 2 to its
parameter, then we test this function using assert_eq! and assert_ne! macros.
Filename: src/lib.cairo
pub fn add_two(a: u32) -> u32 {
a + 2
}
#[cfg(test)]
mod tests {
use super::*;
#[test]
fn it_adds_two() {
assert_eq!(4, add_two(2));
}
#[test]
fn wrong_check() {
assert_ne!(0, add_two(2));
}
}
Listing 10-5: Testing the function add_two using assert_eq! and assert_ne! macros
Let’s check that it passes!
$ scarb test
Running test listing_10_04 (snforge test)
Compiling snforge_scarb_plugin v0.31.0 (git+https://github.com/foundry-rs/starknet-foundry.git?tag=v0.31.0#72ea785ca354e9e506de3e5d687da9fb2c1b3c67)
Blocking waiting for file lock on build directory
Finished `release` profile [optimized] target(s) in 1.00s
Compiling test(listings/ch10-testing-cairo-programs/listing_10_04/Scarb.toml)
Finished `dev` profile target(s) in 5 seconds
Collected 2 test(s) from listing_10_04 package
Running 2 test(s) from src/
[PASS] listing_10_04::add_two::tests::it_adds_two (gas: ~1)
[PASS] listing_10_04::add_two::tests::wrong_check (gas: ~1)
Tests: 2 passed, 0 failed, 0 skipped, 0 ignored, 0 filtered out
In the it_adds_two test, we pass 4 as argument to assert_eq! macro, which is equal to the result of
calling add_two(2). The line for this test is [PASS] adder::tests::it_adds_two (gas: ~1).
In the wrong_check test, we pass 0 as argument to assert_ne! macro, which is not equal to the result of
calling add_two(2). Tests that use the assert_ne! macro will pass if the two values we give it are not equal and
fail if they’re equal. This macro is most useful for cases when we’re not sure
what a value will be, but we know what the value definitely shouldn’t be.
For example, if we’re testing a function that is guaranteed to change its input
in some way, but how the input is changed depends on the day of
the week that we run our tests, the best thing to assert might be that the
output of the function is not equal to the input.
Let’s introduce a bug into our code to see what assert_eq! looks like when it
fails. Change the implementation of the add_two function to instead add 3:
pub fn add_two(a: u32) -> u32 {
a + 3
}
Run the tests again:
$ scarb test
Running test listing_10_04 (snforge test)
Compiling snforge_scarb_plugin v0.31.0 (git+https://github.com/foundry-rs/starknet-foundry.git?tag=v0.31.0#72ea785ca354e9e506de3e5d687da9fb2c1b3c67)
Blocking waiting for file lock on build directory
Finished `release` profile [optimized] target(s) in 1.00s
Compiling test(listings/ch10-testing-cairo-programs/listing_10_04/Scarb.toml)
Finished `dev` profile target(s) in 5 seconds
Collected 2 test(s) from listing_10_04 package
Running 2 test(s) from src/
[PASS] listing_10_04::add_two::tests::it_adds_two (gas: ~1)
[PASS] listing_10_04::add_two::tests::wrong_check (gas: ~1)
Tests: 2 passed, 0 failed, 0 skipped, 0 ignored, 0 filtered out
Our test caught the bug! The it_adds_two test failed with the following
message: "assertion `4 == add_two(2)` failed.
It tells us that the assertion that failed was "assertion `left == right` failed and the left
and right values are printed on the next lines as left: left_value and right: right_value.
This helps us start debugging: the left argument was 4 but the right argument, where we had
add_two(2), was 5. You can imagine that this would be especially helpful
when we have a lot of tests going on.
Note that in some languages and test frameworks, the parameters for equality
assertion functions are called expected and actual, and the order in which
we specify the arguments matters. However, in Cairo, they’re called left and
right, and the order in which we specify the value we expect and the value
the code produces doesn’t matter. We could write the assertion in this test as
assert_eq!(add_two(2), 4), which would result in the same failure message
that displays assertion failed: `(left == right)`.
Here is a simple example comparing two structs, showing how to use assert_eq! and assert_ne! macros:
#[derive(Drop, Debug, PartialEq)]
struct MyStruct {
var1: u8,
var2: u8,
}
#[cfg(test)]
#[test]
fn test_struct_equality() {
let first = MyStruct { var1: 1, var2: 2 };
let second = MyStruct { var1: 1, var2: 2 };
let third = MyStruct { var1: 1, var2: 3 };
assert_eq!(first, second);
assert_eq!(first, second, "{:?},{:?} should be equal", first, second);
assert_ne!(first, third);
assert_ne!(first, third, "{:?},{:?} should not be equal", first, third);
}
Under the surface, assert_eq! and assert_ne! macros use the operators
== and !=, respectively. They both take snapshots of values as arguments. When the assertions fail, these macros print their
arguments using debug formatting ({:?} syntax), which means the values being compared must
implement PartialEq and Debug traits. All primitive types and most of
the core library types implement these traits. For structs and enums that
you define yourself, you’ll need to implement PartialEq to assert equality of
those types. You’ll also need to implement Debug to print the values when the
assertion fails. Because both traits are derivable, this is usually as straightforward as adding the
#[derive(Drop, Debug, PartialEq)] annotation to your struct or enum definition. See
Appendix C for more details about these and other derivable traits.
assert_lt!, assert_le!, assert_gt! and assert_ge! Macros
Comparisons in tests can be done using the assert_xx! macros:
assert_lt!checks if a given value is lower than another value, and reverts otherwise.assert_le!checks if a given value is lower or equal than another value, and reverts otherwise.assert_gt!checks if a given value is greater than another value, and reverts otherwise.assert_ge!checks if a given value is greater or equal than another value, and reverts otherwise.
Listing 10-6 demonstrates how to use these macros:
#[derive(Drop, Copy, Debug, PartialEq)]
struct Dice {
number: u8,
}
impl DicePartialOrd of PartialOrd<Dice> {
fn lt(lhs: Dice, rhs: Dice) -> bool {
lhs.number < rhs.number
}
fn le(lhs: Dice, rhs: Dice) -> bool {
lhs.number <= rhs.number
}
fn gt(lhs: Dice, rhs: Dice) -> bool {
lhs.number > rhs.number
}
fn ge(lhs: Dice, rhs: Dice) -> bool {
lhs.number >= rhs.number
}
}
#[cfg(test)]
#[test]
fn test_struct_equality() {
let first_throw = Dice { number: 5 };
let second_throw = Dice { number: 2 };
let third_throw = Dice { number: 6 };
let fourth_throw = Dice { number: 5 };
assert_gt!(first_throw, second_throw);
assert_ge!(first_throw, fourth_throw);
assert_lt!(second_throw, third_throw);
assert_le!(
first_throw, fourth_throw, "{:?},{:?} should be lower or equal", first_throw, fourth_throw,
);
}
Listing 10-6: Example of tests that use the assert_xx! macros for comparisons
In this example, we roll a Dice struct multiple times and compare the results. We need to manually implement the PartialOrd trait for our struct so that we can compare Dice instances with lt, le, gt and ge functions, which are used by assert_lt!, assert_le!, assert_gt! and assert_ge! macros, respectively. We also need to derive the Copy trait on our Dice struct to use the instantiated structs multiple times, as the comparison functions take ownership of the variables.
Adding Custom Failure Messages
You can also add a custom message to be printed with the failure message as
optional arguments to assert!, assert_eq!, and assert_ne! macros. Any
arguments specified after the required arguments are passed along to the
format! macro (discussed in the Printing chapter), so you can pass a format string that contains {} placeholders and
values to go in those placeholders. Custom messages are useful for documenting
what an assertion means; when a test fails, you’ll have a better idea of what
the problem is with the code.
Let’s add a custom failure message composed of a format
string with a placeholder filled in with the actual value we got from the previous
add_two function:
#[test]
fn it_adds_two() {
assert_eq!(4, add_two(2), "Expected {}, got add_two(2)={}", 4, add_two(2));
}
Now when we run the test, we’ll get a more informative error message:
$ scarb test
Running test no_listing_02_custom_messages (snforge test)
Compiling snforge_scarb_plugin v0.31.0 (git+https://github.com/foundry-rs/starknet-foundry.git?tag=v0.31.0#72ea785ca354e9e506de3e5d687da9fb2c1b3c67)
Blocking waiting for file lock on build directory
Finished `release` profile [optimized] target(s) in 0.39s
Compiling test(listings/ch10-testing-cairo-programs/no_listing_02_custom_messages/Scarb.toml)
Finished `dev` profile target(s) in 4 seconds
Collected 1 test(s) from no_listing_02_custom_messages package
Running 1 test(s) from src/
[FAIL] no_listing_02_custom_messages::tests::it_adds_two
Failure data:
"assertion `4 == add_two(2)` failed: Expected 4, got add_two(2)=5
4: 4
add_two(2): 5"
Tests: 0 passed, 1 failed, 0 skipped, 0 ignored, 0 filtered out
Failures:
no_listing_02_custom_messages::tests::it_adds_two
We can see the value we actually got in the test output, which would help us debug what happened instead of what we were expecting to happen.
Checking for panics with should_panic
In addition to checking return values, it’s important to check that our code handles error conditions as we expect. For example, consider the Guess type in Listing 10-7:
Filename: src/lib.cairo
#[derive(Drop)]
struct Guess {
value: u64,
}
pub trait GuessTrait {
fn new(value: u64) -> Guess;
}
impl GuessImpl of GuessTrait {
fn new(value: u64) -> Guess {
if value < 1 || value > 100 {
panic!("Guess must be >= 1 and <= 100");
}
Guess { value }
}
}
Listing 10-7: Guess struct and its new method
Other code that uses Guess depends on the guarantee that Guess instances will contain only values between 1 and 100. We can write a test that ensures that attempting to create a Guess instance with a value outside that range panics.
We do this by adding the attribute should_panic to our test function. The test passes if the code inside the function panics; the test fails if the code inside the function doesn’t panic.
#[cfg(test)]
mod tests {
use super::*;
#[test]
#[should_panic]
fn greater_than_100() {
GuessTrait::new(200);
}
}
We place the #[should_panic] attribute after the #[test] attribute and before the test function it applies to. Let’s look at the result to see that this test passes:
$ scarb test
Running test listing_09_08 (snforge test)
Compiling snforge_scarb_plugin v0.31.0 (git+https://github.com/foundry-rs/starknet-foundry.git?tag=v0.31.0#72ea785ca354e9e506de3e5d687da9fb2c1b3c67)
Blocking waiting for file lock on build directory
Finished `release` profile [optimized] target(s) in 0.21s
Compiling test(listings/ch10-testing-cairo-programs/listing_10_05/Scarb.toml)
Finished `dev` profile target(s) in 4 seconds
Collected 1 test(s) from listing_09_08 package
Running 1 test(s) from src/
[PASS] listing_09_08::tests::greater_than_100 (gas: ~1)
Success data:
"Guess must be >= 1 and <= 100"
Tests: 1 passed, 0 failed, 0 skipped, 0 ignored, 0 filtered out
Looks good! Now let’s introduce a bug in our code by removing the condition that the new function will panic if the value is greater than 100:
#[derive(Drop)]
struct Guess {
value: u64,
}
trait GuessTrait {
fn new(value: u64) -> Guess;
}
impl GuessImpl of GuessTrait {
fn new(value: u64) -> Guess {
if value < 1 {
panic!("Guess must be >= 1 and <= 100");
}
Guess { value }
}
}
When we run the test, it will fail:
$ scarb test
Running test no_listing_03_wrong_new_impl (snforge test)
Compiling snforge_scarb_plugin v0.31.0 (git+https://github.com/foundry-rs/starknet-foundry.git?tag=v0.31.0#72ea785ca354e9e506de3e5d687da9fb2c1b3c67)
Finished `release` profile [optimized] target(s) in 0.14s
Compiling test(listings/ch10-testing-cairo-programs/no_listing_03_wrong_new_impl/Scarb.toml)
Finished `dev` profile target(s) in 4 seconds
Collected 0 test(s) from no_listing_03_wrong_new_impl package
Running 0 test(s) from src/
Tests: 0 passed, 0 failed, 0 skipped, 0 ignored, 0 filtered out
We don’t get a very helpful message in this case, but when we look at the test function, we see that it’s annotated with #[should_panic] attribute. The failure we got means that the code in the test function did not cause a panic.
Tests that use should_panic can be imprecise. A should_panic test would pass even if the test panics for a different reason from the one we were expecting. To make should_panic tests more precise, we can add an optional expected parameter to the #[should_panic] attribute. The test harness will make sure that the failure message contains the provided text. For example, consider the modified code for GuessImpl in Listing 10-8 where the new function panics with different messages depending on whether the value is too small or too large:
Filename: src/lib.cairo
#[derive(Drop)]
struct Guess {
value: u64,
}
trait GuessTrait {
fn new(value: u64) -> Guess;
}
impl GuessImpl of GuessTrait {
fn new(value: u64) -> Guess {
if value < 1 {
panic!("Guess must be >= 1");
} else if value > 100 {
panic!("Guess must be <= 100");
}
Guess { value }
}
}
#[cfg(test)]
mod tests {
use super::*;
#[test]
#[should_panic(expected: "Guess must be <= 100")]
fn greater_than_100() {
GuessTrait::new(200);
}
}
Listing 10-8: new implementation that panics with different error messages
The test will pass because the value we put in the should_panic attribute’s expected parameter is the string that the Guess::new method panics with. We need to specify the entire panic message that we expect.
To see what happens when a should_panic test with an expected message fails, let’s again introduce a bug into our code by swapping the bodies of the if value < 1 and the else if value > 100 blocks:
impl GuessImpl of GuessTrait {
fn new(value: u64) -> Guess {
if value < 1 {
panic!("Guess must be <= 100");
} else if value > 100 {
panic!("Guess must be >= 1");
}
Guess { value }
}
}
#[cfg(test)]
mod tests {
use super::*;
#[test]
#[should_panic(expected: "Guess must be <= 100")]
fn greater_than_100() {
GuessTrait::new(200);
}
}
This time when we run the should_panic test, it will fail:
$ scarb test
Running test no_listing_04_new_bug (snforge test)
Compiling snforge_scarb_plugin v0.31.0 (git+https://github.com/foundry-rs/starknet-foundry.git?tag=v0.31.0#72ea785ca354e9e506de3e5d687da9fb2c1b3c67)
Blocking waiting for file lock on build directory
Finished `release` profile [optimized] target(s) in 1.01s
Compiling test(listings/ch10-testing-cairo-programs/no_listing_04_new_bug/Scarb.toml)
Finished `dev` profile target(s) in 6 seconds
Collected 1 test(s) from no_listing_04_new_bug package
Running 1 test(s) from src/
[FAIL] no_listing_04_new_bug::tests::greater_than_100
Failure data:
Incorrect panic data
Actual: [0x46a6158a16a947e5916b2a2ca68501a45e93d7110e81aa2d6438b1c57c879a3, 0x0, 0x4775657373206d757374206265203e3d2031, 0x12] (Guess must be >= 1)
Expected: [0x46a6158a16a947e5916b2a2ca68501a45e93d7110e81aa2d6438b1c57c879a3, 0x0, 0x4775657373206d757374206265203c3d20313030, 0x14] (Guess must be <= 100)
Tests: 0 passed, 1 failed, 0 skipped, 0 ignored, 0 filtered out
Failures:
no_listing_04_new_bug::tests::greater_than_100
The failure message indicates that this test did indeed panic as we expected, but the panic message did not include the expected string. The panic message that we did get in this case was Guess must be >= 1. Now we can start figuring out where our bug is!
Running Single Tests
Sometimes, running a full test suite can take a long time. If you’re working on code in a particular area, you might want to run only the tests pertaining to that code. You can choose which tests to run by passing scarb test the name of the test you want to run as an argument.
To demonstrate how to run a single test, we’ll first create two test functions, as shown in Listing 10-9, and choose which ones to run.
Filename: src/lib.cairo
#[cfg(test)]
mod tests {
#[test]
fn add_two_and_two() {
let result = 2 + 2;
assert_eq!(result, 4);
}
#[test]
fn add_three_and_two() {
let result = 3 + 2;
assert!(result == 5, "result is not 5");
}
}
Listing 10-9: Two tests with two different names
We can pass the name of any test function to scarb test to run only that test:
$ scarb test
Running test listing_10_07 (snforge test)
Compiling snforge_scarb_plugin v0.31.0 (git+https://github.com/foundry-rs/starknet-foundry.git?tag=v0.31.0#72ea785ca354e9e506de3e5d687da9fb2c1b3c67)
Blocking waiting for file lock on build directory
Finished `release` profile [optimized] target(s) in 0.71s
Compiling test(listings/ch10-testing-cairo-programs/listing_10_07/Scarb.toml)
Finished `dev` profile target(s) in 6 seconds
Collected 2 test(s) from listing_10_07 package
Running 2 test(s) from src/
[PASS] listing_10_07::tests::add_two_and_two (gas: ~1)
[PASS] listing_10_07::tests::add_three_and_two (gas: ~1)
Tests: 2 passed, 0 failed, 0 skipped, 0 ignored, 0 filtered out
Only the test with the name add_two_and_two ran; the other test didn’t match that name. The test output lets us know we had one more test that didn’t run by displaying 1 filtered out; at the end.
We can also specify part of a test name, and any test whose name contains that value will be run.
Ignoring Some Tests Unless Specifically Requested
Sometimes a few specific tests can be very time-consuming to execute, so you might want to exclude them during most runs of scarb test. Rather than listing as arguments all tests you do want to run, you can instead annotate the time-consuming tests using the #[ignore] attribute to exclude them, as shown here:
pub fn add(left: usize, right: usize) -> usize {
left + right
}
#[cfg(test)]
mod tests {
use super::*;
#[test]
fn it_works() {
let result = add(2, 2);
assert_eq!(result, 4);
}
#[test]
#[ignore]
fn expensive_test() { // code that takes an hour to run
}
}
After #[test] we add the #[ignore] line to the test we want to exclude. Now when we run our tests, it_works runs, but expensive_test doesn’t:
$ scarb test
Running test no_listing_05_ignore_tests (snforge test)
Compiling snforge_scarb_plugin v0.31.0 (git+https://github.com/foundry-rs/starknet-foundry.git?tag=v0.31.0#72ea785ca354e9e506de3e5d687da9fb2c1b3c67)
Blocking waiting for file lock on build directory
Finished `release` profile [optimized] target(s) in 0.79s
Compiling test(listings/ch10-testing-cairo-programs/no_listing_05_ignore_tests/Scarb.toml)
Finished `dev` profile target(s) in 5 seconds
Collected 2 test(s) from no_listing_05_ignore_tests package
Running 2 test(s) from src/
[IGNORE] no_listing_05_ignore_tests::tests::expensive_test
[PASS] no_listing_05_ignore_tests::tests::it_works (gas: ~1)
Tests: 1 passed, 0 failed, 0 skipped, 1 ignored, 0 filtered out
The expensive_test function is listed as ignored.
When you’re at a point where it makes sense to check the results of the ignored tests and you have time to wait for the results, you can run scarb test --include-ignored to run all tests, whether they’re ignored or not.
Testing Recursive Functions or Loops
When testing recursive functions or loops, the test is instantiated by default with a maximum amount of gas that it can consume. This prevents running infinite loops or consuming too much gas, and can help you benchmark the efficiency of your implementations. This value is assumed reasonably large enough, but you can override it by adding the #[available_gas(<Number>)] attribute to the test function. The following example shows how to use it:
fn sum_n(n: usize) -> usize {
let mut i = 0;
let mut sum = 0;
while i <= n {
sum += i;
i += 1;
}
sum
}
#[cfg(test)]
mod tests {
use super::*;
#[test]
#[available_gas(2000000)]
fn test_sum_n() {
let result = sum_n(10);
assert!(result == 55, "result is not 55");
}
}
Benchmarking Cairo Programs
Starknet Foundry contains a profiling feature that is useful to analyze and optimize the performance of your Cairo programs.
The profiling feature generates execution traces for successful tests, which are used to create profile outputs. This allows you to benchmark specific parts of your code.
To use the profiler, you will need to:
- Install Cairo Profiler from Software Mansion.
- Install Go, Graphviz and pprof, all of them are required to visualize the generated profile output.
- Run
snforge test --build-profilecommand, which generates a trace file for each passing test, stored in the snfoundry_trace directory of your project. This command also generates the corresponding output files in the profile directory. - Run
go tool pprof -http=":8000" path/to/profile/output.pb.gzto analyse a profile. This will start a web server at the specified port.
Let's reuse the sum_n function studied above:
fn sum_n(n: usize) -> usize {
let mut i = 0;
let mut sum = 0;
while i <= n {
sum += i;
i += 1;
}
sum
}
#[cfg(test)]
mod tests {
use super::*;
#[test]
#[available_gas(2000000)]
fn test_sum_n() {
let result = sum_n(10);
assert!(result == 55, "result is not 55");
}
}
After generating the trace file and the profile output, running go tool pprof in your project will start the web server where you can find many useful information about the test that you ran:
-
The test includes one function call, corresponding to the call to the test function. Calling
sum_nmultiple times in the test function will still return 1 call. This is becausesnforgesimulates a contract call when executing a test. -
The
sum_nfunction execution uses 256 Cairo steps:
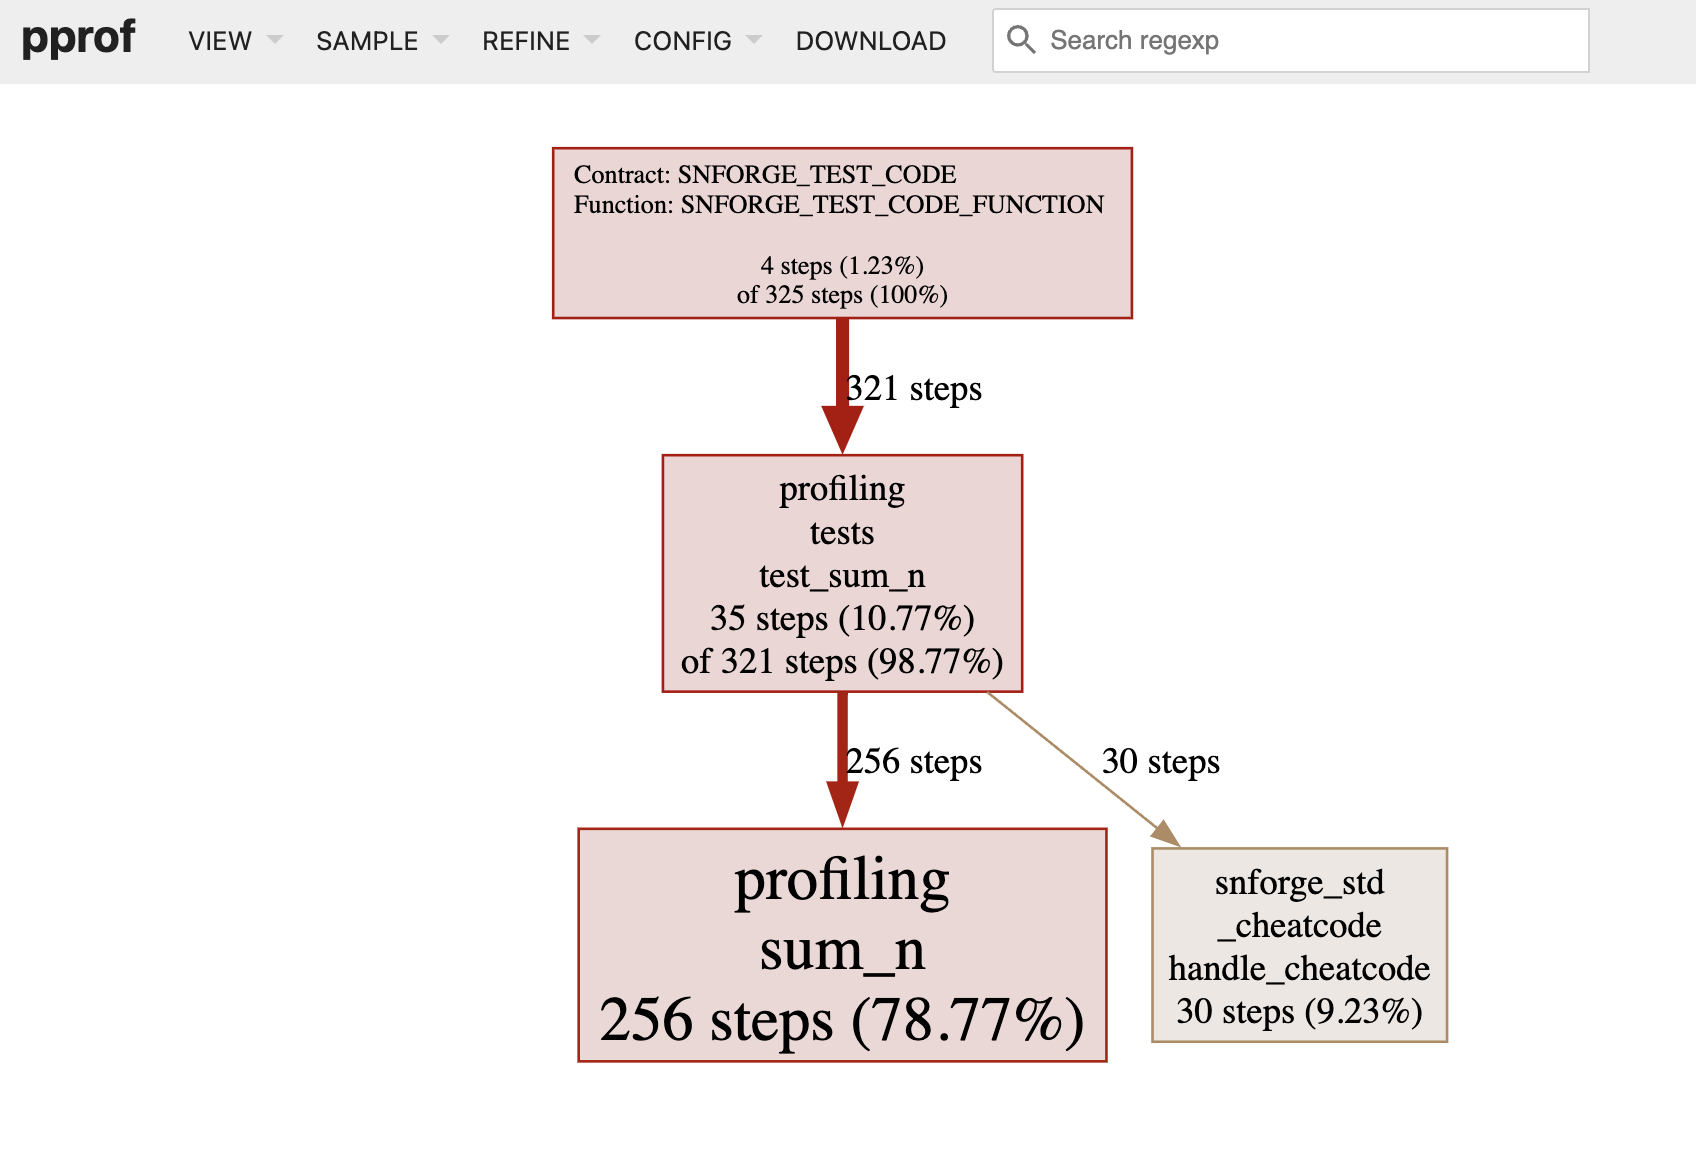
Other information is also available such as memory holes (i.e., unused memory cells) or builtins usage. The Cairo Profiler is under active development, and many other features will be made available in the future.
Test Organization
We'll think about tests in terms of two main categories: unit tests and integration tests. Unit tests are small and more focused, testing one module in isolation at a time, and can test private functions. Integration tests use your code in the same way any other external code would, using only the public interface and potentially exercising multiple modules per test.
Writing both kinds of tests is important to ensure that the pieces of your library are doing what you expect them to, separately and together.
Unit Tests
The purpose of unit tests is to test each unit of code in isolation from the rest of the code to quickly pinpoint where code is and isn’t working as expected. You’ll put unit tests in the src directory in each file with the code that they’re testing.
The convention is to create a module named tests in each file to contain the test functions and to annotate the module with #[cfg(test)] attribute.
The Tests Module and #[cfg(test)]
The #[cfg(test)] annotation on the tests module tells Cairo to compile and run the test code only when you run scarb test, not when you run scarb build. This saves compile time when you only want to build the project and saves space in the resulting compiled artifact because the tests are not included. You’ll see that because integration tests go in a different directory, they don’t need the #[cfg(test)] annotation. However, because unit tests go in the same files as the code, you’ll use #[cfg(test)] to specify that they shouldn’t be included in the compiled result.
Recall that when we created the new adder project in the first section of this chapter, we wrote this first test:
pub fn add(left: usize, right: usize) -> usize {
left + right
}
#[cfg(test)]
mod tests {
use super::*;
#[test]
fn it_works() {
let result = add(2, 2);
assert_eq!(result, 4);
}
}
The attribute cfg stands for configuration and tells Cairo that the following item should only be included given a certain configuration option. In this case, the configuration option is test, which is provided by Cairo for compiling and running tests. By using the cfg attribute, Cairo compiles our test code only if we actively run the tests with scarb test. This includes any helper functions that might be within this module, in addition to the functions annotated with #[test].
Testing Private Functions
There’s debate within the testing community about whether or not private functions should be tested directly, and other languages make it difficult or impossible to test private functions. Regardless of which testing ideology you adhere to, Cairo's privacy rules do allow you to test private functions. Consider the code below with the private function internal_adder.
Filename: src/lib.cairo
pub fn add(a: u32, b: u32) -> u32 {
internal_adder(a, 2)
}
fn internal_adder(a: u32, b: u32) -> u32 {
a + b
}
#[cfg(test)]
mod tests {
use super::*;
#[test]
fn add() {
assert_eq!(4, internal_adder(2, 2));
}
}
Listing 10-10: Testing a private function
Note that the internal_adder function is not marked as pub. Tests are just Cairo code, and the tests module is just another module. As we discussed in the "Paths for Referring to an Item in the Module Tree" section, items in child modules can use the items in their ancestor modules. In this test, we bring the tests module’s parent internal_adder into scope with use super::internal_adder; and then the test can call internal_adder. If you don’t think private functions should be tested, there’s nothing in Cairo that will compel you to do so.
Integration Tests
Integration tests use your library in the same way any other code would. Their purpose is to test whether many parts of your library work together correctly. Units of code that work correctly on their own could have problems when integrated, so test coverage of the integrated code is important as well. To create integration tests, you first need a tests directory.
The tests Directory
We create a tests directory at the top level of our project directory, next to src. Scarb knows to look for integration test files in this directory. We can then make as many test files as we want, and Scarb will compile each of the files as an individual crate.
Let’s create an integration test. With the code in Listing 10-10 still in the src/lib.cairo file, make a tests directory, and create a new file named tests/integration_test.cairo. Your directory structure should look like this:
adder
├── Scarb.lock
├── Scarb.toml
├── src
│ └── lib.cairo
└── tests
└── integration_tests.cairo
Enter the code in Listing 10-11 into the tests/integration_test.cairo file:
Filename: tests/integration_tests.cairo
use adder::add_two;
#[test]
fn it_adds_two() {
assert_eq!(4, add_two(2));
}
Listing 10-11: An integration test of a function in the adder crate
Each file in the tests directory is a separate crate, so we need to bring our library into each test crate’s scope. For that reason we add use adder::add_two at the top of the code, which we didn’t need in the unit tests.
We don’t need to annotate any code in tests/integration_test.cairo with #[cfg(test)]. Scarb treats the tests directory specially and compiles files in this directory only when we run scarb test. Run scarb test now:
$ scarb test
Running test adder (snforge test)
Compiling snforge_scarb_plugin v0.31.0 (git+https://github.com/foundry-rs/starknet-foundry.git?tag=v0.31.0#72ea785ca354e9e506de3e5d687da9fb2c1b3c67)
Blocking waiting for file lock on build directory
Finished `release` profile [optimized] target(s) in 0.88s
Compiling test(listings/ch10-testing-cairo-programs/no_listing_09_integration_test/Scarb.toml)
Compiling test(listings/ch10-testing-cairo-programs/no_listing_09_integration_test/Scarb.toml)
Finished `dev` profile target(s) in 9 seconds
Collected 2 test(s) from adder package
Running 1 test(s) from tests/
[PASS] adder_integrationtest::integration_tests::it_adds_two (gas: ~1)
Running 1 test(s) from src/
[PASS] adder::tests::internal (gas: ~1)
Tests: 2 passed, 0 failed, 0 skipped, 0 ignored, 0 filtered out
The two sections of output include the unit tests and the integration tests. Note that if any test in a section fails, the following sections will not be run. For example, if a unit test fails, there won’t be any output for integration tests because those tests will only be run if all unit tests are passing.
The first displayed section is for the integration tests. Each integration test file has its own section, so if we add more files in the tests directory, there will be more integration test sections.
The second displayed section is the same as we’ve been seeing: one line for each unit test (one named add that we added just above) and then a summary line for the unit tests.
We can still run a particular integration test function by specifying the test function’s name as an argument of the option -f to scarb test like for instance scarb test -f integration_tests::internal. To run all the tests in a particular integration test file, we use the same option of scarb test but using only the name of the file.
Then, to run all of our integration tests, we can just add a filter to only run tests whose path contains integration_tests.
$ scarb test -f integration_tests
Running cairo-test adder
Compiling test(adder_unittest) adder v0.1.0 (cairo-book/listings/ch10-testing-cairo-programs/no_listing_09_integration_test/Scarb.toml)
Compiling test(adder_integration_tests) adder_integration_tests v0.1.0 (cairo-book/listings/ch10-testing-cairo-programs/no_listing_09_integration_test/Scarb.toml)
Finished release target(s) in 7 seconds
testing adder ...
running 1 test
test adder_integration_tests::integration_tests::internal ... ok (gas usage est.: 23110)
test result: ok. 1 passed; 0 failed; 0 ignored; 0 filtered out;
running 0 tests
test result: ok. 0 passed; 0 failed; 0 ignored; 1 filtered out;
We see that in the second section for the unit tests, 1 has been filtered out because it is not in the integration_tests file.
Submodules in Integration Tests
As you add more integration tests, you might want to make more files in the tests directory to help organize them; for example, you can group the test functions by the functionality they’re testing. As mentioned earlier, each file in the tests directory is compiled as its own separate crate, which is useful for creating separate scopes to more closely imitate the way end users will be using your crate. However, this means files in the tests directory don’t share the same behavior as files in src do, as you learned in Chapter 7 regarding how to separate code into modules and files.
The different behavior of tests directory files is most noticeable when you have a set of helper functions to use in multiple integration test files and you try to follow the steps in the Separating Modules into Different Files section of Chapter 7 to extract them into a common module. For example, if we create tests/common.cairo and place a function named setup in it, we can add some code to setup that we want to call from multiple test functions in multiple test files:
Filename: tests/common.cairo
pub fn setup() {
println!("Setting up tests...");
}
Filename: tests/integration_tests.cairo
use adder::it_adds_two;
#[test]
fn internal() {
assert!(it_adds_two(2, 2) == 4, "internal_adder failed");
}
Filename: src/lib.cairo
pub fn it_adds_two(a: u8, b: u8) -> u8 {
a + b
}
#[cfg(test)]
mod tests {
#[test]
fn add() {
assert_eq!(4, super::it_adds_two(2, 2));
}
}
When we run the tests with scarb test, we’ll see a new section in the test output for the common.cairo file, even though this file doesn’t contain any test functions nor did we call the setup function from anywhere:
$ scarb test
Running test adder (snforge test)
Compiling snforge_scarb_plugin v0.31.0 (git+https://github.com/foundry-rs/starknet-foundry.git?tag=v0.31.0#72ea785ca354e9e506de3e5d687da9fb2c1b3c67)
Finished `release` profile [optimized] target(s) in 0.64s
Compiling test(listings/ch10-testing-cairo-programs/no_listing_12_submodules/Scarb.toml)
Compiling test(listings/ch10-testing-cairo-programs/no_listing_12_submodules/Scarb.toml)
Finished `dev` profile target(s) in 8 seconds
Collected 2 test(s) from adder package
Running 1 test(s) from src/
[PASS] adder::tests::add (gas: ~1)
Running 1 test(s) from tests/
[PASS] adder_integrationtest::integration_tests::internal (gas: ~1)
Tests: 2 passed, 0 failed, 0 skipped, 0 ignored, 0 filtered out
To avoid systematically getting a section for each file of the tests folder, we also have the option of making the tests/ directory behave like a regular crate, by adding a tests/lib.cairo file. In that case, the tests directory will no longer compile as one crate per file, but as one crate for the whole directory.
Let's create this tests/lib.cairo file :
Filename: tests/lib.cairo
mod integration_tests;
mod common;
The project directory will now look like this :
adder
├── Scarb.lock
├── Scarb.toml
├── src
│ └── lib.cairo
└── tests
├── common.cairo
├── integration_tests.cairo
└── lib.cairo
When we run the scarb test command again, here is the output :
$ scarb test
Running test adder (snforge test)
Compiling snforge_scarb_plugin v0.31.0 (git+https://github.com/foundry-rs/starknet-foundry.git?tag=v0.31.0#72ea785ca354e9e506de3e5d687da9fb2c1b3c67)
Finished `release` profile [optimized] target(s) in 0.51s
Compiling test(listings/ch10-testing-cairo-programs/no_listing_13_single_integration_crate/Scarb.toml)
Compiling test(listings/ch10-testing-cairo-programs/no_listing_13_single_integration_crate/Scarb.toml)
Finished `dev` profile target(s) in 7 seconds
Collected 2 test(s) from adder package
Running 1 test(s) from tests/
[PASS] adder_tests::integration_tests::internal (gas: ~1)
Running 1 test(s) from src/
[PASS] adder::tests::add (gas: ~1)
Tests: 2 passed, 0 failed, 0 skipped, 0 ignored, 0 filtered out
This way, only the test functions will be tested and the setup function can be imported without being tested.
Summary
Cairo's testing features provide a way to specify how code should function to ensure it continues to work as you expect, even as you make changes. Unit tests exercise different parts of a library separately and can test private implementation details. Integration tests check that many parts of the library work together correctly, and they use the library’s public API to test the code in the same way external code will use it. Even though Cairo's type system and ownership rules help prevent some kinds of bugs, tests are still important to reduce logic bugs having to do with how your code is expected to behave.
Functional Language Features: Iterators and Closures
Cairo’s design has taken strong inspiration from Rust, which itself has taken inspiration from many existing languages and techniques, and one significant influence is functional programming. Programming in a functional style often includes using functions as values by passing them in arguments, returning them from other functions, assigning them to variables for later execution, and so forth.
In this chapter, we won’t debate the issue of what functional programming is or isn’t but will instead discuss some features of Cairo that are similar to features in Rust and many languages often referred to as functional.
More specifically, we’ll cover:
- Closures, a function-like construct you can store in a variable
- Iterators, a way of processing a series of elements -->
We’ve already covered some other Cairo features, such as pattern matching and enums, that are also influenced by the Rust and the functional style. Because mastering closures and iterators is an important part of writing idiomatic, fast Cairo code, we’ll devote this entire chapter to them.
Closures
Closures are anonymous functions you can save in a variable or pass as arguments to other functions. You can create the closure in one place and then call the closure elsewhere to evaluate it in a different context. Unlike functions, closures can capture values from the scope in which they’re defined. We’ll demonstrate how these closure features allow for code reuse and behavior customization.
Note: Closures were introduced in Cairo 2.9 and are still under development. Some new features will be introduced in future versions of Cairo, so this page will evolve accordingly.
Understanding Closures
When writing Cairo programs, you'll often need to pass behavior as a parameter to another function. Closures provide a way to define this behavior inline, without creating a separate named function. They are particularly valuable when working with collections, error handling, and any scenario where you want to customize how a function behaves using a function as a parameter.
Consider a simple example where we want to process numbers differently based on some condition. Instead of writing multiple functions, we can use closures to define the behavior where we need it:
#[generate_trait]
impl ArrayExt of ArrayExtTrait {
// Needed in Cairo 2.11.4 because of a bug in inlining analysis.
#[inline(never)]
fn map<T, +Drop<T>, F, +Drop<F>, impl func: core::ops::Fn<F, (T,)>, +Drop<func::Output>>(
self: Array<T>, f: F,
) -> Array<func::Output> {
let mut output: Array<func::Output> = array![];
for elem in self {
output.append(f(elem));
}
output
}
}
#[generate_trait]
impl ArrayFilterExt of ArrayFilterExtTrait {
// Needed in Cairo 2.11.4 because of a bug in inlining analysis.
#[inline(never)]
fn filter<
T,
+Copy<T>,
+Drop<T>,
F,
+Drop<F>,
impl func: core::ops::Fn<F, (T,)>[Output: bool],
+Drop<func::Output>,
>(
self: Array<T>, f: F,
) -> Array<T> {
let mut output: Array<T> = array![];
for elem in self {
if f(elem) {
output.append(elem);
}
}
output
}
}
fn main() {
let double = |value| value * 2;
println!("Double of 2 is {}", double(2_u8));
println!("Double of 4 is {}", double(4_u8));
// This won't work because `value` type has been inferred as `u8`.
//println!("Double of 6 is {}", double(6_u16));
let sum = |x: u32, y: u32, z: u16| {
x + y + z.into()
};
println!("Result: {}", sum(1, 2, 3));
let x = 8;
let my_closure = |value| {
x * (value + 3)
};
println!("my_closure(1) = {}", my_closure(1));
let double = array![1, 2, 3].map(|item: u32| item * 2);
let another = array![1, 2, 3].map(|item: u32| {
let x: u64 = item.into();
x * x
});
println!("double: {:?}", double);
println!("another: {:?}", another);
let even = array![3, 4, 5, 6].filter(|item: u32| item % 2 == 0);
println!("even: {:?}", even);
}
The closure's arguments go between the pipes (|). Note that we don't have to specify the types of arguments and of the return value (see double closure), they will be inferred from the closure usage, as it is done for any variables.
Of course, if you use a closure with different types, you will get a Type annotations needed error, telling you that you have to choose and specify the closure argument types.
The body is an expression, on a single line without {} like double or on several lines with {} like sum.
Capturing the Environment with Closures
One of the interests of closures is that they can include bindings from their enclosing scope.
In the following example, my_closure use a binding to x to compute x + value * 3.
#[generate_trait]
impl ArrayExt of ArrayExtTrait {
// Needed in Cairo 2.11.4 because of a bug in inlining analysis.
#[inline(never)]
fn map<T, +Drop<T>, F, +Drop<F>, impl func: core::ops::Fn<F, (T,)>, +Drop<func::Output>>(
self: Array<T>, f: F,
) -> Array<func::Output> {
let mut output: Array<func::Output> = array![];
for elem in self {
output.append(f(elem));
}
output
}
}
#[generate_trait]
impl ArrayFilterExt of ArrayFilterExtTrait {
// Needed in Cairo 2.11.4 because of a bug in inlining analysis.
#[inline(never)]
fn filter<
T,
+Copy<T>,
+Drop<T>,
F,
+Drop<F>,
impl func: core::ops::Fn<F, (T,)>[Output: bool],
+Drop<func::Output>,
>(
self: Array<T>, f: F,
) -> Array<T> {
let mut output: Array<T> = array![];
for elem in self {
if f(elem) {
output.append(elem);
}
}
output
}
}
fn main() {
let double = |value| value * 2;
println!("Double of 2 is {}", double(2_u8));
println!("Double of 4 is {}", double(4_u8));
// This won't work because `value` type has been inferred as `u8`.
//println!("Double of 6 is {}", double(6_u16));
let sum = |x: u32, y: u32, z: u16| {
x + y + z.into()
};
println!("Result: {}", sum(1, 2, 3));
let x = 8;
let my_closure = |value| {
x * (value + 3)
};
println!("my_closure(1) = {}", my_closure(1));
let double = array![1, 2, 3].map(|item: u32| item * 2);
let another = array![1, 2, 3].map(|item: u32| {
let x: u64 = item.into();
x * x
});
println!("double: {:?}", double);
println!("another: {:?}", another);
let even = array![3, 4, 5, 6].filter(|item: u32| item % 2 == 0);
println!("even: {:?}", even);
}
Note that, at the moment, closures are still not allowed to capture mutable variables, but this will be supported in future Cairo versions.
Closure Type Inference and Annotation
There are more differences between functions and closures. Closures don’t
usually require you to annotate the types of the parameters or the return value
like fn functions do. Type annotations are required on functions because the
types are part of an explicit interface exposed to your users. Defining this
interface rigidly is important for ensuring that everyone agrees on what types
of values a function uses and returns. Closures, on the other hand, aren’t used
in an exposed interface like this: they’re stored in variables and used without
naming them and exposing them to users of our library.
Closures are typically short and relevant only within a narrow context rather than in any arbitrary scenario. Within these limited contexts, the compiler can infer the types of the parameters and the return type, similar to how it’s able to infer the types of most variables (there are rare cases where the compiler needs closure type annotations too).
As with variables, we can add type annotations if we want to increase explicitness and clarity at the cost of being more verbose than is strictly necessary. Annotating the types for a closure would look like the definition shown in Listing 11-1. In this example, we’re defining a closure and storing it in a variable rather than defining the closure in the spot we pass it as an argument as we did in Listing 13-1.
fn generate_workout(intensity: u32, random_number: u32) {
let expensive_closure = |num: u32| -> u32 {
num
};
if intensity < 25 {
println!("Today, do {} pushups!", expensive_closure(intensity));
println!("Next, do {} situps!", expensive_closure(intensity));
} else {
if random_number == 3 {
println!("Take a break today! Remember to stay hydrated!");
} else {
println!("Today, run for {} minutes!", expensive_closure(intensity));
}
}
}
fn main() {
let simulated_user_specified_value = 10;
let simulated_random_number = 7;
generate_workout(simulated_user_specified_value, simulated_random_number);
}
Listing 11-1: Adding optional type annotations of the parameter and return value types in the closure
With type annotations added, the syntax of closures looks more similar to the syntax of functions. Here we define a function that adds 1 to its parameter and a closure that has the same behavior, for comparison. We’ve added some spaces to line up the relevant parts. This illustrates how closure syntax is similar to function syntax except for the use of pipes and the amount of syntax that is optional:
fn add_one_v1 (x: u32) -> u32 { x + 1 }
let add_one_v2 = |x: u32| -> u32 { x + 1 };
let add_one_v3 = |x| { x + 1 };
let add_one_v4 = |x| x + 1 ;
The first line shows a function definition, and the second line shows a fully
annotated closure definition. In the third line, we remove the type annotations
from the closure definition. In the fourth line, we remove the brackets, which
are optional because the closure body has only one expression. These are all
valid definitions that will produce the same behavior when they’re called. The
add_one_v3 and add_one_v4 lines require the closures to be evaluated to be
able to compile because the types will be inferred from their usage. This is
similar to let array = array![]; needing either type annotations or values of
some type to be inserted into the array for Cairo to be able to infer the type.
For closure definitions, the compiler will infer one concrete type for each of
their parameters and for their return value. For instance, Listing 11-2 shows
the definition of a short closure that just returns the value it receives as a
parameter. This closure isn’t very useful except for the purposes of this
example. Note that we haven’t added any type annotations to the definition.
Because there are no type annotations, we can call the closure with any type,
which we’ve done here with u64 the first time. If we then try to call
example_closure with a u32, we’ll get an error.
//TAG: does_not_compile
fn main() {
let example_closure = |x| x;
let s = example_closure(5_u64);
let n = example_closure(5_u32);
}
Listing 11-2: Attempting to call a closure whose types are inferred with two different types
The compiler gives us this error:
$ scarb build
Compiling listing_closure_different_types v0.1.0 (listings/ch11-functional-features/listing_closure_different_types/Scarb.toml)
warn[E0001]: Unused variable. Consider ignoring by prefixing with `_`.
--> listings/ch11-functional-features/listing_closure_different_types/src/lib.cairo:6:9
let s = example_closure(5_u64);
^
warn[E0001]: Unused variable. Consider ignoring by prefixing with `_`.
--> listings/ch11-functional-features/listing_closure_different_types/src/lib.cairo:7:9
let n = example_closure(5_u32);
^
error: Type annotations needed. Failed to infer ?7.
--> listings/ch11-functional-features/listing_closure_different_types/src/lib.cairo:7:13
let n = example_closure(5_u32);
^********************^
error: could not compile `listing_closure_different_types` due to previous error
The first time we call example_closure with the u64 value, the compiler
infers the type of x and the return type of the closure to be u64. Those
types are then locked into the closure in example_closure, and we get a type
error when we next try to use a different type with the same closure.
Moving Captured Values Out of Closures and the Fn Traits
Once a closure has captured a reference or captured ownership of a value from the environment where the closure is defined (thus affecting what, if anything, is moved into the closure), the code in the body of the closure defines what happens to the references or values when the closure is evaluated later (thus affecting what, if anything, is moved out of the closure). A closure body can do any of the following: move a captured value out of the closure, neither move nor mutate the value, or capture nothing from the environment to begin with.
The way a closure captures and handles values from the environment affects
which traits the closure implements, and traits are how functions and structs
can specify what kinds of closures they can use. Closures will automatically
implement one, two, or all three of these Fn traits, in an additive fashion,
depending on how the closure’s body handles the values:
-
FnOnceapplies to closures that can be called once. All closures implement at least this trait, because all closures can be called. A closure that moves captured values out of its body will only implementFnOnceand none of the otherFntraits, because it can only be called once. -
Fnapplies to closures that don’t move captured values out of their body and that don’t mutate captured values, as well as closures that capture nothing from their environment. These closures can be called more than once without mutating their environment, which is important in cases such as calling a closure multiple times concurrently.
Let’s look at the definition of the unwrap_or_else method on OptionTrait<T> that
we used in Listing 13-1:
pub impl OptionTraitImpl<T> of OptionTrait<T> {
#[inline]
fn unwrap_or_else<F, +Drop<F>, impl func: core::ops::FnOnce<F, ()>[Output: T], +Drop<func::Output>>(
self: Option<T>, f: F,
) -> T {
match self {
Some(x) => x,
None => f(),
}
}
}
Recall that T is the generic type representing the type of the value in the
Some variant of an Option. That type T is also the return type of the
unwrap_or_else function: code that calls unwrap_or_else on an
Option<ByteArray>, for example, will get a ByteArray.
Next, notice that the unwrap_or_else function has the additional generic type
parameter F. The F type is the type of the parameter named f, which is
the closure we provide when calling unwrap_or_else.
The trait bound specified on the generic type F is impl func: core::ops::FnOnce<F, ()>[Output: T],
which means F must be able to be called once, take no arguments (the unit type () is used), and return a T as output.
Using FnOnce in the trait bound expresses the constraint that
unwrap_or_else is only going to call f at most one time. In the body of
unwrap_or_else, we can see that if the Option is Some, f won’t be
called. If the Option is None, f will be called once. Because all
closures implement FnOnce, unwrap_or_else accepts all two kinds of
closures and is as flexible as it can be.
The Fn traits are important when defining or using functions or types that
make use of closures. In the next section, we’ll discuss iterators. Many
iterator methods take closure arguments, so keep these closure details in mind
as we continue!
Under the hood, closures are implemented through FnOnce and Fn traits. FnOnce is implemented for closures that may consume captured variables, where Fn is implemented for closures that capture only copyable variables.
Implementing Your Functional Programming Patterns with Closures
Another great interest of closures is that, like any type of variables, you can pass them as function arguments. This mechanism is massively used in functional programming, through classic functions like map, filter or reduce.
Here is a potential implementation of map to apply a same function to all the items of an array:
#[generate_trait]
impl ArrayExt of ArrayExtTrait {
// Needed in Cairo 2.11.4 because of a bug in inlining analysis.
#[inline(never)]
fn map<T, +Drop<T>, F, +Drop<F>, impl func: core::ops::Fn<F, (T,)>, +Drop<func::Output>>(
self: Array<T>, f: F,
) -> Array<func::Output> {
let mut output: Array<func::Output> = array![];
for elem in self {
output.append(f(elem));
}
output
}
}
#[generate_trait]
impl ArrayFilterExt of ArrayFilterExtTrait {
// Needed in Cairo 2.11.4 because of a bug in inlining analysis.
#[inline(never)]
fn filter<
T,
+Copy<T>,
+Drop<T>,
F,
+Drop<F>,
impl func: core::ops::Fn<F, (T,)>[Output: bool],
+Drop<func::Output>,
>(
self: Array<T>, f: F,
) -> Array<T> {
let mut output: Array<T> = array![];
for elem in self {
if f(elem) {
output.append(elem);
}
}
output
}
}
fn main() {
let double = |value| value * 2;
println!("Double of 2 is {}", double(2_u8));
println!("Double of 4 is {}", double(4_u8));
// This won't work because `value` type has been inferred as `u8`.
//println!("Double of 6 is {}", double(6_u16));
let sum = |x: u32, y: u32, z: u16| {
x + y + z.into()
};
println!("Result: {}", sum(1, 2, 3));
let x = 8;
let my_closure = |value| {
x * (value + 3)
};
println!("my_closure(1) = {}", my_closure(1));
let double = array![1, 2, 3].map(|item: u32| item * 2);
let another = array![1, 2, 3].map(|item: u32| {
let x: u64 = item.into();
x * x
});
println!("double: {:?}", double);
println!("another: {:?}", another);
let even = array![3, 4, 5, 6].filter(|item: u32| item % 2 == 0);
println!("even: {:?}", even);
}
Note that, due to a bug in inlining analysis, this analysis process should be disabled using
#[inline(never)].
In this implementation, you'll notice that, while T is the element type of the input array self, the element type of the output array is defined by the output type of the f closure (the associated type func::Output from the Fn trait).
This means that your f closure can return the same type of elements like as for _double in the following code, or any other type of elements like as for _another:
#[generate_trait]
impl ArrayExt of ArrayExtTrait {
// Needed in Cairo 2.11.4 because of a bug in inlining analysis.
#[inline(never)]
fn map<T, +Drop<T>, F, +Drop<F>, impl func: core::ops::Fn<F, (T,)>, +Drop<func::Output>>(
self: Array<T>, f: F,
) -> Array<func::Output> {
let mut output: Array<func::Output> = array![];
for elem in self {
output.append(f(elem));
}
output
}
}
#[generate_trait]
impl ArrayFilterExt of ArrayFilterExtTrait {
// Needed in Cairo 2.11.4 because of a bug in inlining analysis.
#[inline(never)]
fn filter<
T,
+Copy<T>,
+Drop<T>,
F,
+Drop<F>,
impl func: core::ops::Fn<F, (T,)>[Output: bool],
+Drop<func::Output>,
>(
self: Array<T>, f: F,
) -> Array<T> {
let mut output: Array<T> = array![];
for elem in self {
if f(elem) {
output.append(elem);
}
}
output
}
}
fn main() {
let double = |value| value * 2;
println!("Double of 2 is {}", double(2_u8));
println!("Double of 4 is {}", double(4_u8));
// This won't work because `value` type has been inferred as `u8`.
//println!("Double of 6 is {}", double(6_u16));
let sum = |x: u32, y: u32, z: u16| {
x + y + z.into()
};
println!("Result: {}", sum(1, 2, 3));
let x = 8;
let my_closure = |value| {
x * (value + 3)
};
println!("my_closure(1) = {}", my_closure(1));
let double = array![1, 2, 3].map(|item: u32| item * 2);
let another = array![1, 2, 3].map(|item: u32| {
let x: u64 = item.into();
x * x
});
println!("double: {:?}", double);
println!("another: {:?}", another);
let even = array![3, 4, 5, 6].filter(|item: u32| item % 2 == 0);
println!("even: {:?}", even);
}
Currently, Cairo 2.9 provides an experimental feature allowing you to specify the associated type of trait, using
experimental-features = ["associated_item_constraints"]in yourScarb.toml.
Let's say we want to implement the filter function for arrays, to filter out elements which do not match a criteria.
This criteria will be provided through a closure which takes an element as input, and return true if the element has to be kept,
false otherwise. That means, we need to specify that the closure must return a boolean.
#[generate_trait]
impl ArrayExt of ArrayExtTrait {
// Needed in Cairo 2.11.4 because of a bug in inlining analysis.
#[inline(never)]
fn map<T, +Drop<T>, F, +Drop<F>, impl func: core::ops::Fn<F, (T,)>, +Drop<func::Output>>(
self: Array<T>, f: F,
) -> Array<func::Output> {
let mut output: Array<func::Output> = array![];
for elem in self {
output.append(f(elem));
}
output
}
}
#[generate_trait]
impl ArrayFilterExt of ArrayFilterExtTrait {
// Needed in Cairo 2.11.4 because of a bug in inlining analysis.
#[inline(never)]
fn filter<
T,
+Copy<T>,
+Drop<T>,
F,
+Drop<F>,
impl func: core::ops::Fn<F, (T,)>[Output: bool],
+Drop<func::Output>,
>(
self: Array<T>, f: F,
) -> Array<T> {
let mut output: Array<T> = array![];
for elem in self {
if f(elem) {
output.append(elem);
}
}
output
}
}
fn main() {
let double = |value| value * 2;
println!("Double of 2 is {}", double(2_u8));
println!("Double of 4 is {}", double(4_u8));
// This won't work because `value` type has been inferred as `u8`.
//println!("Double of 6 is {}", double(6_u16));
let sum = |x: u32, y: u32, z: u16| {
x + y + z.into()
};
println!("Result: {}", sum(1, 2, 3));
let x = 8;
let my_closure = |value| {
x * (value + 3)
};
println!("my_closure(1) = {}", my_closure(1));
let double = array![1, 2, 3].map(|item: u32| item * 2);
let another = array![1, 2, 3].map(|item: u32| {
let x: u64 = item.into();
x * x
});
println!("double: {:?}", double);
println!("another: {:?}", another);
let even = array![3, 4, 5, 6].filter(|item: u32| item % 2 == 0);
println!("even: {:?}", even);
}
#[generate_trait]
impl ArrayExt of ArrayExtTrait {
// Needed in Cairo 2.11.4 because of a bug in inlining analysis.
#[inline(never)]
fn map<T, +Drop<T>, F, +Drop<F>, impl func: core::ops::Fn<F, (T,)>, +Drop<func::Output>>(
self: Array<T>, f: F,
) -> Array<func::Output> {
let mut output: Array<func::Output> = array![];
for elem in self {
output.append(f(elem));
}
output
}
}
#[generate_trait]
impl ArrayFilterExt of ArrayFilterExtTrait {
// Needed in Cairo 2.11.4 because of a bug in inlining analysis.
#[inline(never)]
fn filter<
T,
+Copy<T>,
+Drop<T>,
F,
+Drop<F>,
impl func: core::ops::Fn<F, (T,)>[Output: bool],
+Drop<func::Output>,
>(
self: Array<T>, f: F,
) -> Array<T> {
let mut output: Array<T> = array![];
for elem in self {
if f(elem) {
output.append(elem);
}
}
output
}
}
fn main() {
let double = |value| value * 2;
println!("Double of 2 is {}", double(2_u8));
println!("Double of 4 is {}", double(4_u8));
// This won't work because `value` type has been inferred as `u8`.
//println!("Double of 6 is {}", double(6_u16));
let sum = |x: u32, y: u32, z: u16| {
x + y + z.into()
};
println!("Result: {}", sum(1, 2, 3));
let x = 8;
let my_closure = |value| {
x * (value + 3)
};
println!("my_closure(1) = {}", my_closure(1));
let double = array![1, 2, 3].map(|item: u32| item * 2);
let another = array![1, 2, 3].map(|item: u32| {
let x: u64 = item.into();
x * x
});
println!("double: {:?}", double);
println!("another: {:?}", another);
let even = array![3, 4, 5, 6].filter(|item: u32| item % 2 == 0);
println!("even: {:?}", even);
}
Advanced Features
Now, let's learn about more advanced features offered by Cairo.
Custom Data Structures
When you first start programming in Cairo, you'll likely want to use arrays
(Array<T>) to store collections of data. However, you will quickly realize
that arrays have one big limitation - the data stored in them is immutable. Once
you append a value to an array, you can't modify it.
This can be frustrating when you want to use a mutable data structure. For example, say you're making a game where the players have a level, and they can level up. You might try to store the level of the players in an array:
let mut level_players = array![5, 1, 10];
But then you realize you can't increase the level at a specific index once it's set. If a player dies, you cannot remove it from the array unless he happens to be in the first position.
Fortunately, Cairo provides a handy built-in dictionary type called Felt252Dict<T> that allows us to
simulate the behavior of mutable data structures. Let's first explore how to create a struct that contains, among others, a Felt252Dict<T>.
Note: Several concepts used in this chapter were already presented earlier in the book. We recommend checking out the following chapters if you need to revise them: Structs, Methods, Generic types, Traits.
Dictionaries as Struct Members
Defining dictionaries as struct members is possible in Cairo but correctly interacting with them may not be entirely seamless. Let's try implementing a custom user database that will allow us to add users and query them. We will need to define a struct to represent the new type and a trait to define its functionality:
struct UserDatabase<T> {
users_updates: u64,
balances: Felt252Dict<T>,
}
trait UserDatabaseTrait<T> {
fn new() -> UserDatabase<T>;
fn update_user<+Drop<T>>(ref self: UserDatabase<T>, name: felt252, balance: T);
fn get_balance<+Copy<T>>(ref self: UserDatabase<T>, name: felt252) -> T;
}
Our new type UserDatabase<T> represents a database of users. It is generic over the balances of the users, giving major flexibility to whoever uses our data type. Its two members are:
users_updates, the number of users updates in the dictionary.balances, a mapping of each user to its balance.
The database core functionality is defined by UserDatabaseTrait. The following methods are defined:
newfor easily creating newUserDatabasetypes.update_userto update the balance of users in the database.get_balanceto find user's balance in the database.
The only remaining step is to implement each of the methods in UserDatabaseTrait, but since we are working with Generic types we also need to correctly establish the requirements of T so it can be a valid Felt252Dict<T> value type:
Tshould implement theCopy<T>since it's required for getting values from aFelt252Dict<T>.- All value types of a dictionary implement the
Felt252DictValue<T>, our generic type should do as well. - To insert values,
Felt252DictTrait<T>requires all value types to be droppable (implement theDrop<T>trait).
The implementation, with all restrictions in place, would be as follows:
impl UserDatabaseImpl<T, +Felt252DictValue<T>> of UserDatabaseTrait<T> {
// Creates a database
fn new() -> UserDatabase<T> {
UserDatabase { users_updates: 0, balances: Default::default() }
}
// Get the user's balance
fn get_balance<+Copy<T>>(ref self: UserDatabase<T>, name: felt252) -> T {
self.balances.get(name)
}
// Add a user
fn update_user<+Drop<T>>(ref self: UserDatabase<T>, name: felt252, balance: T) {
self.balances.insert(name, balance);
self.users_updates += 1;
}
}
Our database implementation is almost complete, except for one thing: the compiler doesn't know how to make a UserDatabase<T> go out of scope, since it doesn't implement the Drop<T> trait, nor the Destruct<T> trait.
Since it has a Felt252Dict<T> as a member, it cannot be dropped, so we are forced to implement the Destruct<T> trait manually (refer to the Ownership chapter for more information).
Using #[derive(Destruct)] on top of the UserDatabase<T> definition won't work because of the use of Generic types in the struct definition. We need to code the Destruct<T> trait implementation by ourselves:
impl UserDatabaseDestruct<T, +Drop<T>, +Felt252DictValue<T>> of Destruct<UserDatabase<T>> {
fn destruct(self: UserDatabase<T>) nopanic {
self.balances.squash();
}
}
Implementing Destruct<T> for UserDatabase was our last step to get a fully functional database. We can now try it out:
use core::dict::Felt252Dict;
struct UserDatabase<T> {
users_updates: u64,
balances: Felt252Dict<T>,
}
trait UserDatabaseTrait<T> {
fn new() -> UserDatabase<T>;
fn update_user<+Drop<T>>(ref self: UserDatabase<T>, name: felt252, balance: T);
fn get_balance<+Copy<T>>(ref self: UserDatabase<T>, name: felt252) -> T;
}
impl UserDatabaseImpl<T, +Felt252DictValue<T>> of UserDatabaseTrait<T> {
// Creates a database
fn new() -> UserDatabase<T> {
UserDatabase { users_updates: 0, balances: Default::default() }
}
// Get the user's balance
fn get_balance<+Copy<T>>(ref self: UserDatabase<T>, name: felt252) -> T {
self.balances.get(name)
}
// Add a user
fn update_user<+Drop<T>>(ref self: UserDatabase<T>, name: felt252, balance: T) {
self.balances.insert(name, balance);
self.users_updates += 1;
}
}
impl UserDatabaseDestruct<T, +Drop<T>, +Felt252DictValue<T>> of Destruct<UserDatabase<T>> {
fn destruct(self: UserDatabase<T>) nopanic {
self.balances.squash();
}
}
fn main() {
let mut db = UserDatabaseTrait::<u64>::new();
db.update_user('Alex', 100);
db.update_user('Maria', 80);
db.update_user('Alex', 40);
db.update_user('Maria', 0);
let alex_latest_balance = db.get_balance('Alex');
let maria_latest_balance = db.get_balance('Maria');
assert!(alex_latest_balance == 40, "Expected 40");
assert!(maria_latest_balance == 0, "Expected 0");
}
Simulating a Dynamic Array with Dicts
First, let's think about how we want our mutable dynamic array to behave. What operations should it support?
It should:
- Allow us to append items at the end.
- Let us access any item by index.
- Allow setting the value of an item at a specific index.
- Return the current length.
We can define this interface in Cairo like:
trait MemoryVecTrait<V, T> {
fn new() -> V;
fn get(ref self: V, index: usize) -> Option<T>;
fn at(ref self: V, index: usize) -> T;
fn push(ref self: V, value: T) -> ();
fn set(ref self: V, index: usize, value: T);
fn len(self: @V) -> usize;
}
This provides a blueprint for the implementation of our dynamic array. We named
it MemoryVec as it is similar to the Vec<T> data structure in Rust.
Note: The core library of Cairo already includes a
Vec<T>data structure, strictly used as a storage type in smart contracts. To differentiate our data structure from the core library's one, we named our implementation MemoryVec.
Implementing a Dynamic Array in Cairo
To store our data, we'll use a Felt252Dict<T> which maps index numbers (felts)
to values. We'll also store a separate len field to track the length.
Here is what our struct looks like. We wrap the type T inside Nullable
pointer to allow using any type T in our data structure, as explained in the
Dictionaries section:
use core::dict::Felt252Dict;
use core::nullable::NullableTrait;
use core::num::traits::WrappingAdd;
trait MemoryVecTrait<V, T> {
fn new() -> V;
fn get(ref self: V, index: usize) -> Option<T>;
fn at(ref self: V, index: usize) -> T;
fn push(ref self: V, value: T) -> ();
fn set(ref self: V, index: usize, value: T);
fn len(self: @V) -> usize;
}
struct MemoryVec<T> {
data: Felt252Dict<Nullable<T>>,
len: usize,
}
impl DestructMemoryVec<T, +Drop<T>> of Destruct<MemoryVec<T>> {
fn destruct(self: MemoryVec<T>) nopanic {
self.data.squash();
}
}
impl MemoryVecImpl<T, +Drop<T>, +Copy<T>> of MemoryVecTrait<MemoryVec<T>, T> {
fn new() -> MemoryVec<T> {
MemoryVec { data: Default::default(), len: 0 }
}
fn get(ref self: MemoryVec<T>, index: usize) -> Option<T> {
if index < self.len() {
Some(self.data.get(index.into()).deref())
} else {
None
}
}
fn at(ref self: MemoryVec<T>, index: usize) -> T {
assert!(index < self.len(), "Index out of bounds");
self.data.get(index.into()).deref()
}
fn push(ref self: MemoryVec<T>, value: T) -> () {
self.data.insert(self.len.into(), NullableTrait::new(value));
self.len.wrapping_add(1_usize);
}
fn set(ref self: MemoryVec<T>, index: usize, value: T) {
assert!(index < self.len(), "Index out of bounds");
self.data.insert(index.into(), NullableTrait::new(value));
}
fn len(self: @MemoryVec<T>) -> usize {
*self.len
}
}
Since we again have Felt252Dict<T> as a struct member, we need to implement the Destruct<T> trait to tell the compiler how to make MemoryVec<T> go out of scope.
use core::dict::Felt252Dict;
use core::nullable::NullableTrait;
use core::num::traits::WrappingAdd;
trait MemoryVecTrait<V, T> {
fn new() -> V;
fn get(ref self: V, index: usize) -> Option<T>;
fn at(ref self: V, index: usize) -> T;
fn push(ref self: V, value: T) -> ();
fn set(ref self: V, index: usize, value: T);
fn len(self: @V) -> usize;
}
struct MemoryVec<T> {
data: Felt252Dict<Nullable<T>>,
len: usize,
}
impl DestructMemoryVec<T, +Drop<T>> of Destruct<MemoryVec<T>> {
fn destruct(self: MemoryVec<T>) nopanic {
self.data.squash();
}
}
impl MemoryVecImpl<T, +Drop<T>, +Copy<T>> of MemoryVecTrait<MemoryVec<T>, T> {
fn new() -> MemoryVec<T> {
MemoryVec { data: Default::default(), len: 0 }
}
fn get(ref self: MemoryVec<T>, index: usize) -> Option<T> {
if index < self.len() {
Some(self.data.get(index.into()).deref())
} else {
None
}
}
fn at(ref self: MemoryVec<T>, index: usize) -> T {
assert!(index < self.len(), "Index out of bounds");
self.data.get(index.into()).deref()
}
fn push(ref self: MemoryVec<T>, value: T) -> () {
self.data.insert(self.len.into(), NullableTrait::new(value));
self.len.wrapping_add(1_usize);
}
fn set(ref self: MemoryVec<T>, index: usize, value: T) {
assert!(index < self.len(), "Index out of bounds");
self.data.insert(index.into(), NullableTrait::new(value));
}
fn len(self: @MemoryVec<T>) -> usize {
*self.len
}
}
The key thing that makes this vector mutable is that we can insert values into the dictionary to set or update values in our data structure. For example, to update a value at a specific index, we do:
use core::dict::Felt252Dict;
use core::nullable::NullableTrait;
use core::num::traits::WrappingAdd;
trait MemoryVecTrait<V, T> {
fn new() -> V;
fn get(ref self: V, index: usize) -> Option<T>;
fn at(ref self: V, index: usize) -> T;
fn push(ref self: V, value: T) -> ();
fn set(ref self: V, index: usize, value: T);
fn len(self: @V) -> usize;
}
struct MemoryVec<T> {
data: Felt252Dict<Nullable<T>>,
len: usize,
}
impl DestructMemoryVec<T, +Drop<T>> of Destruct<MemoryVec<T>> {
fn destruct(self: MemoryVec<T>) nopanic {
self.data.squash();
}
}
impl MemoryVecImpl<T, +Drop<T>, +Copy<T>> of MemoryVecTrait<MemoryVec<T>, T> {
fn new() -> MemoryVec<T> {
MemoryVec { data: Default::default(), len: 0 }
}
fn get(ref self: MemoryVec<T>, index: usize) -> Option<T> {
if index < self.len() {
Some(self.data.get(index.into()).deref())
} else {
None
}
}
fn at(ref self: MemoryVec<T>, index: usize) -> T {
assert!(index < self.len(), "Index out of bounds");
self.data.get(index.into()).deref()
}
fn push(ref self: MemoryVec<T>, value: T) -> () {
self.data.insert(self.len.into(), NullableTrait::new(value));
self.len.wrapping_add(1_usize);
}
fn set(ref self: MemoryVec<T>, index: usize, value: T) {
assert!(index < self.len(), "Index out of bounds");
self.data.insert(index.into(), NullableTrait::new(value));
}
fn len(self: @MemoryVec<T>) -> usize {
*self.len
}
}
This overwrites the previously existing value at that index in the dictionary.
While arrays are immutable, dictionaries provide the flexibility we need for modifiable data structures like vectors.
The implementation of the rest of the interface is straightforward. The implementation of all the methods defined in our interface can be done as follow :
use core::dict::Felt252Dict;
use core::nullable::NullableTrait;
use core::num::traits::WrappingAdd;
trait MemoryVecTrait<V, T> {
fn new() -> V;
fn get(ref self: V, index: usize) -> Option<T>;
fn at(ref self: V, index: usize) -> T;
fn push(ref self: V, value: T) -> ();
fn set(ref self: V, index: usize, value: T);
fn len(self: @V) -> usize;
}
struct MemoryVec<T> {
data: Felt252Dict<Nullable<T>>,
len: usize,
}
impl DestructMemoryVec<T, +Drop<T>> of Destruct<MemoryVec<T>> {
fn destruct(self: MemoryVec<T>) nopanic {
self.data.squash();
}
}
impl MemoryVecImpl<T, +Drop<T>, +Copy<T>> of MemoryVecTrait<MemoryVec<T>, T> {
fn new() -> MemoryVec<T> {
MemoryVec { data: Default::default(), len: 0 }
}
fn get(ref self: MemoryVec<T>, index: usize) -> Option<T> {
if index < self.len() {
Some(self.data.get(index.into()).deref())
} else {
None
}
}
fn at(ref self: MemoryVec<T>, index: usize) -> T {
assert!(index < self.len(), "Index out of bounds");
self.data.get(index.into()).deref()
}
fn push(ref self: MemoryVec<T>, value: T) -> () {
self.data.insert(self.len.into(), NullableTrait::new(value));
self.len.wrapping_add(1_usize);
}
fn set(ref self: MemoryVec<T>, index: usize, value: T) {
assert!(index < self.len(), "Index out of bounds");
self.data.insert(index.into(), NullableTrait::new(value));
}
fn len(self: @MemoryVec<T>) -> usize {
*self.len
}
}
The full implementation of the MemoryVec structure can be found in the
community-maintained library Alexandria.
Simulating a Stack with Dicts
We will now look at a second example and its implementation details: a Stack.
A Stack is a LIFO (Last-In, First-Out) collection. The insertion of a new element and removal of an existing element takes place at the same end, represented as the top of the stack.
Let us define what operations we need to create a stack:
- Push an item to the top of the stack.
- Pop an item from the top of the stack.
- Check whether there are still any elements in the stack.
From these specifications we can define the following interface :
trait StackTrait<S, T> {
fn push(ref self: S, value: T);
fn pop(ref self: S) -> Option<T>;
fn is_empty(self: @S) -> bool;
}
Implementing a Mutable Stack in Cairo
To create a stack data structure in Cairo, we can again use a Felt252Dict<T>
to store the values of the stack along with a usize field to keep track of the
length of the stack to iterate over it.
The Stack struct is defined as:
struct NullableStack<T> {
data: Felt252Dict<Nullable<T>>,
len: usize,
}
Next, let's see how our main functions push and pop are implemented.
use core::dict::Felt252Dict;
use core::nullable::{match_nullable, FromNullableResult, NullableTrait};
trait StackTrait<S, T> {
fn push(ref self: S, value: T);
fn pop(ref self: S) -> Option<T>;
fn is_empty(self: @S) -> bool;
}
struct NullableStack<T> {
data: Felt252Dict<Nullable<T>>,
len: usize,
}
impl DestructNullableStack<T, +Drop<T>> of Destruct<NullableStack<T>> {
fn destruct(self: NullableStack<T>) nopanic {
self.data.squash();
}
}
impl NullableStackImpl<T, +Drop<T>, +Copy<T>> of StackTrait<NullableStack<T>, T> {
fn push(ref self: NullableStack<T>, value: T) {
self.data.insert(self.len.into(), NullableTrait::new(value));
self.len += 1;
}
fn pop(ref self: NullableStack<T>) -> Option<T> {
if self.is_empty() {
return None;
}
self.len -= 1;
Some(self.data.get(self.len.into()).deref())
}
fn is_empty(self: @NullableStack<T>) -> bool {
*self.len == 0
}
}
The code uses the insert and get methods to access the values in the
Felt252Dict<T>. To push an element to the top of the stack, the push
function inserts the element in the dict at index len and increases the
len field of the stack to keep track of the position of the stack top. To
remove a value, the pop function decreases the value of len to update the
position of the stack top and then retrieves the last value at position len.
The full implementation of the Stack, along with more data structures that you can use in your code, can be found in the community-maintained Alexandria library, in the "data_structures" crate.
Summary
Well done! Now you have knowledge of arrays, dictionaries and even custom data structures.
While Cairo's memory model is immutable and can make it difficult to implement
mutable data structures, we can fortunately use the Felt252Dict<T> type to
simulate mutable data structures. This allows us to implement a wide range of
data structures that are useful for many applications, effectively hiding the
complexity of the underlying memory model.
Smart Pointers
A pointer is a general concept for a variable that contains a memory address. This address refers to, or “points at,” some other data. While pointers are a powerful feature, they can also be a source of bugs and security vulnerabilities. For example, a pointer can reference an unassigned memory cell, which means that attempting to access the data at that address would cause the program to crash, making it unprovable. To prevent such issues, Cairo uses Smart Pointers.
Smart pointers are data structures that act like a pointer, but also have additional metadata and capabilities. The concept of smart pointers isn’t unique to Cairo: smart pointers originated in C++ and exist in other languages like Rust as well. In the specific case of Cairo, smart pointers ensure that memory is not addressed in an unsafe way that could cause a program to be unprovable, by providing a safe way to access memory through strict type checking and ownership rules.
Though we didn’t call them as such at the time, we’ve already encountered a few smart pointers in this book, including Felt252Dict<T> and Array<T> in Chapter 3. Both these types count as smart pointers because they own a memory segment and allow you to manipulate it. They also have metadata and extra capabilities or guarantees. Arrays keep track of their current length to ensure that existing elements are not overwritten, and that new elements are only appended to the end.
The Cairo VM memory is composed by multiple segments that can store data, each identified by a unique index. When you create an array, you allocate a new segment in the memory to store the future elements. The array itself is just a pointer to that segment where the elements are stored.
The Box<T> Type to Manipulate Pointers
The principal smart pointer type in Cairo is a box, denoted as Box<T>. Manually defining boxes allow you to store data in a specific memory segment of the Cairo VM called the boxed segment. This segment is dedicated to store all boxed values, and what remains in the execution segment is only a pointer to the boxed segment. Whenever you instantiate a new pointer variable of type Box<T>, you append the data of type T to the boxed segment.
Boxes have very little performance overhead, other than writing their inner values to the boxed segment. But they don’t have many extra capabilities either. You’ll use them most often in these situations:
- When you have a type whose size can’t be known at compile time and you want to use a value of that type in a context that requires an exact size
- When you have a large amount of data and you want to transfer ownership but ensure the data won’t be copied when you do so
We’ll demonstrate the first situation in the “Enabling Recursive Types with Boxes” section. In the second case, transferring ownership of a large amount of data can take a long time because the data is copied around in memory. To improve performance in this situation, we can store the large amount of data in the boxed segment using a box type. Then, only the small amount of pointer data is copied around in memory, while the data it references stays in one place on the boxed segment.
Using a Box<T> to Store Data in the Boxed Segment
Before we discuss the boxed segment storage use cases for Box<T>, we’ll cover the syntax and how to interact with values stored within a Box<T>.
Listing 12-1 shows how to use a box to store a value in the boxed segment:
fn main() {
let b = BoxTrait::new(5_u128);
println!("b = {}", b.unbox())
}
Listing 12-1: Storing a u128 value in the boxed segment using a box
We define the variable b to have the value of a Box that points to the value 5, which is stored in the boxed segment. This program will print b = 5; in this case, we can access the data in the box similar to how we would if this data was simply in the execution memory. Putting a single value in a box isn’t very useful, so you won’t use boxes by themselves in this way very often. Having values like a single u128 in the execution memory, where they’re stored by default, is more appropriate in the majority of situations. Let’s look at a case where boxes allow us to define types that we wouldn’t be allowed to if we didn’t have boxes.
Enabling Recursive Types with Boxes
A value of recursive type can have another value of the same type as part of itself. Recursive types pose an issue because at compile time because Cairo needs to know how much space a type takes up. However, the nesting of values of recursive types could theoretically continue infinitely, so Cairo can’t know how much space the value needs. Because boxes have a known size, we can enable recursive types by inserting a box in the recursive type definition.
As an example of a recursive type, let’s explore the implementation of a binary tree. The binary tree type we’ll define is straightforward except for the recursion; therefore, the concepts in the example we’ll work with will be useful any time you get into more complex situations involving recursive types.
A binary tree is a tree data structure in which each node has at most two children, which are referred to as the left child and the right child. The last element of a branch is a leaf, which is a node without children.
Listing 12-2 shows an attempt to implement a binary tree of u32 values. Note that this code won’t compile yet because the BinaryTree type doesn’t have a known size, which we’ll demonstrate.
#[derive(Copy, Drop)]
enum BinaryTree {
Leaf: u32,
Node: (u32, BinaryTree, BinaryTree),
}
fn main() {
let leaf1 = BinaryTree::Leaf(1);
let leaf2 = BinaryTree::Leaf(2);
let leaf3 = BinaryTree::Leaf(3);
let node = BinaryTree::Node((4, leaf2, leaf3));
let _root = BinaryTree::Node((5, leaf1, node));
}
Listing 12-2: The first attempt at implementing a binary tree of u32 values
Note: We’re implementing a binary tree that holds only u32 values for the purposes of this example. We could have implemented it using generics, as we discussed in Chapter 8, to define a binary tree that could store values of any type.
The root node contains 5 and two child nodes. The left child is a leaf containing 1. The right child is another node containing 4, which in turn has two leaf children: one containing 2 and another containing 3. This structure forms a simple binary tree with a depth of 2.
If we try to compile the code in listing 12-2, we get the following error:
$ scarb build
Compiling listing_recursive_types_wrong v0.1.0 (listings/ch12-advanced-features/listing_recursive_types_wrong/Scarb.toml)
error: Recursive type "(core::integer::u32, listing_recursive_types_wrong::BinaryTree, listing_recursive_types_wrong::BinaryTree)" has infinite size.
--> listings/ch12-advanced-features/listing_recursive_types_wrong/src/lib.cairo:6:5
Node: (u32, BinaryTree, BinaryTree),
^*********************************^
error: Recursive type "listing_recursive_types_wrong::BinaryTree" has infinite size.
--> listings/ch12-advanced-features/listing_recursive_types_wrong/src/lib.cairo:10:17
let leaf1 = BinaryTree::Leaf(1);
^*****************^
error: Recursive type "(core::integer::u32, listing_recursive_types_wrong::BinaryTree, listing_recursive_types_wrong::BinaryTree)" has infinite size.
--> listings/ch12-advanced-features/listing_recursive_types_wrong/src/lib.cairo:13:33
let node = BinaryTree::Node((4, leaf2, leaf3));
^***************^
error: could not compile `listing_recursive_types_wrong` due to previous error
The error shows this type “has infinite size.” The reason is that we’ve defined BinaryTree with a variant that is recursive: it holds another value of itself directly. As a result, Cairo can’t figure out how much space it needs to store a BinaryTree value.
Hopefully, we can fix this error by using a Box<T> to store the recursive variant of BinaryTree. Because a Box<T> is a pointer, Cairo always knows how much space a Box<T> needs: a pointer’s size doesn’t change based on the amount of data it’s pointing to. This means we can put a Box<T> inside the Node variant instead of another BinaryTree value directly. The Box<T> will point to the child BinaryTree values that will be stored in their own segment, rather than inside the Node variant. Conceptually, we still have a binary tree, created with binary trees holding other binary trees, but this implementation is now more like placing the items next to one another rather than inside one another.
We can change the definition of the BinaryTree enum in Listing 12-2 and the usage of the BinaryTree in Listing 12-2 to the code in Listing 12-3, which will compile:
use core::box::{BoxTrait};
mod display;
use display::DebugBinaryTree;
#[derive(Copy, Drop)]
enum BinaryTree {
Leaf: u32,
Node: (u32, Box<BinaryTree>, Box<BinaryTree>),
}
fn main() {
let leaf1 = BinaryTree::Leaf(1);
let leaf2 = BinaryTree::Leaf(2);
let leaf3 = BinaryTree::Leaf(3);
let node = BinaryTree::Node((4, BoxTrait::new(leaf2), BoxTrait::new(leaf3)));
let root = BinaryTree::Node((5, BoxTrait::new(leaf1), BoxTrait::new(node)));
println!("{:?}", root);
}
Listing 12-3: Defining a recursive Binary Tree using Boxes
The Node variant now holds a (u32, Box<BinaryTree>, Box<BinaryTree>), indicating that the Node variant will store a u32 value, and two Box<BinaryTree> values. Now, we know that the Node variant will need a size of u32 plus the size of the two Box<BinaryTree> values. By using a box, we’ve broken the infinite, recursive chain, so the compiler can figure out the size it needs to store a BinaryTree value.
Using Boxes to Improve Performance
Passing pointers between functions allows you to reference data without copying the data itself. Using boxes can improve performance as it allows you to pass a pointer to some data from one function to another, without the need to copy the entire data in memory before performing the function call. Instead of having to write n values into memory before calling a function, only a single value is written, corresponding to the pointer to the data. If the data stored in the box is very large, the performance improvement can be significant, as you would save n-1 memory operations before each function call.
Note: This only works if the data stored in the box is not mutated. If the data is mutated, a new
Box<T>will be created, which will require copying the data to the new box.
Let's take a look at the code in Listing 12-4, which shows two ways of passing data to a function: by value and by pointer.
#[derive(Drop)]
struct Cart {
paid: bool,
items: u256,
buyer: ByteArray,
}
fn pass_data(cart: Cart) {
println!("{} is shopping today and bought {} items", cart.buyer, cart.items);
}
fn pass_pointer(cart: Box<Cart>) {
let cart = cart.unbox();
println!("{} is shopping today and bought {} items", cart.buyer, cart.items);
}
fn main() {
let new_struct = Cart { paid: true, items: 1, buyer: "Eli" };
pass_data(new_struct);
let new_box = BoxTrait::new(Cart { paid: false, items: 2, buyer: "Uri" });
pass_pointer(new_box);
}
Listing 12-4: Storing large amounts of data in a box for performance.
The main function includes 2 function calls:
pass_datathat takes a variable of typeCart.pass_pointerthat takes a pointer of typeBox<Cart>.
When passing data to a function, the entire data is copied into the last available memory cells right before the function call. Calling pass_data will copy all 3 fields of Cart to memory, while pass_pointer only requires the copy of the new_box pointer which is of size 1.
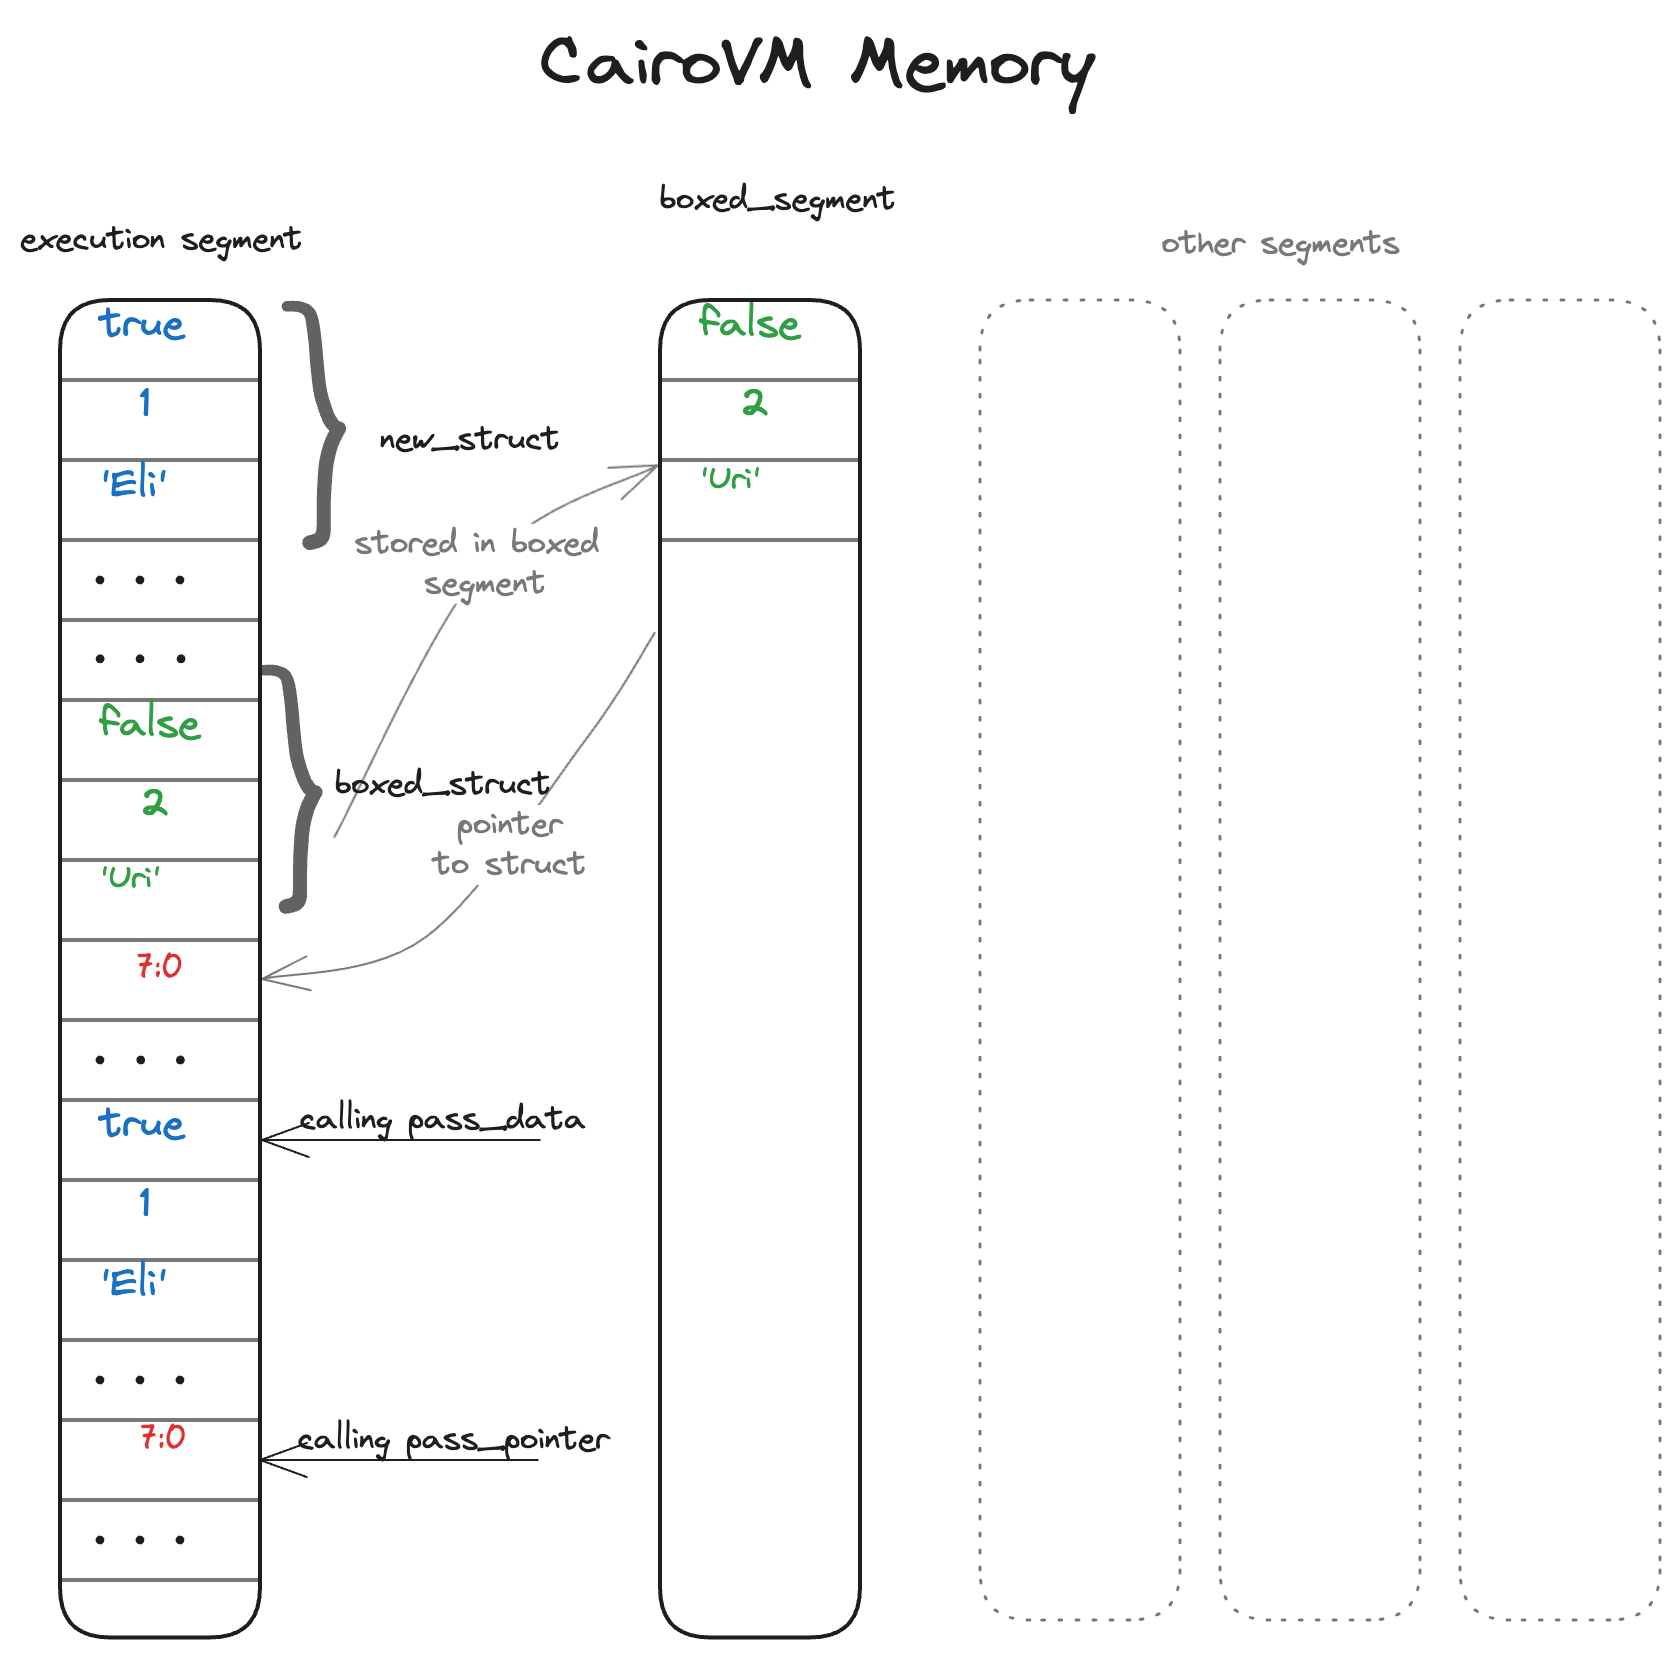
The illustration above demonstrates how the memory behaves in both cases. The first instance of Cart is stored in the execution segment, and we need to copy all its fields to memory before calling the pass_data function. The second instance of Cart is stored in the boxed segment, and the pointer to it is stored in the execution segment. When calling the pass_pointer function, only the pointer to the struct is copied to memory right before the function call. In both cases, however, instantiating the struct will store all its values in the execution segment: the boxed segment can only be filled with data taken from the execution segment.
The Nullable<T> Type for Dictionaries
Nullable<T> is another type of smart pointer that can either point to a value or be null in the absence of value. It is defined at the Sierra level. This type is mainly used in dictionaries that contain types that don't implement the zero_default method of the Felt252DictValue<T> trait (i.e., arrays and structs).
If we try to access an element that does not exist in a dictionary, the code will fail if the zero_default method cannot be called.
Chapter 3 about dictionaries thoroughly explains how to store a Span<felt252> variable inside a dictionary using the Nullable<T> type. Please refer to it for further information.
Deref Coercion
Deref coercion simplifies the way we interact with nested or wrapped data structures by allowing an instance of one type to behave like an instance of another type. This mechanism is enabled by implementing the Deref trait, which allows implicit conversion (or coercion) to a different type, providing direct access to the underlying data.
Deref coercion is implemented via the Deref and DerefMut traits. When a type T implements Deref or DerefMut to type K, instances of T can access the members of K directly.
The Deref trait in Cairo is defined as follows:
pub trait Deref<T> {
type Target;
fn deref(self: T) -> Self::Target;
}
pub trait DerefMut<T> {
type Target;
fn deref_mut(ref self: T) -> Self::Target;
}
The Target type specifies the result of dereferencing, and the deref method defines how to transform T into K.
Using Deref Coercion
To better understand how deref coercion works, let's look at a practical example. We'll create a simple generic wrapper type around a type T called Wrapper<T>, and use it to wrap a UserProfile struct.
#[derive(Drop, Copy)]
struct UserProfile {
username: felt252,
email: felt252,
age: u16,
}
#[derive(Drop, Copy)]
struct Wrapper<T> {
value: T,
}
impl DerefWrapper<T> of Deref<Wrapper<T>> {
type Target = T;
fn deref(self: Wrapper<T>) -> T {
self.value
}
}
fn main() {
let wrapped_profile = Wrapper {
value: UserProfile { username: 'john_doe', email: 'john@example.com', age: 30 },
};
// Access fields directly via deref coercion
println!("Username: {}", wrapped_profile.username);
println!("Current age: {}", wrapped_profile.age);
}
The Wrapper struct wraps a single value generic of type T. To simplify access to the wrapped value, we implement the Deref trait for Wrapper<T>.
#[derive(Drop, Copy)]
struct UserProfile {
username: felt252,
email: felt252,
age: u16,
}
#[derive(Drop, Copy)]
struct Wrapper<T> {
value: T,
}
impl DerefWrapper<T> of Deref<Wrapper<T>> {
type Target = T;
fn deref(self: Wrapper<T>) -> T {
self.value
}
}
fn main() {
let wrapped_profile = Wrapper {
value: UserProfile { username: 'john_doe', email: 'john@example.com', age: 30 },
};
// Access fields directly via deref coercion
println!("Username: {}", wrapped_profile.username);
println!("Current age: {}", wrapped_profile.age);
}
This implementation is quite simple. The deref method returns the wrapped value, allowing instances of Wrapper<T> to access the members of T directly.
In practice, this mechanism is totally transparent. The following example demonstrates how, holding
an instance of Wrapper<UserProfile>, we can print the username and age fields of the underlying
UserProfile instance.
#[derive(Drop, Copy)]
struct UserProfile {
username: felt252,
email: felt252,
age: u16,
}
#[derive(Drop, Copy)]
struct Wrapper<T> {
value: T,
}
impl DerefWrapper<T> of Deref<Wrapper<T>> {
type Target = T;
fn deref(self: Wrapper<T>) -> T {
self.value
}
}
fn main() {
let wrapped_profile = Wrapper {
value: UserProfile { username: 'john_doe', email: 'john@example.com', age: 30 },
};
// Access fields directly via deref coercion
println!("Username: {}", wrapped_profile.username);
println!("Current age: {}", wrapped_profile.age);
}
Restricting Deref Coercion to Mutable Variables
While Deref works for both mutable and immutable variables, DerefMut will only be applicable to mutable variables. Contrary to what the name might suggest, DerefMut does not provide mutable access to the underlying data.
//TAG: does_not_compile
use core::ops::DerefMut;
#[derive(Drop, Copy)]
struct UserProfile {
username: felt252,
email: felt252,
age: u16,
}
#[derive(Drop, Copy)]
struct Wrapper<T> {
value: T,
}
impl DerefMutWrapper<T, +Copy<T>> of DerefMut<Wrapper<T>> {
type Target = T;
fn deref_mut(ref self: Wrapper<T>) -> T {
self.value
}
}
fn error() {
let wrapped_profile = Wrapper {
value: UserProfile { username: 'john_doe', email: 'john@example.com', age: 30 },
};
// Uncommenting the next line will cause a compilation error
println!("Username: {}", wrapped_profile.username);
}
fn main() {
let mut wrapped_profile = Wrapper {
value: UserProfile { username: 'john_doe', email: 'john@example.com', age: 30 },
};
println!("Username: {}", wrapped_profile.username);
println!("Current age: {}", wrapped_profile.age);
}
If you try to use DerefMut with an immutable variable, the compiler would throw an error. Here’s an example:
//TAG: does_not_compile
use core::ops::DerefMut;
#[derive(Drop, Copy)]
struct UserProfile {
username: felt252,
email: felt252,
age: u16,
}
#[derive(Drop, Copy)]
struct Wrapper<T> {
value: T,
}
impl DerefMutWrapper<T, +Copy<T>> of DerefMut<Wrapper<T>> {
type Target = T;
fn deref_mut(ref self: Wrapper<T>) -> T {
self.value
}
}
fn error() {
let wrapped_profile = Wrapper {
value: UserProfile { username: 'john_doe', email: 'john@example.com', age: 30 },
};
// Uncommenting the next line will cause a compilation error
println!("Username: {}", wrapped_profile.username);
}
fn main() {
let mut wrapped_profile = Wrapper {
value: UserProfile { username: 'john_doe', email: 'john@example.com', age: 30 },
};
println!("Username: {}", wrapped_profile.username);
println!("Current age: {}", wrapped_profile.age);
}
Compiling this code will result in the following error:
$ scarb build
Compiling no_listing_09_deref_coercion_example v0.1.0 (listings/ch12-advanced-features/no_listing_09_deref_mut_example/Scarb.toml)
error: Type "no_listing_09_deref_coercion_example::Wrapper::<no_listing_09_deref_coercion_example::UserProfile>" has no member "username"
--> listings/ch12-advanced-features/no_listing_09_deref_mut_example/src/lib.cairo:32:46
println!("Username: {}", wrapped_profile.username);
^******^
error: could not compile `no_listing_09_deref_coercion_example` due to previous error
For the above code to work, we need to define wrapped_profile as a mutable variable.
//TAG: does_not_compile
use core::ops::DerefMut;
#[derive(Drop, Copy)]
struct UserProfile {
username: felt252,
email: felt252,
age: u16,
}
#[derive(Drop, Copy)]
struct Wrapper<T> {
value: T,
}
impl DerefMutWrapper<T, +Copy<T>> of DerefMut<Wrapper<T>> {
type Target = T;
fn deref_mut(ref self: Wrapper<T>) -> T {
self.value
}
}
fn error() {
let wrapped_profile = Wrapper {
value: UserProfile { username: 'john_doe', email: 'john@example.com', age: 30 },
};
// Uncommenting the next line will cause a compilation error
println!("Username: {}", wrapped_profile.username);
}
fn main() {
let mut wrapped_profile = Wrapper {
value: UserProfile { username: 'john_doe', email: 'john@example.com', age: 30 },
};
println!("Username: {}", wrapped_profile.username);
println!("Current age: {}", wrapped_profile.age);
}
Calling Methods via Deref Coercion
In addition to accessing members, deref coercion also allows calling methods defined on the target type directly on the source type instance. Let's illustrate this with an example:
struct MySource {
pub data: u8,
}
struct MyTarget {
pub data: u8,
}
#[generate_trait]
impl TargetImpl of TargetTrait {
fn foo(self: MyTarget) -> u8 {
self.data
}
}
impl SourceDeref of Deref<MySource> {
type Target = MyTarget;
fn deref(self: MySource) -> MyTarget {
MyTarget { data: self.data }
}
}
fn main() {
let source = MySource { data: 5 };
// Thanks to the Deref impl, we can call foo directly on MySource
let res = source.foo();
assert!(res == 5);
}
In this example, MySource implements Deref to MyTarget. The MyTarget struct has an implementation TargetImpl of the trait TargetTrait which defines a method foo. Because MySource dereferences to MyTarget, we can call the foo method directly on an instance of MySource, as demonstrated in the main function.
Summary
By using the Deref and DerefMut traits, we can transparently convert one type into another, simplifying the access to nested or wrapped data structures and enabling method calls defined on the target type. This feature is particularly useful when working with generic types or building abstractions that require easy access to the underlying data and can help reduce boilerplate code.
Associated Items
Associated Items are the items declared in traits or defined in implementations. Specifically, there are associated functions (including methods, that we already covered in Chapter 5), associated types, associated constants, and associated implementations.
Associated items are useful when they are logically related to the implementation. For example, the is_some method on Option is intrinsically related to Options, so should be associated.
Every associated item kind comes in two varieties: definitions that contain the actual implementation and declarations that declare signatures for definitions.
Associated Types
Associated types are type aliases allowing you to define abstract type placeholders within traits. Instead of specifying concrete types in the trait definition, associated types let trait implementers choose the actual types to use.
Let's consider the following Pack trait:
trait Pack<T> {
type Result;
fn pack(self: T, other: T) -> Self::Result;
}
impl PackU32Impl of Pack<u32> {
type Result = u64;
fn pack(self: u32, other: u32) -> Self::Result {
let shift: u64 = 0x100000000; // 2^32
self.into() * shift + other.into()
}
}
fn bar<T, impl PackImpl: Pack<T>>(self: T, b: T) -> PackImpl::Result {
PackImpl::pack(self, b)
}
trait PackGeneric<T, U> {
fn pack_generic(self: T, other: T) -> U;
}
impl PackGenericU32 of PackGeneric<u32, u64> {
fn pack_generic(self: u32, other: u32) -> u64 {
let shift: u64 = 0x100000000; // 2^32
self.into() * shift + other.into()
}
}
fn foo<T, U, +PackGeneric<T, U>>(self: T, other: T) -> U {
self.pack_generic(other)
}
fn main() {
let a: u32 = 1;
let b: u32 = 1;
let x = foo(a, b);
let y = bar(a, b);
// result is 2^32 + 1
println!("x: {}", x);
println!("y: {}", y);
}
The Result type in our Pack trait acts as placeholder for a type that will be filled in later. Think of associated types as leaving a blank space in your trait for each implementation to write in the specific type it needs. This approach keeps your trait definition clean and flexible. When you use the trait, you don't need to worry about specifying these types - they're already chosen for you by the implementation. In our Pack trait, the type Result is such a placeholder. The method's definition shows that it will return values of type Self::Result, but it doesn't specify what Result actually is. This is left to the implementers of the Pack trait, who will specify the concrete type for Result. When the pack method is called, it will return a value of that chosen concrete type, whatever it may be.
Let's see how associated types compare to a more traditional generic approach. Suppose we need a function foo that can pack two variables of type T. Without associated types, we might define a PackGeneric trait and an implementation to pack two u32 like this:
trait Pack<T> {
type Result;
fn pack(self: T, other: T) -> Self::Result;
}
impl PackU32Impl of Pack<u32> {
type Result = u64;
fn pack(self: u32, other: u32) -> Self::Result {
let shift: u64 = 0x100000000; // 2^32
self.into() * shift + other.into()
}
}
fn bar<T, impl PackImpl: Pack<T>>(self: T, b: T) -> PackImpl::Result {
PackImpl::pack(self, b)
}
trait PackGeneric<T, U> {
fn pack_generic(self: T, other: T) -> U;
}
impl PackGenericU32 of PackGeneric<u32, u64> {
fn pack_generic(self: u32, other: u32) -> u64 {
let shift: u64 = 0x100000000; // 2^32
self.into() * shift + other.into()
}
}
fn foo<T, U, +PackGeneric<T, U>>(self: T, other: T) -> U {
self.pack_generic(other)
}
fn main() {
let a: u32 = 1;
let b: u32 = 1;
let x = foo(a, b);
let y = bar(a, b);
// result is 2^32 + 1
println!("x: {}", x);
println!("y: {}", y);
}
With this approach, foo would be implemented as:
trait Pack<T> {
type Result;
fn pack(self: T, other: T) -> Self::Result;
}
impl PackU32Impl of Pack<u32> {
type Result = u64;
fn pack(self: u32, other: u32) -> Self::Result {
let shift: u64 = 0x100000000; // 2^32
self.into() * shift + other.into()
}
}
fn bar<T, impl PackImpl: Pack<T>>(self: T, b: T) -> PackImpl::Result {
PackImpl::pack(self, b)
}
trait PackGeneric<T, U> {
fn pack_generic(self: T, other: T) -> U;
}
impl PackGenericU32 of PackGeneric<u32, u64> {
fn pack_generic(self: u32, other: u32) -> u64 {
let shift: u64 = 0x100000000; // 2^32
self.into() * shift + other.into()
}
}
fn foo<T, U, +PackGeneric<T, U>>(self: T, other: T) -> U {
self.pack_generic(other)
}
fn main() {
let a: u32 = 1;
let b: u32 = 1;
let x = foo(a, b);
let y = bar(a, b);
// result is 2^32 + 1
println!("x: {}", x);
println!("y: {}", y);
}
Notice how foo needs to specify both T and U as generic parameters. Now, let's compare this to our Pack trait with an associated type:
trait Pack<T> {
type Result;
fn pack(self: T, other: T) -> Self::Result;
}
impl PackU32Impl of Pack<u32> {
type Result = u64;
fn pack(self: u32, other: u32) -> Self::Result {
let shift: u64 = 0x100000000; // 2^32
self.into() * shift + other.into()
}
}
fn bar<T, impl PackImpl: Pack<T>>(self: T, b: T) -> PackImpl::Result {
PackImpl::pack(self, b)
}
trait PackGeneric<T, U> {
fn pack_generic(self: T, other: T) -> U;
}
impl PackGenericU32 of PackGeneric<u32, u64> {
fn pack_generic(self: u32, other: u32) -> u64 {
let shift: u64 = 0x100000000; // 2^32
self.into() * shift + other.into()
}
}
fn foo<T, U, +PackGeneric<T, U>>(self: T, other: T) -> U {
self.pack_generic(other)
}
fn main() {
let a: u32 = 1;
let b: u32 = 1;
let x = foo(a, b);
let y = bar(a, b);
// result is 2^32 + 1
println!("x: {}", x);
println!("y: {}", y);
}
With associated types, we can define bar more concisely:
trait Pack<T> {
type Result;
fn pack(self: T, other: T) -> Self::Result;
}
impl PackU32Impl of Pack<u32> {
type Result = u64;
fn pack(self: u32, other: u32) -> Self::Result {
let shift: u64 = 0x100000000; // 2^32
self.into() * shift + other.into()
}
}
fn bar<T, impl PackImpl: Pack<T>>(self: T, b: T) -> PackImpl::Result {
PackImpl::pack(self, b)
}
trait PackGeneric<T, U> {
fn pack_generic(self: T, other: T) -> U;
}
impl PackGenericU32 of PackGeneric<u32, u64> {
fn pack_generic(self: u32, other: u32) -> u64 {
let shift: u64 = 0x100000000; // 2^32
self.into() * shift + other.into()
}
}
fn foo<T, U, +PackGeneric<T, U>>(self: T, other: T) -> U {
self.pack_generic(other)
}
fn main() {
let a: u32 = 1;
let b: u32 = 1;
let x = foo(a, b);
let y = bar(a, b);
// result is 2^32 + 1
println!("x: {}", x);
println!("y: {}", y);
}
Finally, let's see both approaches in action, demonstrating that the end result is the same:
trait Pack<T> {
type Result;
fn pack(self: T, other: T) -> Self::Result;
}
impl PackU32Impl of Pack<u32> {
type Result = u64;
fn pack(self: u32, other: u32) -> Self::Result {
let shift: u64 = 0x100000000; // 2^32
self.into() * shift + other.into()
}
}
fn bar<T, impl PackImpl: Pack<T>>(self: T, b: T) -> PackImpl::Result {
PackImpl::pack(self, b)
}
trait PackGeneric<T, U> {
fn pack_generic(self: T, other: T) -> U;
}
impl PackGenericU32 of PackGeneric<u32, u64> {
fn pack_generic(self: u32, other: u32) -> u64 {
let shift: u64 = 0x100000000; // 2^32
self.into() * shift + other.into()
}
}
fn foo<T, U, +PackGeneric<T, U>>(self: T, other: T) -> U {
self.pack_generic(other)
}
fn main() {
let a: u32 = 1;
let b: u32 = 1;
let x = foo(a, b);
let y = bar(a, b);
// result is 2^32 + 1
println!("x: {}", x);
println!("y: {}", y);
}
As you can see, bar doesn't need to specify a second generic type for the packing result. This information is hidden in the implementation of the Pack trait, making the function signature cleaner and more flexible. Associated types allow us to express the same functionality with less verbosity, while still maintaining the flexibility of generic programming.
Associated Constants
Associated constants are constants associated with a type. They are declared using the const keyword in a trait and defined in its implementation.
In our next example, we define a generic Shape trait that we implement for a Triangle and a Square. This trait includes an associated constant, defining the number of sides of the type that implements the trait.
trait Shape<T> {
const SIDES: u32;
fn describe() -> ByteArray;
}
struct Triangle {}
impl TriangleShape of Shape<Triangle> {
const SIDES: u32 = 3;
fn describe() -> ByteArray {
"I am a triangle."
}
}
struct Square {}
impl SquareShape of Shape<Square> {
const SIDES: u32 = 4;
fn describe() -> ByteArray {
"I am a square."
}
}
fn print_shape_info<T, impl ShapeImpl: Shape<T>>() {
println!("I have {} sides. {}", ShapeImpl::SIDES, ShapeImpl::describe());
}
fn main() {
print_shape_info::<Triangle>();
print_shape_info::<Square>();
}
After that, we create a print_shape_info generic function, which requires that the generic argument implements the Shape trait. This function will use the associated constant to retrieve the number of sides of the geometric figure, and print it along with its description.
trait Shape<T> {
const SIDES: u32;
fn describe() -> ByteArray;
}
struct Triangle {}
impl TriangleShape of Shape<Triangle> {
const SIDES: u32 = 3;
fn describe() -> ByteArray {
"I am a triangle."
}
}
struct Square {}
impl SquareShape of Shape<Square> {
const SIDES: u32 = 4;
fn describe() -> ByteArray {
"I am a square."
}
}
fn print_shape_info<T, impl ShapeImpl: Shape<T>>() {
println!("I have {} sides. {}", ShapeImpl::SIDES, ShapeImpl::describe());
}
fn main() {
print_shape_info::<Triangle>();
print_shape_info::<Square>();
}
Associated constants allow us to bind a constant number to the Shape trait rather than adding it to the struct or just hardcoding the value in the implementation. This approach provides several benefits:
- It keeps the constant closely tied to the trait, improving code organization.
- It allows for compile-time checks to ensure all implementors define the required constant.
- It ensures two instances of the same type have the same number of sides.
Associated constants can also be used for type-specific behavior or configuration, making them a versatile tool in trait design.
We can ultimately run the print_shape_info and see the output for both Triangle and Square:
trait Shape<T> {
const SIDES: u32;
fn describe() -> ByteArray;
}
struct Triangle {}
impl TriangleShape of Shape<Triangle> {
const SIDES: u32 = 3;
fn describe() -> ByteArray {
"I am a triangle."
}
}
struct Square {}
impl SquareShape of Shape<Square> {
const SIDES: u32 = 4;
fn describe() -> ByteArray {
"I am a square."
}
}
fn print_shape_info<T, impl ShapeImpl: Shape<T>>() {
println!("I have {} sides. {}", ShapeImpl::SIDES, ShapeImpl::describe());
}
fn main() {
print_shape_info::<Triangle>();
print_shape_info::<Square>();
}
Associated Implementations
Associated implementations allow you to declare that a trait implementation must exist for an associated type. This feature is particularly useful when you want to enforce relationships between types and implementations at the trait level. It ensures type safety and consistency across different implementations of a trait, which is important in generic programming contexts.
To understand the utility of associated implementations, let's examine the Iterator and IntoIterator traits from the Cairo core library, with their respective implementations using ArrayIter<T> as the collection type:
// Collection type that contains a simple array
#[derive(Drop)]
pub struct ArrayIter<T> {
array: Array<T>,
}
// T is the collection type
pub trait Iterator<T> {
type Item;
fn next(ref self: T) -> Option<Self::Item>;
}
impl ArrayIterator<T> of Iterator<ArrayIter<T>> {
type Item = T;
fn next(ref self: ArrayIter<T>) -> Option<T> {
self.array.pop_front()
}
}
/// Turns a collection of values into an iterator
pub trait IntoIterator<T> {
/// The iterator type that will be created
type IntoIter;
impl Iterator: Iterator<Self::IntoIter>;
fn into_iter(self: T) -> Self::IntoIter;
}
impl ArrayIntoIterator<T> of IntoIterator<Array<T>> {
type IntoIter = ArrayIter<T>;
fn into_iter(self: Array<T>) -> ArrayIter<T> {
ArrayIter { array: self }
}
}
- The
IntoIteratortrait is designed to convert a collection into an iterator. - The
IntoIterassociated type represents the specific iterator type that will be created. This allows different collections to define their own efficient iterator types. - The associated implementation
Iterator: Iterator<Self::IntoIter>(the key feature we're discussing) declares that thisIntoItertype must implement theIteratortrait. - This design allows for type-safe iteration without needing to specify the iterator type explicitly every time, improving code ergonomics.
The associated implementation creates a binding at the trait level, guaranteeing that:
- The
into_itermethod will always return a type that implementsIterator. - This relationship is enforced for all implementations of
IntoIterator, not just on a case-by-case basis.
The following main function demonstrates how this works in practice for an Array<felt252>:
fn main() {
let mut arr: Array<felt252> = array![1, 2, 3];
// Converts the array into an iterator
let mut iter = arr.into_iter();
// Uses the iterator to print each element
loop {
match iter.next() {
Some(item) => println!("Item: {}", item),
None => { break; },
};
}
}
Operator Overloading
Operator overloading is a feature in some programming languages that allows the redefinition of standard operators, such as addition (+), subtraction (-), multiplication (*), and division (/), to work with user-defined types. This can make the syntax of the code more intuitive, by enabling operations on user-defined types to be expressed in the same way as operations on primitive types.
In Cairo, operator overloading is achieved through the implementation of specific traits. Each operator has an associated trait, and overloading that operator involves providing an implementation of that trait for a custom type. However, it's essential to use operator overloading judiciously. Misuse can lead to confusion, making the code more difficult to maintain, for example when there is no semantic meaning to the operator being overloaded.
Consider an example where two Potions need to be combined. Potions have two data fields, mana and health. Combining two Potions should add their respective fields.
struct Potion {
health: felt252,
mana: felt252,
}
impl PotionAdd of Add<Potion> {
fn add(lhs: Potion, rhs: Potion) -> Potion {
Potion { health: lhs.health + rhs.health, mana: lhs.mana + rhs.mana }
}
}
fn main() {
let health_potion: Potion = Potion { health: 100, mana: 0 };
let mana_potion: Potion = Potion { health: 0, mana: 100 };
let super_potion: Potion = health_potion + mana_potion;
// Both potions were combined with the `+` operator.
assert(super_potion.health == 100, '');
assert(super_potion.mana == 100, '');
}
In the code above, we're implementing the Add trait for the Potion type. The add function takes two arguments: lhs and rhs (left and right-hand side). The function body returns a new Potion instance, its field values being a combination of lhs and rhs.
As illustrated in the example, overloading an operator requires specification of the concrete type being overloaded. The overloaded generic trait is Add<T>, and we define a concrete implementation for the type Potion with Add<Potion>.
Hashes
At its essence, hashing is a process of converting input data (often called a message) of any length into a fixed-size value, typically referred to as a "hash." This transformation is deterministic, meaning that the same input will always produce the same hash value. Hash functions are a fundamental component in various fields, including data storage, cryptography and data integrity verification. They are very often used when developing smart contracts, especially when working with Merkle trees.
In this chapter, we will present the two hash functions implemented natively in the Cairo core library: Poseidon and Pedersen. We will discuss when and how to use them, and see examples with Cairo programs.
Hash Functions in Cairo
The Cairo core library provides two hash functions: Pedersen and Poseidon.
Pedersen hash functions are cryptographic algorithms that rely on elliptic curve cryptography. These functions perform operations on points along an elliptic curve — essentially, doing math with the locations of these points — which are easy to do in one direction and hard to undo. This one-way difficulty is based on the Elliptic Curve Discrete Logarithm Problem (ECDLP), which is a problem so hard to solve that it ensures the security of the hash function. The difficulty of reversing these operations is what makes the Pedersen hash function secure and reliable for cryptographic purposes.
Poseidon is a family of hash functions designed to be very efficient as algebraic circuits. Its design is particularly efficient for Zero-Knowledge proof systems, including STARKs (so, Cairo). Poseidon uses a method called a 'sponge construction,' which soaks up data and transforms it securely using a process known as the Hades permutation. Cairo's version of Poseidon is based on a three-element state permutation with specific parameters.
When to Use Them?
Pedersen was the first hash function used on Starknet, and is still used to compute the addresses of variables in storage (for example, LegacyMap uses Pedersen to hash the keys of a storage mapping on Starknet). However, as Poseidon is cheaper and faster than Pedersen when working with STARK proofs system, it's now the recommended hash function to use in Cairo programs.
Working with Hashes
The core library makes it easy to work with hashes. The Hash trait is implemented for all types that can be converted to felt252, including felt252 itself. For more complex types like structs, deriving Hash allows them to be hashed easily using the hash function of your choice - given that all of the struct's fields are themselves hashable. You cannot derive the Hash trait on a struct that contains un-hashable values, such as Array<T> or Felt252Dict<T>, even if T itself is hashable.
The Hash trait is accompanied by the HashStateTrait and HashStateExTrait that define the basic methods to work with hashes. They allow you to initialize a hash state that will contain the temporary values of the hash after each application of the hash function, update the hash state and finalize it when the computation is completed. HashStateTrait and HashStateExTrait are defined as follows:
/// A trait for hash state accumulators.
trait HashStateTrait<S> {
fn update(self: S, value: felt252) -> S;
fn finalize(self: S) -> felt252;
}
/// Extension trait for hash state accumulators.
trait HashStateExTrait<S, T> {
/// Updates the hash state with the given value.
fn update_with(self: S, value: T) -> S;
}
/// A trait for values that can be hashed.
trait Hash<T, S, +HashStateTrait<S>> {
/// Updates the hash state with the given value.
fn update_state(state: S, value: T) -> S;
}
To use hashes in your code, you must first import the relevant traits and functions. In the following example, we will demonstrate how to hash a struct using both the Pedersen and Poseidon hash functions.
The first step is to initialize the hash with either PoseidonTrait::new() -> HashState or PedersenTrait::new(base: felt252) -> HashState depending on which hash function we want to work with. Then the hash state can be updated with the update(self: HashState, value: felt252) -> HashState or update_with(self: S, value: T) -> S functions as many times as required. Then the function finalize(self: HashState) -> felt252 is called on the hash state and it returns the value of the hash as a felt252.
use core::poseidon::PoseidonTrait;
use core::hash::{HashStateTrait, HashStateExTrait};
#[derive(Drop, Hash)]
struct StructForHash {
first: felt252,
second: felt252,
third: (u32, u32),
last: bool,
}
fn main() -> felt252 {
let struct_to_hash = StructForHash { first: 0, second: 1, third: (1, 2), last: false };
let hash = PoseidonTrait::new().update_with(struct_to_hash).finalize();
hash
}
Pedersen is different from Poseidon, as it starts with a base state. This base state must be of felt252 type, which forces us to either hash the struct with an arbitrary base state using the update_with method, or serialize the struct into an array to loop through all of its fields and hash its elements together.
Here is a short example of Pedersen hashing:
use core::pedersen::PedersenTrait;
use core::hash::{HashStateTrait, HashStateExTrait};
#[derive(Drop, Hash, Serde, Copy)]
struct StructForHash {
first: felt252,
second: felt252,
third: (u32, u32),
last: bool,
}
fn main() -> (felt252, felt252) {
let struct_to_hash = StructForHash { first: 0, second: 1, third: (1, 2), last: false };
// hash1 is the result of hashing a struct with a base state of 0
let hash1 = PedersenTrait::new(0).update_with(struct_to_hash).finalize();
let mut serialized_struct: Array<felt252> = ArrayTrait::new();
Serde::serialize(@struct_to_hash, ref serialized_struct);
let first_element = serialized_struct.pop_front().unwrap();
let mut state = PedersenTrait::new(first_element);
while let Some(value) = serialized_struct.pop_front() {
state = state.update(value);
}
// hash2 is the result of hashing only the fields of the struct
let hash2 = state.finalize();
(hash1, hash2)
}
Advanced Hashing: Hashing Arrays with Poseidon
Let us look at an example of hashing a struct that contains a Span<felt252>.
To hash a Span<felt252> or a struct that contains a Span<felt252> you can use the built-in function poseidon_hash_span(mut span: Span<felt252>) -> felt252. Similarly, you can hash Array<felt252> by calling poseidon_hash_span on its span.
First, let us import the following traits and function:
use core::poseidon::PoseidonTrait;
use core::poseidon::poseidon_hash_span;
use core::hash::{HashStateTrait, HashStateExTrait};
Now we define the struct. As you might have noticed, we didn't derive the Hash trait. If you attempt to derive the Hash trait for this struct, it will result in an error because the structure contains a field that is not hashable.
#[derive(Drop)]
struct StructForHashArray {
first: felt252,
second: felt252,
third: Array<felt252>,
}
In this example, we initialized a HashState (hash), updated it and then called the function finalize() on the
HashState to get the computed hash hash_felt252. We used poseidon_hash_span on the Span of the Array<felt252> to compute its hash.
use core::poseidon::PoseidonTrait;
use core::poseidon::poseidon_hash_span;
use core::hash::{HashStateTrait, HashStateExTrait};
#[derive(Drop)]
struct StructForHashArray {
first: felt252,
second: felt252,
third: Array<felt252>,
}
fn main() {
let struct_to_hash = StructForHashArray { first: 0, second: 1, third: array![1, 2, 3, 4, 5] };
let mut hash = PoseidonTrait::new().update(struct_to_hash.first).update(struct_to_hash.second);
let hash_felt252 = hash.update(poseidon_hash_span(struct_to_hash.third.span())).finalize();
}
Macros
The Cairo language has some plugins that allow developers to simplify their code. They are called inline_macros and are a way of writing code that generates other code.
consteval_int! Macro
In some situations, a developer might need to declare a constant that is the result of a computation of integers. To compute a constant expression and use its result at compile time, it is required to use the consteval_int! macro.
Here is an example of consteval_int!:
const a: felt252 = consteval_int!(2 * 2 * 2);
This will be interpreted as const a: felt252 = 8; by the compiler.
selector! Macro
selector!("function_name") macro generates the entry point selector for the given function name.
print! and println! Macros
Please refer to the Printing page.
array! Macro
Please refer to the Arrays page.
panic! Macro
See Unrecoverable Errors with panic page.
assert! and assert_xx! Macros
See How to Write Tests page.
format! Macro
See Printing page.
write! and writeln! Macros
See Printing page.
get_dep_component!, get_dep_component_mut and component! Macros
Please refer to the Composability and Components chapter.
Procedural Macros
Cairo provides macros as a fundamental feature that lets you write code that generates other code (known as metaprogramming). When you use macros, you can extend Cairo's capabilities beyond what regular functions offer. Throughout this book, we've used macros like println! and assert!, but haven't fully explored how we can create our own macros.
Before diving into procedural macros specifically, let's understand why we need macros when we already have functions:
The Difference Between Macros and Functions
Fundamentally, macros are a way of writing code that writes other code, which
is known as metaprogramming. In Appendix C, we discuss derivable traits and the derive
attribute, which generates an implementation of various traits for you. We’ve
also used the println! and array! macros throughout the book. All of these
macros expand to produce more code than the code you’ve written manually.
Metaprogramming is useful for reducing the amount of code you have to write and maintain, which is also one of the roles of functions. However, macros have some additional powers that functions don’t.
A function signature must declare the number and type of parameters the
function has. Macros, on the other hand, can take a variable number of
parameters: we can call println!("hello") with one argument or
println!("hello {}", name) with two arguments. Also, macros are expanded
before the compiler interprets the meaning of the code, so a macro can, for
example, implement a trait on a given type. A function can’t, because it gets
called at runtime and a trait needs to be implemented at compile time.
Another important difference between macros and functions is that the design of Cairo macros is complex: they're written in Rust, but operate on Cairo code. Due to this indirection and the combination of the two languages, macro definitions are generally more difficult to read, understand, and maintain than function definitions.
We call procedural macros macros that allow you to run code at compile time that operates over Cairo syntax, both consuming and producing Cairo syntax. You can sort of think of procedural macros as functions from an AST to another AST. The three kinds of procedural macros are custom derive, attribute-like, and function-like, and all work in a similar fashion.
In this chapter, we'll explore what procedural macros are, how they're defined, and examine each of the three types in detail.
Cairo Procedural Macros are Rust Functions
Just as the Cairo compiler is written in Rust, procedural macros are Rust functions that transform Cairo code. These functions take Cairo code as input and return modified Cairo code as output. To implement macros, you'll need a package with both a Cargo.toml and a Scarb.toml file. The Cargo.toml defines the macro implementation dependencies, while the Scarb.toml marks the package as a macro and defines its metadata.
The function that defines a procedural macro operates on two key types:
TokenStream: A sequence of Cairo tokens representing your source code. Tokens are the smallest units of code that the compiler recognizes (like identifiers, keywords, and operators).ProcMacroResult: An enhanced version of TokenStream that includes both the generated code and any diagnostic messages (warnings or errors) that should be shown to the user during compilation.
The function implementing the macro must be decorated with one of three special attributes that tell the compiler how the macro should be used:
#[inline_macro]: For macros that look like function calls (e.g.,println!())#[attribute_macro]: For macros that act as attributes (e.g.,#[generate_trait])#[derive_macro]: For macros that implement traits automatically
Each attribute type corresponds to a different use case and affects how the macro can be invoked in your code.
Here are the signatures for each types :
#[inline_macro]
pub fn inline(code: TokenStream) -> ProcMacroResult {}
#[attribute_macro]
pub fn attribute(attr: TokenStream, code: TokenStream) -> ProcMacroResult {}
#[derive_macro]
pub fn derive(code: TokenStream) -> ProcMacroResult {}Install dependencies
To use procedural macros, you need to have Rust toolchain (Cargo) installed on your machine. To install Rust using Rustup, you can run the following command in you terminal :
curl --proto '=https' --tlsv1.2 -sSf https://sh.rustup.rs | sh
Create your macro
Creating a procedural macro requires setting up a specific project structure. Your macro project needs:
-
A Rust Project (where you implement the macro):
Cargo.toml: Defines Rust dependencies and build settingssrc/lib.rs: Contains the macro implementation
-
A Cairo Project:
Scarb.toml: Declares the macro for Cairo projects- No Cairo source files needed
Let's walk through each component and understand its role:
├── Cargo.toml
├── Scarb.toml
├── src
│ └── lib.rs
The project contains a Scarb.toml and a Cargo.toml file in the root directory.
The Cargo manifest file needs to contain a crate-type = ["cdylib"] on the [lib] target, and the cairo-lang-macro crate on the [dependencies] target. Here is an example :
[package]
name = "pow"
version = "0.1.0"
edition = "2021"
publish = false
[lib]
crate-type = ["cdylib"]
[dependencies]
bigdecimal = "0.4.5"
cairo-lang-macro = "0.1.1"
cairo-lang-parser = "2.11.4"
cairo-lang-syntax = "2.11.4"
[workspace]
The Scarb manifest file must define a [cairo-plugin] target type. Here is an example :
[package]
name = "pow"
version = "0.1.0"
[cairo-plugin]
Finally the project needs to contain a Rust library (lib.rs), inside the src/ directory that implements the procedural macro API.
As you might have notice the project doesn't need any cairo code, it only requires the Scarb.toml manifest file mentioned.
Using your macro
From the user's perspective, you only need to add the package defining the macro in your dependencies. In the project using the macro you will have a Scarb manifest file with :
[package]
name = "no_listing_15_procedural_macro"
version = "0.1.0"
edition = "2024_07"
# See more keys and their definitions at https://docs.swmansion.com/scarb/docs/reference/manifest.html
[dependencies]
pow = { path = "../no_listing_16_procedural_macro_expression" }
hello_macro = { path = "../no_listing_17_procedural_macro_derive" }
rename_macro = { path = "../no_listing_18_procedural_macro_attribute" }
[dev-dependencies]
cairo_test = "2.11.4"
Expression Macros
Expression macros provide functionality similar to function calls but with enhanced capabilities. Unlike regular functions, they can:
- Accept a variable number of arguments
- Handle arguments of different types
- Generate code at compile time
- Perform more complex code transformations
This flexibility makes them powerful tools for generic programming and code generation. Let's examine a practical example: implementing a compile-time power function.
Creating an expression Macros
To understand how to create an expression macro, we will look at a pow macro implementation from the Alexandria library that computes the power of a number at compile time.
The core code of the macro implementation is a Rust code that uses three Rust crates : cairo_lang_macro specific to macros implementation, cairo_lang_parser crate with function related to the compiler parser and cairo_lang_syntax related to the compiler syntax. The two latters were initially created for the Cairo lang compiler, as macro functions operate at the Cairo syntax level, we can reuse the logic directly from the syntax functions created for the compiler to create macros.
Note: To understand better the Cairo compiler and some of the concepts we only mention here such as the Cairo parser or the Cairo syntax, you can read the Cairo compiler workshop.
In the pow function example below the input is processed to extract the value of the base argument and the exponent argument to return the result of \(base^{exponent}\).
use bigdecimal::{num_traits::pow, BigDecimal};
use cairo_lang_macro::{inline_macro, Diagnostic, ProcMacroResult, TokenStream};
use cairo_lang_parser::utils::SimpleParserDatabase;
#[inline_macro]
pub fn pow(token_stream: TokenStream) -> ProcMacroResult {
let db = SimpleParserDatabase::default();
let (parsed, _diag) = db.parse_virtual_with_diagnostics(token_stream);
// extracting the args from the parsed input
let macro_args: Vec<String> = parsed
.descendants(&db)
.next()
.unwrap()
.get_text(&db)
.trim_matches(|c| c == '(' || c == ')')
.split(',')
.map(|s| s.trim().to_string())
.collect();
if macro_args.len() != 2 {
return ProcMacroResult::new(TokenStream::empty()).with_diagnostics(
Diagnostic::error(format!("Expected two arguments, got {:?}", macro_args)).into(),
);
}
// getting the value from the base arg
let base: BigDecimal = match macro_args[0].parse() {
Ok(val) => val,
Err(_) => {
return ProcMacroResult::new(TokenStream::empty())
.with_diagnostics(Diagnostic::error("Invalid base value").into());
}
};
// getting the value from the exponent arg
let exp: usize = match macro_args[1].parse() {
Ok(val) => val,
Err(_) => {
return ProcMacroResult::new(TokenStream::empty())
.with_diagnostics(Diagnostic::error("Invalid exponent value").into());
}
};
// base^exp
let result: BigDecimal = pow(base, exp);
ProcMacroResult::new(TokenStream::new(result.to_string()))
}Now that the macro is defined, we can use it. In a Cairo project we need to have pow = { path = "path/to/pow" } in the [dependencies] target of the Scarb.toml manifest file. And then we can use it without further import like this :
fn main() {
let a = SomeType {};
a.hello();
let res = pow!(10, 2);
println!("res : {}", res);
let _a = RenamedType {};
}
#[derive(HelloMacro, Drop, Destruct)]
struct SomeType {}
#[rename]
struct OldType {}
trait Hello<T> {
fn hello(self: @T);
}
Derive Macros
Derive macros let you define custom trait implementations that can be automatically applied to types. When you annotate a type with #[derive(TraitName)], your derive macro:
- Receives the type's structure as input
- Contains your custom logic for generating the trait implementation
- Outputs the implementation code that will be included in the crate
Writing derive macros eliminates repetitive trait implementation code by using a generic logic on how to generate the trait implementation.
Creating a derive macro
In this example, we will implement a derive macro that will implement the Hello Trait. The Hello trait will have a hello() function that will print : Hello, StructName!, where StructName is the name of the struct.
Here is the definition of the Hello trait :
fn main() {
let a = SomeType {};
a.hello();
let res = pow!(10, 2);
println!("res : {}", res);
let _a = RenamedType {};
}
#[derive(HelloMacro, Drop, Destruct)]
struct SomeType {}
#[rename]
struct OldType {}
trait Hello<T> {
fn hello(self: @T);
}
Let's check the marcro implementation, first the hello_derive function parses the input token stream and then extracts the struct_name to implement the trait for that specific struct.
Then hello derived returns a hard-coded piece of code containing the implementation of Hello trait for the type StructName.
use cairo_lang_macro::{derive_macro, ProcMacroResult, TokenStream};
use cairo_lang_parser::utils::SimpleParserDatabase;
use cairo_lang_syntax::node::kind::SyntaxKind::{TerminalStruct, TokenIdentifier};
#[derive_macro]
pub fn hello_macro(token_stream: TokenStream) -> ProcMacroResult {
let db = SimpleParserDatabase::default();
let (parsed, _diag) = db.parse_virtual_with_diagnostics(token_stream);
let mut nodes = parsed.descendants(&db);
let mut struct_name = String::new();
for node in nodes.by_ref() {
if node.kind(&db) == TerminalStruct {
struct_name = nodes
.find(|node| node.kind(&db) == TokenIdentifier)
.unwrap()
.get_text(&db);
break;
}
}
ProcMacroResult::new(TokenStream::new(indoc::formatdoc! {r#"
impl SomeHelloImpl of Hello<{0}> {{
fn hello(self: @{0}) {{
println!("Hello {0}!");
}}
}}
"#, struct_name}))
}Now that the macro is defined, we can use it. In a Cairo project we need to have hello_macro = { path = "path/to/hello_macro" } in the [dependencies] target of the Scarb.toml manifest file. And we can then use it without further import on any struct :
#[derive(HelloMacro, Drop, Destruct)]
struct SomeType {}
And now we can call the implemented function hello on an variable of the type SomeType.
fn main() {
let a = SomeType {};
a.hello();
let res = pow!(10, 2);
println!("res : {}", res);
let _a = RenamedType {};
}
#[derive(HelloMacro, Drop, Destruct)]
struct SomeType {}
#[rename]
struct OldType {}
trait Hello<T> {
fn hello(self: @T);
}
Note that the Hello trait that is implemented in the macro has to be defined somewhere in the code or imported.
Attribute Macros
Attribute-like macros are similar to custom derive macros, but allowing more possibilities, they are not restricted to struct and enum and can be applied to other items as well, such as functions. They can be used for more diverse code generation than implementing trait. It could be used to modify the name of a struct, add fields in the structure, execute some code before a function, change the signature of a function and many other possibilities.
The extra possibilities also come from the fact that they are defined with a second argument TokenStream, indeed the signature looks like this :
#[attribute_macro]
pub fn attribute(attr: TokenStream, code: TokenStream) -> ProcMacroResult {}With the first attribute (attr) for the attribute arguments (#[macro(arguments)]) and second for the actual code on which the attribute is applied to, the second attribute is the only one the two other macros have.
Creating an attribute macro
Now let's look at an example of a custom made attribute macro, in this example we will create a macro that will rename the struct.
use cairo_lang_macro::attribute_macro;
use cairo_lang_macro::{ProcMacroResult, TokenStream};
#[attribute_macro]
pub fn rename(_attr: TokenStream, token_stream: TokenStream) -> ProcMacroResult {
ProcMacroResult::new(TokenStream::new(
token_stream
.to_string()
.replace("struct OldType", "#[derive(Drop)]\n struct RenamedType"),
))
}Again, to use the macro in a Cairo project we need to have rename_macro = { path = "path/to/rename_macro" } in the [dependencies] target of the Scarb.toml manifest file. And we can then use it without further import on any struct.
The rename macro can be derived as follow :
fn main() {
let a = SomeType {};
a.hello();
let res = pow!(10, 2);
println!("res : {}", res);
let _a = RenamedType {};
}
#[derive(HelloMacro, Drop, Destruct)]
struct SomeType {}
#[rename]
struct OldType {}
trait Hello<T> {
fn hello(self: @T);
}
Now the compiler knows the RenamedType struct, therefore we can create an instance as such :
fn main() {
let a = SomeType {};
a.hello();
let res = pow!(10, 2);
println!("res : {}", res);
let _a = RenamedType {};
}
#[derive(HelloMacro, Drop, Destruct)]
struct SomeType {}
#[rename]
struct OldType {}
trait Hello<T> {
fn hello(self: @T);
}
You can notice that the names OldType and RenamedType were hardcoded in the example but could be variables leveraging the second arg of rattribute macro. Also note that due to the order of compilation, the derive of other macro such as Drop here as to be done in the code generated by the macro. Some deeper understanding of Cairo compilation can be required for custom macro creation.
Inlining in Cairo
Inlining is a common code optimization technique supported by most compilers. It involves replacing a function call at the call site with the actual code of the called function, eliminating the overhead associated with the function call itself. This can improve performance by reducing the number of instructions executed, but may increase the total size of the program. When you're thinking about whether to inline a function, take into account things like how big it is, what parameters it has, how often it gets called, and how it might affect the size of your compiled code.
The inline Attribute
In Cairo, the inline attribute suggests whether or not the Sierra code corresponding to the attributed function should be directly injected in the caller function's context, rather than using a function_call libfunc to execute that code.
There are three variants of the inline attribute that one can use:
#[inline]suggests performing an inline expansion.#[inline(always)]suggests that an inline expansion should always be performed.#[inline(never)]suggests that an inline expansion should never be performed.
Note: the
inlineattribute in every form is a hint, with no requirements on the language to place a copy of the attributed function in the caller. This means that the attribute may be ignored by the compiler. In practice,#[inline(always)]will cause inlining in all but the most exceptional cases.
Many of the Cairo corelib functions are inlined. User-defined functions may also be annotated with the inline attribute. Annotating functions with the #[inline(always)] attribute reduces the total number of steps required when calling these attributed functions. Indeed, injecting the Sierra code at the caller site avoids the step-cost involved in calling functions and obtaining their arguments.
However, inlining can also lead to increased code size. Whenever a function is inlined, the call site contains a copy of the function's Sierra code, potentially leading to duplication of code across the compiled code.
Therefore, inlining should be applied with caution. Using #[inline] or #[inline(always)] indiscriminately will lead to increased compile time. It is particularly useful to inline small functions, ideally with many arguments. This is because inlining large functions will increase the code length of the program, and handling many arguments will increase the number of steps to execute these functions.
The more frequently a function is called, the more beneficial inlining becomes in terms of performance. By doing so, the number of steps for the execution will be lower, while the code length will not grow that much or might even decrease in terms of total number of instructions.
Inlining is often a tradeoff between number of steps and code length. Use the
inlineattribute cautiously where it is appropriate.
Inlining decision process
The Cairo compiler follows the inline attribute but for functions without explicit inline directives, it will use a heuristic approach. The decision to inline or not a function will be made depending on the complexity of the attributed function and mostly rely on the threshold DEFAULT_INLINE_SMALL_FUNCTIONS_THRESHOLD.
The compiler calculates a function's "weight" using the ApproxCasmInlineWeight struct, which estimates the number of Cairo Assembly (CASM) statements the function will generate. This weight calculation provides a more nuanced view of the function's complexity than a simple statement count. If a function's weight falls below the threshold, it will be inlined.
In addition to the weight-based approach, the compiler also considers the raw statement count. Functions with fewer statements than the threshold are typically inlined, promoting the optimization of small, frequently called functions.
The inlining process also accounts for special cases. Very simple functions, such as those that only call another function or return a constant, are always inlined regardless of other factors. Conversely, functions with complex control flow structures like Match or those ending with a Panic are generally not inlined.
Inlining Example
Let's introduce a short example to illustrate the mechanisms of inlining in Cairo. Listing 12-5 shows a basic program allowing comparison between inlined and non-inlined functions.
fn main() -> felt252 {
inlined() + not_inlined()
}
#[inline(always)]
fn inlined() -> felt252 {
1
}
#[inline(never)]
fn not_inlined() -> felt252 {
2
}
Listing 12-5: A small Cairo program that adds the return value of 2 functions, with one of them being inlined
Let's take a look at the corresponding Sierra code to see how inlining works under the hood:
// type declarations
type felt252 = felt252 [storable: true, drop: true, dup: true, zero_sized: false]
// libfunc declarations
libfunc function_call<user@main::main::not_inlined> = function_call<user@main::main::not_inlined>
libfunc felt252_const<1> = felt252_const<1>
libfunc store_temp<felt252> = store_temp<felt252>
libfunc felt252_add = felt252_add
libfunc felt252_const<2> = felt252_const<2>
// statements
00 function_call<user@main::main::not_inlined>() -> ([0])
01 felt252_const<1>() -> ([1])
02 store_temp<felt252>([1]) -> ([1])
03 felt252_add([1], [0]) -> ([2])
04 store_temp<felt252>([2]) -> ([2])
05 return([2])
06 felt252_const<1>() -> ([0])
07 store_temp<felt252>([0]) -> ([0])
08 return([0])
09 felt252_const<2>() -> ([0])
10 store_temp<felt252>([0]) -> ([0])
11 return([0])
// funcs
main::main::main@0() -> (felt252)
main::main::inlined@6() -> (felt252)
main::main::not_inlined@9() -> (felt252)
The Sierra file is structured in three parts:
- Type and libfunc declarations.
- Statements that constitute the program.
- Declaration of the functions of the program.
The Sierra code statements always match the order of function declarations in the Cairo program. Indeed, the declaration of the functions of the program tells us that:
mainfunction starts at line 0, and returns afelt252on line 5.inlinedfunction starts at line 6, and returns afelt252on line 8.not_inlinedfunction starts at line 9, and returns afelt252on line 11.
All statements corresponding to the main function are located between lines 0 and 5:
00 function_call<user@main::main::not_inlined>() -> ([0])
01 felt252_const<1>() -> ([1])
02 store_temp<felt252>([1]) -> ([1])
03 felt252_add([1], [0]) -> ([2])
04 store_temp<felt252>([2]) -> ([2])
05 return([2])
The function_call libfunc is called on line 0 to execute the not_inlined function. This will execute the code from lines 9 to 10 and store the return value in the variable with id 0.
09 felt252_const<2>() -> ([0])
10 store_temp<felt252>([0]) -> ([0])
This code uses a single data type, felt252. It uses two library functions - felt252_const<2>, which returns the constant felt252 2, and store_temp<felt252>, which pushes a constant value to memory. The first line calls the felt252_const<2> libfunc to create a variable with id 0. Then, the second line pushes this variable to memory for later use.
After that, Sierra statements from line 1 to 2 are the actual body of the inlined function:
06 felt252_const<1>() -> ([0])
07 store_temp<felt252>([0]) -> ([0])
The only difference is that the inlined code will store the felt252_const value in a variable with id 1, because [0] refers to a variable previously assigned:
01 felt252_const<1>() -> ([1])
02 store_temp<felt252>([1]) -> ([1])
Note: in both cases (inlined or not), the
returninstruction of the function being called is not executed, as this would lead to prematurely end the execution of themainfunction. Instead, return values ofinlinedandnot_inlinedwill be added and the result will be returned.
Lines 3 to 5 contain the Sierra statements that will add the values contained in variables with ids 0 and 1, store the result in memory and return it:
03 felt252_add([1], [0]) -> ([2])
04 store_temp<felt252>([2]) -> ([2])
05 return([2])
Now, let's take a look at the Casm code corresponding to this program to really understand the benefits of inlining.
Casm Code Explanations
Here is the Casm code for our previous program example:
1 call rel 3
2 ret
3 call rel 9
4 [ap + 0] = 1, ap++
5 [ap + 0] = [ap + -1] + [ap + -2], ap++
6 ret
7 [ap + 0] = 1, ap++
8 ret
9 [ap + 0] = 2, ap++
10 ret
11 ret
Don't hesitate to use cairovm.codes playground to follow along and see all the execution trace.
Each instruction and each argument for any instruction increment the Program Counter (known as PC) by 1. This means that ret on line 2 is actually the instruction at PC = 3, as the argument 3 corresponds to PC = 2.
The call and ret instructions allow implementation of a function stack:
callinstruction acts like a jump instruction, updating the PC to a given value, whether relatively to the current value usingrelor absolutely usingabs.retinstruction jumps back right after thecallinstruction and continues the execution of the code.
We can now decompose how these instructions are executed to understand what this code does:
call rel 3: this instruction increments the PC by 3 and executes the instruction at this location, which iscall rel 9atPC = 4.call rel 9increments the PC by 9 and executes the instruction atPC = 13, which is actually line 9.[ap + 0] = 2, ap++:apstands for Allocation Pointer, which points to the first memory cell that has not been used by the program so far. This means we store the value2in the next free memory cell indicated by the current value ofap, after which we incrementapby 1. Then, we go to the next line which isret.ret: jumps back to the line aftercall rel 9, so we go to line 4.[ap + 0] = 1, ap++: we store the value1in[ap]and we applyap++so that[ap - 1] = 1. This means we now have[ap-1] = 1, [ap-2] = 2and we go to the next line.[ap + 0] = [ap + -1] + [ap + -2], ap++: we sum the values1and2and store the result in[ap], and we applyap++so the result is[ap-1] = 3, [ap-2] = 1, [ap-3]=2.ret: jumps back to the line aftercall rel 3, so we go to line 2.ret: last instruction executed as there is no morecallinstruction where to jump right after. This is the actual return instruction of the Cairomainfunction.
To summarize:
call rel 3corresponds to themainfunction, which is obviously not inlined.call rel 9triggers the call to thenot_inlinedfunction, which returns2and stores it at the final location[ap-3].- The line 4 is the inlined code of the
inlinedfunction, which returns1and stores it at the final location[ap-2]. We clearly see that there is nocallinstruction in this case, because the body of the function is inserted and directly executed. - After that, the sum is computed and we ultimately go back to the line 2 which contains the final
retinstruction that returns the sum, corresponding to the return value of themainfunction.
It is interesting to note that in both Sierra code and Casm code, the not_inlined function will be called and executed before the body of the inlined function, even though the Cairo program executes inlined() + not_inlined().
The Casm code of our program clearly shows that there is a function call for the
not_inlinedfunction, while theinlinedfunction is correctly inlined.
Additional Optimizations
Let's study another program that shows other benefits that inlining may sometimes provide. Listing 12-6 shows a Cairo program that calls 2 functions and doesn't return anything:
fn main() {
inlined();
not_inlined();
}
#[inline(always)]
fn inlined() -> felt252 {
'inlined'
}
#[inline(never)]
fn not_inlined() -> felt252 {
'not inlined'
}
Listing 12-6: A small Cairo program that calls inlined and not_inlined and doesn't return any value.
Here is the corresponding Sierra code:
// type declarations
type felt252 = felt252 [storable: true, drop: true, dup: true, zero_sized: false]
type Unit = Struct<ut@Tuple> [storable: true, drop: true, dup: true, zero_sized: true]
// libfunc declarations
libfunc function_call<user@main::main::not_inlined> = function_call<user@main::main::not_inlined>
libfunc drop<felt252> = drop<felt252>
libfunc struct_construct<Unit> = struct_construct<Unit>
libfunc felt252_const<29676284458984804> = felt252_const<29676284458984804>
libfunc store_temp<felt252> = store_temp<felt252>
libfunc felt252_const<133508164995039583817065828> = felt252_const<133508164995039583817065828>
// statements
00 function_call<user@main::main::not_inlined>() -> ([0])
01 drop<felt252>([0]) -> ()
02 struct_construct<Unit>() -> ([1])
03 return([1])
04 felt252_const<29676284458984804>() -> ([0])
05 store_temp<felt252>([0]) -> ([0])
06 return([0])
07 felt252_const<133508164995039583817065828>() -> ([0])
08 store_temp<felt252>([0]) -> ([0])
09 return([0])
// funcs
main::main::main@0() -> (Unit)
main::main::inlined@4() -> (felt252)
main::main::not_inlined@7() -> (felt252)
In this specific case, we can observe that the compiler has applied additional optimizations to the main function of our code : the code of the inlined function, which is annotated with the #[inline(always)] attribute, is actually not copied in the main function. Instead, the main function starts with the function_call libfunc to call the not_inlined function, entirely omitting the code of the inlined function.
Because
inlinedreturn value is never used, the compiler optimizes themainfunction by skipping theinlinedfunction code. This will actually reduce the code length while reducing the number of steps required to executemain.
In contrast, line 0 uses the function_call libfunc to execute the not_inlined function normally. This means that all the code from lines 7 to 8 will be executed:
07 felt252_const<133508164995039583817065828>() -> ([0])
08 store_temp<felt252>([0]) -> ([0])
This value stored in the variable with id 0 is then dropped on line 1, as it is not used in the main function:
01 drop<felt252>([0]) -> ()
Finally, as the main function doesn't return any value, a variable of unit type () is created and returned:
02 struct_construct<Unit>() -> ([1])
03 return([1])
Summary
Inlining is a compiler optimization technique that can be very useful in various situations. Inlining a function allows to get rid of the overhead of calling a function with the function_call libfunc by injecting the Sierra code directly in the caller function's context, while potentially optimizing the Sierra code executed to reduce the number of steps. If used effectively, inlining can even reduce code length as shown in the previous example.
Nevertheless, applying the inline attribute to a function with a lot of code and few parameters might result in an increased code size, especially if the inlined function is used many times in the codebase. Use inlining only where it makes sense, and be aware that the compiler handles inlining by default. Therefore, manually applying inlining is not recommended in most situations, but can help improve and fine-tune your code's behavior.
Printing
When writing a program, it is quite common to print some data to the console, either for the normal process of the program or for debugging purpose. In this chapter, we describe the options you have to print simple and complex data types.
Printing Standard Data Types
Cairo provides two macros to print standard data types:
println!which prints on a new lineprint!with inline printing
Both take a ByteArray string as first parameter (see Data Types), which can be a simple string to print a message or a string with placeholders to format the way values are printed.
There are two ways to use these placeholders and both can be mixed:
- empty curly brackets
{}are replaced by values given as parameters to theprint!macro, in the same order. - curly brackets with variable names are directly replaced by the variable value.
Here are some examples:
fn main() {
let a = 10;
let b = 20;
let c = 30;
println!("Hello world!");
println!("{} {} {}", a, b, c); // 10 20 30
println!("{c} {a} {}", b); // 30 10 20
}
print!andprintln!macros use theDisplaytrait under the hood, and are therefore used to print the value of types that implement it. This is the case for basic data types, but not for more complex ones. If you try to print complex data type values with these macros, e.g. for debugging purposes, you will get an error. In that case, you can either manually implement theDisplaytrait for your type or use theDebugtrait (see below).
Formatting
Cairo also provides a useful macro to handle string formatting: format!. This macro works like println!, but instead of printing the output to the screen, it returns a ByteArray with the contents. In the following example, we perform string concatenation using either the + operator or the
format! macro. The version of the code using format! is much easier to read, and the code generated by the format! macro uses snapshots, so that this call doesn’t take ownership of any of its parameters.
fn main() {
let s1: ByteArray = "tic";
let s2: ByteArray = "tac";
let s3: ByteArray = "toe";
let s = s1 + "-" + s2 + "-" + s3;
// using + operator consumes the strings, so they can't be used again!
let s1: ByteArray = "tic";
let s2: ByteArray = "tac";
let s3: ByteArray = "toe";
let s = format!("{s1}-{s2}-{s3}"); // s1, s2, s3 are not consumed by format!
// or
let s = format!("{}-{}-{}", s1, s2, s3);
println!("{}", s);
}
Printing Custom Data Types
As previously explained, if you try to print the value of a custom data type with print! or println! macros, you'll get an error telling you that the Display trait is not implemented for your custom type:
error: Trait has no implementation in context: core::fmt::Display::<package_name::struct_name>
The println! macro can do many kinds of formatting, and by default, the curly brackets tell println! to use formatting known as Display - output intended for direct end user consumption. The primitive types we’ve seen so far implement Display by default because there’s only one way you’d want to show a 1 or any other primitive type to a user. But with structs, the way println! should format the output is less clear because there are more display possibilities: Do we want commas or not? Do we want to print the curly brackets? Should all the fields be shown? Due to this ambiguity, Cairo doesn’t try to guess what we want, and structs don’t have a provided implementation of Display to use with println! and the {} placeholder.
Here is the Display trait to implement:
trait Display<T> {
fn fmt(self: @T, ref f: Formatter) -> Result<(), Error>;
}
The second parameter f is of type Formatter, which is just a struct containing a ByteArray, representing the pending result of formatting:
#[derive(Default, Drop)]
pub struct Formatter {
/// The pending result of formatting.
pub buffer: ByteArray,
}
Knowing this, here is an example of how to implement the Display trait for a custom Point struct:
use core::fmt::{Display, Formatter, Error};
#[derive(Copy, Drop)]
struct Point {
x: u8,
y: u8,
}
impl PointDisplay of Display<Point> {
fn fmt(self: @Point, ref f: Formatter) -> Result<(), Error> {
let str: ByteArray = format!("Point ({}, {})", *self.x, *self.y);
f.buffer.append(@str);
Ok(())
}
}
fn main() {
let p = Point { x: 1, y: 3 };
println!("{}", p); // Point: (1, 3)
}
Cairo also provides the write! and writeln! macros to write formatted strings in a formatter.
Here is a short example using write! macro to concatenate multiple strings on the same line and then print the result:
use core::fmt::Formatter;
fn main() {
let mut formatter: Formatter = Default::default();
let a = 10;
let b = 20;
write!(formatter, "hello");
write!(formatter, "world");
write!(formatter, " {a} {b}");
println!("{}", formatter.buffer); // helloworld 10 20
}
It is also possible to implement the Display trait for the Point struct using these macros, as shown here:
use core::fmt::{Display, Formatter, Error};
#[derive(Copy, Drop)]
struct Point {
x: u8,
y: u8,
}
impl PointDisplay of Display<Point> {
fn fmt(self: @Point, ref f: Formatter) -> Result<(), Error> {
let x = *self.x;
let y = *self.y;
writeln!(f, "Point ({x}, {y})")
}
}
fn main() {
let p = Point { x: 1, y: 3 };
println!("{}", p); // Point: (1, 3)
}
Printing complex data types this way might not be ideal as it requires additional steps to use the
print!andprintln!macros. If you need to print complex data types, especially when debugging, use theDebugtrait described below instead.
Print in Hexadecimal
By default, the Display trait prints integer values in decimal. But, as in Rust, you can use the {:x} notation to print them in hexadecimal.
Under the hood, Cairo implements the LowerHex trait for common types such as unsigned integers, felt252 and NonZero but also for common Starknet types such as ContractAddress and ClassHash.
If it makes sense for you, you can also implement the LowerHex trait for your custom types using the same approach as for the Display trait (see Printing Custom Data Types).
Print Debug Traces
Cairo provides the Debug trait, which can be derived to print the value of variables when debugging. Simply add :? within the curly brackets {} placeholders in a print! or println! macro string.
This trait is very useful and is implemented by default for basic data types. It can also be simply derived for complex data types using the #[derive(Debug)] attribute, as long as all types they contain implement it. This eliminates the need to manually implement extra code to print complex data types.
Note that assert_xx! macros used in tests require the provided values to implement the Debug trait, as they also print the result in case of assertion failure.
For more details about the Debug trait and its usage for printing values when debugging, please refer to the Derivable Traits appendix.
Arithmetic Circuits
Arithmetic circuits are mathematical models used to represent polynomial computations. They are defined over a field (typically a finite field \(F_p\) where \(p\) is prime) and consist of:
- Input signals (values in the range \([0, p-1]\))
- Arithmetic operations (addition and multiplication gates)
- Output signals
Cairo supports emulated arithmetic circuits with modulo up to 384 bits.
This is especially useful for:
- Implementing verification for other proof systems
- Implementing cryptographic primitives
- Creating more low-level programs, with potential reduced overhead compared to standard Cairo constructs
Implementing Arithmetic Circuits in Cairo
Cairo's circuit constructs are available in the core::circuit module of the corelib.
Arithmetic circuits consist of:
- Addition modulo \(p\):
AddModbuiltin - Multiplication modulo \(p\):
MulModbuiltin
Because of the modulo properties, we can build four basic arithmetic gates:
- Addition:
AddModGate - Subtraction:
SubModGate - Multiplication:
MulModGate - Inverse:
InvModGate
Let's create a circuit that computes \(a \cdot (a + b)\) over the BN254 prime field.
We start from the empty struct CircuitElement<T>.
The inputs of our circuit are defined as CircuitInput:
use core::circuit::{
CircuitElement, CircuitInput, circuit_add, circuit_mul, EvalCircuitTrait, CircuitOutputsTrait,
CircuitModulus, AddInputResultTrait, CircuitInputs, u384,
};
// Circuit: a * (a + b)
// witness: a = 10, b = 20
// expected output: 10 * (10 + 20) = 300
fn eval_circuit() -> (u384, u384) {
let a = CircuitElement::<CircuitInput<0>> {};
let b = CircuitElement::<CircuitInput<1>> {};
let add = circuit_add(a, b);
let mul = circuit_mul(a, add);
let output = (mul,);
let mut inputs = output.new_inputs();
inputs = inputs.next([10, 0, 0, 0]);
inputs = inputs.next([20, 0, 0, 0]);
let instance = inputs.done();
let bn254_modulus = TryInto::<
_, CircuitModulus,
>::try_into([0x6871ca8d3c208c16d87cfd47, 0xb85045b68181585d97816a91, 0x30644e72e131a029, 0x0])
.unwrap();
let res = instance.eval(bn254_modulus).unwrap();
let add_output = res.get_output(add);
let circuit_output = res.get_output(mul);
assert(add_output == u384 { limb0: 30, limb1: 0, limb2: 0, limb3: 0 }, 'add_output');
assert(circuit_output == u384 { limb0: 300, limb1: 0, limb2: 0, limb3: 0 }, 'circuit_output');
(add_output, circuit_output)
}
fn main() {
eval_circuit();
}
We can combine circuit inputs and gates: CircuitElement<a> and CircuitElement<b> combined with an addition gate gives CircuitElement<AddModGate<a, b>>.
We can use circuit_add, circuit_sub, circuit_mul and circuit_inverse to directly combine circuit elements.
For \(a * (a + b)\), the description of our circuit is:
use core::circuit::{
CircuitElement, CircuitInput, circuit_add, circuit_mul, EvalCircuitTrait, CircuitOutputsTrait,
CircuitModulus, AddInputResultTrait, CircuitInputs, u384,
};
// Circuit: a * (a + b)
// witness: a = 10, b = 20
// expected output: 10 * (10 + 20) = 300
fn eval_circuit() -> (u384, u384) {
let a = CircuitElement::<CircuitInput<0>> {};
let b = CircuitElement::<CircuitInput<1>> {};
let add = circuit_add(a, b);
let mul = circuit_mul(a, add);
let output = (mul,);
let mut inputs = output.new_inputs();
inputs = inputs.next([10, 0, 0, 0]);
inputs = inputs.next([20, 0, 0, 0]);
let instance = inputs.done();
let bn254_modulus = TryInto::<
_, CircuitModulus,
>::try_into([0x6871ca8d3c208c16d87cfd47, 0xb85045b68181585d97816a91, 0x30644e72e131a029, 0x0])
.unwrap();
let res = instance.eval(bn254_modulus).unwrap();
let add_output = res.get_output(add);
let circuit_output = res.get_output(mul);
assert(add_output == u384 { limb0: 30, limb1: 0, limb2: 0, limb3: 0 }, 'add_output');
assert(circuit_output == u384 { limb0: 300, limb1: 0, limb2: 0, limb3: 0 }, 'circuit_output');
(add_output, circuit_output)
}
fn main() {
eval_circuit();
}
Note that a, b and add are intermediate circuit elements and not specifically inputs or gates, which is why we need the distinction between the empty struct CircuitElement<T> and the circuit description specified by the type T.
The outputs of the circuits are defined as a tuple of circuit elements. It's possible to add any intermediate gates of our circuit, but we must add all gates with degree 0 (gates where the output signal is not used as input of any other gate).
In our case, we will only add the last gate mul:
use core::circuit::{
CircuitElement, CircuitInput, circuit_add, circuit_mul, EvalCircuitTrait, CircuitOutputsTrait,
CircuitModulus, AddInputResultTrait, CircuitInputs, u384,
};
// Circuit: a * (a + b)
// witness: a = 10, b = 20
// expected output: 10 * (10 + 20) = 300
fn eval_circuit() -> (u384, u384) {
let a = CircuitElement::<CircuitInput<0>> {};
let b = CircuitElement::<CircuitInput<1>> {};
let add = circuit_add(a, b);
let mul = circuit_mul(a, add);
let output = (mul,);
let mut inputs = output.new_inputs();
inputs = inputs.next([10, 0, 0, 0]);
inputs = inputs.next([20, 0, 0, 0]);
let instance = inputs.done();
let bn254_modulus = TryInto::<
_, CircuitModulus,
>::try_into([0x6871ca8d3c208c16d87cfd47, 0xb85045b68181585d97816a91, 0x30644e72e131a029, 0x0])
.unwrap();
let res = instance.eval(bn254_modulus).unwrap();
let add_output = res.get_output(add);
let circuit_output = res.get_output(mul);
assert(add_output == u384 { limb0: 30, limb1: 0, limb2: 0, limb3: 0 }, 'add_output');
assert(circuit_output == u384 { limb0: 300, limb1: 0, limb2: 0, limb3: 0 }, 'circuit_output');
(add_output, circuit_output)
}
fn main() {
eval_circuit();
}
We now have a complete description of our circuit and its outputs.
We now need to assign a value to each input.
As circuits are defined with 384-bit modulus, a single u384 value can be represented as a fixed array of four u96.
We can initialize \(a\) and \(b\) to respectively \(10\) and \(20\):
use core::circuit::{
CircuitElement, CircuitInput, circuit_add, circuit_mul, EvalCircuitTrait, CircuitOutputsTrait,
CircuitModulus, AddInputResultTrait, CircuitInputs, u384,
};
// Circuit: a * (a + b)
// witness: a = 10, b = 20
// expected output: 10 * (10 + 20) = 300
fn eval_circuit() -> (u384, u384) {
let a = CircuitElement::<CircuitInput<0>> {};
let b = CircuitElement::<CircuitInput<1>> {};
let add = circuit_add(a, b);
let mul = circuit_mul(a, add);
let output = (mul,);
let mut inputs = output.new_inputs();
inputs = inputs.next([10, 0, 0, 0]);
inputs = inputs.next([20, 0, 0, 0]);
let instance = inputs.done();
let bn254_modulus = TryInto::<
_, CircuitModulus,
>::try_into([0x6871ca8d3c208c16d87cfd47, 0xb85045b68181585d97816a91, 0x30644e72e131a029, 0x0])
.unwrap();
let res = instance.eval(bn254_modulus).unwrap();
let add_output = res.get_output(add);
let circuit_output = res.get_output(mul);
assert(add_output == u384 { limb0: 30, limb1: 0, limb2: 0, limb3: 0 }, 'add_output');
assert(circuit_output == u384 { limb0: 300, limb1: 0, limb2: 0, limb3: 0 }, 'circuit_output');
(add_output, circuit_output)
}
fn main() {
eval_circuit();
}
As the number of inputs can vary, Cairo use an accumulator and the new_inputs and next functions return a variant of the AddInputResult enum.
pub enum AddInputResult<C> {
/// All inputs have been filled.
Done: CircuitData<C>,
/// More inputs are needed to fill the circuit instance's data.
More: CircuitInputAccumulator<C>,
}
We have to assign a value to every input, by calling next on each CircuitInputAccumulator variant.
After the inputs initialization, by calling the done function we get the complete circuit CircuitData<C>, where C is a long type that encodes the entire circuit instance.
We then need to define what modulus our circuit is using (up to 384-bit modulus), by defining a CircuitModulus. We want to use BN254 prime field modulus:
use core::circuit::{
CircuitElement, CircuitInput, circuit_add, circuit_mul, EvalCircuitTrait, CircuitOutputsTrait,
CircuitModulus, AddInputResultTrait, CircuitInputs, u384,
};
// Circuit: a * (a + b)
// witness: a = 10, b = 20
// expected output: 10 * (10 + 20) = 300
fn eval_circuit() -> (u384, u384) {
let a = CircuitElement::<CircuitInput<0>> {};
let b = CircuitElement::<CircuitInput<1>> {};
let add = circuit_add(a, b);
let mul = circuit_mul(a, add);
let output = (mul,);
let mut inputs = output.new_inputs();
inputs = inputs.next([10, 0, 0, 0]);
inputs = inputs.next([20, 0, 0, 0]);
let instance = inputs.done();
let bn254_modulus = TryInto::<
_, CircuitModulus,
>::try_into([0x6871ca8d3c208c16d87cfd47, 0xb85045b68181585d97816a91, 0x30644e72e131a029, 0x0])
.unwrap();
let res = instance.eval(bn254_modulus).unwrap();
let add_output = res.get_output(add);
let circuit_output = res.get_output(mul);
assert(add_output == u384 { limb0: 30, limb1: 0, limb2: 0, limb3: 0 }, 'add_output');
assert(circuit_output == u384 { limb0: 300, limb1: 0, limb2: 0, limb3: 0 }, 'circuit_output');
(add_output, circuit_output)
}
fn main() {
eval_circuit();
}
The last part is the evaluation of the circuit, i.e. the actual process of passing the input signals correctly through each gate described by our circuit and getting the values of each output gate. We can evaluate and get the results for a given modulus as follows:
use core::circuit::{
CircuitElement, CircuitInput, circuit_add, circuit_mul, EvalCircuitTrait, CircuitOutputsTrait,
CircuitModulus, AddInputResultTrait, CircuitInputs, u384,
};
// Circuit: a * (a + b)
// witness: a = 10, b = 20
// expected output: 10 * (10 + 20) = 300
fn eval_circuit() -> (u384, u384) {
let a = CircuitElement::<CircuitInput<0>> {};
let b = CircuitElement::<CircuitInput<1>> {};
let add = circuit_add(a, b);
let mul = circuit_mul(a, add);
let output = (mul,);
let mut inputs = output.new_inputs();
inputs = inputs.next([10, 0, 0, 0]);
inputs = inputs.next([20, 0, 0, 0]);
let instance = inputs.done();
let bn254_modulus = TryInto::<
_, CircuitModulus,
>::try_into([0x6871ca8d3c208c16d87cfd47, 0xb85045b68181585d97816a91, 0x30644e72e131a029, 0x0])
.unwrap();
let res = instance.eval(bn254_modulus).unwrap();
let add_output = res.get_output(add);
let circuit_output = res.get_output(mul);
assert(add_output == u384 { limb0: 30, limb1: 0, limb2: 0, limb3: 0 }, 'add_output');
assert(circuit_output == u384 { limb0: 300, limb1: 0, limb2: 0, limb3: 0 }, 'circuit_output');
(add_output, circuit_output)
}
fn main() {
eval_circuit();
}
To retrieve the value of a specific output, we can use the get_output function on our results with the CircuitElement instance of the output gate we want. We can also retrieve any intermediate gate value as well.
use core::circuit::{
CircuitElement, CircuitInput, circuit_add, circuit_mul, EvalCircuitTrait, CircuitOutputsTrait,
CircuitModulus, AddInputResultTrait, CircuitInputs, u384,
};
// Circuit: a * (a + b)
// witness: a = 10, b = 20
// expected output: 10 * (10 + 20) = 300
fn eval_circuit() -> (u384, u384) {
let a = CircuitElement::<CircuitInput<0>> {};
let b = CircuitElement::<CircuitInput<1>> {};
let add = circuit_add(a, b);
let mul = circuit_mul(a, add);
let output = (mul,);
let mut inputs = output.new_inputs();
inputs = inputs.next([10, 0, 0, 0]);
inputs = inputs.next([20, 0, 0, 0]);
let instance = inputs.done();
let bn254_modulus = TryInto::<
_, CircuitModulus,
>::try_into([0x6871ca8d3c208c16d87cfd47, 0xb85045b68181585d97816a91, 0x30644e72e131a029, 0x0])
.unwrap();
let res = instance.eval(bn254_modulus).unwrap();
let add_output = res.get_output(add);
let circuit_output = res.get_output(mul);
assert(add_output == u384 { limb0: 30, limb1: 0, limb2: 0, limb3: 0 }, 'add_output');
assert(circuit_output == u384 { limb0: 300, limb1: 0, limb2: 0, limb3: 0 }, 'circuit_output');
(add_output, circuit_output)
}
fn main() {
eval_circuit();
}
To recap, we did the following steps:
- Define Circuit Inputs
- Describe the circuit
- Specify the outputs
- Assign values to the inputs
- Define the modulus
- Evaluate the circuit
- Get the output values
And the full code is:
use core::circuit::{
CircuitElement, CircuitInput, circuit_add, circuit_mul, EvalCircuitTrait, CircuitOutputsTrait,
CircuitModulus, AddInputResultTrait, CircuitInputs, u384,
};
// Circuit: a * (a + b)
// witness: a = 10, b = 20
// expected output: 10 * (10 + 20) = 300
fn eval_circuit() -> (u384, u384) {
let a = CircuitElement::<CircuitInput<0>> {};
let b = CircuitElement::<CircuitInput<1>> {};
let add = circuit_add(a, b);
let mul = circuit_mul(a, add);
let output = (mul,);
let mut inputs = output.new_inputs();
inputs = inputs.next([10, 0, 0, 0]);
inputs = inputs.next([20, 0, 0, 0]);
let instance = inputs.done();
let bn254_modulus = TryInto::<
_, CircuitModulus,
>::try_into([0x6871ca8d3c208c16d87cfd47, 0xb85045b68181585d97816a91, 0x30644e72e131a029, 0x0])
.unwrap();
let res = instance.eval(bn254_modulus).unwrap();
let add_output = res.get_output(add);
let circuit_output = res.get_output(mul);
assert(add_output == u384 { limb0: 30, limb1: 0, limb2: 0, limb3: 0 }, 'add_output');
assert(circuit_output == u384 { limb0: 300, limb1: 0, limb2: 0, limb3: 0 }, 'circuit_output');
(add_output, circuit_output)
}
fn main() {
eval_circuit();
}
Arithmetic Circuits in Zero-Knowledge Proof Systems
In zero-knowledge proof systems, a prover creates a proof of computational statements, which a verifier can check without performing the full computation. However, these statements must first be converted into a suitable representation for the proof system.
zk-SNARKs Approach
Some proof systems, like zk-SNARKs, use arithmetic circuits over a finite field \(F_p\). These circuits include constraints at specific gates, represented as equations:
\[ (a_1 \cdot s_1 + ... + a_n \cdot s_n) \cdot (b_1 \cdot s_1 + ... + b_n \cdot s_n) + (c_1 \cdot s_1 + ... + c_n \cdot s_n) = 0 \mod p \] Where \(s_1, ..., s_n\) are signals, and \(a_i, b_i, c_i\) are coefficients.
A witness is an assignment of signals that satisfies all constraints in a circuit. zk-SNARK proofs use these properties to prove knowledge of a witness without revealing private input signals, ensuring the prover's honesty while preserving privacy.
Some work has already been done, such as Garaga Groth16 verifier
zk-STARKs Approach
STARKs (which Cairo uses) use an Algebraic Intermediate Representation (AIR) instead of arithmetic circuits. AIR describes computations as a set of polynomial constraints.
By allowing emulated arithmetic circuits, Cairo can be used to implement zk-SNARKs proof verification inside STARK proofs.
Appendix
The following sections contain reference material you may find useful in your Cairo journey.
Appendix A - Keywords
The following list contains keywords that are reserved for current or future use by the Cairo language.
There are three keyword categories:
- strict
- loose
- reserved
There is a fourth category, which are functions from the core library. While their names are not reserved, they are not recommended to be used as names of any items to follow good practices.
Strict keywords
These keywords can only be used in their correct contexts. They cannot be used as names of any items.
as- Rename importbreak- Exit a loop immediatelyconst- Define constant itemscontinue- Continue to the next loop iterationelse- Fallback forifandif letcontrol flow constructsenum- Define an enumerationextern- Function defined at the compiler level that can be compiled to CASMfalse- Boolean false literalfn- Define a functionif- Branch based on the result of a conditional expressionimpl- Implement inherent or trait functionalityimplicits- Special kind of function parameters that are required to perform certain actionslet- Bind a variableloop- Loop unconditionallymatch- Match a value to patternsmod- Define a modulemut- Denote variable mutabilitynopanic- Functions marked with this notation mean that the function will never panic.of- Implement a traitpub- Denote public visibility in items, such as struct and struct fields, enums, consts, traits and impl blocks, or modulesref- Parameter passed implicitly returned at the end of a functionreturn- Return from functionstruct- Define a structuretrait- Define a traittrue- Boolean true literaltype- Define a type aliasuse- Bring symbols into scopewhile- loop conditionally based on the result of an expression
Loose Keywords
These keywords are associated with a specific behaviour, but can also be used to define items.
self- Method subjectsuper- Parent module of the current module
Reserved Keywords
These keywords aren't used yet, but they are reserved for future use. For now, it is possible to use them to define items, although it is highly recommended not to do so. The reasoning behind this recommendation is to make current programs forward compatible with future versions of Cairo by forbidding them to use these keywords.
Selfdodynforhintinmacromovestatic_assertstatictrytypeofunsafewherewithyield
Built-in Functions
The Cairo programming language provides several specific functions that serve a special purpose. We will not cover all of them in this book, but using the names of these functions as names of other items is not recommended.
assert- This function checks a boolean expression, and if it evaluates to false, it triggers the panic function.panic- This function acknowledges the occurrence of an error and terminates the program.
Appendix B - Operators and Symbols
This appendix contains a glossary of Cairo's syntax, including operators and other symbols that appear by themselves or in the context of paths, generics, macros, attributes, comments, tuples, and brackets.
Operators
Table B-1 contains the operators in Cairo, an example of how the operator would appear in context, a short explanation, and whether that operator is overloadable. If an operator is overloadable, the relevant trait to use to overload that operator is listed.
| Operator | Example | Explanation | Overloadable? |
|---|---|---|---|
! | !expr | Logical complement | Not |
~ | ~expr | Bitwise NOT | BitNot |
!= | expr != expr | Non-equality comparison | PartialEq |
% | expr % expr | Arithmetic remainder | Rem |
%= | var %= expr | Arithmetic remainder and assignment | RemEq |
& | expr & expr | Bitwise AND | BitAnd |
&& | expr && expr | Short-circuiting logical AND | |
* | expr * expr | Arithmetic multiplication | Mul |
*= | var *= expr | Arithmetic multiplication and assignment | MulEq |
@ | @var | Snapshot | |
* | *var | Desnap | |
+ | expr + expr | Arithmetic addition | Add |
+= | var += expr | Arithmetic addition and assignment | AddEq |
, | expr, expr | Argument and element separator | |
- | -expr | Arithmetic negation | Neg |
- | expr - expr | Arithmetic subtraction | Sub |
-= | var -= expr | Arithmetic subtraction and assignment | SubEq |
-> | fn(...) -> type, |...| -> type | Function and closure return type | |
. | expr.ident | Member access | |
/ | expr / expr | Arithmetic division | Div |
/= | var /= expr | Arithmetic division and assignment | DivEq |
: | pat: type, ident: type | Constraints | |
: | ident: expr | Struct field initializer | |
; | expr; | Statement and item terminator | |
< | expr < expr | Less than comparison | PartialOrd |
<= | expr <= expr | Less than or equal to comparison | PartialOrd |
= | var = expr | Assignment | |
== | expr == expr | Equality comparison | PartialEq |
=> | pat => expr | Part of match arm syntax | |
> | expr > expr | Greater than comparison | PartialOrd |
>= | expr >= expr | Greater than or equal to comparison | PartialOrd |
^ | expr ^ expr | Bitwise exclusive OR | BitXor |
| | expr | expr | Bitwise OR | BitOr |
|| | expr || expr | Short-circuiting logical OR | |
? | expr? | Error propagation |
Table B-1: Operators
Non Operator Symbols
The following list contains all symbols that are not used as operators; that is, they do not have the same behavior as a function or method call.
Table B-2 shows symbols that appear on their own and are valid in a variety of locations.
| Symbol | Explanation |
|---|---|
..._u8, ..._usize, ..._bool, etc. | Numeric literal of specific type |
"..." | String literal |
'...' | Short string, 31 ASCII characters maximum |
_ | “Ignored” pattern binding |
Table B-2: Stand-Alone Syntax
Table B-3 shows symbols that are used within the context of a module hierarchy path to access an item.
| Symbol | Explanation |
|---|---|
ident::ident | Namespace path |
super::path | Path relative to the parent of the current module |
trait::method(...) | Disambiguating a method call by naming the trait that defines it |
Table B-3: Path-Related Syntax
Table B-4 shows symbols that appear in the context of using generic type parameters.
| Symbol | Explanation |
|---|---|
path<...> | Specifies parameters to generic type in a type (e.g., Array<u8>) |
path::<...>, method::<...> | Specifies parameters to a generic type, function, or method in an expression; often referred to as turbofish |
fn ident<...> ... | Define generic function |
struct ident<...> ... | Define generic structure |
enum ident<...> ... | Define generic enumeration |
impl<...> ... | Define generic implementation |
Table B-4: Generics
Table B-5 shows symbols that appear in the context of specifying attributes on an item.
| Symbol | Explanation |
|---|---|
#[derive(...)] | Automatically implements a trait for a type |
#[inline] | Hint to the compiler to allow inlining of annotated function |
#[inline(always)] | Hint to the compiler to systematically inline annotated function |
#[inline(never)] | Hint to the compiler to never inline annotated function |
#[must_use] | Hint to the compiler that the return value of a function or a specific returned type must be used |
#[generate_trait] | Automatically generates a trait for an impl |
#[available_gas(...)] | Set the maximum amount of gas available to execute a function |
#[panic_with('...', wrapper_name)] | Creates a wrapper for the annotated function which will panic if the function returns None or Err, with the given data as the panic error |
#[test] | Describe a function as a test function |
#[cfg(...)] | Configuration attribute, especially used to configure a tests module with #[cfg(test)] |
#[should_panic] | Specifies that a test function should necessarily panic |
#[starknet::contract] | Defines a Starknet smart contract |
#[starknet::interface] | Defines a Starknet interface |
#[starknet::component] | Defines a Starknet component |
#[starknet::embeddable] | Defines an isolated embeddable implementation that can be injected in any smart contract |
#[embeddable_as(...)] | Defines an embeddable implementation inside a component |
#[storage] | Defines the storage of a smart contract |
#[event] | Defines an event in a smart contract |
#[constructor] | Defines the constructor in a smart contract |
#[abi(embed_v0)] | Defines an implementation of a trait, exposing the functions of the impl as entrypoints of a contract |
#[abi(per_item)] | Allows individual definition of the entrypoint type of functions inside an impl |
#[external(v0)] | Defines an external function when #[abi(per_item)] is used |
#[flat] | Defines a enum variant of the Event enum that is not nested, ignoring the variant name in the serialization process, very useful for composability when using Starknet components |
#[key] | Defines an indexed Event enum field, allowing for more efficient queries and filtering of events |
Table B-5: Attributes
Table B-6 shows symbols that appear in the context of calling or defining macros.
| Symbol | Explanation |
|---|---|
print! | Inline printing |
println! | Print on a new line |
consteval_int! | Declare a constant that is the result of a computation of integers |
array! | Instantiate and fill arrays |
panic! | Calls panic function and allows to provide a message error longer than 31 characters |
assert! | Evaluates a Boolean and panics if false |
assert_eq! | Evaluates an equality, and panics if not equal |
assert_ne! | Evaluates an equality, and panics if equal |
assert_lt! | Evaluates a comparison, and panics if greater or equal |
assert_le! | Evaluates a comparison, and panics if greater |
assert_gt! | Evaluates a comparison, and panics if lower or equal |
assert_ge! | Evaluates a comparison, and panics if lower |
format! | Format a string and returns a ByteArray with the contents |
write! | Write formatted strings in a formatter |
writeln! | Write formatted strings in a formatter on a new line |
get_dep_component! | Returns the requested component state from a snapshot of the state inside a component |
get_dep_component_mut! | Returns the requested component state from a reference of the state inside a component |
component! | Macro used in Starknet contracts to embed a component inside a contract |
Table B-6: Macros
Table B-7 shows symbols that create comments.
| Symbol | Explanation |
|---|---|
// | Line comment |
Table B-7: Comments
Table B-8 shows symbols that appear in the context of using tuples.
| Symbol | Explanation |
|---|---|
() | Empty tuple (aka unit), both literal and type |
(expr) | Parenthesized expression |
(expr,) | Single-element tuple expression |
(type,) | Single-element tuple type |
(expr, ...) | Tuple expression |
(type, ...) | Tuple type |
expr(expr, ...) | Function call expression; also used to initialize tuple structs and tuple enum variants |
Table B-8: Tuples
Table B-9 shows the contexts in which curly braces are used.
| Context | Explanation |
|---|---|
{...} | Block expression |
Type {...} | struct literal |
Table B-9: Curly Braces
Appendix C - Derivable Traits
In various places in the book, we’ve discussed the derive attribute, which you can apply to a struct or enum definition. The derive attribute generates code to implement a default trait on the type you’ve annotated with the derive syntax.
In this appendix, we provide a comprehensive reference detailing all the traits in the standard library compatible with the derive attribute.
These traits listed here are the only ones defined by the core library that can be implemented on your types using derive. Other traits defined in the standard library don’t have sensible default behavior, so it’s up to you to implement them in a way that makes sense for what you’re trying to accomplish.
Drop and Destruct
When moving out of scope, variables need to be moved first. This is where the Drop trait intervenes. You can find more details about its usage here.
Moreover, Dictionaries need to be squashed before going out of scope. Calling the squash method on each of them manually can quickly become redundant. Destruct trait allows Dictionaries to be automatically squashed when they get out of scope. You can also find more information about Destruct here.
Clone and Copy for Duplicating Values
The Clone trait provides the functionality to explicitly create a deep copy of a value.
Deriving Clone implements the clone method, which, in turn, calls clone on each of the type's components. This means all the fields or values in the type must also implement Clone to derive Clone.
Here is a simple example:
#[derive(Clone, Drop)]
struct A {
item: felt252,
}
fn main() {
let first_struct = A { item: 2 };
let second_struct = first_struct.clone();
assert!(second_struct.item == 2, "Not equal");
}
The Copy trait allows for the duplication of values. You can derive Copy on any type whose parts all implement Copy.
Example:
#[derive(Copy, Drop)]
struct A {
item: felt252,
}
fn main() {
let first_struct = A { item: 2 };
let second_struct = first_struct;
// Copy Trait prevents first_struct from moving into second_struct
assert!(second_struct.item == 2, "Not equal");
assert!(first_struct.item == 2, "Not Equal");
}
Debug for Printing and Debugging
The Debug trait enables debug formatting in format strings, which you indicate by adding :? within {} placeholders.
It allows you to print instances of a type for debugging purposes, so you and other programmers using this type can inspect an instance at a particular point in a program’s execution.
For example, if you want to print the value of a variable of type Point, you can do it as follows:
#[derive(Copy, Drop, Debug)]
struct Point {
x: u8,
y: u8,
}
fn main() {
let p = Point { x: 1, y: 3 };
println!("{:?}", p);
}
scarb cairo-run
Point { x: 1, y: 3 }
The Debug trait is required, for example, when using the assert_xx! macros in tests. These macros print the values of instances given as arguments if the equality or comparison assertion fails so programmers can see why the two instances weren’t equal.
Default for Default Values
The Default trait allows creation of a default value of a type. The most common default value is zero. All primitive types in the standard library implement Default.
If you want to derive Default on a composite type, each of its elements must already implement Default. If you have an enum type, you must declare its default value by using the #[default] attribute on one of its variants.
An example:
#[derive(Default, Drop)]
struct A {
item1: felt252,
item2: u64,
}
#[derive(Default, Drop, PartialEq)]
enum CaseWithDefault {
A: felt252,
B: u128,
#[default]
C: u64,
}
fn main() {
let defaulted: A = Default::default();
assert!(defaulted.item1 == 0_felt252, "item1 mismatch");
assert!(defaulted.item2 == 0_u64, "item2 mismatch");
let default_case: CaseWithDefault = Default::default();
assert!(default_case == CaseWithDefault::C(0_u64), "case mismatch");
}
PartialEq for Equality Comparisons
The PartialEq trait allows for comparison between instances of a type for equality, thereby enabling the == and != operators.
When PartialEq is derived on structs, two instances are equal only if all their fields are equal; they are not equal if any field is different. When derived for enums, each variant is equal to itself and not equal to the other variants.
You can write your own implementation of the PartialEq trait for your type, if you can't derive it or if you want to implement your custom rules. In the following example, we write an implementation for PartialEq in which we consider that two rectangles are equal if they have the same area:
#[derive(Copy, Drop)]
struct Rectangle {
width: u64,
height: u64,
}
impl PartialEqImpl of PartialEq<Rectangle> {
fn eq(lhs: @Rectangle, rhs: @Rectangle) -> bool {
(*lhs.width) * (*lhs.height) == (*rhs.width) * (*rhs.height)
}
fn ne(lhs: @Rectangle, rhs: @Rectangle) -> bool {
(*lhs.width) * (*lhs.height) != (*rhs.width) * (*rhs.height)
}
}
fn main() {
let rect1 = Rectangle { width: 30, height: 50 };
let rect2 = Rectangle { width: 50, height: 30 };
println!("Are rect1 and rect2 equal? {}", rect1 == rect2);
}
The PartialEq trait is required when using the assert_eq! macro in tests, which needs to be able to compare two instances of a type for equality.
Here is an example:
#[derive(PartialEq, Drop)]
struct A {
item: felt252,
}
fn main() {
let first_struct = A { item: 2 };
let second_struct = A { item: 2 };
assert!(first_struct == second_struct, "Structs are different");
}
Serializing with Serde
Serde provides trait implementations for serialize and deserialize functions for data structures defined in your crate. It allows you to transform your structure into an array (or the opposite).
Serialization is a process of transforming data structures into a format that can be easily stored or transmitted. Let's say you are running a program and would like to persist its state to be able to resume it later. To do this, you could take each of the objects your program is using and save their information, for example in a file. This is a simplified version of serialization. Now if you want to resume your program with this saved state, you would perform deserialization, which means loading the state of the objects from the saved source.
For example:
#[derive(Serde, Drop)]
struct A {
item_one: felt252,
item_two: felt252,
}
fn main() {
let first_struct = A { item_one: 2, item_two: 99 };
let mut output_array = array![];
first_struct.serialize(ref output_array);
panic(output_array);
}
If you run the main function, the output will be:
Run panicked with [2, 99 ('c'), ].
We can see here that our struct A has been serialized into the output array. Note that the serialize function takes as argument a snapshot of the type you want to convert into an array. This is why deriving Drop for A is required here, as the main function keeps ownership of the first_struct struct.
Also, we can use the deserialize function to convert the serialized array back into our A struct.
Here is an example:
#[derive(Serde, Drop)]
struct A {
item_one: felt252,
item_two: felt252,
}
fn main() {
let first_struct = A { item_one: 2, item_two: 99 };
let mut output_array = array![];
first_struct.serialize(ref output_array);
let mut span_array = output_array.span();
let deserialized_struct: A = Serde::<A>::deserialize(ref span_array).unwrap();
}
Here we are converting a serialized array span back to the struct A. deserialize returns an Option so we need to unwrap it. When using deserialize we also need to specify the type we want to deserialize into.
Hashing with Hash
It is possible to derive the Hash trait on structs and enums. This allows them to be hashed easily using any available hash function. For a struct or an enum to derive the Hash attribute, all fields or variants need to be hashable themselves.
You can refer to the Hashes section to get more information about how to hash complex data types.
Starknet Storage with starknet::Store
The starknet::Store trait is relevant only when building on Starknet. It allows for a type to be used in smart contract storage by automatically implementing the necessary read and write functions.
You can find detailed information about the inner workings of Starknet storage in the Contract storage section.
Appendix D - The Cairo Prelude
Prelude
The Cairo prelude is a collection of commonly used modules, functions, data types, and traits that are automatically brought into scope of every module in a Cairo crate without needing explicit import statements. Cairo's prelude provides the basic building blocks developers need to start Cairo programs and writing smart contracts.
The core library prelude is defined in the lib.cairo file of the corelib crate and contains Cairo's primitive data types, traits, operators, and utility functions. This includes:
- Data types: integers, bools, arrays, dicts, etc.
- Traits: behaviors for arithmetic, comparison, and serialization operations
- Operators: arithmetic, logical, bitwise
- Utility functions - helpers for arrays, maps, boxing, etc.
The core library prelude delivers the fundamental programming
constructs and operations needed for basic Cairo programs, without requiring the
explicit import of elements. Since the core library prelude is automatically
imported, its contents are available for use in any Cairo crate without explicit
imports. This prevents repetition and provides a better devX. This is what
allows you to use ArrayTrait::append() or the Default trait without bringing
them explicitly into scope.
You can choose which prelude to use. For example, adding edition = "2024_07" in the Scarb.toml configuration file will load the prelude from July 2024. Note that when you create a new project using scarb new command, the Scarb.toml file will automatically include edition = "2024_07".
Different prelude versions will expose different functions and traits, so it is important to specify the correct edition in the Scarb.toml file. Generally, you want to start a new project using the latest edition, and migrate to newer editions as they are released.
Cairo editions
Here is the list of available Cairo editions (i.e prelude versions) with their details:
| Version | Details |
|---|---|
2024-07 | details for 2024-07 |
2023-11 | details for 2023-11 |
2023-10 / 2023-1 | details for 2023-10 |
Appendix E - Common Error Messages
You might encounter error messages when writing Cairo code. Some of them occur very frequently, which is why we will be listing the most common error messages in this appendix to help you resolve common issues.
-
Variable not dropped.: this error message means that you are trying to make a variable with a type that do not implement theDroptrait go out of scope, without destroying it. Make sure that variables that need to be dropped at the end of the execution of a function implement theDroptrait or theDestructtrait. See Ownership section. -
Variable was previously moved.: this error message means that you are trying to use a variable whose ownership has already been transferred to another function. When a variable doesn't implement theCopytrait, it is passed by value to functions, and ownership of the variable is transferred to the function. Such a variable cannot be used anymore in the current context after its ownership has been transferred. It is often useful to use theclonemethod in this situation. -
error: Trait has no implementation in context: core::fmt::Display::<package_name::struct_name>: this error message is encountered if you try to print an instance of a custom data type with{}placeholders in aprint!orprintln!macro. To mitigate this issue, you need to either manually implement theDisplaytrait for your type, or use theDebugtrait by applyingderive(Debug)to your type, allowing to print your instance by adding:?in{}placeholders. -
Got an exception while executing a hint: Hint Error: Failed to deserialize param #x.: this error means that the execution failed because an entrypoint was called without the expected arguments. Make sure that the arguments you provide when calling an entrypoint are correct. There is a classic issue withu256variables, which are actually structs of 2u128. Therefore, when calling a function that takes au256as argument, you need to pass 2 values. -
Item path::item is not visible in this context.: this error message lets us know that the path to bring an item into scope is correct, but there is a vibility issue. In cairo, all items are private to parent modules by default. To resolve this issue, make sure that all the modules on the path to items and items themselves are declared withpub(crate)orpubto have access to them. -
Identifier not found.: this error message is a bit aspecific but might indicate that:- A variable is being used before it has been declared. Make sure to declare variables with the
letkeyword. - The path to bring an item into scope is wrongly defined. Make sure to use valid paths.
- A variable is being used before it has been declared. Make sure to declare variables with the
Starknet Components Related Error Messages
You might encounter some errors when trying to implement components. Unfortunately, some of them lack meaningful error messages to help debug. This section aims to provide you with some pointers to help you debug your code.
-
Trait not found. Not a trait.: this error can occur when you're not importing the component's impl block correctly in your contract. Make sure to respect the following syntax:#[abi(embed_v0)] impl IMPL_NAME = PATH_TO_COMPONENT::EMBEDDED_NAME<ContractState> -
Plugin diagnostic: name is not a substorage member in the contract's Storage. Consider adding to Storage: (...): the compiler helps you a lot debugging this by giving you recommendation on the action to take. Basically, you forgot to add the component's storage to your contract's storage. Make sure to add the path to the component's storage annotated with the#[substorage(v0)]attribute to your contract's storage. -
Plugin diagnostic: name is not a nested event in the contract's Event enum. Consider adding to the Event enum:similar to the previous error, the compiler tells you that you forgot to add the component's events to your contract's events. Make sure to add the path to the component's events to your contract's events.
Appendix F - Useful Development Tools
In this appendix, we talk about some useful development tools that the Cairo project provides. We’ll look at automatic formatting, quick ways to apply warning fixes, a linter, and integrating with IDEs.
Automatic Formatting with scarb fmt
Scarb projects can be formatted using the scarb fmt command.
If you're using the Cairo binaries directly, you can run cairo-format instead.
Many collaborative projects use scarb fmt to prevent arguments about which
style to use when writing Cairo: everyone formats their code using the tool.
To format any Cairo project, enter the following inside the project directory:
scarb fmt
For things you do not want scarb fmt to mangle, use #[cairofmt::skip]:
#[cairofmt::skip]
let table: Array<ByteArray> = array![
"oxo",
"xox",
"oxo",
];
IDE Integration Using cairo-language-server
To help IDE integration, the Cairo community recommends using the
cairo-language-server. This tool is a set of
compiler-centric utilities that speaks the Language Server Protocol, which is a specification for IDEs and programming languages to
communicate with each other. Different clients can use cairo-language-server, such as
the Cairo extension for Visual Studio Code.
Visit the vscode-cairo page
to install it on VSCode. You will get abilities such as autocompletion, jump to
definition, and inline errors.
Note: If you have Scarb installed, it should work out of the box with the Cairo VSCode extension, without a manual installation of the language server.
meta: "Explore the fundamentals of smart contracts in this comprehensive introduction, tailored for developers using Cairo. Learn how smart contracts work and their role in blockchain technology."
Introduction to Smart Contracts
This chapter will give you a high level introduction to what smart contracts are, what they are used for, and why blockchain developers would use Cairo and Starknet. If you are already familiar with blockchain programming, feel free to skip this chapter. The last part might still be interesting though.
Smart Contracts - Introduction
Smart contracts gained popularity and became more widespread with the birth of Ethereum. Smart contracts are essentially programs deployed on a blockchain. The term "smart contract" is somewhat misleading, as they are neither "smart" nor "contracts" but rather code and instructions that are executed based on specific inputs. They primarily consist of two components: storage and functions. Once deployed, users can interact with smart contracts by initiating blockchain transactions containing execution data (which function to call and with what input). Smart contracts can modify and read the storage of the underlying blockchain. A smart contract has its own address and is considered a blockchain account, meaning it can hold tokens.
The programming language used to write smart contracts varies depending on the blockchain. For example, on Ethereum and the EVM-compatible ecosystem, the most commonly used language is Solidity, while on Starknet, it is Cairo. The way the code is compiled also differs based on the blockchain. On Ethereum, Solidity is compiled into bytecode. On Starknet, Cairo is compiled into Sierra and then into Cairo Assembly (CASM).
Smart contracts possess several unique characteristics. They are permissionless, meaning anyone can deploy a smart contract on the network (within the context of a decentralized blockchain, of course). Smart contracts are also transparent; the data stored by the smart contract is accessible to anyone. The code that composes the contract can also be transparent, enabling composability. This allows developers to write smart contracts that use other smart contracts. Smart contracts can only access and interact with data from the blockchain they are deployed on. They require third-party software (called oracles) to access external data (the price of a token for instance).
For developers to build smart contracts that can interact with each other, it is required to know what the other contracts look like. Hence, Ethereum developers started to build standards for smart contract development, the ERCxx. The two most used and famous standards are the ERC20, used to build tokens like USDC, DAI or STARK, and the ERC721, for NFTs (Non-Fungible Tokens) like CryptoPunks or Everai.
Smart Contracts - Use Cases
There are many possible use cases for smart contracts. The only limits are the technical constraints of the blockchain and the creativity of developers.
DeFi
For now, the principal use case for smart contracts is similar to that of Ethereum or Bitcoin, which is essentially handling money. In the context of the alternative payment system promised by Bitcoin, smart contracts on Ethereum enable the creation of decentralized financial applications that no longer rely on traditional financial intermediaries. This is what we call DeFi (decentralized finance). DeFi consists of various projects such as lending/borrowing applications, decentralized exchanges (DEX), on-chain derivatives, stablecoins, decentralized hedge funds, insurance, and many more.
Tokenization
Smart contracts can facilitate the tokenization of real-world assets, such as real estate, art, or precious metals. Tokenization divides an asset into digital tokens, which can be easily traded and managed on blockchain platforms. This can increase liquidity, enable fractional ownership, and simplify the buying and selling process.
Voting
Smart contracts can be used to create secure and transparent voting systems. Votes can be recorded on the blockchain, ensuring immutability and transparency. The smart contract can then automatically tally the votes and declare the results, minimizing the potential for fraud or manipulation.
Royalties
Smart contracts can automate royalty payments for artists, musicians, and other content creators. When a piece of content is consumed or sold, the smart contract can automatically calculate and distribute the royalties to the rightful owners, ensuring fair compensation and reducing the need for intermediaries.
Decentralized Identities DIDs
Smart contracts can be used to create and manage digital identities, allowing individuals to control their personal information and share it with third parties securely. The smart contract could verify the authenticity of a user's identity and automatically grant or revoke access to specific services based on the user's credentials.
As Ethereum continues to mature, we can expect the use cases and applications of smart contracts to expand further, bringing about exciting new opportunities and reshaping traditional systems for the better.
The Rise of Starknet and Cairo
Ethereum, being the most widely used and resilient smart contract platform, became a victim of its own success. With the rapid adoption of some previously mentioned use cases, mainly DeFi, the cost of performing transactions became extremely high, rendering the network almost unusable. Engineers and researchers in the ecosystem began working on solutions to address this scalability issue.
A famous trilemma called The Blockchain Trilemma in the blockchain space states that it is hard to achieve a high level of scalability, decentralization, and security simultaneously; trade-offs must be made. Ethereum is at the intersection of decentralization and security. Eventually, it was decided that Ethereum's purpose would be to serve as a secure settlement layer, while complex computations would be offloaded to other networks built on top of Ethereum. These are called Layer 2s (L2s).
The two primary types of L2s are optimistic rollups and validity rollups. Both approaches involve compressing and batching numerous transactions together, computing the new state, and settling the result on Ethereum (L1). The difference lies in the way the result is settled on L1. For optimistic rollups, the new state is considered valid by default, but there is a 7-day window for nodes to identify malicious transactions.
In contrast, validity rollups, such as Starknet, use cryptography to prove that the new state has been correctly computed. This is the purpose of STARKs, this cryptographic technology could permit validity rollups to scale significantly more than optimistic rollups. You can learn more about STARKs from Starkware's Medium article, which serves as a good primer.
Starknet's architecture is thoroughly described in the Starknet documentation, which is a great resource to learn more about the Starknet network.
Remember Cairo? It is, in fact, a language developed specifically to work with STARKs and make them general-purpose. With Cairo, we can write provable code. In the context of Starknet, this allows proving the correctness of computations from one state to another.
Unlike most (if not all) of Starknet's competitors that chose to use the EVM (either as-is or adapted) as a base layer, Starknet employs its own VM. This frees developers from the constraints of the EVM, opening up a broader range of possibilities. Coupled with decreased transaction costs, the combination of Starknet and Cairo creates an exciting playground for developers. Native account abstraction enables more complex logic for accounts, that we call "Smart Accounts", and transaction flows. Emerging use cases include transparent AI and machine learning applications. Finally, blockchain games can be developed entirely on-chain. Starknet has been specifically designed to maximize the capabilities of STARK proofs for optimal scalability.
Learn more about Account Abstraction in the Starknet documentation.
Cairo Programs and Starknet Smart Contracts: What Is the Difference?
Starknet contracts are a special superset of Cairo programs, so the concepts previously learned in this book are still applicable to write Starknet contracts.
As you may have already noticed, a Cairo program must always have a main function that serves as the entry point for this program:
fn main() {}
Contracts deployed on the Starknet network are essentially programs that are run by the sequencer, and as such, have access to Starknet's state. Contracts do not have a main function but one or multiple functions that can serve as entry points.
Starknet contracts are defined within modules. For a module to be handled as a contract by the compiler, it must be annotated with the #[starknet::contract] attribute.
Anatomy of a Simple Contract
This chapter will introduce you to the basics of Starknet contracts using a very simple smart contract as example. You will learn how to write a contract that allows anyone to store a single number on the Starknet blockchain.
Let's consider the following contract for the whole chapter. It might not be easy to understand it all at once, but we will go through it step by step:
#[starknet::interface]
trait ISimpleStorage<TContractState> {
fn set(ref self: TContractState, x: u128);
fn get(self: @TContractState) -> u128;
}
#[starknet::contract]
mod SimpleStorage {
use starknet::storage::{StoragePointerReadAccess, StoragePointerWriteAccess};
#[storage]
struct Storage {
stored_data: u128,
}
#[abi(embed_v0)]
impl SimpleStorage of super::ISimpleStorage<ContractState> {
fn set(ref self: ContractState, x: u128) {
self.stored_data.write(x);
}
fn get(self: @ContractState) -> u128 {
self.stored_data.read()
}
}
}
Listing 14-1: A simple storage contract
What Is this Contract?
Contracts are defined by encapsulating state and logic within a module annotated with the #[starknet::contract] attribute.
The state is defined within the Storage struct, and is always initialized empty. Here, our struct contains a single field called stored_data of type u128 (unsigned integer of 128 bits), indicating that our contract can store any number between 0 and \( {2^{128}} - 1 \).
The logic is defined by functions that interact with the state. Here, our contract defines and publicly exposes the functions set and get that can be used to modify or retrieve the value of the stored variable.
You can think of it as a single slot in a database that you can query and modify by calling functions of the code that manages the database.
The Interface: the Contract's Blueprint
#[starknet::interface]
trait ISimpleStorage<TContractState> {
fn set(ref self: TContractState, x: u128);
fn get(self: @TContractState) -> u128;
}
Listing 14-2: A basic contract interface
Interfaces represent the blueprint of the contract. They define the functions that the contract exposes to the outside world, without including the function body. In Cairo, they're defined by annotating a trait with the #[starknet::interface] attribute. All functions of the trait are considered public functions of any contract that implements this trait, and are callable from the outside world.
The contract constructor is not part of the interface. Nor are internal functions.
All contract interfaces use a generic type for the self parameter, representing the contract state. We chose to name this generic parameter TContractState in our interface, but this is not enforced and any name can be chosen.
In our interface, note the generic type TContractState of the self argument which is passed by reference to the set function. Seeing the self argument passed in a contract function tells us that this function can access the state of the contract. The ref modifier implies that self may be modified, meaning that the storage variables of the contract may be modified inside the set function.
On the other hand, the get function takes a snapshot of TContractState, which immediately tells us that it does not modify the state (and indeed, the compiler will complain if we try to modify storage inside the get function).
By leveraging the traits & impls mechanism from Cairo, we can make sure that the actual implementation of the contract matches its interface. In fact, you will get a compilation error if your contract doesn’t conform with the declared interface. For example, Listing 14-3 shows a wrong implementation of the ISimpleStorage interface, containing a slightly different set function that doesn't have the same signature.
#[abi(embed_v0)]
impl SimpleStorage of super::ISimpleStorage<ContractState> {
fn set(ref self: ContractState) {}
fn get(self: @ContractState) -> u128 {
self.stored_data.read()
}
}
Listing 14-3: A wrong implementation of the interface of the contract. This does not compile, as the signature of set doesn't match the trait's.
Trying to compile a contract using this implementation will result in the following error:
$ scarb cairo-run
Compiling listing_99_02 v0.1.0 (listings/ch100-introduction-to-smart-contracts/listing_02_wrong_impl/Scarb.toml)
error: The number of parameters in the impl function `SimpleStorage::set` is incompatible with `ISimpleStorage::set`. Expected: 2, actual: 1.
--> listings/ch100-introduction-to-smart-contracts/listing_02_wrong_impl/src/lib.cairo:23:16
fn set(ref self: ContractState) {}
^*********************^
error: Wrong number of arguments. Expected 2, found: 1
--> listings/ch100-introduction-to-smart-contracts/listing_02_wrong_impl/src/lib.cairo:23:9
fn set(ref self: ContractState) {}
^********************************^
error: could not compile `listing_99_02` due to previous error
error: `scarb metadata` exited with error
Public Functions Defined in an Implementation Block
Before we explore things further down, let's define some terminology.
-
In the context of Starknet, a public function is a function that is exposed to the outside world. A public function can be called by anyone, either from outside the contract or from within the contract itself. In the example above,
setandgetare public functions. -
What we call an external function is a public function that can be directly invoked through a Starknet transaction and that can mutate the state of the contract.
setis an external function. -
A view function is a public function that is typically read-only and cannot mutate the state of the contract. However, this limitation is only enforced by the compiler, and not by Starknet itself. We will discuss the implications of this in a later section.
getis a view function.
#[abi(embed_v0)]
impl SimpleStorage of super::ISimpleStorage<ContractState> {
fn set(ref self: ContractState, x: u128) {
self.stored_data.write(x);
}
fn get(self: @ContractState) -> u128 {
self.stored_data.read()
}
}
Listing 14-4: SimpleStorage implementation
Since the contract interface is defined as the ISimpleStorage trait, in order to match the interface, the public functions of the contract must be defined in an implementation of this trait — which allows us to make sure that the implementation of the contract matches its interface.
However, simply defining the functions in the implementation block is not enough. The implementation block must be annotated with the #[abi(embed_v0)] attribute. This attribute exposes the functions defined in this implementation to the outside world — forget to add it and your functions will not be callable from the outside. All functions defined in a block marked as #[abi(embed_v0)] are consequently public functions.
Because the SimpleStorage contract is defined as a module, we need to access the interface defined in the parent module. We can either bring it to the current scope with the use keyword, or refer to it directly using super.
When writing the implementation of an interface, the self parameter in the trait methods must be of type ContractState. The ContractState type is generated by the compiler, and gives access to the storage variables defined in the Storage struct.
Additionally, ContractState gives us the ability to emit events. The name ContractState is not surprising, as it’s a representation of the contract’s state, which is what we think of self in the contract interface trait.
When self is a snapshot of ContractState, only read access is allowed, and emitting events is not possible.
Accessing and Modifying the Contract's State
Two methods are commonly used to access or modify the state of a contract:
read, which returns the value of a storage variable. This method is called on the variable itself and does not take any argument.
self.stored_data.read()
write, which allows to write a new value in a storage slot. This method is also called on the variable itself and takes one argument, which is the value to be written. Note thatwritemay take more than one argument, depending on the type of the storage variable. For example, writing on a mapping requires 2 arguments: the key and the value to be written.
self.stored_data.write(x);
Reminder: if the contract state is passed as a snapshot with
@instead of passed by reference withref, attempting to modify the contract state will result in a compilation error.
This contract does not do much apart from allowing anyone to store a single number that is accessible by anyone in the world. Anyone could call set again with a different value and overwrite the current number. Nevertheless, each value stored in the storage of the contract will still be stored in the history of the blockchain. Later in this book, you will see how you can impose access restrictions so that only you can alter the number.
Building Starknet Smart Contracts
In the previous section, we gave an introductory example of a smart contract written in Cairo, describing the basic blocks to build smart contracts on Starknet. In this section, we'll be taking a deeper look at all the components of a smart contract, step by step.
When we discussed interfaces, we specified the difference between the two types of public functions, i.e., external functions and view functions, and we mentioned how to interact with the storage of a contract.
At this point, you should have multiple questions that come to mind:
- How can I store more complex data types?
- How do I define internal/private functions?
- How can I emit events? How can I index them?
- Is there a way to reduce the boilerplate?
Luckily, we'll be answering all these questions in this chapter.
Contract Storage
The contract’s storage is a persistent storage space where you can read, write, modify, and persist data. The storage is a map with
\(2^{251}\) slots, where each slot is a felt252 initialized to 0.
Each storage slot is identified by a felt252 value, called the storage address, which is computed from the variable's name and parameters that depend on the variable's type, outlined in the "Addresses of Storage Variables" section.
We can interact with the contract's storage in two ways:
- Through high-level storage variables, which are declared in a special
Storagestruct annotated with the#[storage]attribute. - Directly accessing storage slots using their computed address and the low-level
storage_readandstorage_writesyscalls. This is useful when you need to perform custom storage operations that don't fit well with the structured approach of storage variables, but should generally be avoided; as such, we will not cover them in this chapter.
Declaring and Using Storage Variables
Storage variables in Starknet contracts are stored in a special struct called Storage:
#[starknet::interface]
pub trait ISimpleStorage<TContractState> {
fn get_owner(self: @TContractState) -> SimpleStorage::Person;
fn get_owner_name(self: @TContractState) -> felt252;
fn get_expiration(self: @TContractState) -> SimpleStorage::Expiration;
fn change_expiration(ref self: TContractState, expiration: SimpleStorage::Expiration);
}
#[starknet::contract]
mod SimpleStorage {
use starknet::{ContractAddress, get_caller_address};
use starknet::storage::{StoragePointerReadAccess, StoragePointerWriteAccess};
#[storage]
struct Storage {
owner: Person,
expiration: Expiration,
}
#[derive(Drop, Serde, starknet::Store)]
pub struct Person {
address: ContractAddress,
name: felt252,
}
#[derive(Copy, Drop, Serde, starknet::Store)]
pub enum Expiration {
Finite: u64,
#[default]
Infinite,
}
#[constructor]
fn constructor(ref self: ContractState, owner: Person) {
self.owner.write(owner);
}
#[abi(embed_v0)]
impl SimpleCounterImpl of super::ISimpleStorage<ContractState> {
fn get_owner(self: @ContractState) -> Person {
self.owner.read()
}
fn get_owner_name(self: @ContractState) -> felt252 {
self.owner.name.read()
}
fn get_expiration(self: @ContractState) -> Expiration {
self.expiration.read()
}
fn change_expiration(ref self: ContractState, expiration: Expiration) {
if get_caller_address() != self.owner.address.read() {
panic!("Only the owner can change the expiration");
}
self.expiration.write(expiration);
}
}
fn get_owner_storage_address(self: @ContractState) -> felt252 {
self.owner.__base_address__
}
fn get_owner_name_storage_address(self: @ContractState) -> felt252 {
self.owner.name.__storage_pointer_address__.into()
}
}
The Storage struct is a struct like any other, except that it must be annotated with the #[storage] attribute. This annotation tells the compiler to generate the required code to interact with the blockchain state, and allows you to read and write data from and to storage. This struct can contain any type that implements the Store trait, including other structs, enums, as well as Storage Mappings, Storage Vectors, and Storage Nodes. In this section, we'll focus on simple storage variables, and we'll see how to store more complex types in the next sections.
Accessing Storage Variables
Variables stored in the Storage struct can be accessed and modified using the read and write functions, respectively. All these functions are automatically generated by the compiler for each storage variable.
To read the value of the owner storage variable, which is of type Person, we call the read function on the owner variable, passing in no arguments.
#[starknet::interface]
pub trait ISimpleStorage<TContractState> {
fn get_owner(self: @TContractState) -> SimpleStorage::Person;
fn get_owner_name(self: @TContractState) -> felt252;
fn get_expiration(self: @TContractState) -> SimpleStorage::Expiration;
fn change_expiration(ref self: TContractState, expiration: SimpleStorage::Expiration);
}
#[starknet::contract]
mod SimpleStorage {
use starknet::{ContractAddress, get_caller_address};
use starknet::storage::{StoragePointerReadAccess, StoragePointerWriteAccess};
#[storage]
struct Storage {
owner: Person,
expiration: Expiration,
}
#[derive(Drop, Serde, starknet::Store)]
pub struct Person {
address: ContractAddress,
name: felt252,
}
#[derive(Copy, Drop, Serde, starknet::Store)]
pub enum Expiration {
Finite: u64,
#[default]
Infinite,
}
#[constructor]
fn constructor(ref self: ContractState, owner: Person) {
self.owner.write(owner);
}
#[abi(embed_v0)]
impl SimpleCounterImpl of super::ISimpleStorage<ContractState> {
fn get_owner(self: @ContractState) -> Person {
self.owner.read()
}
fn get_owner_name(self: @ContractState) -> felt252 {
self.owner.name.read()
}
fn get_expiration(self: @ContractState) -> Expiration {
self.expiration.read()
}
fn change_expiration(ref self: ContractState, expiration: Expiration) {
if get_caller_address() != self.owner.address.read() {
panic!("Only the owner can change the expiration");
}
self.expiration.write(expiration);
}
}
fn get_owner_storage_address(self: @ContractState) -> felt252 {
self.owner.__base_address__
}
fn get_owner_name_storage_address(self: @ContractState) -> felt252 {
self.owner.name.__storage_pointer_address__.into()
}
}
To write a new value to the storage slot of a storage variable, we call the write function, passing in the value as argument. Here, we only pass in the value to write to the owner variable as it is a simple variable.
#[starknet::interface]
pub trait ISimpleStorage<TContractState> {
fn get_owner(self: @TContractState) -> SimpleStorage::Person;
fn get_owner_name(self: @TContractState) -> felt252;
fn get_expiration(self: @TContractState) -> SimpleStorage::Expiration;
fn change_expiration(ref self: TContractState, expiration: SimpleStorage::Expiration);
}
#[starknet::contract]
mod SimpleStorage {
use starknet::{ContractAddress, get_caller_address};
use starknet::storage::{StoragePointerReadAccess, StoragePointerWriteAccess};
#[storage]
struct Storage {
owner: Person,
expiration: Expiration,
}
#[derive(Drop, Serde, starknet::Store)]
pub struct Person {
address: ContractAddress,
name: felt252,
}
#[derive(Copy, Drop, Serde, starknet::Store)]
pub enum Expiration {
Finite: u64,
#[default]
Infinite,
}
#[constructor]
fn constructor(ref self: ContractState, owner: Person) {
self.owner.write(owner);
}
#[abi(embed_v0)]
impl SimpleCounterImpl of super::ISimpleStorage<ContractState> {
fn get_owner(self: @ContractState) -> Person {
self.owner.read()
}
fn get_owner_name(self: @ContractState) -> felt252 {
self.owner.name.read()
}
fn get_expiration(self: @ContractState) -> Expiration {
self.expiration.read()
}
fn change_expiration(ref self: ContractState, expiration: Expiration) {
if get_caller_address() != self.owner.address.read() {
panic!("Only the owner can change the expiration");
}
self.expiration.write(expiration);
}
}
fn get_owner_storage_address(self: @ContractState) -> felt252 {
self.owner.__base_address__
}
fn get_owner_name_storage_address(self: @ContractState) -> felt252 {
self.owner.name.__storage_pointer_address__.into()
}
}
When working with compound types, instead of calling read and write on the struct variable itself, which would perform a storage operation for each member, you can call read and write on specific members of the struct. This allows you to access and modify the values of the struct members directly, minimizing the amount of storage operations performed. In the following example, the owner variable is of type Person. Thus, it has one attribute called name, on which we can call the read and write functions to access and modify its value.
#[starknet::interface]
pub trait ISimpleStorage<TContractState> {
fn get_owner(self: @TContractState) -> SimpleStorage::Person;
fn get_owner_name(self: @TContractState) -> felt252;
fn get_expiration(self: @TContractState) -> SimpleStorage::Expiration;
fn change_expiration(ref self: TContractState, expiration: SimpleStorage::Expiration);
}
#[starknet::contract]
mod SimpleStorage {
use starknet::{ContractAddress, get_caller_address};
use starknet::storage::{StoragePointerReadAccess, StoragePointerWriteAccess};
#[storage]
struct Storage {
owner: Person,
expiration: Expiration,
}
#[derive(Drop, Serde, starknet::Store)]
pub struct Person {
address: ContractAddress,
name: felt252,
}
#[derive(Copy, Drop, Serde, starknet::Store)]
pub enum Expiration {
Finite: u64,
#[default]
Infinite,
}
#[constructor]
fn constructor(ref self: ContractState, owner: Person) {
self.owner.write(owner);
}
#[abi(embed_v0)]
impl SimpleCounterImpl of super::ISimpleStorage<ContractState> {
fn get_owner(self: @ContractState) -> Person {
self.owner.read()
}
fn get_owner_name(self: @ContractState) -> felt252 {
self.owner.name.read()
}
fn get_expiration(self: @ContractState) -> Expiration {
self.expiration.read()
}
fn change_expiration(ref self: ContractState, expiration: Expiration) {
if get_caller_address() != self.owner.address.read() {
panic!("Only the owner can change the expiration");
}
self.expiration.write(expiration);
}
}
fn get_owner_storage_address(self: @ContractState) -> felt252 {
self.owner.__base_address__
}
fn get_owner_name_storage_address(self: @ContractState) -> felt252 {
self.owner.name.__storage_pointer_address__.into()
}
}
Storing Custom Types with the Store Trait
The Store trait, defined in the starknet::storage_access module, is used to specify how a type should be stored in storage. In order for a type to be stored in storage, it must implement the Store trait. Most types from the core library, such as unsigned integers (u8, u128, u256...), felt252, bool, ByteArray, ContractAddress, etc. implement the Store trait and can thus be stored without further action. However, memory collections, such as Array<T> and Felt252Dict<T>, cannot be stored in contract storage - you will have to use the special types Vec<T> and Map<K, V> instead.
But what if you wanted to store a type that you defined yourself, such as an enum or a struct? In that case, you have to explicitly tell the compiler how to store this type.
In our example, we want to store a Person struct in storage, which is only possible by implementing the Store trait for the Person type. This can be simply achieved by adding a #[derive(starknet::Store)] attribute on top of our struct definition. Note that all the members of the struct need to implement the Store trait for the trait to be derived.
#[starknet::interface]
pub trait ISimpleStorage<TContractState> {
fn get_owner(self: @TContractState) -> SimpleStorage::Person;
fn get_owner_name(self: @TContractState) -> felt252;
fn get_expiration(self: @TContractState) -> SimpleStorage::Expiration;
fn change_expiration(ref self: TContractState, expiration: SimpleStorage::Expiration);
}
#[starknet::contract]
mod SimpleStorage {
use starknet::{ContractAddress, get_caller_address};
use starknet::storage::{StoragePointerReadAccess, StoragePointerWriteAccess};
#[storage]
struct Storage {
owner: Person,
expiration: Expiration,
}
#[derive(Drop, Serde, starknet::Store)]
pub struct Person {
address: ContractAddress,
name: felt252,
}
#[derive(Copy, Drop, Serde, starknet::Store)]
pub enum Expiration {
Finite: u64,
#[default]
Infinite,
}
#[constructor]
fn constructor(ref self: ContractState, owner: Person) {
self.owner.write(owner);
}
#[abi(embed_v0)]
impl SimpleCounterImpl of super::ISimpleStorage<ContractState> {
fn get_owner(self: @ContractState) -> Person {
self.owner.read()
}
fn get_owner_name(self: @ContractState) -> felt252 {
self.owner.name.read()
}
fn get_expiration(self: @ContractState) -> Expiration {
self.expiration.read()
}
fn change_expiration(ref self: ContractState, expiration: Expiration) {
if get_caller_address() != self.owner.address.read() {
panic!("Only the owner can change the expiration");
}
self.expiration.write(expiration);
}
}
fn get_owner_storage_address(self: @ContractState) -> felt252 {
self.owner.__base_address__
}
fn get_owner_name_storage_address(self: @ContractState) -> felt252 {
self.owner.name.__storage_pointer_address__.into()
}
}
Similarly, Enums can only be written to storage if they implement the Store trait, which can be trivially derived as long as all associated types implement the Store trait.
Enums used in contract storage must define a default variant. This default variant is returned when reading an empty storage slot - otherwise, it will result in a runtime error.
Here's an example of how to properly define an enum for use in contract storage:
#[starknet::interface]
pub trait ISimpleStorage<TContractState> {
fn get_owner(self: @TContractState) -> SimpleStorage::Person;
fn get_owner_name(self: @TContractState) -> felt252;
fn get_expiration(self: @TContractState) -> SimpleStorage::Expiration;
fn change_expiration(ref self: TContractState, expiration: SimpleStorage::Expiration);
}
#[starknet::contract]
mod SimpleStorage {
use starknet::{ContractAddress, get_caller_address};
use starknet::storage::{StoragePointerReadAccess, StoragePointerWriteAccess};
#[storage]
struct Storage {
owner: Person,
expiration: Expiration,
}
#[derive(Drop, Serde, starknet::Store)]
pub struct Person {
address: ContractAddress,
name: felt252,
}
#[derive(Copy, Drop, Serde, starknet::Store)]
pub enum Expiration {
Finite: u64,
#[default]
Infinite,
}
#[constructor]
fn constructor(ref self: ContractState, owner: Person) {
self.owner.write(owner);
}
#[abi(embed_v0)]
impl SimpleCounterImpl of super::ISimpleStorage<ContractState> {
fn get_owner(self: @ContractState) -> Person {
self.owner.read()
}
fn get_owner_name(self: @ContractState) -> felt252 {
self.owner.name.read()
}
fn get_expiration(self: @ContractState) -> Expiration {
self.expiration.read()
}
fn change_expiration(ref self: ContractState, expiration: Expiration) {
if get_caller_address() != self.owner.address.read() {
panic!("Only the owner can change the expiration");
}
self.expiration.write(expiration);
}
}
fn get_owner_storage_address(self: @ContractState) -> felt252 {
self.owner.__base_address__
}
fn get_owner_name_storage_address(self: @ContractState) -> felt252 {
self.owner.name.__storage_pointer_address__.into()
}
}
In this example, we've added the #[default] attribute to the Infinite variant. This tells the Cairo compiler that if we try to read an uninitialized enum from storage, the Infinite variant should be returned.
You might have noticed that we also derived Drop and Serde on our custom types. Both of them are required for properly serializing arguments passed to entrypoints and deserializing their outputs.
Structs Storage Layout
On Starknet, structs are stored in storage as a sequence of primitive types.
The elements of the struct are stored in the same order as they are defined in the struct definition. The first element of the struct is stored at the base address of the struct, which is computed as specified in the "Addresses of Storage Variables" section and can be obtained with var.__base_address__. Subsequent elements are stored at addresses contiguous to the previous element.
For example, the storage layout for the owner variable of type Person will result in the following layout:
| Fields | Address |
|---|---|
| name | owner.__base_address__ |
| address | owner.__base_address__ +1 |
Note that tuples are similarly stored in contract's storage, with the first element of the tuple being stored at the base address, and subsequent elements stored contiguously.
Enums Storage Layout
When you store an enum variant, what you're essentially storing is the variant's index and eventual associated values. This index starts at 0 for the first variant of your enum and increments by 1 for each subsequent variant.
If your variant has an associated value, this value is stored starting from the address immediately following the address of the index of the variant.
For example, suppose we have the Expiration enum with the Finite variant that carries an associated limit date, and the Infinite variant without associated data. The storage layout for the Finite variant would look like this:
| Element | Address |
|---|---|
| Variant index (0 for Finite) | expiration.__base_address__ |
| Associated limit date | expiration.__base_address__ + 1 |
while the storage layout for the Infinite variant would be as follows:
| Element | Address |
|---|---|
| Variant index (1 for Infinite) | expiration.__base_address__ |
Storage Nodes
A storage node is a special kind of struct that can contain storage-specific types, such as Map, Vec, or other storage nodes, as members. Unlike regular structs, storage nodes can only exist within contract storage and cannot be instantiated or used outside of it.
You can think of storage nodes as intermediate nodes involved in address calculations within the tree representing the contract's storage space. In the next subsection, we will introduce how this concept is modeled in the core library.
The main benefits of storage nodes is that they allow you to create more sophisticated storage layouts, including mappings or vectors inside custom types, and allow you to logically group related data, improving code readability and maintainability.
Storage nodes are structs defined with the #[starknet::storage_node] attribute. In this new contract that implements a voting system, we implement a ProposalNode storage node containing a Map<ContractAddress, bool> to keep track of the voters of the proposal, along with other fields to store the proposal's metadata.
#[starknet::contract]
mod VotingSystem {
use starknet::{ContractAddress, get_caller_address};
use starknet::storage::{
Map, StoragePathEntry, StoragePointerReadAccess, StoragePointerWriteAccess,
};
#[storage]
struct Storage {
proposals: Map<u32, ProposalNode>,
proposal_count: u32,
}
#[starknet::storage_node]
struct ProposalNode {
title: felt252,
description: felt252,
yes_votes: u32,
no_votes: u32,
voters: Map<ContractAddress, bool>,
}
#[external(v0)]
fn create_proposal(ref self: ContractState, title: felt252, description: felt252) -> u32 {
let mut proposal_count = self.proposal_count.read();
let new_proposal_id = proposal_count + 1;
let mut proposal = self.proposals.entry(new_proposal_id);
proposal.title.write(title);
proposal.description.write(description);
proposal.yes_votes.write(0);
proposal.no_votes.write(0);
self.proposal_count.write(new_proposal_id);
new_proposal_id
}
#[external(v0)]
fn vote(ref self: ContractState, proposal_id: u32, vote: bool) {
let mut proposal = self.proposals.entry(proposal_id);
let caller = get_caller_address();
let has_voted = proposal.voters.entry(caller).read();
if has_voted {
return;
}
proposal.voters.entry(caller).write(true);
}
}
When accessing a storage node, you can't read or write it directly. Instead, you have to access its individual members. Here's an example from our VotingSystem contract that demonstrates how we populate each field of the ProposalNode storage node:
#[starknet::contract]
mod VotingSystem {
use starknet::{ContractAddress, get_caller_address};
use starknet::storage::{
Map, StoragePathEntry, StoragePointerReadAccess, StoragePointerWriteAccess,
};
#[storage]
struct Storage {
proposals: Map<u32, ProposalNode>,
proposal_count: u32,
}
#[starknet::storage_node]
struct ProposalNode {
title: felt252,
description: felt252,
yes_votes: u32,
no_votes: u32,
voters: Map<ContractAddress, bool>,
}
#[external(v0)]
fn create_proposal(ref self: ContractState, title: felt252, description: felt252) -> u32 {
let mut proposal_count = self.proposal_count.read();
let new_proposal_id = proposal_count + 1;
let mut proposal = self.proposals.entry(new_proposal_id);
proposal.title.write(title);
proposal.description.write(description);
proposal.yes_votes.write(0);
proposal.no_votes.write(0);
self.proposal_count.write(new_proposal_id);
new_proposal_id
}
#[external(v0)]
fn vote(ref self: ContractState, proposal_id: u32, vote: bool) {
let mut proposal = self.proposals.entry(proposal_id);
let caller = get_caller_address();
let has_voted = proposal.voters.entry(caller).read();
if has_voted {
return;
}
proposal.voters.entry(caller).write(true);
}
}
Because no voter has voted on this proposal yet, we don't need to populate the voters map when creating the proposal. But we could very well access the voters map to check if a given address has already voted on this proposal when it tries to cast its vote:
#[starknet::contract]
mod VotingSystem {
use starknet::{ContractAddress, get_caller_address};
use starknet::storage::{
Map, StoragePathEntry, StoragePointerReadAccess, StoragePointerWriteAccess,
};
#[storage]
struct Storage {
proposals: Map<u32, ProposalNode>,
proposal_count: u32,
}
#[starknet::storage_node]
struct ProposalNode {
title: felt252,
description: felt252,
yes_votes: u32,
no_votes: u32,
voters: Map<ContractAddress, bool>,
}
#[external(v0)]
fn create_proposal(ref self: ContractState, title: felt252, description: felt252) -> u32 {
let mut proposal_count = self.proposal_count.read();
let new_proposal_id = proposal_count + 1;
let mut proposal = self.proposals.entry(new_proposal_id);
proposal.title.write(title);
proposal.description.write(description);
proposal.yes_votes.write(0);
proposal.no_votes.write(0);
self.proposal_count.write(new_proposal_id);
new_proposal_id
}
#[external(v0)]
fn vote(ref self: ContractState, proposal_id: u32, vote: bool) {
let mut proposal = self.proposals.entry(proposal_id);
let caller = get_caller_address();
let has_voted = proposal.voters.entry(caller).read();
if has_voted {
return;
}
proposal.voters.entry(caller).write(true);
}
}
In this example, we access the ProposalNode for a specific proposal ID. We then check if the caller has already voted by reading from the voters map within the storage node. If they haven't voted yet, we write to the voters map to mark that they have now voted.
Addresses of Storage Variables
The address of a storage variable is computed as follows:
-
If the variable is a single value, the address is the
sn_keccakhash of the ASCII encoding of the variable's name.sn_keccakis Starknet's version of the Keccak256 hash function, whose output is truncated to 250 bits. -
If the variable is composed of multiple values (i.e., a tuple, a struct or an enum), we also use the
sn_keccakhash of the ASCII encoding of the variable's name to determine the base address in storage. Then, depending on the type, the storage layout will differ. See the "Storing Custom Types" section. -
If the variable is part of a storage node, its address is based on a chain of hashes that reflects the structure of the node. For a storage node member
mwithin a storage variablevariable_name, the path to that member is computed ash(sn_keccak(variable_name), sn_keccak(m)), wherehis the Pedersen hash. This process continues for nested storage nodes, building a chain of hashes that represents the path to a leaf node. Once a leaf node is reached, the storage calculation proceeds as it normally would for that type of variable. -
If the variable is a Map or a Vec, the address is computed relative to the storage base address, which is the
sn_keccakhash of the variable's name, and the keys of the mapping or indexes in the Vec. The exact computation is described in the "Storage Mappings" and "Storage Vecs" sections.
You can access the base address of a storage variable by accessing the __base_address__ attribute on the variable, which returns a felt252 value.
use starknet::ContractAddress;
#[starknet::interface]
pub trait INameRegistry<TContractState> {
fn store_name(ref self: TContractState, name: felt252);
fn get_name(self: @TContractState, address: ContractAddress) -> felt252;
}
#[starknet::contract]
mod NameRegistry {
use starknet::{ContractAddress, get_caller_address};
use starknet::storage::{
Map, StoragePathEntry, StoragePointerReadAccess, StoragePointerWriteAccess,
};
#[storage]
struct Storage {
names: Map::<ContractAddress, felt252>,
total_names: u128,
}
#[derive(Drop, Serde, starknet::Store)]
pub struct Person {
address: ContractAddress,
name: felt252,
}
#[constructor]
fn constructor(ref self: ContractState, owner: Person) {
self.names.entry(owner.address).write(owner.name);
self.total_names.write(1);
}
// Public functions inside an impl block
#[abi(embed_v0)]
impl NameRegistry of super::INameRegistry<ContractState> {
fn store_name(ref self: ContractState, name: felt252) {
let caller = get_caller_address();
self._store_name(caller, name);
}
fn get_name(self: @ContractState, address: ContractAddress) -> felt252 {
self.names.entry(address).read()
}
}
// Standalone public function
#[external(v0)]
fn get_contract_name(self: @ContractState) -> felt252 {
'Name Registry'
}
// Could be a group of functions about a same topic
#[generate_trait]
impl InternalFunctions of InternalFunctionsTrait {
fn _store_name(ref self: ContractState, user: ContractAddress, name: felt252) {
let total_names = self.total_names.read();
self.names.entry(user).write(name);
self.total_names.write(total_names + 1);
}
}
// Free function
fn get_total_names_storage_address(self: @ContractState) -> felt252 {
self.total_names.__base_address__
}
}
This address calculation mechanism is performed through a modelisation of the contract storage space using a concept of StoragePointers and StoragePaths that we'll now introduce.
Modeling of the Contract Storage in the Core Library
To understand how storage variables are stored in Cairo, it's important to note that they are not stored contiguously but in different locations in the contract's storage. To facilitate the retrieval of these addresses, the core library provides a model of the contract storage through a system of StoragePointers and StoragePaths.
Each storage variable can be converted to a StoragePointer. This pointer contains two main fields:
- The base address of the storage variable in the contract's storage.
- The offset, relative to the base address, of the specific storage slot being pointed to.
An example is worth a thousand words. Let's consider the Person struct defined in the previous section:
#[starknet::interface]
pub trait ISimpleStorage<TContractState> {
fn get_owner(self: @TContractState) -> SimpleStorage::Person;
fn get_owner_name(self: @TContractState) -> felt252;
fn get_expiration(self: @TContractState) -> SimpleStorage::Expiration;
fn change_expiration(ref self: TContractState, expiration: SimpleStorage::Expiration);
}
#[starknet::contract]
mod SimpleStorage {
use starknet::{ContractAddress, get_caller_address};
use starknet::storage::{StoragePointerReadAccess, StoragePointerWriteAccess};
#[storage]
struct Storage {
owner: Person,
expiration: Expiration,
}
#[derive(Drop, Serde, starknet::Store)]
pub struct Person {
address: ContractAddress,
name: felt252,
}
#[derive(Copy, Drop, Serde, starknet::Store)]
pub enum Expiration {
Finite: u64,
#[default]
Infinite,
}
#[constructor]
fn constructor(ref self: ContractState, owner: Person) {
self.owner.write(owner);
}
#[abi(embed_v0)]
impl SimpleCounterImpl of super::ISimpleStorage<ContractState> {
fn get_owner(self: @ContractState) -> Person {
self.owner.read()
}
fn get_owner_name(self: @ContractState) -> felt252 {
self.owner.name.read()
}
fn get_expiration(self: @ContractState) -> Expiration {
self.expiration.read()
}
fn change_expiration(ref self: ContractState, expiration: Expiration) {
if get_caller_address() != self.owner.address.read() {
panic!("Only the owner can change the expiration");
}
self.expiration.write(expiration);
}
}
fn get_owner_storage_address(self: @ContractState) -> felt252 {
self.owner.__base_address__
}
fn get_owner_name_storage_address(self: @ContractState) -> felt252 {
self.owner.name.__storage_pointer_address__.into()
}
}
When we write let x = self.owner;, we access a variable of type StorageBase that represents the base location of the owner variable in the contract's storage.
From this base address, we can either get pointers to the struct's fields (like name or address) or a pointer to the struct itself. On these pointers, we can call read and write, defined in the Store trait, to read and write the values pointed to.
Of course, all of this is transparent to the developer. We can read and write to the struct's fields as if we were accessing regular variables, but the compiler translates these accesses into the appropriate StoragePointer manipulations under the hood.
For storage mappings, the process is similar, except that we introduce an intermediate type, StoragePath. A StoragePath is a chain of storage nodes and struct fields that form a path to a specific storage slot. For example, to access a value contained in a Map<ContractAddress, u128>, the process would be the following:
- Start at
StorageBaseof theMap, and convert it to aStoragePath. - Walk the
StoragePathto reach the desired value using theentrymethod, which, in the case of aMap, hashes the current path with the next key to generate the nextStoragePath. - Repeat step 2 until the
StoragePathpoints to the desired value, converting the final value to aStoragePointer - Read or write the value at that pointer.
Note that we need to convert the ContractAddress to a StoragePointer before being able to read or write to it.
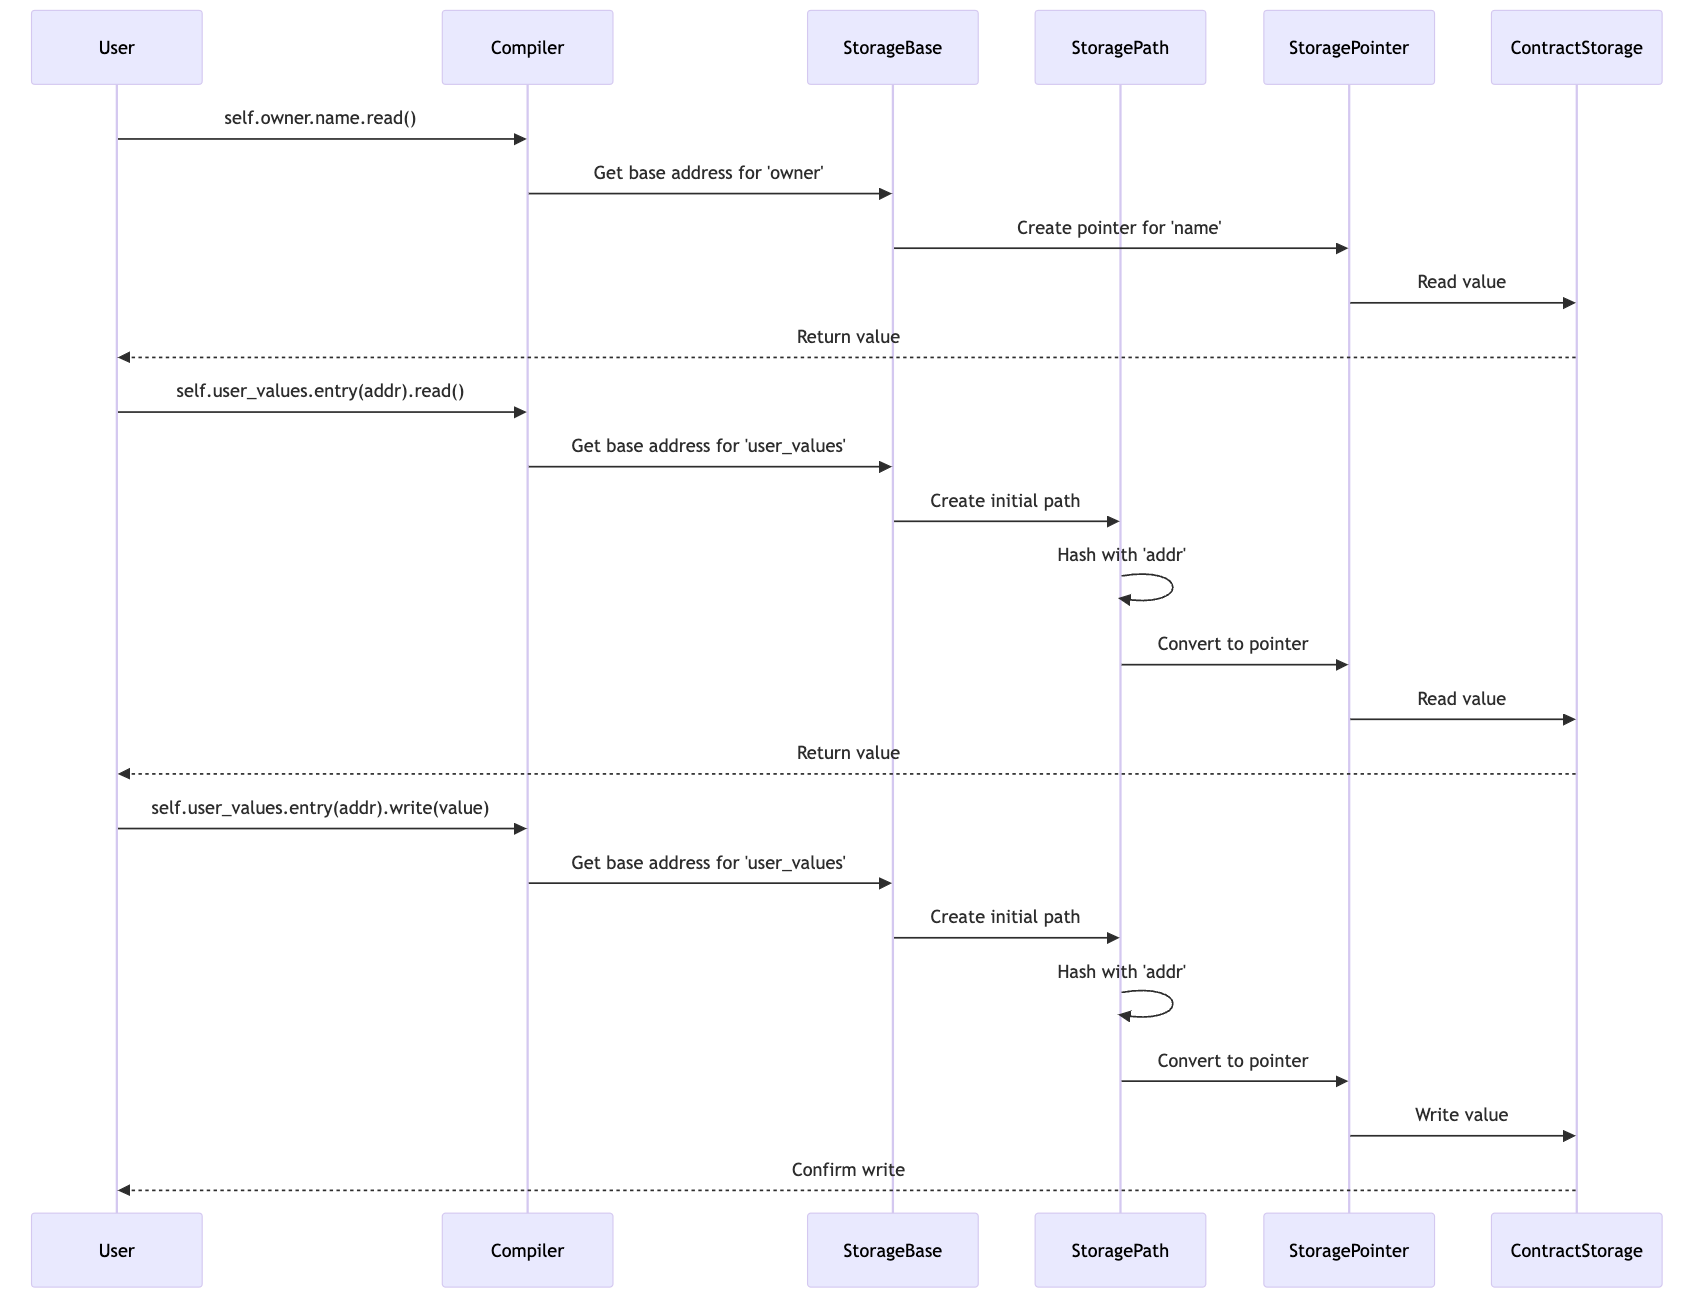
Summary
In this chapter, we covered the following key points:
- Storage Variables: These are used to store persistent data on the blockchain. They are defined in a special
Storagestruct annotated with the#[storage]attribute. - Accessing Storage Variables: You can read and write storage variables using automatically generated
readandwritefunctions. For structs, you can access individual members directly. - Custom Types with the
StoreTrait: To store custom types like structs and enums, they must implement theStoretrait. This can be achieved using the#[derive(starknet::Store)]attribute or writing your own implementation. - Addresses of Storage Variables: The address of a storage variable is computed using the
sn_keccakhash of its name, and additional steps for special types. For complex types, the storage layout is determined by the type's structure. - Structs and Enums Storage Layout: Structs are stored as a sequence of primitive types, while enums store the variant index and potential associated values.
- Storage Nodes: Special structs that can contain storage-specific types like
MaporVec. They allow for more sophisticated storage layouts and can only exist within contract storage.
Next, we'll focus on the Map and Vec types in depth.
Storing Key-Value Pairs with Mappings
Storage mappings in Cairo provide a way to associate keys with values and persist them in the contract's storage. Unlike traditional hash tables, storage mappings do not store the key data itself; instead, they use the hash of the key to compute an address that corresponds to the storage slot where the corresponding value is stored. Therefore, it is not possible to iterate over the keys of a storage mapping.
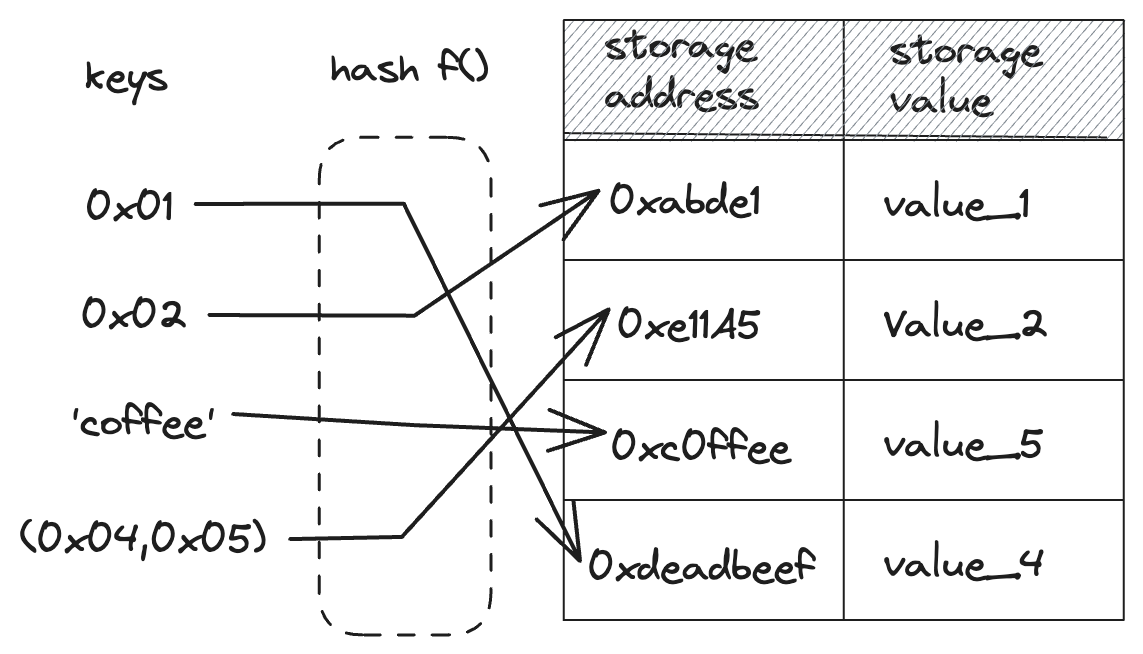
Mappings do not have a concept of length or whether a key-value pair is set. All values are by default set to 0. As such, the only way to remove an entry from a mapping is to set its value to the default value for the type, which would be 0 for the u64 type.
The Map type, provided by the Cairo core library, inside the core::starknet::storage module, is used to declare mappings in contracts.
To declare a mapping, use the Map type enclosed in angle brackets <>, specifying the key and value types. In Listing 15-2, we create a simple contract that stores values mapped to the caller's address.
The
Felt252Dicttype is a memory type that cannot be stored in contract storage. For persistent storage of key-value pairs, use theMaptype, which is a [phantom type][phantom types] designed specifically for contract storage. However,Maphas limitations: it can't be instantiated as a regular variable, used as a function parameter, or included as a member in regular structs.Mapcan only be used as a storage variable within a contract's storage struct. To work with the contents of aMapin memory or perform complex operations, you'll need to copy its elements to and from aFelt252Dictor other suitable data structure.
Declaring and Using Storage Mappings
use starknet::ContractAddress;
#[starknet::interface]
trait IUserValues<TState> {
fn set(ref self: TState, amount: u64);
fn get(self: @TState, address: ContractAddress) -> u64;
}
#[starknet::contract]
mod UserValues {
use starknet::storage::{
StoragePointerReadAccess, StoragePointerWriteAccess, StoragePathEntry, Map,
};
use starknet::{ContractAddress, get_caller_address};
#[storage]
struct Storage {
user_values: Map<ContractAddress, u64>,
}
impl UserValuesImpl of super::IUserValues<ContractState> {
fn set(ref self: ContractState, amount: u64) {
let caller = get_caller_address();
self.user_values.entry(caller).write(amount);
}
fn get(self: @ContractState, address: ContractAddress) -> u64 {
self.user_values.entry(address).read()
}
}
}
Listing 15-2: Declaring a storage mapping in the Storage struct
To read the value corresponding to a key in a mapping, you first need to retrieve the storage pointer associated with that key. This is done by calling the entry method on the storage mapping variable, passing in the key as a parameter. Once you have the entry path, you can call the read function on it to retrieve the stored value.
use starknet::ContractAddress;
#[starknet::interface]
trait IUserValues<TState> {
fn set(ref self: TState, amount: u64);
fn get(self: @TState, address: ContractAddress) -> u64;
}
#[starknet::contract]
mod UserValues {
use starknet::storage::{
StoragePointerReadAccess, StoragePointerWriteAccess, StoragePathEntry, Map,
};
use starknet::{ContractAddress, get_caller_address};
#[storage]
struct Storage {
user_values: Map<ContractAddress, u64>,
}
impl UserValuesImpl of super::IUserValues<ContractState> {
fn set(ref self: ContractState, amount: u64) {
let caller = get_caller_address();
self.user_values.entry(caller).write(amount);
}
fn get(self: @ContractState, address: ContractAddress) -> u64 {
self.user_values.entry(address).read()
}
}
}
Similarly, to write a value in a storage mapping, you need to retrieve the storage pointer corresponding to the key. Once you have this storage pointer, you can call the write function on it with the value to write.
use starknet::ContractAddress;
#[starknet::interface]
trait IUserValues<TState> {
fn set(ref self: TState, amount: u64);
fn get(self: @TState, address: ContractAddress) -> u64;
}
#[starknet::contract]
mod UserValues {
use starknet::storage::{
StoragePointerReadAccess, StoragePointerWriteAccess, StoragePathEntry, Map,
};
use starknet::{ContractAddress, get_caller_address};
#[storage]
struct Storage {
user_values: Map<ContractAddress, u64>,
}
impl UserValuesImpl of super::IUserValues<ContractState> {
fn set(ref self: ContractState, amount: u64) {
let caller = get_caller_address();
self.user_values.entry(caller).write(amount);
}
fn get(self: @ContractState, address: ContractAddress) -> u64 {
self.user_values.entry(address).read()
}
}
}
Nested Mappings
You can also create more complex mappings with multiple keys. To illustrate this, we'll implement a contract representing warehouses assigned to users, where each user can store multiple items with their respective quantities.
The user_warehouse mapping is a storage mapping that maps ContractAddress to another mapping that maps u64 (item ID) to u64 (quantity). This can be implemented by declaring a Map<ContractAddress, Map<u64, u64>> in the storage struct. Each ContractAddress key in the user_warehouse mapping corresponds to a user's warehouse, and each user's warehouse contains a mapping of item IDs to their respective quantities.
use starknet::ContractAddress;
#[starknet::interface]
trait IWarehouseContract<TState> {
fn set_quantity(ref self: TState, item_id: u64, quantity: u64);
fn get_item_quantity(self: @TState, address: ContractAddress, item_id: u64) -> u64;
}
#[starknet::contract]
mod WarehouseContract {
use starknet::storage::{
StoragePointerReadAccess, StoragePointerWriteAccess, StoragePathEntry, Map,
};
use starknet::{ContractAddress, get_caller_address};
#[storage]
struct Storage {
user_warehouse: Map<ContractAddress, Map<u64, u64>>,
}
impl WarehouseContractImpl of super::IWarehouseContract<ContractState> {
fn set_quantity(ref self: ContractState, item_id: u64, quantity: u64) {
let caller = get_caller_address();
self.user_warehouse.entry(caller).entry(item_id).write(quantity);
}
fn get_item_quantity(self: @ContractState, address: ContractAddress, item_id: u64) -> u64 {
self.user_warehouse.entry(address).entry(item_id).read()
}
}
}
In this case, the same principle applies for accessing the stored values. You need to traverse the keys step by step, using the entry method to get the storage path to the next key in the sequence, and finally calling read or write on the innermost mapping.
use starknet::ContractAddress;
#[starknet::interface]
trait IWarehouseContract<TState> {
fn set_quantity(ref self: TState, item_id: u64, quantity: u64);
fn get_item_quantity(self: @TState, address: ContractAddress, item_id: u64) -> u64;
}
#[starknet::contract]
mod WarehouseContract {
use starknet::storage::{
StoragePointerReadAccess, StoragePointerWriteAccess, StoragePathEntry, Map,
};
use starknet::{ContractAddress, get_caller_address};
#[storage]
struct Storage {
user_warehouse: Map<ContractAddress, Map<u64, u64>>,
}
impl WarehouseContractImpl of super::IWarehouseContract<ContractState> {
fn set_quantity(ref self: ContractState, item_id: u64, quantity: u64) {
let caller = get_caller_address();
self.user_warehouse.entry(caller).entry(item_id).write(quantity);
}
fn get_item_quantity(self: @ContractState, address: ContractAddress, item_id: u64) -> u64 {
self.user_warehouse.entry(address).entry(item_id).read()
}
}
}
Storage Address Computation for Mappings
The address in storage of a variable stored in a mapping is computed according to the following rules:
- For a single key
k, the address of the value at keykish(sn_keccak(variable_name), k), wherehis the Pedersen hash and the final value is taken modulo \( {2^{251}} - 256\). - For multiple keys, the address is computed as
h(...h(h(sn_keccak(variable_name), k_1), k_2), ..., k_n), withk_1, ..., k_nbeing all keys that constitute the mapping.
If the key of a mapping is a struct, each element of the struct constitutes a key. Moreover, the struct should implement the Hash trait, which can be derived with the #[derive(Hash)] attribute.
Summary
- Storage mappings allow you to map keys to values in contract storage.
- Use the
Maptype to declare mappings. - Access mappings using the
entrymethod andread/writefunctions. - Mappings can contain other mappings, creating nested storage mappings.
- The address of a mapping variable is computed using the
sn_keccakand the Pedersen hash functions.
Storing Collections with Vectors
The Vec type provides a way to store collections of values in the contract's storage. In this section, we will explore how to declare, add elements to and retrieve elements from a Vec, as well as how the storage addresses for Vec variables are computed.
The Vec type is provided by the Cairo core library, inside the core::starknet::storage module. Its associated methods are defined in the VecTrait and MutableVecTrait traits that you will also need to import for read and write operations on the Vec type.
The
Array<T>type is a memory type and cannot be directly stored in contract storage. For storage, use theVec<T>type, which is a [phantom type][phantom types] designed specifically for contract storage. However,Vec<T>has limitations: it can't be instantiated as a regular variable, used as a function parameter, or included as a member in regular structs. To work with the full contents of aVec<T>, you'll need to copy its elements to and from a memoryArray<T>.
Declaring and Using Storage Vectors
To declare a Storage Vector, use the Vec type enclosed in angle brackets <>, specifying the type of elements it will store. In Listing 15-3, we create a simple contract that registers all the addresses that call it and stores them in a Vec. We can then retrieve the n-th registered address, or all registered addresses.
use starknet::ContractAddress;
#[starknet::interface]
trait IAddressList<TState> {
fn register_caller(ref self: TState);
fn get_n_th_registered_address(self: @TState, index: u64) -> Option<ContractAddress>;
fn get_all_addresses(self: @TState) -> Array<ContractAddress>;
fn modify_nth_address(ref self: TState, index: u64, new_address: ContractAddress);
}
#[starknet::contract]
mod AddressList {
use starknet::storage::{
StoragePointerReadAccess, StoragePointerWriteAccess, Vec, VecTrait, MutableVecTrait,
};
use starknet::{get_caller_address, ContractAddress};
#[storage]
struct Storage {
addresses: Vec<ContractAddress>,
}
impl AddressListImpl of super::IAddressList<ContractState> {
fn register_caller(ref self: ContractState) {
let caller = get_caller_address();
self.addresses.push(caller);
}
fn get_n_th_registered_address(
self: @ContractState, index: u64,
) -> Option<ContractAddress> {
if let Some(storage_ptr) = self.addresses.get(index) {
return Some(storage_ptr.read());
}
return None;
}
fn get_all_addresses(self: @ContractState) -> Array<ContractAddress> {
let mut addresses = array![];
for i in 0..self.addresses.len() {
addresses.append(self.addresses.at(i).read());
}
addresses
}
fn modify_nth_address(ref self: ContractState, index: u64, new_address: ContractAddress) {
let mut storage_ptr = self.addresses.at(index);
storage_ptr.write(new_address);
}
}
}
Listing 15-3: Declaring a storage Vec in the Storage struct
To add an element to a Vec, you can use the push method to add an element to the end of the Vec.
use starknet::ContractAddress;
#[starknet::interface]
trait IAddressList<TState> {
fn register_caller(ref self: TState);
fn get_n_th_registered_address(self: @TState, index: u64) -> Option<ContractAddress>;
fn get_all_addresses(self: @TState) -> Array<ContractAddress>;
fn modify_nth_address(ref self: TState, index: u64, new_address: ContractAddress);
}
#[starknet::contract]
mod AddressList {
use starknet::storage::{
StoragePointerReadAccess, StoragePointerWriteAccess, Vec, VecTrait, MutableVecTrait,
};
use starknet::{get_caller_address, ContractAddress};
#[storage]
struct Storage {
addresses: Vec<ContractAddress>,
}
impl AddressListImpl of super::IAddressList<ContractState> {
fn register_caller(ref self: ContractState) {
let caller = get_caller_address();
self.addresses.push(caller);
}
fn get_n_th_registered_address(
self: @ContractState, index: u64,
) -> Option<ContractAddress> {
if let Some(storage_ptr) = self.addresses.get(index) {
return Some(storage_ptr.read());
}
return None;
}
fn get_all_addresses(self: @ContractState) -> Array<ContractAddress> {
let mut addresses = array![];
for i in 0..self.addresses.len() {
addresses.append(self.addresses.at(i).read());
}
addresses
}
fn modify_nth_address(ref self: ContractState, index: u64, new_address: ContractAddress) {
let mut storage_ptr = self.addresses.at(index);
storage_ptr.write(new_address);
}
}
}
To retrieve an element, you can use the at or get methods to get a storage pointer to the element at the specified index, and then call the read method to get the value. If the index is out of bounds, the at method panics, while the get method returns None.
use starknet::ContractAddress;
#[starknet::interface]
trait IAddressList<TState> {
fn register_caller(ref self: TState);
fn get_n_th_registered_address(self: @TState, index: u64) -> Option<ContractAddress>;
fn get_all_addresses(self: @TState) -> Array<ContractAddress>;
fn modify_nth_address(ref self: TState, index: u64, new_address: ContractAddress);
}
#[starknet::contract]
mod AddressList {
use starknet::storage::{
StoragePointerReadAccess, StoragePointerWriteAccess, Vec, VecTrait, MutableVecTrait,
};
use starknet::{get_caller_address, ContractAddress};
#[storage]
struct Storage {
addresses: Vec<ContractAddress>,
}
impl AddressListImpl of super::IAddressList<ContractState> {
fn register_caller(ref self: ContractState) {
let caller = get_caller_address();
self.addresses.push(caller);
}
fn get_n_th_registered_address(
self: @ContractState, index: u64,
) -> Option<ContractAddress> {
if let Some(storage_ptr) = self.addresses.get(index) {
return Some(storage_ptr.read());
}
return None;
}
fn get_all_addresses(self: @ContractState) -> Array<ContractAddress> {
let mut addresses = array![];
for i in 0..self.addresses.len() {
addresses.append(self.addresses.at(i).read());
}
addresses
}
fn modify_nth_address(ref self: ContractState, index: u64, new_address: ContractAddress) {
let mut storage_ptr = self.addresses.at(index);
storage_ptr.write(new_address);
}
}
}
If you want to retrieve all the elements of the Vec, you can iterate over the indices of the storage Vec, read the value at each index, and append it to a memory Array<T>.
Similarly, you can't store an Array<T> in storage: you would need to iterate over the elements of the array and append them to a storage Vec<T>.
At this point, you should be familiar with the concept of storage pointers and storage paths introduced in the "Contract Storage" section and how they are used to access storage variables through a pointer-based model. Thus how would you modify the address stored at a specific index of a Vec?
use starknet::ContractAddress;
#[starknet::interface]
trait IAddressList<TState> {
fn register_caller(ref self: TState);
fn get_n_th_registered_address(self: @TState, index: u64) -> Option<ContractAddress>;
fn get_all_addresses(self: @TState) -> Array<ContractAddress>;
fn modify_nth_address(ref self: TState, index: u64, new_address: ContractAddress);
}
#[starknet::contract]
mod AddressList {
use starknet::storage::{
StoragePointerReadAccess, StoragePointerWriteAccess, Vec, VecTrait, MutableVecTrait,
};
use starknet::{get_caller_address, ContractAddress};
#[storage]
struct Storage {
addresses: Vec<ContractAddress>,
}
impl AddressListImpl of super::IAddressList<ContractState> {
fn register_caller(ref self: ContractState) {
let caller = get_caller_address();
self.addresses.push(caller);
}
fn get_n_th_registered_address(
self: @ContractState, index: u64,
) -> Option<ContractAddress> {
if let Some(storage_ptr) = self.addresses.get(index) {
return Some(storage_ptr.read());
}
return None;
}
fn get_all_addresses(self: @ContractState) -> Array<ContractAddress> {
let mut addresses = array![];
for i in 0..self.addresses.len() {
addresses.append(self.addresses.at(i).read());
}
addresses
}
fn modify_nth_address(ref self: ContractState, index: u64, new_address: ContractAddress) {
let mut storage_ptr = self.addresses.at(index);
storage_ptr.write(new_address);
}
}
}
The answer is fairly simple: get a mutable pointer to the storage pointer at the desired index, and use the write method to modify the value at that index.
Storage Address Computation for Vecs
The address in storage of a variable stored in a Vec is computed according to the following rules:
- The length of the
Vecis stored at the base address, computed assn_keccak(variable_name). - The elements of the
Vecare stored in addresses computed ash(base_address, i), whereiis the index of the element in theVecandhis the Pedersen hash function.
Summary
- Use the
Vectype to store collections of values in contract storage - Access Vecs using the
pushmethod to add elements, and theatorgetmethods to read elements - The address of a
Vecvariable is computed using thesn_keccakand the Pedersen hash functions
This wraps up our tour of the Contract Storage! In the next section, we'll start looking at the different kind of functions defined in a contract. You already know most of them, as we used them in the previous chapters, but we'll explain them in more detail.
Contract Functions
In this section, we are going to be looking at the different types of functions you could encounter in Starknet smart contracts.
Functions can access the contract's state easily via the self: ContractState object, which abstracts away the complexity of underlying system calls (storage_read_syscall and storage_write_syscall). The compiler provides two modifiers: ref and @ to decorate self, which intends to distinguish view and external functions.
Let's consider the NameRegistry contract in Listing 15-4 that we'll be using throughout this chapter:
use starknet::ContractAddress;
#[starknet::interface]
pub trait INameRegistry<TContractState> {
fn store_name(ref self: TContractState, name: felt252);
fn get_name(self: @TContractState, address: ContractAddress) -> felt252;
}
#[starknet::contract]
mod NameRegistry {
use starknet::{ContractAddress, get_caller_address};
use starknet::storage::{
Map, StoragePathEntry, StoragePointerReadAccess, StoragePointerWriteAccess,
};
#[storage]
struct Storage {
names: Map::<ContractAddress, felt252>,
total_names: u128,
}
#[derive(Drop, Serde, starknet::Store)]
pub struct Person {
address: ContractAddress,
name: felt252,
}
#[constructor]
fn constructor(ref self: ContractState, owner: Person) {
self.names.entry(owner.address).write(owner.name);
self.total_names.write(1);
}
// Public functions inside an impl block
#[abi(embed_v0)]
impl NameRegistry of super::INameRegistry<ContractState> {
fn store_name(ref self: ContractState, name: felt252) {
let caller = get_caller_address();
self._store_name(caller, name);
}
fn get_name(self: @ContractState, address: ContractAddress) -> felt252 {
self.names.entry(address).read()
}
}
// Standalone public function
#[external(v0)]
fn get_contract_name(self: @ContractState) -> felt252 {
'Name Registry'
}
// Could be a group of functions about a same topic
#[generate_trait]
impl InternalFunctions of InternalFunctionsTrait {
fn _store_name(ref self: ContractState, user: ContractAddress, name: felt252) {
let total_names = self.total_names.read();
self.names.entry(user).write(name);
self.total_names.write(total_names + 1);
}
}
// Free function
fn get_total_names_storage_address(self: @ContractState) -> felt252 {
self.total_names.__base_address__
}
}
Listing 15-4: Our reference contract for this chapter
1. Constructors
Constructors are a special type of function that only runs once when deploying a contract, and can be used to initialize the state of a contract.
use starknet::ContractAddress;
#[starknet::interface]
pub trait INameRegistry<TContractState> {
fn store_name(ref self: TContractState, name: felt252);
fn get_name(self: @TContractState, address: ContractAddress) -> felt252;
}
#[starknet::contract]
mod NameRegistry {
use starknet::{ContractAddress, get_caller_address};
use starknet::storage::{
Map, StoragePathEntry, StoragePointerReadAccess, StoragePointerWriteAccess,
};
#[storage]
struct Storage {
names: Map::<ContractAddress, felt252>,
total_names: u128,
}
#[derive(Drop, Serde, starknet::Store)]
pub struct Person {
address: ContractAddress,
name: felt252,
}
#[constructor]
fn constructor(ref self: ContractState, owner: Person) {
self.names.entry(owner.address).write(owner.name);
self.total_names.write(1);
}
// Public functions inside an impl block
#[abi(embed_v0)]
impl NameRegistry of super::INameRegistry<ContractState> {
fn store_name(ref self: ContractState, name: felt252) {
let caller = get_caller_address();
self._store_name(caller, name);
}
fn get_name(self: @ContractState, address: ContractAddress) -> felt252 {
self.names.entry(address).read()
}
}
// Standalone public function
#[external(v0)]
fn get_contract_name(self: @ContractState) -> felt252 {
'Name Registry'
}
// Could be a group of functions about a same topic
#[generate_trait]
impl InternalFunctions of InternalFunctionsTrait {
fn _store_name(ref self: ContractState, user: ContractAddress, name: felt252) {
let total_names = self.total_names.read();
self.names.entry(user).write(name);
self.total_names.write(total_names + 1);
}
}
// Free function
fn get_total_names_storage_address(self: @ContractState) -> felt252 {
self.total_names.__base_address__
}
}
Some important rules to note:
- A contract can't have more than one constructor.
- The constructor function must be named
constructor, and must be annotated with the#[constructor]attribute.
The constructor function might take arguments, which are passed when deploying the contract. In our example, we pass some value corresponding to a Person type as argument in order to store the owner information (address and name) in the contract.
Note that the constructor function must take self as a first argument, corresponding to the state of the contract, generally passed by reference with the ref keyword to be able to modify the contract's state. We will explain self and its type shortly.
2. Public Functions
As stated previously, public functions are accessible from outside of the contract. They are usually defined inside an implementation block annotated with the #[abi(embed_v0)] attribute, but might also be defined independently under the #[external(v0)] attribute.
The #[abi(embed_v0)] attribute means that all functions embedded inside it are implementations of the Starknet interface of the contract, and therefore potential entry points.
Annotating an impl block with the #[abi(embed_v0)] attribute only affects the visibility (i.e., public vs private/internal) of the functions it contains, but it doesn't inform us on the ability of these functions to modify the state of the contract.
use starknet::ContractAddress;
#[starknet::interface]
pub trait INameRegistry<TContractState> {
fn store_name(ref self: TContractState, name: felt252);
fn get_name(self: @TContractState, address: ContractAddress) -> felt252;
}
#[starknet::contract]
mod NameRegistry {
use starknet::{ContractAddress, get_caller_address};
use starknet::storage::{
Map, StoragePathEntry, StoragePointerReadAccess, StoragePointerWriteAccess,
};
#[storage]
struct Storage {
names: Map::<ContractAddress, felt252>,
total_names: u128,
}
#[derive(Drop, Serde, starknet::Store)]
pub struct Person {
address: ContractAddress,
name: felt252,
}
#[constructor]
fn constructor(ref self: ContractState, owner: Person) {
self.names.entry(owner.address).write(owner.name);
self.total_names.write(1);
}
// Public functions inside an impl block
#[abi(embed_v0)]
impl NameRegistry of super::INameRegistry<ContractState> {
fn store_name(ref self: ContractState, name: felt252) {
let caller = get_caller_address();
self._store_name(caller, name);
}
fn get_name(self: @ContractState, address: ContractAddress) -> felt252 {
self.names.entry(address).read()
}
}
// Standalone public function
#[external(v0)]
fn get_contract_name(self: @ContractState) -> felt252 {
'Name Registry'
}
// Could be a group of functions about a same topic
#[generate_trait]
impl InternalFunctions of InternalFunctionsTrait {
fn _store_name(ref self: ContractState, user: ContractAddress, name: felt252) {
let total_names = self.total_names.read();
self.names.entry(user).write(name);
self.total_names.write(total_names + 1);
}
}
// Free function
fn get_total_names_storage_address(self: @ContractState) -> felt252 {
self.total_names.__base_address__
}
}
Similarly to the
constructorfunction, all public functions, either standalone functions annotated with the#[external(v0)]or functions within an impl block annotated with the#[abi(embed_v0)]attribute, must takeselfas a first argument. This is not the case for private functions.
External Functions
External functions are public functions where the self: ContractState argument is passed by reference with the ref keyword, which exposes both the read and write access to storage variables. This allows modifying the state of the contract via self directly.
use starknet::ContractAddress;
#[starknet::interface]
pub trait INameRegistry<TContractState> {
fn store_name(ref self: TContractState, name: felt252);
fn get_name(self: @TContractState, address: ContractAddress) -> felt252;
}
#[starknet::contract]
mod NameRegistry {
use starknet::{ContractAddress, get_caller_address};
use starknet::storage::{
Map, StoragePathEntry, StoragePointerReadAccess, StoragePointerWriteAccess,
};
#[storage]
struct Storage {
names: Map::<ContractAddress, felt252>,
total_names: u128,
}
#[derive(Drop, Serde, starknet::Store)]
pub struct Person {
address: ContractAddress,
name: felt252,
}
#[constructor]
fn constructor(ref self: ContractState, owner: Person) {
self.names.entry(owner.address).write(owner.name);
self.total_names.write(1);
}
// Public functions inside an impl block
#[abi(embed_v0)]
impl NameRegistry of super::INameRegistry<ContractState> {
fn store_name(ref self: ContractState, name: felt252) {
let caller = get_caller_address();
self._store_name(caller, name);
}
fn get_name(self: @ContractState, address: ContractAddress) -> felt252 {
self.names.entry(address).read()
}
}
// Standalone public function
#[external(v0)]
fn get_contract_name(self: @ContractState) -> felt252 {
'Name Registry'
}
// Could be a group of functions about a same topic
#[generate_trait]
impl InternalFunctions of InternalFunctionsTrait {
fn _store_name(ref self: ContractState, user: ContractAddress, name: felt252) {
let total_names = self.total_names.read();
self.names.entry(user).write(name);
self.total_names.write(total_names + 1);
}
}
// Free function
fn get_total_names_storage_address(self: @ContractState) -> felt252 {
self.total_names.__base_address__
}
}
View Functions
View functions are public functions where the self: ContractState argument is passed as snapshot, which only allows the read access to storage variables, and restricts writes to storage made via self by causing compilation errors. The compiler will mark their state_mutability to view, preventing any state modification through self directly.
use starknet::ContractAddress;
#[starknet::interface]
pub trait INameRegistry<TContractState> {
fn store_name(ref self: TContractState, name: felt252);
fn get_name(self: @TContractState, address: ContractAddress) -> felt252;
}
#[starknet::contract]
mod NameRegistry {
use starknet::{ContractAddress, get_caller_address};
use starknet::storage::{
Map, StoragePathEntry, StoragePointerReadAccess, StoragePointerWriteAccess,
};
#[storage]
struct Storage {
names: Map::<ContractAddress, felt252>,
total_names: u128,
}
#[derive(Drop, Serde, starknet::Store)]
pub struct Person {
address: ContractAddress,
name: felt252,
}
#[constructor]
fn constructor(ref self: ContractState, owner: Person) {
self.names.entry(owner.address).write(owner.name);
self.total_names.write(1);
}
// Public functions inside an impl block
#[abi(embed_v0)]
impl NameRegistry of super::INameRegistry<ContractState> {
fn store_name(ref self: ContractState, name: felt252) {
let caller = get_caller_address();
self._store_name(caller, name);
}
fn get_name(self: @ContractState, address: ContractAddress) -> felt252 {
self.names.entry(address).read()
}
}
// Standalone public function
#[external(v0)]
fn get_contract_name(self: @ContractState) -> felt252 {
'Name Registry'
}
// Could be a group of functions about a same topic
#[generate_trait]
impl InternalFunctions of InternalFunctionsTrait {
fn _store_name(ref self: ContractState, user: ContractAddress, name: felt252) {
let total_names = self.total_names.read();
self.names.entry(user).write(name);
self.total_names.write(total_names + 1);
}
}
// Free function
fn get_total_names_storage_address(self: @ContractState) -> felt252 {
self.total_names.__base_address__
}
}
State Mutability of Public Functions
However, as you may have noticed, passing self as a snapshot only restricts the storage write access via self at compile time. It does not prevent state modification via direct system calls, nor calling another contract that would modify the state.
The read-only property of view functions is not enforced on Starknet, and sending a transaction targeting a view function could change the state.
In conclusion, even though external and view functions are distinguished by the Cairo compiler, all public functions can be called through an invoke transaction and can potentially modify the Starknet state. Moreover, all public functions can be called with the starknet_call RPC method, which will not create a transaction and hence will not change the state.
Warning: This is different from the EVM where a
staticcallopcode is provided, which prevents storage modifications in the current context and subcontexts. Hence developers should not have the assumption that calling a view function on another contract cannot modify the state.
Standalone Public Functions
It is also possible to define public functions outside of an implementation of a trait, using the #[external(v0)] attribute. Doing this will automatically generate an entry in the contract ABI, allowing these standalone public functions to be callable by anyone from outside. These functions can also be called from within the contract just like any function in Starknet contracts. The first parameter must be self.
Here, we define a standalone get_contract_name function outside of an impl block:
use starknet::ContractAddress;
#[starknet::interface]
pub trait INameRegistry<TContractState> {
fn store_name(ref self: TContractState, name: felt252);
fn get_name(self: @TContractState, address: ContractAddress) -> felt252;
}
#[starknet::contract]
mod NameRegistry {
use starknet::{ContractAddress, get_caller_address};
use starknet::storage::{
Map, StoragePathEntry, StoragePointerReadAccess, StoragePointerWriteAccess,
};
#[storage]
struct Storage {
names: Map::<ContractAddress, felt252>,
total_names: u128,
}
#[derive(Drop, Serde, starknet::Store)]
pub struct Person {
address: ContractAddress,
name: felt252,
}
#[constructor]
fn constructor(ref self: ContractState, owner: Person) {
self.names.entry(owner.address).write(owner.name);
self.total_names.write(1);
}
// Public functions inside an impl block
#[abi(embed_v0)]
impl NameRegistry of super::INameRegistry<ContractState> {
fn store_name(ref self: ContractState, name: felt252) {
let caller = get_caller_address();
self._store_name(caller, name);
}
fn get_name(self: @ContractState, address: ContractAddress) -> felt252 {
self.names.entry(address).read()
}
}
// Standalone public function
#[external(v0)]
fn get_contract_name(self: @ContractState) -> felt252 {
'Name Registry'
}
// Could be a group of functions about a same topic
#[generate_trait]
impl InternalFunctions of InternalFunctionsTrait {
fn _store_name(ref self: ContractState, user: ContractAddress, name: felt252) {
let total_names = self.total_names.read();
self.names.entry(user).write(name);
self.total_names.write(total_names + 1);
}
}
// Free function
fn get_total_names_storage_address(self: @ContractState) -> felt252 {
self.total_names.__base_address__
}
}
3. Private Functions
Functions that are not defined with the #[external(v0)] attribute or inside a block annotated with the #[abi(embed_v0)] attribute are private functions (also called internal functions). They can only be called from within the contract.
They can be grouped in a dedicated impl block (e.g., in components, to easily import internal functions all at once in the embedding contracts) or just be added as free functions inside the contract module. Note that these 2 methods are equivalent. Just choose the one that makes your code more readable and easy to use.
use starknet::ContractAddress;
#[starknet::interface]
pub trait INameRegistry<TContractState> {
fn store_name(ref self: TContractState, name: felt252);
fn get_name(self: @TContractState, address: ContractAddress) -> felt252;
}
#[starknet::contract]
mod NameRegistry {
use starknet::{ContractAddress, get_caller_address};
use starknet::storage::{
Map, StoragePathEntry, StoragePointerReadAccess, StoragePointerWriteAccess,
};
#[storage]
struct Storage {
names: Map::<ContractAddress, felt252>,
total_names: u128,
}
#[derive(Drop, Serde, starknet::Store)]
pub struct Person {
address: ContractAddress,
name: felt252,
}
#[constructor]
fn constructor(ref self: ContractState, owner: Person) {
self.names.entry(owner.address).write(owner.name);
self.total_names.write(1);
}
// Public functions inside an impl block
#[abi(embed_v0)]
impl NameRegistry of super::INameRegistry<ContractState> {
fn store_name(ref self: ContractState, name: felt252) {
let caller = get_caller_address();
self._store_name(caller, name);
}
fn get_name(self: @ContractState, address: ContractAddress) -> felt252 {
self.names.entry(address).read()
}
}
// Standalone public function
#[external(v0)]
fn get_contract_name(self: @ContractState) -> felt252 {
'Name Registry'
}
// Could be a group of functions about a same topic
#[generate_trait]
impl InternalFunctions of InternalFunctionsTrait {
fn _store_name(ref self: ContractState, user: ContractAddress, name: felt252) {
let total_names = self.total_names.read();
self.names.entry(user).write(name);
self.total_names.write(total_names + 1);
}
}
// Free function
fn get_total_names_storage_address(self: @ContractState) -> felt252 {
self.total_names.__base_address__
}
}
Wait, what is this
#[generate_trait]attribute? Where is the trait definition for this implementation? Well, the#[generate_trait]attribute is a special attribute that tells the compiler to generate a trait definition for the implementation block. This allows you to get rid of the boilerplate code of defining a trait with generic parameters and implementing it for the implementation block. With this attribute, we can simply define the implementation block directly, without any generic parameter, and useself: ContractStatein our functions.
The #[generate_trait] attribute is mostly used to define private impl blocks. It might also be used in addition to #[abi(per_item)] to define the various entrypoints of a contract (see next section).
Note: using
#[generate_trait]in addition to the#[abi(embed_v0)]attribute for a public impl block is not recommended, as it will result in a failure to generate the corresponding ABI. Public functions should only be defined in an impl block annotated with#[generate_trait]if this block is also annotated with the#[abi(per_item)]attribute.
[abi(per_item)] Attribute
You can also define the entrypoint type of functions individually inside an impl block using the#[abi(per_item)] attribute on top of your impl. It is often used with the #[generate_trait] attribute, as it allows you to define entrypoints without an explicit interface. In this case, the functions will not be grouped under an impl in the ABI. Note that when using #[abi(per_item)] attribute, public functions need to be annotated with the #[external(v0)] attribute - otherwise, they will not be exposed and will be considered as private functions.
Here is a short example:
#[starknet::contract]
mod ContractExample {
#[storage]
struct Storage {}
#[abi(per_item)]
#[generate_trait]
impl SomeImpl of SomeTrait {
#[constructor]
// this is a constructor function
fn constructor(ref self: ContractState) {}
#[external(v0)]
// this is a public function
fn external_function(ref self: ContractState, arg1: felt252) {}
#[l1_handler]
// this is a l1_handler function
fn handle_message(ref self: ContractState, from_address: felt252, arg: felt252) {}
// this is an internal function
fn internal_function(self: @ContractState) {}
}
}
In the case of #[abi(per_item)] attribute usage without #[generate_trait], it will only be possible to include constructor, l1-handler and internal functions in the trait implementation. Indeed, #[abi(per_item)] only works with a trait that is not defined as a Starknet interface. Hence, it will be mandatory to create another trait defined as interface to implement public functions.
Contract Events
Events are a way for smart contracts to inform the outside world of any changes that occur during their execution. They play a critical role in the integration of smart contracts into real-world applications.
Technically speaking, an event is a custom data structure emitted by a smart contract during its execution and stored in the corresponding transaction receipt, allowing any external tool to parse and index it.
Defining Events
The events of a smart contract are defined in an enum annotated with the attribute #[event]. This enum must be named Event.
#[starknet::interface]
pub trait IEventExample<TContractState> {
fn add_book(ref self: TContractState, id: u32, title: felt252, author: felt252);
fn change_book_title(ref self: TContractState, id: u32, new_title: felt252);
fn change_book_author(ref self: TContractState, id: u32, new_author: felt252);
fn remove_book(ref self: TContractState, id: u32);
}
#[starknet::contract]
mod EventExample {
#[storage]
struct Storage {}
#[event]
#[derive(Drop, starknet::Event)]
pub enum Event {
BookAdded: BookAdded,
#[flat]
FieldUpdated: FieldUpdated,
BookRemoved: BookRemoved,
}
#[derive(Drop, starknet::Event)]
pub struct BookAdded {
pub id: u32,
pub title: felt252,
#[key]
pub author: felt252,
}
#[derive(Drop, starknet::Event)]
pub enum FieldUpdated {
Title: UpdatedTitleData,
Author: UpdatedAuthorData,
}
#[derive(Drop, starknet::Event)]
pub struct UpdatedTitleData {
#[key]
pub id: u32,
pub new_title: felt252,
}
#[derive(Drop, starknet::Event)]
pub struct UpdatedAuthorData {
#[key]
pub id: u32,
pub new_author: felt252,
}
#[derive(Drop, starknet::Event)]
pub struct BookRemoved {
pub id: u32,
}
#[abi(embed_v0)]
impl EventExampleImpl of super::IEventExample<ContractState> {
fn add_book(ref self: ContractState, id: u32, title: felt252, author: felt252) {
// ... logic to add a book in the contract storage ...
self.emit(BookAdded { id, title, author });
}
fn change_book_title(ref self: ContractState, id: u32, new_title: felt252) {
self.emit(FieldUpdated::Title(UpdatedTitleData { id, new_title }));
}
fn change_book_author(ref self: ContractState, id: u32, new_author: felt252) {
self.emit(FieldUpdated::Author(UpdatedAuthorData { id, new_author }));
}
fn remove_book(ref self: ContractState, id: u32) {
self.emit(BookRemoved { id });
}
}
}
Each variant, like BookAdded or FieldUpdated represents an event that can be emitted by the contract. The variant data represents the data associated to an event. It can be any struct or enum that implements the starknet::Event trait.
This can be simply achieved by adding a #[derive(starknet::Event)] attribute on top of your type definition.
Each event data field can be annotated with the attribute #[key]. Key fields are then stored separately than data fields to be used by external tools to easily filter events on these keys.
Let's look at the full event definition of this example to add, update and remove books:
#[starknet::interface]
pub trait IEventExample<TContractState> {
fn add_book(ref self: TContractState, id: u32, title: felt252, author: felt252);
fn change_book_title(ref self: TContractState, id: u32, new_title: felt252);
fn change_book_author(ref self: TContractState, id: u32, new_author: felt252);
fn remove_book(ref self: TContractState, id: u32);
}
#[starknet::contract]
mod EventExample {
#[storage]
struct Storage {}
#[event]
#[derive(Drop, starknet::Event)]
pub enum Event {
BookAdded: BookAdded,
#[flat]
FieldUpdated: FieldUpdated,
BookRemoved: BookRemoved,
}
#[derive(Drop, starknet::Event)]
pub struct BookAdded {
pub id: u32,
pub title: felt252,
#[key]
pub author: felt252,
}
#[derive(Drop, starknet::Event)]
pub enum FieldUpdated {
Title: UpdatedTitleData,
Author: UpdatedAuthorData,
}
#[derive(Drop, starknet::Event)]
pub struct UpdatedTitleData {
#[key]
pub id: u32,
pub new_title: felt252,
}
#[derive(Drop, starknet::Event)]
pub struct UpdatedAuthorData {
#[key]
pub id: u32,
pub new_author: felt252,
}
#[derive(Drop, starknet::Event)]
pub struct BookRemoved {
pub id: u32,
}
#[abi(embed_v0)]
impl EventExampleImpl of super::IEventExample<ContractState> {
fn add_book(ref self: ContractState, id: u32, title: felt252, author: felt252) {
// ... logic to add a book in the contract storage ...
self.emit(BookAdded { id, title, author });
}
fn change_book_title(ref self: ContractState, id: u32, new_title: felt252) {
self.emit(FieldUpdated::Title(UpdatedTitleData { id, new_title }));
}
fn change_book_author(ref self: ContractState, id: u32, new_author: felt252) {
self.emit(FieldUpdated::Author(UpdatedAuthorData { id, new_author }));
}
fn remove_book(ref self: ContractState, id: u32) {
self.emit(BookRemoved { id });
}
}
}
In this example:
- There are 3 events:
BookAdded,FieldUpdatedandBookRemoved, BookAddedandBookRemovedevents use a simplestructto store their data while theFieldUpdatedevent uses anenumof structs,- In the
BookAddedevent, theauthorfield is a key field and will be used outside of the smart contract to filterBookAddedevents byauthor, whileidandtitleare data fields.
The variant and its associated data structure can be named differently, although it's common practice to use the same name. The variant name is used internally as the first event key to represent the name of the event and to help filter events, while the variant data name is used in the smart contract to build the event before it is emitted.
The #[flat] attribute
Sometimes you may have a complex event structure with some nested enums like the FieldUpdated event in the previous example. In this case, you can flatten this structure using the #[flat] attribute, which means that the inner variant name is used as the event name instead of the variant name of the annotated enum.
In the previous example, because the FieldUpdated variant is annotated with #[flat], when you emit a FieldUpdated::Title event, its name will be Title instead of FieldUpdated.
If you have more than 2 nested enums, you can use the #[flat] attribute on multiple levels.
Emitting Events
Once you have defined your list of events, you want to emit them in your smart contracts. This can be simply achieved by calling self.emit() with an event data structure in parameter.
#[starknet::interface]
pub trait IEventExample<TContractState> {
fn add_book(ref self: TContractState, id: u32, title: felt252, author: felt252);
fn change_book_title(ref self: TContractState, id: u32, new_title: felt252);
fn change_book_author(ref self: TContractState, id: u32, new_author: felt252);
fn remove_book(ref self: TContractState, id: u32);
}
#[starknet::contract]
mod EventExample {
#[storage]
struct Storage {}
#[event]
#[derive(Drop, starknet::Event)]
pub enum Event {
BookAdded: BookAdded,
#[flat]
FieldUpdated: FieldUpdated,
BookRemoved: BookRemoved,
}
#[derive(Drop, starknet::Event)]
pub struct BookAdded {
pub id: u32,
pub title: felt252,
#[key]
pub author: felt252,
}
#[derive(Drop, starknet::Event)]
pub enum FieldUpdated {
Title: UpdatedTitleData,
Author: UpdatedAuthorData,
}
#[derive(Drop, starknet::Event)]
pub struct UpdatedTitleData {
#[key]
pub id: u32,
pub new_title: felt252,
}
#[derive(Drop, starknet::Event)]
pub struct UpdatedAuthorData {
#[key]
pub id: u32,
pub new_author: felt252,
}
#[derive(Drop, starknet::Event)]
pub struct BookRemoved {
pub id: u32,
}
#[abi(embed_v0)]
impl EventExampleImpl of super::IEventExample<ContractState> {
fn add_book(ref self: ContractState, id: u32, title: felt252, author: felt252) {
// ... logic to add a book in the contract storage ...
self.emit(BookAdded { id, title, author });
}
fn change_book_title(ref self: ContractState, id: u32, new_title: felt252) {
self.emit(FieldUpdated::Title(UpdatedTitleData { id, new_title }));
}
fn change_book_author(ref self: ContractState, id: u32, new_author: felt252) {
self.emit(FieldUpdated::Author(UpdatedAuthorData { id, new_author }));
}
fn remove_book(ref self: ContractState, id: u32) {
self.emit(BookRemoved { id });
}
}
}
To have a better understanding of what happens under the hood, let's see two examples of emitted events and how they are stored in the transaction receipt:
Example 1: Add a book
In this example, we send a transaction invoking the add_book function with id = 42, title = 'Misery' and author = 'S. King'.
If you read the "events" section of the transaction receipt, you will get something like:
"events": [
{
"from_address": "0x27d07155a12554d4fd785d0b6d80c03e433313df03bb57939ec8fb0652dbe79",
"keys": [
"0x2d00090ebd741d3a4883f2218bd731a3aaa913083e84fcf363af3db06f235bc",
"0x532e204b696e67"
],
"data": [
"0x2a",
"0x4d6973657279"
]
}
]
In this receipt:
from_addressis the address of your smart contract,keyscontains the key fields of the emittedBookAddedevent, serialized in an array offelt252.- The first key
0x2d00090ebd741d3a4883f2218bd731a3aaa913083e84fcf363af3db06f235bcis the selector of the event name, which is the variant name in theEventenum, soselector!("BookAdded"), - The second key
0x532e204b696e67 = 'S. King'is theauthorfield of your event as it has been defined using the#[key]attribute,
- The first key
datacontains the data fields of the emittedBookAddedevent, serialized in an array offelt252. The first item0x2a = 42is theiddata field and0x4d6973657279 = 'Misery'is thetitledata field.
Example 2: Update a book author
Now we want to change the author name of the book, so we send a transaction invoking change_book_author with id = 42 and new_author = 'Stephen King'.
This change_book_author call emits a FieldUpdated event with the event data FieldUpdated::Author(UpdatedAuthorData { id: 42, title: author: 'Stephen King' }). If you read the "events" section of the transaction receipt, you will get something like:
"events": [
{
"from_address": "0x27d07155a12554d4fd785d0b6d80c03e433313df03bb57939ec8fb0652dbe79",
"keys": [
"0x1b90a4a3fc9e1658a4afcd28ad839182217a69668000c6104560d6db882b0e1",
"0x2a"
],
"data": [
"0x5374657068656e204b696e67"
]
}
]
As the FieldUpdated variant in Event enum has been annotated with the #[flat] attribute, this is the inner variant Author that is used as event name, instead of FieldUpdated. So:
- the first key is
selector!("Author"), - the second key is the
idfield, annotated with#[key], - the data field is
0x5374657068656e204b696e67 = 'Stephen King'.
Interacting with Starknet Contracts
A smart contract cannot execute itself without an external trigger. It needs to be called by an external entity, such as a user or another smart contract. The possibility for smart contracts to interact with each other enables the creation of sophisticated applications, where the scope of each contract is restricted to a specific functionality.
This chapter sheds light on how to interact with smart contracts and make them interact with each other. Specifically, you'll learn what the Application Binary Interface (ABI) is, how to call a smart contract, and how to make contracts communicate with each other. You will also learn how to properly use classes as libraries, and when to use them.
Contract Class ABI
The Contract Class Application Binary Interface (ABI) is the high-level specification of the interface of a contract. It describes the functions that can be called, their expected parameters and return values, along with the types of these parameters and return values. It allows external sources, both from outside the blockchain and other contracts, to communicate with the contract, by encoding and decoding data according to the contract's interface.
Sources outside the blockchain typically use a JSON representation of the ABI to interact with the contract. This JSON representation is generated from the contract class, and contains an array of items that are either types, functions, or events.
Contracts, on the other hand, use the ABI of another contract directly in Cairo through the dispatcher pattern, which is a specific type that implements methods to call the functions of another contract. These methods are auto-generated, and contain the entire logic required to encode and decode the data to be sent to the contract.
When you interact with a smart contract using a block explorer like Voyager or Starkscan, the JSON ABI is used to properly encode the data you send to the contract and decode the data it returns.
Entrypoints
All the functions exposed in the ABI of a contract are called entrypoints. An entrypoint is a function that can be called from outside the contract class.
There are 3 different types of entrypoints in a Starknet contract:
- Public functions, the most common entrypoints, exposed either as
vieworexternaldepending on their state mutability.
Note: An entrypoint can be marked as
view, but might still modify the contract's state when invoked along with a transaction, if the contract uses low-level calls whose immutability is not enforced by the compiler.
-
An optional unique constructor, which is a specific entrypoint that will be called only once during the deployment of the contract.
-
L1-Handlers, functions that can only be triggered by the sequencer after receiving a message from the L1 network whose payload contains an instruction to call a contract.
A function entrypoint is represented by a selector and a function_idx in a Cairo contract class.
Function Selector
While functions are defined with a name, entrypoints are identified by their selector. The selector is a unique identifier derived from the function name, and is simply computed as sn_keccak(function_name). As overloading a function with different parameters is not possible in Cairo, the hash of the function name is sufficient to uniquely identify the function to be called.
While this process is often abstracted by libraries and when using dispatchers, know that it's possible to call a function directly by providing its selector, for example when using a low-level system call like starknet::call_contract_syscall or when interacting with an RPC.
Encoding
Smart contracts are written in a high-level language like Cairo, using strong types to inform us about the data manipulated. However, the code executed on the blockchain is compiled into a sequence of low-level CASM instructions. The base data type in Starknet is felt252, and that's the only data manipulated at the CASM level. As such, all data must be serialized into felt252 before being sent to the contract. The ABI specifies how types can be encoded into a sequence of felt252, and decoded back into their original form.
Interacting with Another Contract
In the previous section, we introduced the dispatcher pattern for contract interactions. This chapter will explore this pattern in depth and demonstrate how to use it.
The dispatcher pattern allows us to call functions on another contract by using a struct that wraps the contract address and implements the dispatcher trait generated by the compiler from the contract class ABI. This leverages Cairo's trait system to provide a clean and type-safe way to interact with other contracts.
When a contract interface is defined, the compiler automatically generates and exports multiple dispatchers. For instance, for an IERC20 interface, the compiler will generate the following dispatchers:
- Contract Dispatchers:
IERC20DispatcherandIERC20SafeDispatcher - Library Dispatchers:
IERC20LibraryDispatcherandIERC20SafeLibraryDispatcher
These dispatchers serve different purposes:
- Contract dispatchers wrap a contract address and are used to call functions on other contracts.
- Library dispatchers wrap a class hash and are used to call functions on classes. Library dispatchers will be discussed in the next chapter, "Executing code from another class".
- 'Safe' dispatchers allow the caller to handle potential errors during the execution of the call.
Under the hood, these dispatchers use the low-level contract_call_syscall, which allows us to call functions on other contracts by passing the contract address, the function selector, and the function arguments. The dispatcher abstracts away the complexity of this syscall, providing a clean and type-safe way to interact with other contracts.
To effectively break down the concepts involved, we will use the ERC20 interface as an illustration.
The Dispatcher Pattern
We mentioned that the compiler would automatically generate the dispatcher struct and the dispatcher trait for a given interface. Listing 16-1 shows an example of the generated items for an IERC20 interface that exposes a name view function and a transfer external function:
use starknet::ContractAddress;
trait IERC20DispatcherTrait<T> {
fn name(self: T) -> felt252;
fn transfer(self: T, recipient: ContractAddress, amount: u256);
}
#[derive(Copy, Drop, starknet::Store, Serde)]
struct IERC20Dispatcher {
pub contract_address: starknet::ContractAddress,
}
impl IERC20DispatcherImpl of IERC20DispatcherTrait<IERC20Dispatcher> {
fn name(self: IERC20Dispatcher) -> felt252 {
let mut __calldata__ = core::traits::Default::default();
let mut __dispatcher_return_data__ = starknet::syscalls::call_contract_syscall(
self.contract_address, selector!("name"), core::array::ArrayTrait::span(@__calldata__),
);
let mut __dispatcher_return_data__ = starknet::SyscallResultTrait::unwrap_syscall(
__dispatcher_return_data__,
);
core::option::OptionTrait::expect(
core::serde::Serde::<felt252>::deserialize(ref __dispatcher_return_data__),
'Returned data too short',
)
}
fn transfer(self: IERC20Dispatcher, recipient: ContractAddress, amount: u256) {
let mut __calldata__ = core::traits::Default::default();
core::serde::Serde::<ContractAddress>::serialize(@recipient, ref __calldata__);
core::serde::Serde::<u256>::serialize(@amount, ref __calldata__);
let mut __dispatcher_return_data__ = starknet::syscalls::call_contract_syscall(
self.contract_address,
selector!("transfer"),
core::array::ArrayTrait::span(@__calldata__),
);
let mut __dispatcher_return_data__ = starknet::SyscallResultTrait::unwrap_syscall(
__dispatcher_return_data__,
);
()
}
}
Listing 16-1: A simplified example of the IERC20Dispatcher and its associated trait and impl
As you can see, the contract dispatcher is a simple struct that wraps a contract address and implements the IERC20DispatcherTrait generated by the compiler. For each function, the implementation of the trait will contain the following elements:
- A serialization of the function arguments into a
felt252array,__calldata__. - A low-level contract call using
contract_call_syscallwith the contract address, the function selector, and the__calldata__array. - A deserialization of the returned value into the expected return type.
Calling Contracts Using the Contract Dispatcher
To illustrate the use of the contract dispatcher, let's create a simple contract that interacts with an ERC20 contract. This wrapper contract will allow us to call the name and transfer_from functions on the ERC20 contract, as shown in Listing 16-2:
use starknet::ContractAddress;
#[starknet::interface]
trait IERC20<TContractState> {
fn name(self: @TContractState) -> felt252;
fn symbol(self: @TContractState) -> felt252;
fn decimals(self: @TContractState) -> u8;
fn total_supply(self: @TContractState) -> u256;
fn balance_of(self: @TContractState, account: ContractAddress) -> u256;
fn allowance(self: @TContractState, owner: ContractAddress, spender: ContractAddress) -> u256;
fn transfer(ref self: TContractState, recipient: ContractAddress, amount: u256) -> bool;
fn transfer_from(
ref self: TContractState, sender: ContractAddress, recipient: ContractAddress, amount: u256,
) -> bool;
fn approve(ref self: TContractState, spender: ContractAddress, amount: u256) -> bool;
}
#[starknet::interface]
trait ITokenWrapper<TContractState> {
fn token_name(self: @TContractState, contract_address: ContractAddress) -> felt252;
fn transfer_token(
ref self: TContractState,
address: ContractAddress,
recipient: ContractAddress,
amount: u256,
) -> bool;
}
//**** Specify interface here ****//
#[starknet::contract]
mod TokenWrapper {
use super::{IERC20Dispatcher, IERC20DispatcherTrait};
use super::ITokenWrapper;
use starknet::{get_caller_address, ContractAddress};
#[storage]
struct Storage {}
impl TokenWrapper of ITokenWrapper<ContractState> {
fn token_name(self: @ContractState, contract_address: ContractAddress) -> felt252 {
IERC20Dispatcher { contract_address }.name()
}
fn transfer_token(
ref self: ContractState,
address: ContractAddress,
recipient: ContractAddress,
amount: u256,
) -> bool {
let erc20_dispatcher = IERC20Dispatcher { contract_address: address };
erc20_dispatcher.transfer_from(get_caller_address(), recipient, amount)
}
}
}
Listing 16-2: A sample contract which uses the dispatcher pattern to call another contract
In this contract, we import the IERC20Dispatcher struct and the IERC20DispatcherTrait trait. We then wrap the address of the ERC20 contract in an instance of the IERC20Dispatcher struct. This allows us to call the name and transfer functions on the ERC20 contract.
Calling transfer_token external function will modify the state of the contract deployed at contract_address.
Handling Errors with Safe Dispatchers
As mentioned earlier, 'Safe' dispatchers, like IERC20SafeDispatcher, allow the calling contract to gracefully handle potential errors that occur during the execution of the called function.
When a function called via a safe dispatcher panics, the execution returns to the caller contract, and the safe dispatcher returns a Result::Err containing the panic reason. This allows developers to implement custom error handling logic within their contracts.
Consider the following example using a hypothetical IFailableContract interface:
#[starknet::interface]
pub trait IFailableContract<TState> {
fn can_fail(self: @TState) -> u32;
}
#[feature("safe_dispatcher")]
fn interact_with_failable_contract() -> u32 {
let contract_address = 0x123.try_into().unwrap();
// Use the Safe Dispatcher
let faillable_dispatcher = IFailableContractSafeDispatcher { contract_address };
let response: Result<u32, Array<felt252>> = faillable_dispatcher.can_fail();
// Match the result to handle success or failure
match response {
Result::Ok(x) => x, // Return the value on success
Result::Err(_panic_reason) => {
// Handle the error, e.g., log it or return a default value
// The panic_reason is an array of felts detailing the error
0 // Return 0 in case of failure
},
}
}
Listing 16-3: Handling errors using a Safe Dispatcher
In this code, we first obtain an instance of IFailableContractSafeDispatcher for the target contract address. Calling the can_fail() function using this safe dispatcher returns a Result<u32, Array<felt252>>, which encapsulates either the successful u32 result or the failure information. We can then properly handle this result, as seen in Chapter 9: Error Handling.
It's important to note that some scenarios still lead to an immediate transaction revert, meaning the error cannot be caught by the caller using a safe dispatcher. These include:
- Failure in a Cairo Zero contract call.
- Library call with a non-existent class hash.
- Contract call to a non-existent contract address.
- Failure within the
deploysyscall (e.g., panic in the constructor, deploying to an existing address).- Using the
deploysyscall with a non-existent class hash.- Using the
replace_classsyscall with a non-existent class hash.These cases are expected to be handled in future Starknet versions.
Calling Contracts using Low-Level Calls
Another way to call other contracts is to directly use the call_contract_syscall. While less convenient than using the dispatcher pattern, this syscall provides more control over the serialization and deserialization process and allows for more customized error handling.
Listing 16-4 shows an example demonstrating how to call the transfer_from function of an ERC20 contract with a low-level call_contract_sycall syscall:
use starknet::ContractAddress;
#[starknet::interface]
trait ITokenWrapper<TContractState> {
fn transfer_token(
ref self: TContractState,
address: ContractAddress,
recipient: ContractAddress,
amount: u256,
) -> bool;
}
#[starknet::contract]
mod TokenWrapper {
use super::ITokenWrapper;
use starknet::{ContractAddress, syscalls, SyscallResultTrait, get_caller_address};
#[storage]
struct Storage {}
impl TokenWrapper of ITokenWrapper<ContractState> {
fn transfer_token(
ref self: ContractState,
address: ContractAddress,
recipient: ContractAddress,
amount: u256,
) -> bool {
let mut call_data: Array<felt252> = array![];
Serde::serialize(@get_caller_address(), ref call_data);
Serde::serialize(@recipient, ref call_data);
Serde::serialize(@amount, ref call_data);
let mut res = syscalls::call_contract_syscall(
address, selector!("transfer_from"), call_data.span(),
)
.unwrap_syscall();
Serde::<bool>::deserialize(ref res).unwrap()
}
}
}
Listing 16-4: A sample contract using call_contract_sycall syscall
To use this syscall, we passed in the contract address, the selector of the function we want to call and the call arguments.
The call arguments must be provided as an array of arguments, serialized to a Span<felt252>. To serialize the arguments, we can simply use the Serde trait, provided that the types being serialized implement this trait. The call returns an array of serialized values, which we'll need to deserialize ourselves!
Executing Code from Another Class
In previous chapters, we explored how to call external contracts to execute their logic and update their state. But what if we want to execute code from another class without updating the state of another contract? Starknet makes this possible with library calls, which allow a contract to execute the logic of another class in its own context, updating its own state.
Library calls
The key differences between contract calls and library calls lie in the execution context of the logic defined in the class. While contract calls are used to call functions from deployed contracts, library calls are used to call stateless classes in the context of the caller.
To illustrate this, let's consider two contracts A and B.
When A performs a contract call to the contract B, the execution context of the logic defined in B is that of B. As such, the value returned by get_caller_address() in B will return the address of A, get_contract_address() in B will return the address of B, and any storage updates in B will update the storage of B.
However, when A uses a library call to call the class of B, the execution context of the logic defined in B is that of A. This means that the value returned by get_caller_address() in B will be the address of the caller of A, get_contract_address() in B's class will return the address of A, and updating a storage variable in B's class will update the storage of A.
Library calls can be performed using the dispatcher pattern presented in the previous chapter, only with a class hash instead of a contract address.
Listing 16-5 describes the library dispatcher and its associated IERC20DispatcherTrait trait and impl using the same IERC20 example:
use starknet::ContractAddress;
trait IERC20DispatcherTrait<T> {
fn name(self: T) -> felt252;
fn transfer(self: T, recipient: ContractAddress, amount: u256);
}
#[derive(Copy, Drop, starknet::Store, Serde)]
struct IERC20LibraryDispatcher {
class_hash: starknet::ClassHash,
}
impl IERC20LibraryDispatcherImpl of IERC20DispatcherTrait<IERC20LibraryDispatcher> {
fn name(
self: IERC20LibraryDispatcher,
) -> felt252 { // starknet::syscalls::library_call_syscall is called in here
}
fn transfer(
self: IERC20LibraryDispatcher, recipient: ContractAddress, amount: u256,
) { // starknet::syscalls::library_call_syscall is called in here
}
}
Listing 16-5: A simplified example of the IERC20DLibraryDispatcher and its associated trait and impl
One notable difference with the contract dispatcher is that the library dispatcher uses library_call_syscall instead of call_contract_syscall. Otherwise, the process is similar.
Let's see how to use library calls to execute the logic of another class in the context of the current contract.
Using the Library Dispatcher
Listing 16-6 defines two contracts: ValueStoreLogic, which defines the logic of our example, and ValueStoreExecutor, which simply executes the logic of ValueStoreLogic's class.
We first need to import the IValueStoreDispatcherTrait and IValueStoreLibraryDispatcher which were generated from our interface by the compiler. Then, we can create an instance of IValueStoreLibraryDispatcher, passing in the class_hash of the class we want to make library calls to. From there, we can call the functions defined in that class, executing its logic in the context of our contract.
#[starknet::interface]
trait IValueStore<TContractState> {
fn set_value(ref self: TContractState, value: u128);
fn get_value(self: @TContractState) -> u128;
}
#[starknet::contract]
mod ValueStoreLogic {
use starknet::{ContractAddress};
use starknet::storage::{StoragePointerReadAccess, StoragePointerWriteAccess};
#[storage]
struct Storage {
value: u128,
}
#[abi(embed_v0)]
impl ValueStore of super::IValueStore<ContractState> {
fn set_value(ref self: ContractState, value: u128) {
self.value.write(value);
}
fn get_value(self: @ContractState) -> u128 {
self.value.read()
}
}
}
#[starknet::contract]
mod ValueStoreExecutor {
use super::{IValueStoreDispatcherTrait, IValueStoreLibraryDispatcher};
use starknet::{ContractAddress, ClassHash};
use starknet::storage::{StoragePointerReadAccess, StoragePointerWriteAccess};
#[storage]
struct Storage {
logic_library: ClassHash,
value: u128,
}
#[constructor]
fn constructor(ref self: ContractState, logic_library: ClassHash) {
self.logic_library.write(logic_library);
}
#[abi(embed_v0)]
impl ValueStoreExecutor of super::IValueStore<ContractState> {
fn set_value(ref self: ContractState, value: u128) {
IValueStoreLibraryDispatcher { class_hash: self.logic_library.read() }
.set_value((value));
}
fn get_value(self: @ContractState) -> u128 {
IValueStoreLibraryDispatcher { class_hash: self.logic_library.read() }.get_value()
}
}
#[external(v0)]
fn get_value_local(self: @ContractState) -> u128 {
self.value.read()
}
}
Listing 16-6: An example contract using a Library Dispatcher
When we call the set_value function on ValueStoreExecutor, it will make a library call to the set_value function defined in ValueStoreLogic. Because we are using a library call, ValueStoreExecutor's storage variable value will be updated. Similarly, when we call the get_value function, it will make a library call to the get_value function defined in ValueStoreLogic, returning the value of the storage variable value - still in the context of ValueStoreExecutor.
As such, both get_value and get_value_local return the same value, as they are reading the same storage slot.
Calling Classes using Low-Level Calls
Another way to call classes is to directly use library_call_syscall. While less convenient than using the dispatcher pattern, this syscall provides more control over the serialization and deserialization process and allows for more customized error handling.
Listing 16-7 shows an example demonstrating how to use a library_call_syscall to call the set_value function of ValueStore contract:
#[starknet::contract]
mod ValueStore {
use starknet::{ClassHash, syscalls, SyscallResultTrait};
use starknet::storage::{StoragePointerReadAccess, StoragePointerWriteAccess};
#[storage]
struct Storage {
logic_library: ClassHash,
value: u128,
}
#[constructor]
fn constructor(ref self: ContractState, logic_library: ClassHash) {
self.logic_library.write(logic_library);
}
#[external(v0)]
fn set_value(ref self: ContractState, value: u128) -> bool {
let mut call_data: Array<felt252> = array![];
Serde::serialize(@value, ref call_data);
let mut res = syscalls::library_call_syscall(
self.logic_library.read(), selector!("set_value"), call_data.span(),
)
.unwrap_syscall();
Serde::<bool>::deserialize(ref res).unwrap()
}
#[external(v0)]
fn get_value(self: @ContractState) -> u128 {
self.value.read()
}
}
Listing 16-7: A sample contract using library_call_syscall system call
To use this syscall, we passed in the class hash, the selector of the function we want to call and the call arguments.
The call arguments must be provided as an array of arguments, serialized to a Span<felt252>. To serialize the arguments, we can simply use the Serde trait, provided that the types being serialized implement this trait. The call returns an array of serialized values, which we'll need to deserialize ourselves!
Summary
Congratulations for finishing this chapter! You have learned a lot of new concepts:
- How Contracts differ from Classes and how the ABI describes them for external sources
- How to call functions from other contracts and classes using the Dispatcher pattern
- How to use Library calls to execute the logic of another class in the context of the caller
- The two syscalls that Starknet provides to interact with contracts and classes
You now have all the required tools to develop complex applications with logic spread across multiple contracts and classes. In the next chapter, we will explore more advanced topics that will help you unleash the full potential of Starknet.
Building Advanced Starknet Smart Contracts
Optimizing Storage Costs
Bit-packing is a simple concept: use as few bits as possible to store a piece of data. When done well, it can significantly reduce the size of the data you need to store. This is especially important in smart contracts, where storage is expensive.
When writing Cairo smart contracts, it is important to optimize storage usage to reduce gas costs. Indeed, most of the cost associated with a transaction is related to storage updates; and each storage slot costs gas to write to. This means that by packing multiple values into fewer slots, you can decrease the gas cost incurred by the users of your smart contract.
Integer Structure and Bitwise Operators
An integer is coded on a certain number of bits, depending on its size (For example, a u8 integer is coded on 8 bits).
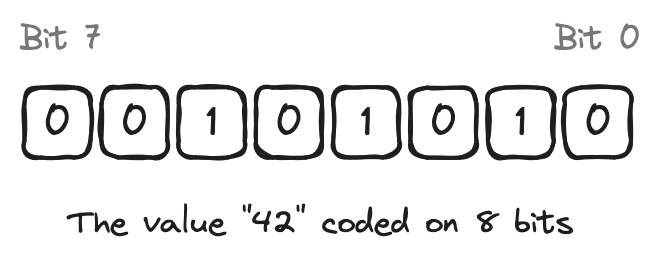
Intuitively, several integers can be combined into a single integer if the size of this single integer is greater than or equal to the sum of the sizes of the integers (For example, two u8 and one u16 in one u32).
But, to do that, we need some bitwise operators:
- multiplying or dividing an integer by a power of 2 shifts the integer value to the left or to the right respectively
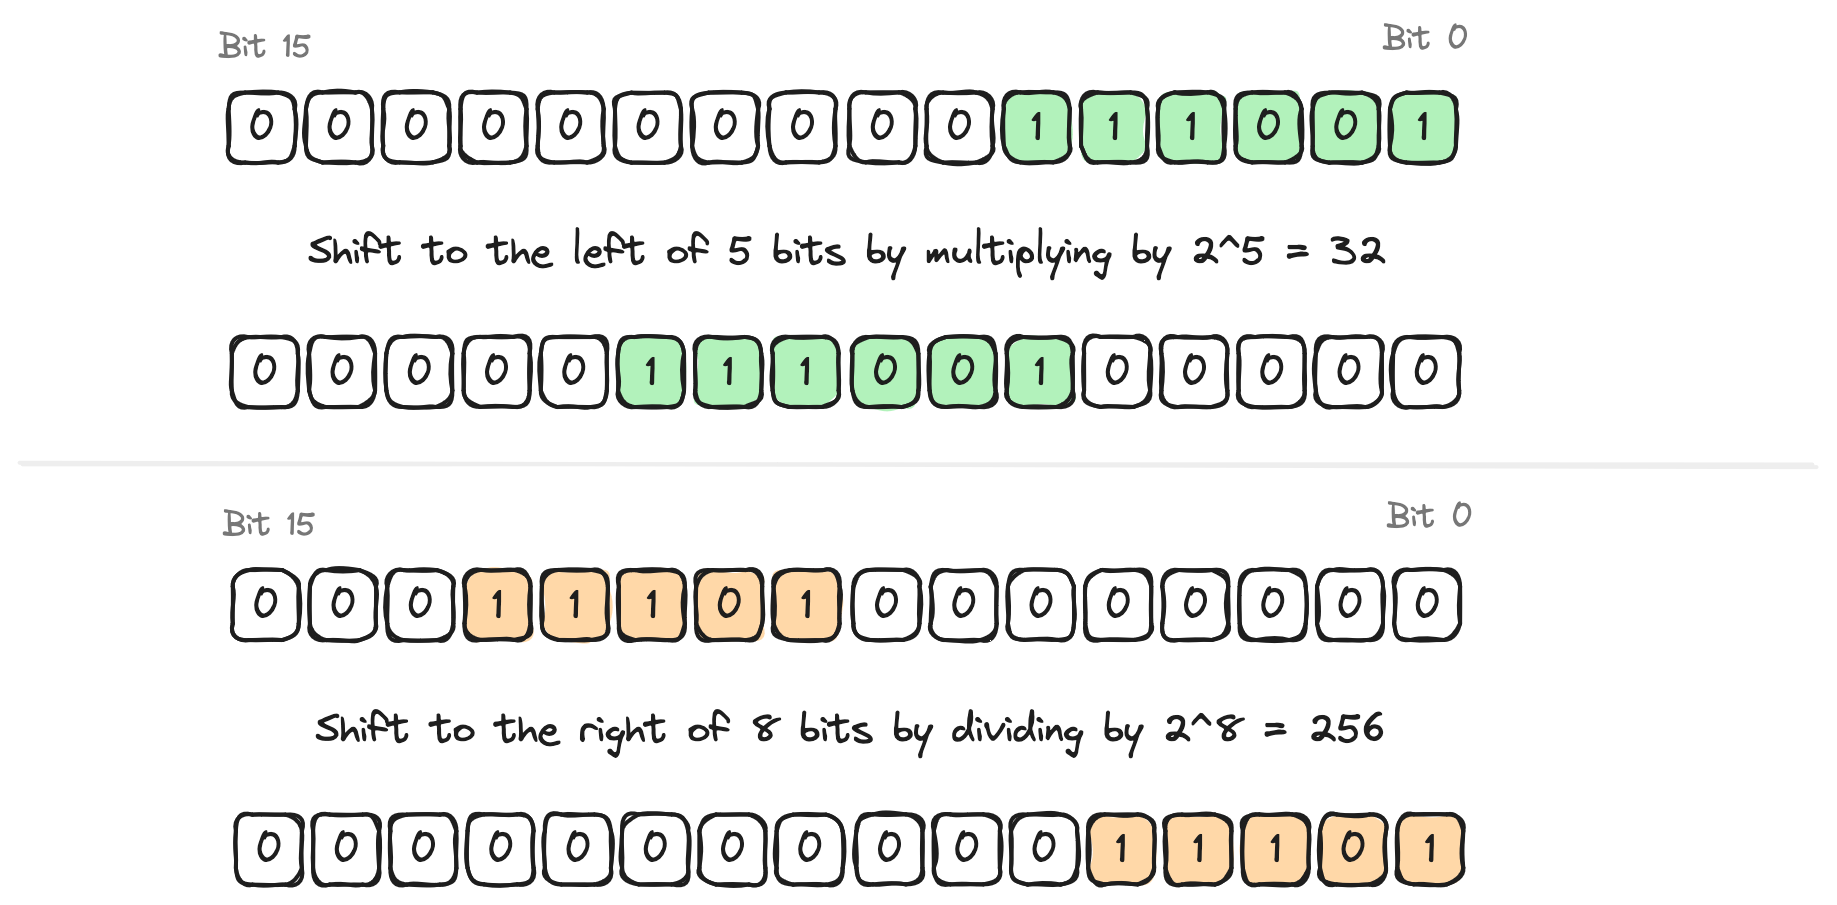
- applying a mask (
ANDoperator) on an integer value isolates some bits of this integer
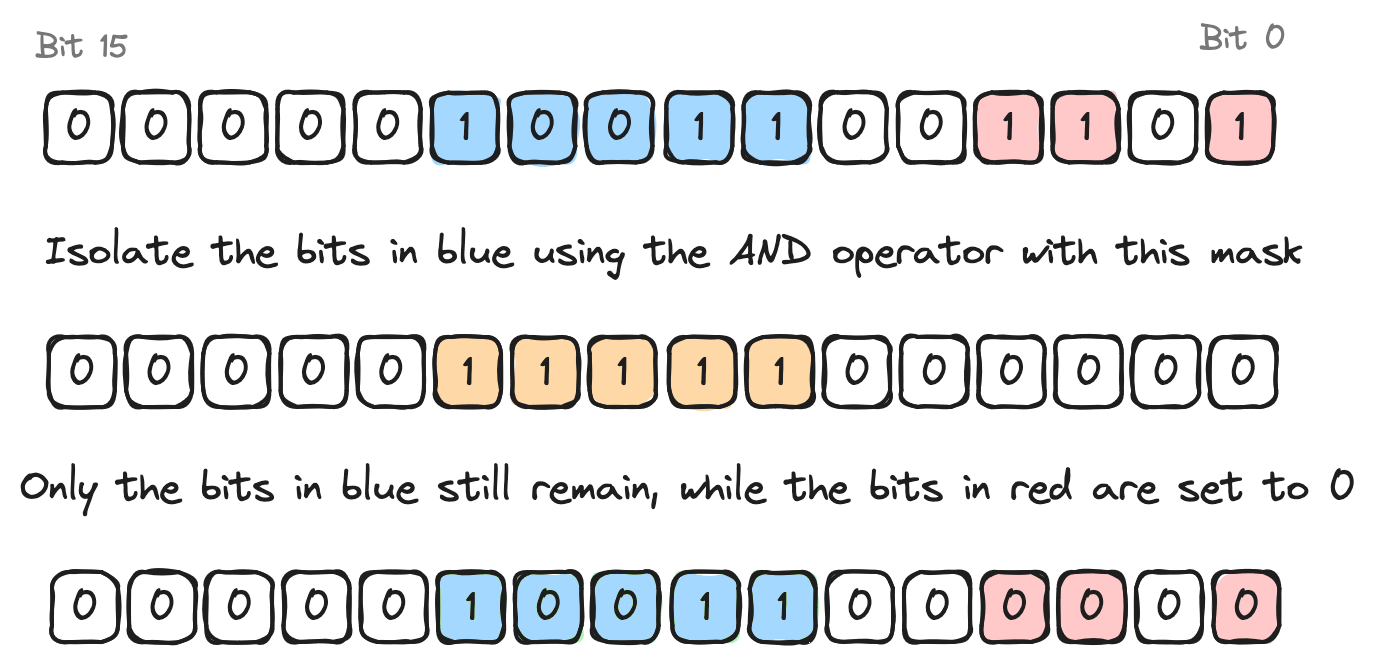
- adding (
ORoperator) two integers will combine both values into a single one.
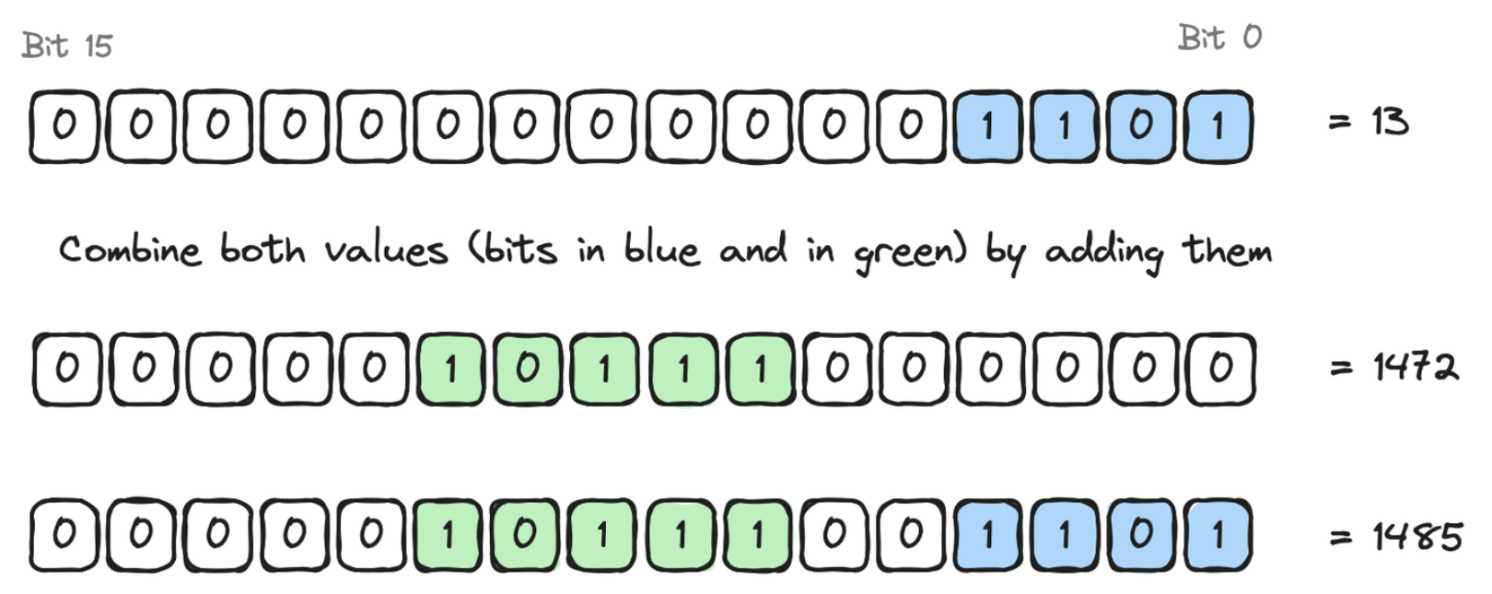
With these bitwise operators, let's see how to combine two u8 integers into a single u16 integer (called packing) and reversely (called unpacking) in the following example:
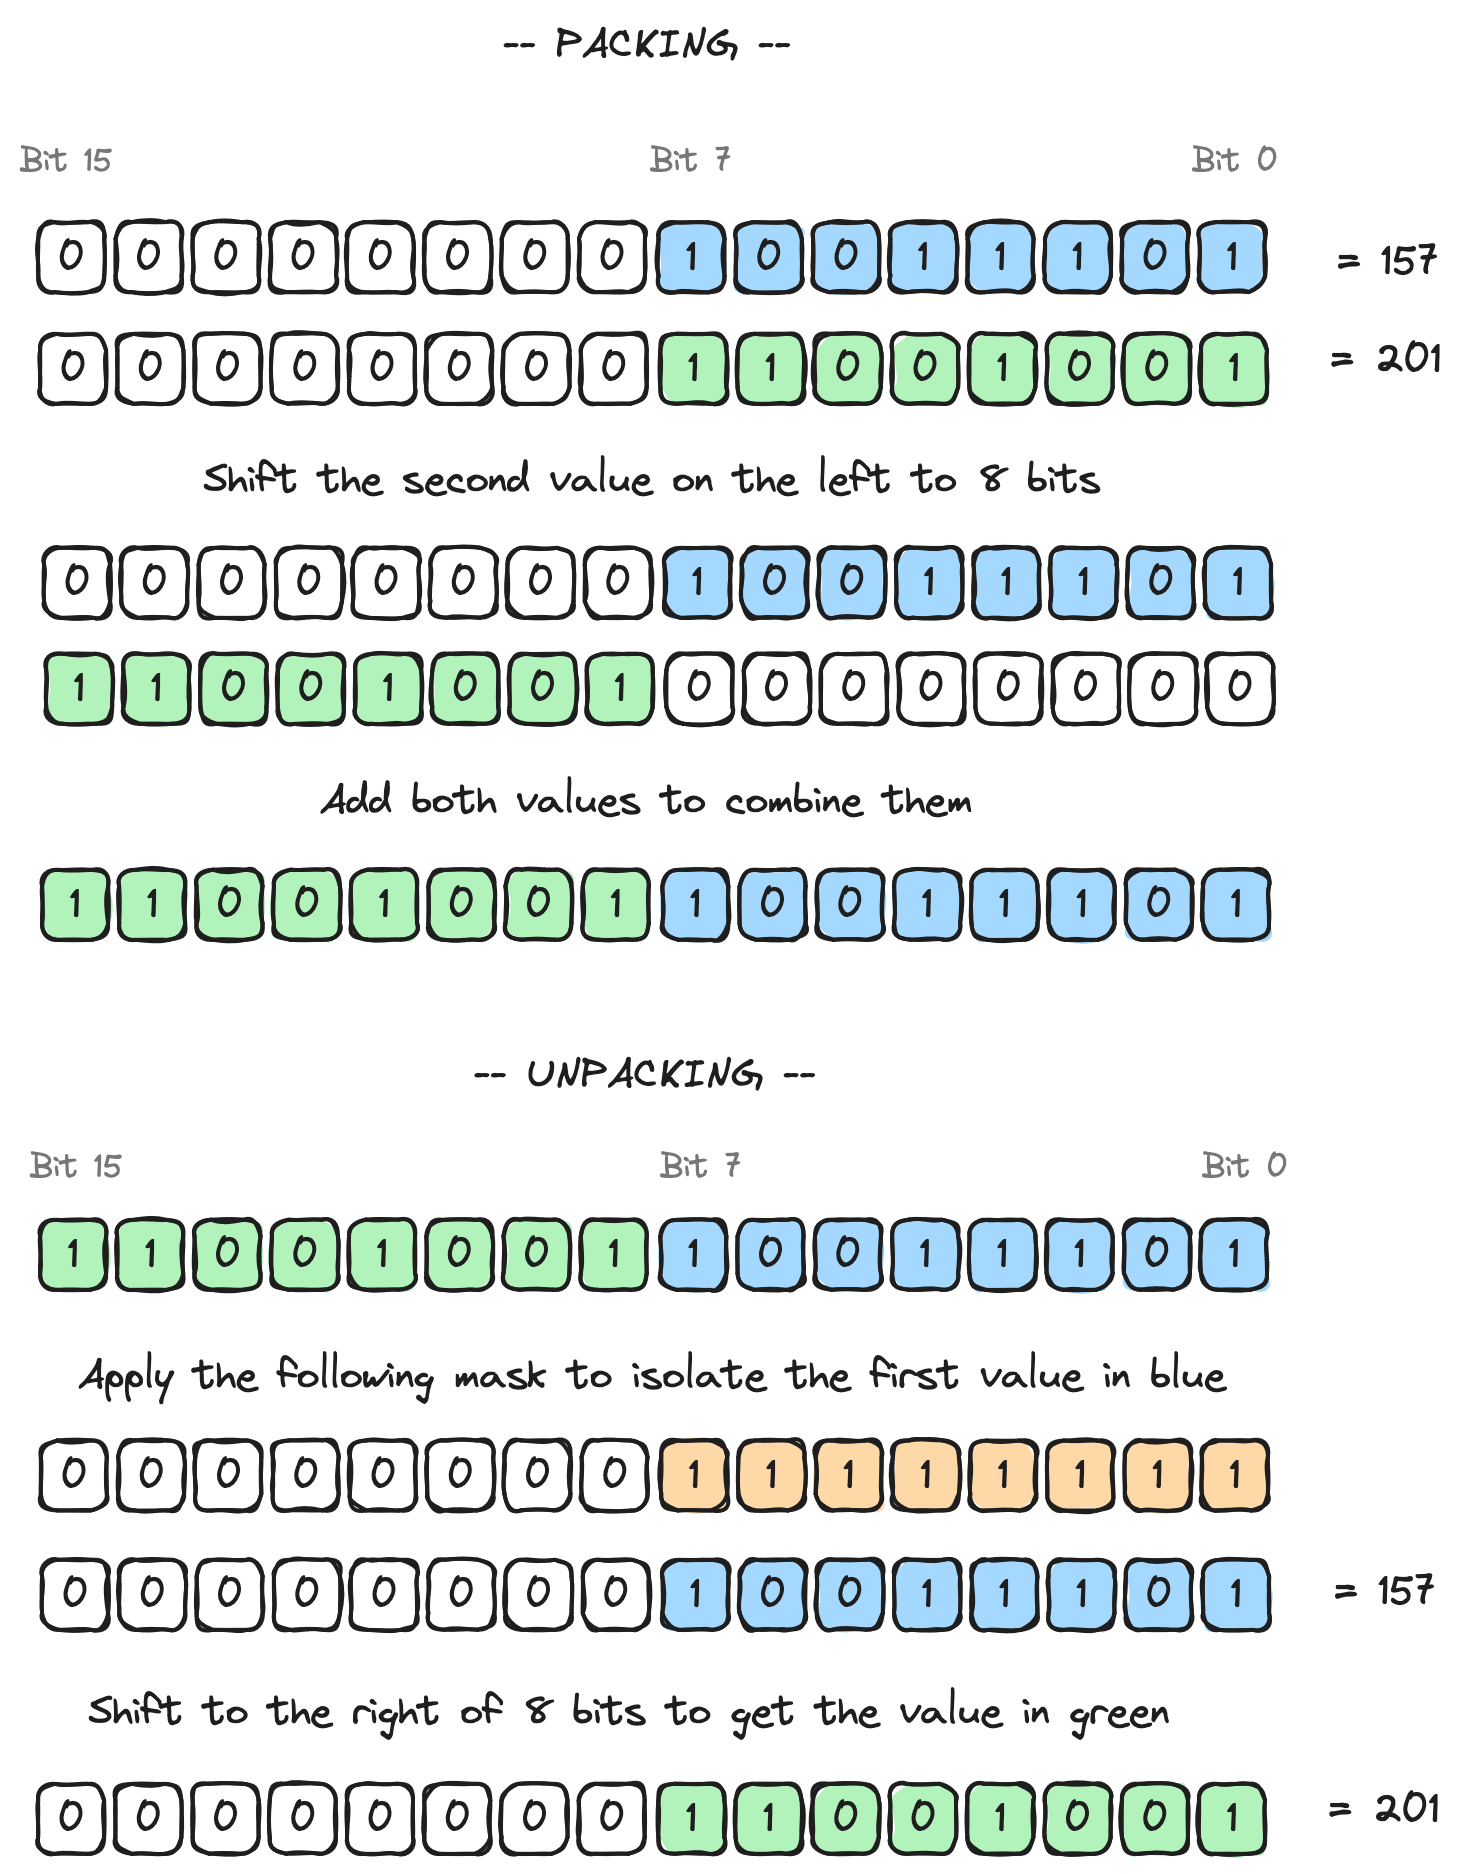
Bit-packing in Cairo
The storage of a Starknet smart contract is a map with 2251 slots, where each slot is a felt252 which is initialized to 0.
As we saw earlier, to reduce gas costs due to storage updates, we have to use as few bits as possible, so we have to organize stored variables by packing them.
For example, consider the following Sizes struct with 3 fields of different types: one u8, one u32 and one u64. The total size is 8 + 32 + 64 = 104 bits. This is less than a slot size (i.e 251 bits) so we can pack them together to be stored into a single slot.
Note that, as it also fits in a u128, it's a good practice to use the smallest type to pack all your variables, so here a u128 should be used.
struct Sizes {
tiny: u8,
small: u32,
medium: u64,
}
To pack these 3 variables into a u128 we have to successively shift them to the left, and finally sum them.
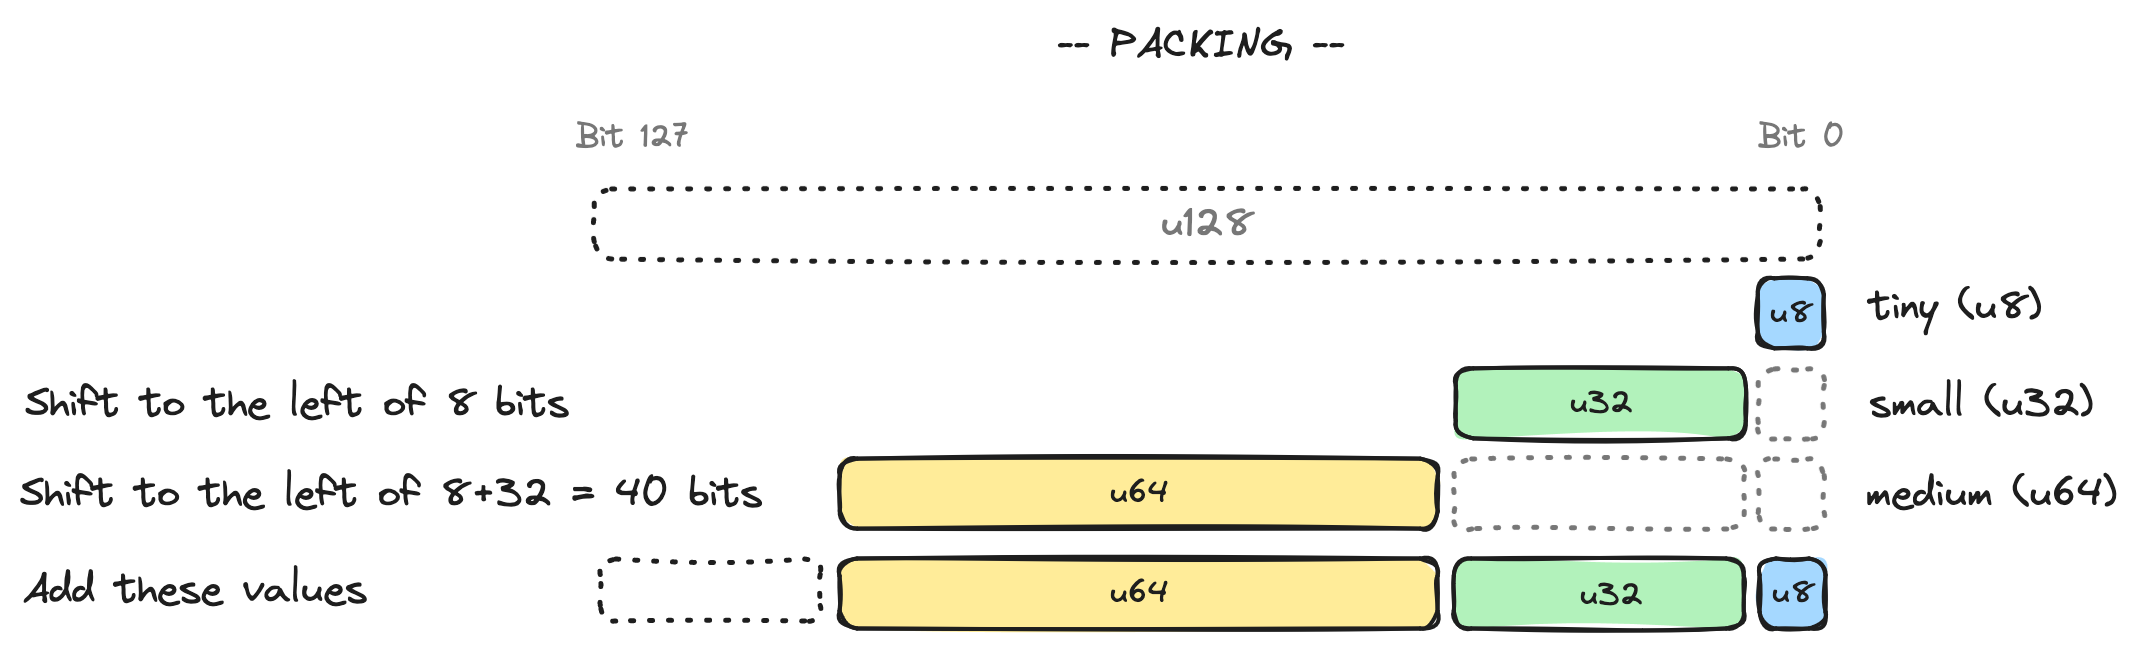
To unpack these 3 variables from a u128 we have to successively shift them to the right and use a mask to isolate them.
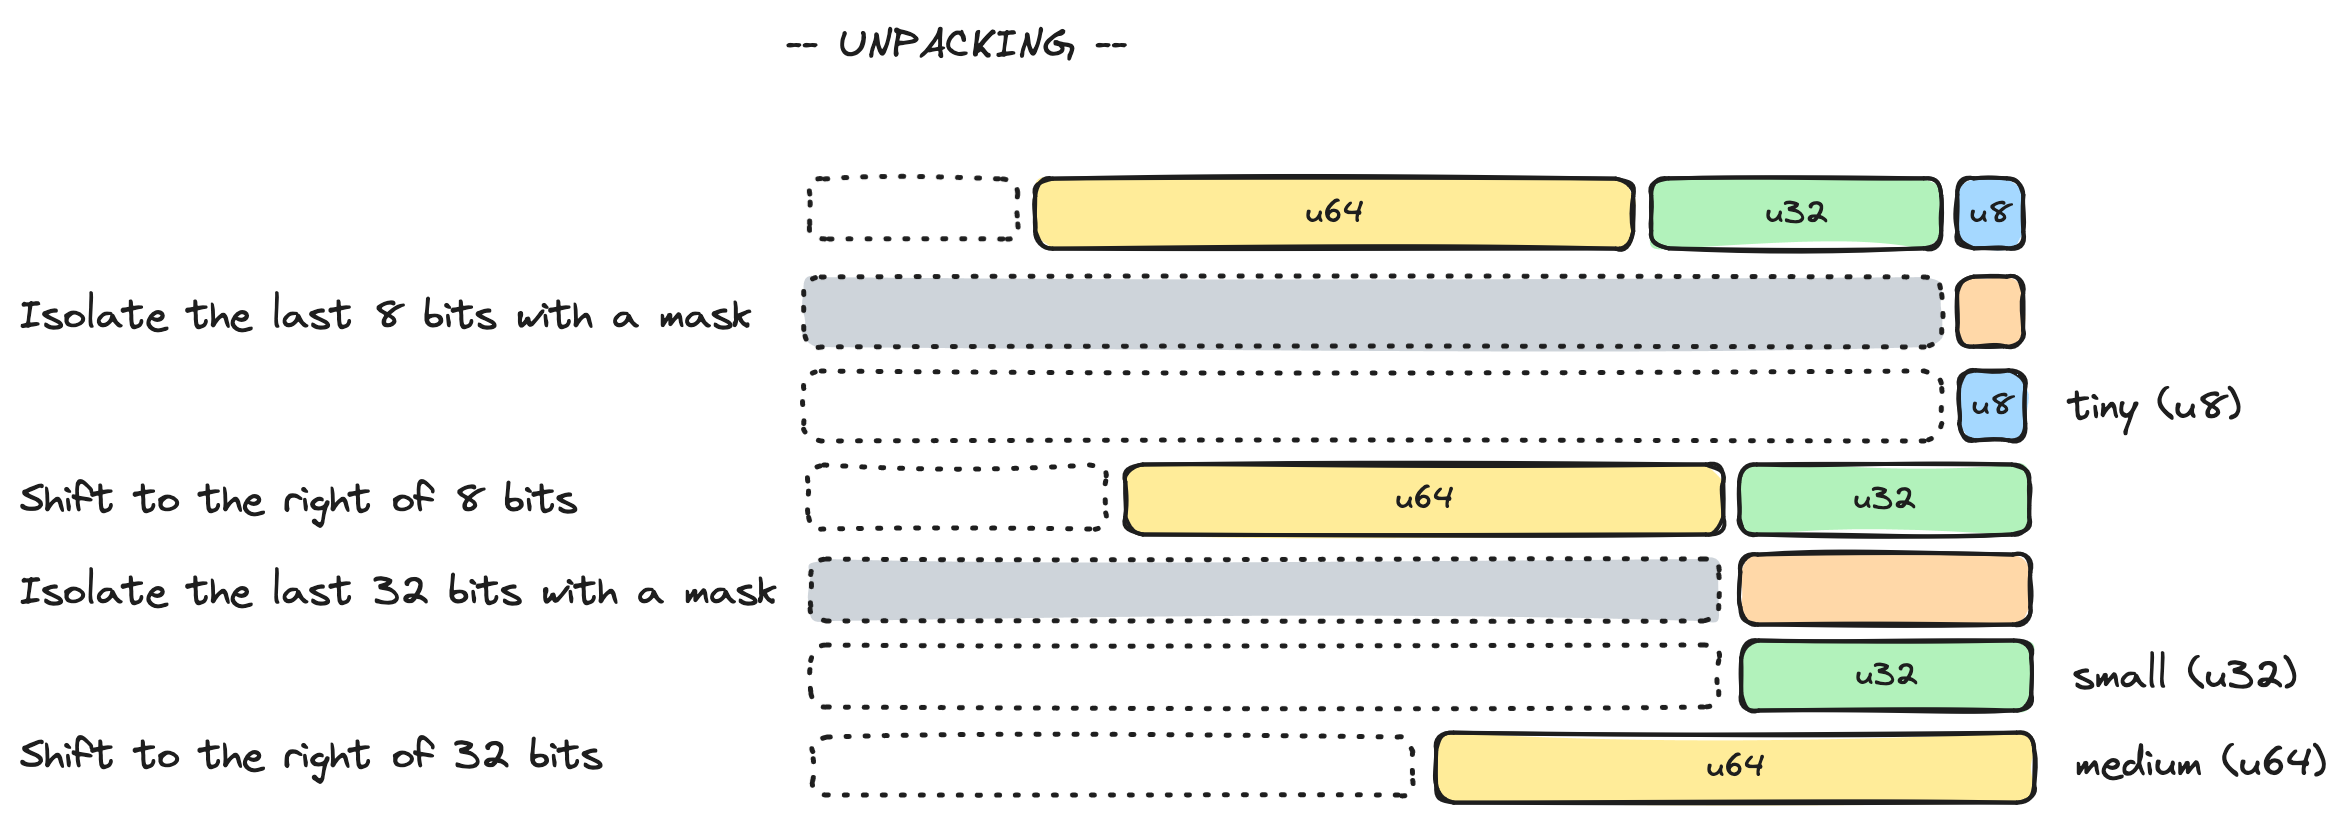
The StorePacking Trait
Cairo provides the StorePacking trait to enable packing struct fields into fewer storage slots. StorePacking<T, PackedT> is a generic trait taking the type you want to pack (T) and the destination type (PackedT) as parameters. It provides two functions to implement: pack and unpack.
Here is the implementation of the example of the previous chapter:
use starknet::storage_access::StorePacking;
#[derive(Drop, Serde)]
struct Sizes {
tiny: u8,
small: u32,
medium: u64,
}
const TWO_POW_8: u128 = 0x100;
const TWO_POW_40: u128 = 0x10000000000;
const MASK_8: u128 = 0xff;
const MASK_32: u128 = 0xffffffff;
impl SizesStorePacking of StorePacking<Sizes, u128> {
fn pack(value: Sizes) -> u128 {
value.tiny.into() + (value.small.into() * TWO_POW_8) + (value.medium.into() * TWO_POW_40)
}
fn unpack(value: u128) -> Sizes {
let tiny = value & MASK_8;
let small = (value / TWO_POW_8) & MASK_32;
let medium = (value / TWO_POW_40);
Sizes {
tiny: tiny.try_into().unwrap(),
small: small.try_into().unwrap(),
medium: medium.try_into().unwrap(),
}
}
}
#[starknet::contract]
mod SizeFactory {
use super::Sizes;
use super::SizesStorePacking; //don't forget to import it!
use starknet::storage::{StoragePointerReadAccess, StoragePointerWriteAccess};
#[storage]
struct Storage {
remaining_sizes: Sizes,
}
#[abi(embed_v0)]
fn update_sizes(ref self: ContractState, sizes: Sizes) {
// This will automatically pack the
// struct into a single u128
self.remaining_sizes.write(sizes);
}
#[abi(embed_v0)]
fn get_sizes(ref self: ContractState) -> Sizes {
// this will automatically unpack the
// packed-representation into the Sizes struct
self.remaining_sizes.read()
}
}
In this code snippet, you see that:
TWO_POW_8andTWO_POW_40are used to shift left in thepackfunction and shift right in theunpackfunction,MASK_8andMASK_32are used to isolate a variable in theunpackfunction,- all the variables from the storage are converted to
u128to be able to use bitwise operators.
This technique can be used for any group of fields that fit within the bit size of the packed storage type. For example, if you have a struct with multiple fields whose bit sizes add up to 256 bits, you can pack them into a single u256 variable. If the bit sizes add up to 512 bits, you can pack them into a single u512 variable, and so on. You can define your own structs and logic to pack and unpack them.
The rest of the work is done magically by the compiler - if a type implements the StorePacking trait, then the compiler will know it can use the StoreUsingPacking implementation of the Store trait in order to pack before writing and unpack after reading from storage.
One important detail, however, is that the type that StorePacking::pack spits out also has to implement Store for StoreUsingPacking to work. Most of the time, we will want to pack into a felt252 or u256 - but if you want to pack into a type of your own, make sure that this one implements the Store trait.
Components: Lego-Like Building Blocks for Smart Contracts
Developing contracts sharing a common logic and storage can be painful and bug-prone, as this logic can hardly be reused and needs to be reimplemented in each contract. But what if there was a way to snap in just the extra functionality you need inside your contract, separating the core logic of your contract from the rest?
Components provide exactly that. They are modular add-ons encapsulating reusable logic, storage, and events that can be incorporated into multiple contracts. They can be used to extend a contract's functionality, without having to reimplement the same logic over and over again.
Think of components as Lego blocks. They allow you to enrich your contracts by plugging in a module that you or someone else wrote. This module can be a simple one, like an ownership component, or more complex like a full-fledged ERC20 token.
A component is a separate module that can contain storage, events, and functions. Unlike a contract, a component cannot be declared or deployed. Its logic will eventually be part of the contract’s bytecode it has been embedded in.
What's in a Component?
A component is very similar to a contract. It can contain:
- Storage variables
- Events
- External and internal functions
Unlike a contract, a component cannot be deployed on its own. The component's code becomes part of the contract it's embedded to.
Creating Components
To create a component, first define it in its own module decorated with a
#[starknet::component] attribute. Within this module, you can declare a Storage struct and Event enum, as usually done in contracts.
The next step is to define the component interface, containing the signatures of
the functions that will allow external access to the component's logic. You can
define the interface of the component by declaring a trait with the
#[starknet::interface] attribute, just as you would with contracts. This
interface will be used to enable external access to the component's functions
using the dispatcher pattern.
The actual implementation of the component's external logic is done in an impl
block marked as #[embeddable_as(name)]. Usually, this impl block will be an
implementation of the trait defining the interface of the component.
Note:
nameis the name that we’ll be using in the contract to refer to the component. It is different than the name of your impl.
You can also define internal functions that will not be accessible externally,
by simply omitting the #[embeddable_as(name)] attribute above the internal
impl block. You will be able to use these internal functions inside the
contract you embed the component in, but not interact with it from outside, as
they're not a part of the abi of the contract.
Functions within these impl block expect arguments like ref self: ComponentState<TContractState> (for state-modifying functions) or self: @ComponentState<TContractState> (for view functions). This makes the impl
generic over TContractState, allowing us to use this component in any
contract.
Example: an Ownable Component
⚠️ The example shown below has not been audited and is not intended for production use. The authors are not responsible for any damages caused by the use of this code.
The interface of the Ownable component, defining the methods available externally to manage ownership of a contract, would look like this:
#[starknet::interface]
trait IOwnable<TContractState> {
fn owner(self: @TContractState) -> ContractAddress;
fn transfer_ownership(ref self: TContractState, new_owner: ContractAddress);
fn renounce_ownership(ref self: TContractState);
}
The component itself is defined as:
#[starknet::component]
pub mod ownable_component {
use starknet::{ContractAddress, get_caller_address};
use starknet::storage::{StoragePointerReadAccess, StoragePointerWriteAccess};
use super::Errors;
use core::num::traits::Zero;
#[storage]
pub struct Storage {
owner: ContractAddress,
}
#[event]
#[derive(Drop, starknet::Event)]
pub enum Event {
OwnershipTransferred: OwnershipTransferred,
}
#[derive(Drop, starknet::Event)]
struct OwnershipTransferred {
previous_owner: ContractAddress,
new_owner: ContractAddress,
}
#[embeddable_as(Ownable)]
impl OwnableImpl<
TContractState, +HasComponent<TContractState>,
> of super::IOwnable<ComponentState<TContractState>> {
fn owner(self: @ComponentState<TContractState>) -> ContractAddress {
self.owner.read()
}
fn transfer_ownership(
ref self: ComponentState<TContractState>, new_owner: ContractAddress,
) {
assert(!new_owner.is_zero(), Errors::ZERO_ADDRESS_OWNER);
self.assert_only_owner();
self._transfer_ownership(new_owner);
}
fn renounce_ownership(ref self: ComponentState<TContractState>) {
self.assert_only_owner();
self._transfer_ownership(Zero::zero());
}
}
#[generate_trait]
pub impl InternalImpl<
TContractState, +HasComponent<TContractState>,
> of InternalTrait<TContractState> {
fn initializer(ref self: ComponentState<TContractState>, owner: ContractAddress) {
self._transfer_ownership(owner);
}
fn assert_only_owner(self: @ComponentState<TContractState>) {
let owner: ContractAddress = self.owner.read();
let caller: ContractAddress = get_caller_address();
assert(!caller.is_zero(), Errors::ZERO_ADDRESS_CALLER);
assert(caller == owner, Errors::NOT_OWNER);
}
fn _transfer_ownership(
ref self: ComponentState<TContractState>, new_owner: ContractAddress,
) {
let previous_owner: ContractAddress = self.owner.read();
self.owner.write(new_owner);
self
.emit(
OwnershipTransferred { previous_owner: previous_owner, new_owner: new_owner },
);
}
}
}
This syntax is actually quite similar to the syntax used for contracts. The only
differences relate to the #[embeddable_as] attribute above the impl and the
genericity of the impl block that we will dissect in details.
As you can see, our component has two impl blocks: one corresponding to the
implementation of the interface trait, and one containing methods that should
not be exposed externally and are only meant for internal use. Exposing the
assert_only_owner as part of the interface wouldn't make sense, as it's only
meant to be used internally by a contract embedding the component.
A Closer Look at the impl Block
#[embeddable_as(Ownable)]
impl OwnableImpl<
TContractState, +HasComponent<TContractState>,
> of super::IOwnable<ComponentState<TContractState>> {
The #[embeddable_as] attribute is used to mark the impl as embeddable inside a
contract. It allows us to specify the name of the impl that will be used in the
contract to refer to this component. In this case, the component will be
referred to as Ownable in contracts embedding it.
The implementation itself is generic over ComponentState<TContractState>, with
the added restriction that TContractState must implement the HasComponent<T>
trait. This allows us to use the component in any contract, as long as the
contract implements the HasComponent trait. Understanding this mechanism in
details is not required to use components, but if you're curious about the inner
workings, you can read more in the "Components Under the Hood" section.
One of the major differences from a regular smart contract is that access to
storage and events is done via the generic ComponentState<TContractState> type
and not ContractState. Note that while the type is different, accessing
storage or emitting events is done similarly via self.storage_var_name.read()
or self.emit(...).
Note: To avoid the confusion between the embeddable name and the impl name, we recommend keeping the suffix
Implin the impl name.
Migrating a Contract to a Component
Since both contracts and components share a lot of similarities, it's actually very easy to migrate from a contract to a component. The only changes required are:
- Adding the
#[starknet::component]attribute to the module. - Adding the
#[embeddable_as(name)]attribute to theimplblock that will be embedded in another contract. - Adding generic parameters to the
implblock:- Adding
TContractStateas a generic parameter. - Adding
+HasComponent<TContractState>as an impl restriction.
- Adding
- Changing the type of the
selfargument in the functions inside theimplblock toComponentState<TContractState>instead ofContractState.
For traits that do not have an explicit definition and are generated using
#[generate_trait], the logic is the same - but the trait is generic over
TContractState instead of ComponentState<TContractState>, as demonstrated in
the example with the InternalTrait.
Using Components Inside a Contract
The major strength of components is how it allows reusing already built primitives inside your contracts with a restricted amount of boilerplate. To integrate a component into your contract, you need to:
-
Declare it with the
component!()macro, specifying- The path to the component
path::to::component. - The name of the variable in your contract's storage referring to this
component's storage (e.g.
ownable). - The name of the variant in your contract's event enum referring to this
component's events (e.g.
OwnableEvent).
- The path to the component
-
Add the path to the component's storage and events to the contract's
StorageandEvent. They must match the names provided in step 1 (e.g.ownable: ownable_component::StorageandOwnableEvent: ownable_component::Event).The storage variable MUST be annotated with the
#[substorage(v0)]attribute. -
Embed the component's logic defined inside your contract, by instantiating the component's generic impl with a concrete
ContractStateusing an impl alias. This alias must be annotated with#[abi(embed_v0)]to externally expose the component's functions.As you can see, the InternalImpl is not marked with
#[abi(embed_v0)]. Indeed, we don't want to expose externally the functions defined in this impl. However, we might still want to access them internally.
For example, to embed the Ownable component defined above, we would do the
following:
#[starknet::contract]
mod OwnableCounter {
use listing_01_ownable::component::ownable_component;
use starknet::storage::{StoragePointerReadAccess, StoragePointerWriteAccess};
component!(path: ownable_component, storage: ownable, event: OwnableEvent);
#[abi(embed_v0)]
impl OwnableImpl = ownable_component::Ownable<ContractState>;
impl OwnableInternalImpl = ownable_component::InternalImpl<ContractState>;
#[storage]
struct Storage {
counter: u128,
#[substorage(v0)]
ownable: ownable_component::Storage,
}
#[event]
#[derive(Drop, starknet::Event)]
enum Event {
OwnableEvent: ownable_component::Event,
}
#[abi(embed_v0)]
fn foo(ref self: ContractState) {
self.ownable.assert_only_owner();
self.counter.write(self.counter.read() + 1);
}
}
The component's logic is now seamlessly part of the contract! We can interact
with the components functions externally by calling them using the
IOwnableDispatcher instantiated with the contract's address.
#[starknet::interface]
trait IOwnable<TContractState> {
fn owner(self: @TContractState) -> ContractAddress;
fn transfer_ownership(ref self: TContractState, new_owner: ContractAddress);
fn renounce_ownership(ref self: TContractState);
}
Stacking Components for Maximum Composability
The composability of components really shines when combining multiple of them together. Each adds its features onto the contract. You can rely on Openzeppelin's implementation of components to quickly plug-in all the common functionalities you need a contract to have.
Developers can focus on their core contract logic while relying on battle-tested and audited components for everything else.
Components can even depend on other components by restricting the
TContractstate they're generic on to implement the trait of another component.
Before we dive into this mechanism, let's first look at how components work under the hood.
Components: Under the Hood
Components provide powerful modularity to Starknet contracts. But how does this magic actually happen behind the scenes?
This chapter will dive deep into the compiler internals to explain the mechanisms that enable component composability.
A Primer on Embeddable Impls
Before digging into components, we need to understand embeddable impls.
An impl of a Starknet interface trait (marked with #[starknet::interface]) can
be made embeddable. Embeddable impls can be injected into any contract, adding
new entry points and modifying the ABI of the contract.
Let's look at an example to see this in action:
#[starknet::interface]
trait SimpleTrait<TContractState> {
fn ret_4(self: @TContractState) -> u8;
}
#[starknet::embeddable]
impl SimpleImpl<TContractState> of SimpleTrait<TContractState> {
fn ret_4(self: @TContractState) -> u8 {
4
}
}
#[starknet::contract]
mod simple_contract {
#[storage]
struct Storage {}
#[abi(embed_v0)]
impl MySimpleImpl = super::SimpleImpl<ContractState>;
}
By embedding SimpleImpl, we externally expose ret4 in the contract's ABI.
Now that we’re more familiar with the embedding mechanism, we can now see how components build on this.
Inside Components: Generic Impls
Recall the impl block syntax used in components:
#[embeddable_as(Ownable)]
impl OwnableImpl<
TContractState, +HasComponent<TContractState>,
> of super::IOwnable<ComponentState<TContractState>> {
The key points:
-
OwnableImplrequires the implementation of theHasComponent<TContractState>trait by the underlying contract, which is automatically generated with thecomponent!()macro when using a component inside a contract.The compiler will generate an impl that wraps any function in
OwnableImpl, replacing theself: ComponentState<TContractState>argument withself: TContractState, where access to the component state is made via theget_componentfunction in theHasComponent<TContractState>trait.For each component, the compiler generates a
HasComponenttrait. This trait defines the interface to bridge between the actualTContractStateof a generic contract, andComponentState<TContractState>.// generated per component trait HasComponent<TContractState> { fn get_component(self: @TContractState) -> @ComponentState<TContractState>; fn get_component_mut(ref self: TContractState) -> ComponentState<TContractState>; fn get_contract(self: @ComponentState<TContractState>) -> @TContractState; fn get_contract_mut(ref self: ComponentState<TContractState>) -> TContractState; fn emit<S, impl IntoImp: traits::Into<S, Event>>(ref self: ComponentState<TContractState>, event: S); }In our context
ComponentState<TContractState>is a type specific to the ownable component, i.e. it has members based on the storage variables defined inownable_component::Storage. Moving from the genericTContractStatetoComponentState<TContractState>will allow us to embedOwnablein any contract that wants to use it. The opposite direction (ComponentState<TContractState>toContractState) is useful for dependencies (see theUpgradeablecomponent depending on anIOwnableimplementation example in the Components dependencies section).To put it briefly, one should think of an implementation of the above
HasComponent<T>as saying: “Contract whose state T has the upgradeable component”. -
Ownableis annotated with theembeddable_as(<name>)attribute:embeddable_asis similar toembeddable; it only applies to impls ofstarknet::interfacetraits and allows embedding this impl in a contract module. That said,embeddable_as(<name>)has another role in the context of components. Eventually, when embeddingOwnableImplin some contract, we expect to get an impl with the following functions:fn owner(self: @TContractState) -> ContractAddress; fn transfer_ownership(ref self: TContractState, new_owner: ContractAddress); fn renounce_ownership(ref self: TContractState);Note that while starting with a function receiving the generic type
ComponentState<TContractState>, we want to end up with a function receivingContractState. This is whereembeddable_as(<name>)comes in. To see the full picture, we need to see what is the impl generated by the compiler due to theembeddable_as(Ownable)annotation:
#[starknet::embeddable]
impl Ownable<
TContractState, +HasComponent<TContractState>, impl TContractStateDrop: Drop<TContractState>,
> of super::IOwnable<TContractState> {
fn owner(self: @TContractState) -> ContractAddress {
let component = HasComponent::get_component(self);
OwnableImpl::owner(component)
}
fn transfer_ownership(ref self: TContractState, new_owner: ContractAddress) {
let mut component = HasComponent::get_component_mut(ref self);
OwnableImpl::transfer_ownership(ref component, new_owner)
}
fn renounce_ownership(ref self: TContractState) {
let mut component = HasComponent::get_component_mut(ref self);
OwnableImpl::renounce_ownership(ref component)
}
}
Note that thanks to having an impl of HasComponent<TContractState>, the
compiler was able to wrap our functions in a new impl that doesn’t directly
know about the ComponentState type. Ownable, whose name we chose when
writing embeddable_as(Ownable), is the impl that we will embed in a contract
that wants ownership.
Contract Integration
We've seen how generic impls enable component reusability. Next let's see how a contract integrates a component.
The contract uses an impl alias to instantiate the component's generic impl
with the concrete ContractState of the contract.
#[abi(embed_v0)]
impl OwnableImpl = ownable_component::Ownable<ContractState>;
impl OwnableInternalImpl = ownable_component::InternalImpl<ContractState>;
The above lines use the Cairo impl embedding mechanism alongside the impl alias
syntax. We’re instantiating the generic OwnableImpl<TContractState> with the
concrete type ContractState. Recall that OwnableImpl<TContractState> has the
HasComponent<TContractState> generic impl parameter. An implementation of this
trait is generated by the component! macro.
Note that only the using contract could have implemented this trait since only it knows about both the contract state and the component state.
This glues everything together to inject the component logic into the contract.
Key Takeaways
- Embeddable impls allow injecting components logic into contracts by adding entry points and modifying the contract ABI.
- The compiler automatically generates a
HasComponenttrait implementation when a component is used in a contract. This creates a bridge between the contract's state and the component's state, enabling interaction between the two. - Components encapsulate reusable logic in a generic, contract-agnostic way.
Contracts integrate components through impl aliases and access them via the
generated
HasComponenttrait. - Components build on embeddable impls by defining generic component logic that can be integrated into any contract wanting to use that component. Impl aliases instantiate these generic impls with the contract's concrete storage types.
Component Dependencies
Working with components becomes more complex when we try to use one component inside another. As mentioned earlier, a component can only be embedded within a contract, meaning that it's not possible to embed a component within another component. However, this doesn't mean that we can't use one component inside another. In this section, we will see how to use a component as a dependency of another component.
Consider a component called OwnableCounter whose purpose is to create a counter that can only be incremented by its owner. This component can be embedded in any contract, so that any contract that uses it will have a counter that can only be incremented by its owner.
The first way to implement this is to create a single component that contains both counter and ownership features from within a single component. However, this approach is not recommended: our goal is to minimize the amount of code duplication and take advantage of component reusability. Instead, we can create a new component that depends on the Ownable component for the ownership features, and internally defines the logic for the counter.
Listing 17-1 shows the complete implementation, which we'll break down right after:
use starknet::ContractAddress;
#[starknet::interface]
trait IOwnableCounter<TContractState> {
fn get_counter(self: @TContractState) -> u32;
fn increment(ref self: TContractState);
fn transfer_ownership(ref self: TContractState, new_owner: ContractAddress);
}
#[starknet::component]
mod OwnableCounterComponent {
use listing_03_component_dep::owner::{ownable_component, ownable_component::InternalImpl};
use starknet::storage::{StoragePointerReadAccess, StoragePointerWriteAccess};
use starknet::ContractAddress;
#[storage]
pub struct Storage {
value: u32,
}
#[embeddable_as(OwnableCounterImpl)]
impl OwnableCounter<
TContractState,
+HasComponent<TContractState>,
+Drop<TContractState>,
impl Owner: ownable_component::HasComponent<TContractState>,
> of super::IOwnableCounter<ComponentState<TContractState>> {
fn get_counter(self: @ComponentState<TContractState>) -> u32 {
self.value.read()
}
fn increment(ref self: ComponentState<TContractState>) {
let ownable_comp = get_dep_component!(@self, Owner);
ownable_comp.assert_only_owner();
self.value.write(self.value.read() + 1);
}
fn transfer_ownership(
ref self: ComponentState<TContractState>, new_owner: ContractAddress,
) {
self.transfer_ownership(new_owner);
}
}
}
Listing 17-1: An OwnableCounter Component
Specificities
Specifying Dependencies on Another Component
impl OwnableCounter<
TContractState,
+HasComponent<TContractState>,
+Drop<TContractState>,
impl Owner: ownable_component::HasComponent<TContractState>,
> of super::IOwnableCounter<ComponentState<TContractState>> {
In chapter 8, we introduced trait bounds, which are used to specify that a generic type must implement a certain trait. In the same way, we can specify that a component depends on another component by restricting the impl block to be available only for contracts that contain the required component.
In our case, this is done by adding a restriction impl Owner: ownable_component::HasComponent<TContractState>, which indicates that this impl block is only available for contracts that contain an implementation of the ownable_component::HasComponent trait. This essentially means that the `TContractState' type has access to the ownable component. See Components under the hood for more information.
Although most of the trait bounds were defined using anonymous parameters, the dependency on the Ownable component is defined using a named parameter (here, Owner). We will need to use this explicit name when accessing the Ownablecomponent within theimpl block.
While this mechanism is verbose and may not be easy to approach at first, it is a powerful leverage of the trait system in Cairo. The inner workings of this mechanism are abstracted away from the user, and all you need to know is that when you embed a component in a contract, all other components in the same contract can access it.
Using the Dependency
Now that we have made our impl depend on the Ownable component, we can access its functions, storage, and events within the implementation block. To bring the Ownable component into scope, we have two choices, depending on whether we intend to mutate the state of the Ownable component or not.
If we want to access the state of the Ownable component without mutating it, we use the get_dep_component! macro. If we want to mutate the state of the Ownable component (for example, change the current owner), we use the get_dep_component_mut! macro.
Both macros take two arguments: the first is self, either as a snapshot or by reference depending on mutability, representing the state of the component using the dependency, and the second is the component to access.
fn increment(ref self: ComponentState<TContractState>) {
let ownable_comp = get_dep_component!(@self, Owner);
ownable_comp.assert_only_owner();
self.value.write(self.value.read() + 1);
}
In this function, we want to make sure that only the owner can call the increment function. We need to use
the assert_only_owner function from the Ownable component. We'll use the get_dep_component! macro which will return a snapshot of the requested component state, and call assert_only_owner on it, as a method of that component.
For the transfer_ownership function, we want to mutate that state to change the current owner. Because we know the contract embedding this component implements the ownable component trait, we can directly call the transfer_ownership function from the Ownable component.
fn transfer_ownership(
ref self: ComponentState<TContractState>, new_owner: ContractAddress,
) {
self.transfer_ownership(new_owner);
}
It works exactly the same as get_dep_component! except that we need to pass the state as a ref so we can
mutate it to transfer the ownership.
Testing Components
Testing components is a bit different than testing contracts.
Contracts need to be tested against a specific state, which can be achieved by either deploying the contract in a test, or by simply getting the ContractState object and modifying it in the context of your tests.
Components are a generic construct, meant to be integrated in contracts, that can't be deployed on their own and don't have a ContractState object that we could use. So how do we test them?
Let's consider that we want to test a very simple component called "Counter", that will allow each contract to have a counter that can be incremented. The component is defined in Listing 17-2:
#[starknet::component]
pub mod CounterComponent {
use starknet::storage::{StoragePointerReadAccess, StoragePointerWriteAccess};
#[storage]
pub struct Storage {
value: u32,
}
#[embeddable_as(CounterImpl)]
impl Counter<
TContractState, +HasComponent<TContractState>,
> of super::ICounter<ComponentState<TContractState>> {
fn get_counter(self: @ComponentState<TContractState>) -> u32 {
self.value.read()
}
fn increment(ref self: ComponentState<TContractState>) {
self.value.write(self.value.read() + 1);
}
}
}
Listing 17-2: A simple Counter component
Testing the Component by Deploying a Mock Contract
The easiest way to test a component is to integrate it within a mock contract. This mock contract is only used for testing purposes, and only integrates the component you want to test. This allows you to test the component in the context of a contract, and to use a Dispatcher to call the component's entry points.
We can define such a mock contract as follows:
#[starknet::contract]
mod MockContract {
use super::counter::CounterComponent;
component!(path: CounterComponent, storage: counter, event: CounterEvent);
#[storage]
struct Storage {
#[substorage(v0)]
counter: CounterComponent::Storage,
}
#[event]
#[derive(Drop, starknet::Event)]
enum Event {
CounterEvent: CounterComponent::Event,
}
#[abi(embed_v0)]
impl CounterImpl = CounterComponent::CounterImpl<ContractState>;
}
This contract is entirely dedicated to testing the Counter component. It embeds the component with the component! macro, exposes the component's entry points by annotating the impl aliases with #[abi(embed_v0)].
We also need to define an interface that will be required to interact externally with this mock contract.
#[starknet::interface]
pub trait ICounter<TContractState> {
fn get_counter(self: @TContractState) -> u32;
fn increment(ref self: TContractState);
}
We can now write tests for the component by deploying this mock contract and calling its entry points, as we would with a typical contract.
use super::MockContract;
use super::counter::{ICounterDispatcher, ICounterDispatcherTrait};
use starknet::syscalls::deploy_syscall;
use starknet::SyscallResultTrait;
fn setup_counter() -> ICounterDispatcher {
let (address, _) = deploy_syscall(
MockContract::TEST_CLASS_HASH.try_into().unwrap(), 0, array![].span(), false,
)
.unwrap_syscall();
ICounterDispatcher { contract_address: address }
}
#[test]
fn test_constructor() {
let counter = setup_counter();
assert_eq!(counter.get_counter(), 0);
}
#[test]
fn test_increment() {
let counter = setup_counter();
counter.increment();
assert_eq!(counter.get_counter(), 1);
}
Testing Components Without Deploying a Contract
In Components under the hood, we saw that components leveraged genericity to define storage and logic that could be embedded in multiple contracts. If a contract embeds a component, a HasComponent trait is created in this contract, and the component methods are made available.
This informs us that if we can provide a concrete TContractState that implements the HasComponent trait to the ComponentState struct, should be able to directly invoke the methods of the component using this concrete ComponentState object, without having to deploy a mock.
Let's see how we can do that by using type aliases. We still need to define a mock contract - let's use the same as above - but this time, we won't need to deploy it.
First, we need to define a concrete implementation of the generic ComponentState type using a type alias. We will use the MockContract::ContractState type to do so.
use super::counter::{CounterComponent};
use super::MockContract;
use CounterComponent::{CounterImpl};
type TestingState = CounterComponent::ComponentState<MockContract::ContractState>;
// You can derive even `Default` on this type alias
impl TestingStateDefault of Default<TestingState> {
fn default() -> TestingState {
CounterComponent::component_state_for_testing()
}
}
#[test]
fn test_increment() {
let mut counter: TestingState = Default::default();
counter.increment();
counter.increment();
assert_eq!(counter.get_counter(), 2);
}
We defined the TestingState type as an alias of the CounterComponent::ComponentState<MockContract::ContractState> type. By passing the MockContract::ContractState type as a concrete type for ComponentState, we aliased a concrete implementation of the ComponentState struct to TestingState.
Because MockContract embeds CounterComponent, the methods of CounterComponent defined in the CounterImpl block can now be used on a TestingState object.
Now that we have made these methods available, we need to instantiate an object of type TestingState, that we will use to test the component. We can do so by calling the component_state_for_testing function, which automatically infers that it should return an object of type TestingState.
We can even implement this as part of the Default trait, which allows us to return an empty TestingState with the Default::default() syntax.
Let's summarize what we've done so far:
- We defined a mock contract that embeds the component we want to test.
- We defined a concrete implementation of
ComponentState<TContractState>using a type alias withMockContract::ContractState, that we namedTestingState. - We defined a function that uses
component_state_for_testingto return aTestingStateobject.
We can now write tests for the component by calling its functions directly, without having to deploy a mock contract. This approach is more lightweight than the previous one, and it allows testing internal functions of the component that are not exposed to the outside world trivially.
use super::counter::{CounterComponent};
use super::MockContract;
use CounterComponent::{CounterImpl};
type TestingState = CounterComponent::ComponentState<MockContract::ContractState>;
// You can derive even `Default` on this type alias
impl TestingStateDefault of Default<TestingState> {
fn default() -> TestingState {
CounterComponent::component_state_for_testing()
}
}
#[test]
fn test_increment() {
let mut counter: TestingState = Default::default();
counter.increment();
counter.increment();
assert_eq!(counter.get_counter(), 2);
}
Upgradeable Contracts
Starknet separates contracts into classes and instances, making it simple to upgrade a contract's logic without affecting its state.
A contract class is the definition of the semantics of a contract. It includes the entire logic of a contract: the name of the entry points, the addresses of the storage variables, the events that can be emitted, etc. Each class is uniquely identified by its class hash. A class does not have its own storage: it's only a definition of logic.
Classes are typically identified by a class hash. When declaring a class, the network registers it and assigns a unique hash used to identify the class and deploy contract instances from it.
A contract instance is a deployed contract corresponding to a class, with its own storage.
Starknet natively supports upgradeable contracts through the replace_class_syscall system call, enabling simple contract upgrades without affecting the contract's state.
Upgrading Contracts
To upgrade a contract, expose an entry point that executes replace_class_syscall with the new class hash as an argument:
use starknet::{ClassHash, syscalls};
use starknet::class_hash::class_hash_const;
use core::num::traits::Zero;
fn _upgrade(new_class_hash: ClassHash) {
assert(!new_class_hash.is_zero(), 'Class hash cannot be zero');
syscalls::replace_class_syscall(new_class_hash).unwrap();
}
Listing 17-3: Exposing replace_class_syscall to update the contract's class
Note: Thoroughly review changes and potential impacts before upgrading, as it's a delicate procedure with security implications. Don't allow arbitrary addresses to upgrade your contract.
Upgradeable Component
OpenZeppelin Contracts for Cairo provides the Upgradeable component that can be embedded into your contract to make it upgradeable. This component is a simple way to add upgradeability to your contract while relying on an audited library. It can be combined with the Ownable component to restrict the upgradeability to a single address, so that the contract owner has the exclusive right to upgrade the contract.
#[starknet::contract]
mod UpgradeableContract {
use openzeppelin::access::ownable::OwnableComponent;
use openzeppelin::upgrades::UpgradeableComponent;
use openzeppelin::upgrades::interface::IUpgradeable;
use starknet::{ContractAddress, ClassHash};
component!(path: OwnableComponent, storage: ownable, event: OwnableEvent);
component!(path: UpgradeableComponent, storage: upgradeable, event: UpgradeableEvent);
/// Ownable
#[abi(embed_v0)]
impl OwnableImpl = OwnableComponent::OwnableImpl<ContractState>;
impl OwnableInternalImpl = OwnableComponent::InternalImpl<ContractState>;
/// Upgradeable
impl UpgradeableInternalImpl = UpgradeableComponent::InternalImpl<ContractState>;
#[storage]
struct Storage {
#[substorage(v0)]
ownable: OwnableComponent::Storage,
#[substorage(v0)]
upgradeable: UpgradeableComponent::Storage,
}
#[event]
#[derive(Drop, starknet::Event)]
enum Event {
#[flat]
OwnableEvent: OwnableComponent::Event,
#[flat]
UpgradeableEvent: UpgradeableComponent::Event,
}
#[constructor]
fn constructor(ref self: ContractState, owner: ContractAddress) {
self.ownable.initializer(owner);
}
#[abi(embed_v0)]
impl UpgradeableImpl of IUpgradeable<ContractState> {
fn upgrade(ref self: ContractState, new_class_hash: ClassHash) {
// This function can only be called by the owner
self.ownable.assert_only_owner();
// Replace the class hash upgrading the contract
self.upgradeable.upgrade(new_class_hash);
}
}
}
Listing 17-4 Integrating OpenZeppelin's Upgradeable component in a contract
For more information, please refer to the OpenZeppelin docs API reference.
L1-L2 Messaging
A crucial feature of a Layer 2 is its ability to interact with Layer 1.
Starknet has its own L1-L2 messaging system, which is different from its consensus mechanism and the submission of state updates on L1. Messaging is a way for smart-contracts on L1 to interact with smart-contracts on L2 (or the other way around), allowing us to do "cross-chain" transactions. For example, we can do some computations on one chain and use the result of this computation on the other chain.
Bridges on Starknet all use L1-L2 messaging. Let's say that you want to bridge tokens from Ethereum to Starknet. You will simply have to deposit your tokens into the L1 bridge contract, which will automatically trigger the minting of the same token on L2. Another good use case for L1-L2 messaging would be DeFi pooling.
On Starknet, it's important to note that the messaging system is asynchronous and asymmetric.
- Asynchronous: this means that in your contract code (being Solidity or Cairo), you can't await the result of the message being sent on the other chain within your contract code execution.
- Asymmetric: sending a message from Ethereum to Starknet (
L1->L2) is fully automated by the Starknet sequencer, which means that the message is being automatically delivered to the target contract on L2. However, when sending a message from Starknet to Ethereum (L2->L1), only the hash of the message is sent to L1 by the Starknet sequencer. You must then consume the message manually via a transaction on L1.
Let's dive into the details.
The StarknetMessaging Contract
The crucial component of the L1-L2 Messaging system is the StarknetCore contract. It is a set of Solidity contracts deployed on Ethereum that allows Starknet to function properly. One of the contracts of StarknetCore is called StarknetMessaging and it is the contract responsible for passing messages between Starknet and Ethereum. StarknetMessaging follows an interface with functions allowing to send messages to L2, receiving messages on L1 from L2 and canceling messages.
interface IStarknetMessaging is IStarknetMessagingEvents {
function sendMessageToL2(
uint256 toAddress,
uint256 selector,
uint256[] calldata payload
) external returns (bytes32);
function consumeMessageFromL2(uint256 fromAddress, uint256[] calldata payload)
external
returns (bytes32);
function startL1ToL2MessageCancellation(
uint256 toAddress,
uint256 selector,
uint256[] calldata payload,
uint256 nonce
) external;
function cancelL1ToL2Message(
uint256 toAddress,
uint256 selector,
uint256[] calldata payload,
uint256 nonce
) external;
}
Starknet messaging contract interface
In the case of L1->L2 messages, the Starknet sequencer is constantly listening to the logs emitted by the StarknetMessaging contract on Ethereum.
Once a message is detected in a log, the sequencer prepares and executes an L1HandlerTransaction to call the function on the target L2 contract. This takes up to 1-2 minutes to be done (few seconds for ethereum block to be mined, and then the sequencer must build and execute the transaction).
L2->L1 messages are prepared by contract's execution on L2 and are part of the block produced. When the sequencer produces a block, it sends the hash of each message prepared by the contract's execution
to the StarknetCore contract on L1, where they can then be consumed once the block they belong to is proven and verified on Ethereum (which for now is around 3-4 hours).
Sending Messages from Ethereum to Starknet
If you want to send messages from Ethereum to Starknet, your Solidity contracts must call the sendMessageToL2 function of the StarknetMessaging contract. To receive these messages on Starknet, you will need to annotate functions that can be called from L1 with the #[l1_handler] attribute.
Let's take a simple contract taken from this tutorial where we want to send a message to Starknet.
The _snMessaging is a state variable already initialized with the address of the StarknetMessaging contract. You can check all Starknet contract and sequencer addresses here.
// Sends a message on Starknet with a single felt.
function sendMessageFelt(
uint256 contractAddress,
uint256 selector,
uint256 myFelt
)
external
payable
{
// We "serialize" here the felt into a payload, which is an array of uint256.
uint256[] memory payload = new uint256[](1);
payload[0] = myFelt;
// msg.value must always be >= 20_000 wei.
_snMessaging.sendMessageToL2{value: msg.value}(
contractAddress,
selector,
payload
);
}
The function sends a message with a single felt value to the StarknetMessaging contract.
Be aware that your Cairo contract will only understand felt252 data type, so if you want to send more complex data, you must ensure that the data serialization into the uint256 array follows the Cairo serialization scheme.
It's important to note that we have {value: msg.value}. In fact, the minimum value we have to send here is 20k wei, due to the fact that the StarknetMessaging contract will register
the hash of our message in the storage of Ethereum.
In addition to those 20k wei, since the L1HandlerTransaction executed by the sequencer is not tied to any account (the message originates from L1), you must also ensure
that you pay enough fees on L1 for your message to be deserialized and processed on L2.
The fees of the L1HandlerTransaction are computed in a regular manner as it would be done for an Invoke transaction. For this, you can profile
the gas consumption using starkli or snforge to estimate the cost of your message execution.
The signature of the sendMessageToL2 is:
function sendMessageToL2(
uint256 toAddress,
uint256 selector,
uint256[] calldata payload
) external override returns (bytes32);
The parameters are as follows:
toAddress: The contract address on L2 that will be called.selector: The selector of the function of this contract attoAddress. This selector (function) must have the#[l1_handler]attribute to be callable.payload: The payload is always an array offelt252(which are represented byuint256in Solidity). For this reason we've inserted the inputmyFeltinto the array. This is why we need to insert the input data into an array.
On the Starknet side, to receive this message, we have:
#[l1_handler]
fn msg_handler_felt(ref self: ContractState, from_address: felt252, my_felt: felt252) {
assert(from_address == self.allowed_message_sender.read(), 'Invalid message sender');
// You can now use the data, automatically deserialized from the message payload.
assert(my_felt == 123, 'Invalid value');
}
We need to add the #[l1_handler] attribute to our function. L1 handlers are special functions that can only be executed by an L1HandlerTransaction. There is nothing particular to do to receive transactions from L1, as the message is relayed by the sequencer automatically. In your #[l1_handler] functions, it is important to verify the sender of the L1 message to ensure that our contract can only receive messages from a trusted L1 contract.
Sending Messages from Starknet to Ethereum
When sending messages from Starknet to Ethereum, you will have to use the send_message_to_l1 syscall in your Cairo contracts. This syscall allows you to send messages to the StarknetMessaging contract on L1. Unlike L1->L2 messages, L2->L1 messages must be consumed manually, which means that you will need your Solidity contract to explicitly call the consumeMessageFromL2 function of the StarknetMessaging contract in order to consume the message.
To send a message from L2 to L1, what we would do on Starknet is:
fn send_message_felt(ref self: ContractState, to_address: EthAddress, my_felt: felt252) {
// Note here, we "serialize" my_felt, as the payload must be
// a `Span<felt252>`.
syscalls::send_message_to_l1_syscall(to_address.into(), array![my_felt].span())
.unwrap();
}
We simply build the payload and pass it, along with the L1 contract address, to the syscall function.
On L1, the important part is to build the same payload sent by the L2. Then in your Solidity contract, you can call consumeMessageFromL2 by passing the L2 contract address and the payload. Please be aware that the L2 contract address expected by the consumeMessageFromL2 is the address of the contract that sends the message on the L2 by calling send_message_to_l1_syscall.
function consumeMessageFelt(
uint256 fromAddress,
uint256[] calldata payload
)
external
{
let messageHash = _snMessaging.consumeMessageFromL2(fromAddress, payload);
// You can use the message hash if you want here.
// We expect the payload to contain only a felt252 value (which is a uint256 in Solidity).
require(payload.length == 1, "Invalid payload");
uint256 my_felt = payload[0];
// From here, you can safely use `my_felt` as the message has been verified by StarknetMessaging.
require(my_felt > 0, "Invalid value");
}
As you can see, in this context we don't have to verify which contract from L2 is sending the message (as we do on the L2 to verify which contract from L1 is sending the message). But we are actually using the consumeMessageFromL2 of the StarknetCore contract to validate the inputs (the contract address on L2 and the payload) to ensure we are only consuming valid messages.
Note: The
consumeMessageFromL2function of theStarknetCorecontract is expected to be called from a Solidity contract, and not directly on theStarknetCorecontract. The reason for that is because theStarknetCorecontract is usingmsg.senderto actually compute the hash of the message. And thismsg.sendermust correspond to theto_addressfield that is given to the functionsend_message_to_l1_syscallthat is called on Starknet.
Cairo Serde
Before sending messages between L1 and L2, you must remember that Starknet contracts, written in Cairo, can only understand serialized data. And serialized data is always an array of felt252.
In Solidity we have uint256 type, and felt252 is approximately 4 bits smaller than uint256. So we have to pay attention to the values contained in the payload of the messages we are sending.
If, on L1, we build a message with values above the maximum felt252, the message will be stuck and never consumed on L2.
So for instance, an actual uint256 value in Cairo is represented by a struct like:
struct u256 {
low: u128,
high: u128,
}
which will be serialized as TWO felts, one for low, and one for high. This means that to send only one u256 to Cairo, you'll need to send a payload from L1 with TWO values.
uint256[] memory payload = new uint256[](2);
// Let's send the value 1 as a u256 in cairo: low = 1, high = 0.
payload[0] = 1;
payload[1] = 0;
If you want to learn more about the messaging mechanism, you can visit the Starknet documentation.
You can also find a detailed guide here to test the messaging system locally.
Oracle Interactions
This section focuses on the concept of bringing off-chain data to the Starknet blockchain using oracles. Oracles are third-party services that serve as intermediaries, securely transmitting external data, such as asset prices, weather information, or other real-world data, to blockchains and smart contracts. It also provides practical examples and code snippets demonstrating how developers can interact with a specific oracle named Pragma on Starknet network, covering topics like querying and handling price data, and verifiable random function (VRF) to generate random numbers.
Price Feeds
Price feeds enabled by an oracle serve as a bridge between real-world data feed and the blockchain. They provide real time pricing data that is aggregated from multiple trusted external sources ( e.g. crypto exchanges, financial data providers, etc. ) to the blockchain network.
For the example in this book section, we will use Pragma Oracle to read the price feed for ETH/USD asset pair and also showcase a mini application that utilizes this feed.
Pragma Oracle is a leading zero knowledge oracle that provides access to off-chain data on Starknet blockchain in a verifiable way.
Setting Up Your Contract for Price Feeds
Add Pragma as a Project Dependency
To get started with integrating Pragma on your Cairo smart contract for price feed data, edit your project's Scarb.toml file to include the path to use Pragma.
[dependencies]
pragma_lib = { git = "https://github.com/astraly-labs/pragma-lib" }
Creating a Price Feed Contract
After adding the required dependencies for your project, you'll need to define a contract interface that includes the required pragma price feed entry point.
#[starknet::interface]
pub trait IPriceFeedExample<TContractState> {
fn buy_item(ref self: TContractState);
fn get_asset_price(self: @TContractState, asset_id: felt252) -> u128;
}
Of the two public functions exposed in the IPriceFeedExample, the one necessary to interact with the pragma price feed oracle is the get_asset_price function, a view function that takes in the asset_id argument and returns a u128 value.
Import Pragma Dependencies
use pragma_lib::abi::{IPragmaABIDispatcher, IPragmaABIDispatcherTrait};
use pragma_lib::types::{DataType, PragmaPricesResponse};
The snippet above shows the necessary imports you need to add to your contract module in order to interact with the Pragma oracle.
Required Price Feed Function Impl in Contract
fn get_asset_price(self: @ContractState, asset_id: felt252) -> u128 {
// Retrieve the oracle dispatcher
let oracle_dispatcher = IPragmaABIDispatcher {
contract_address: self.pragma_contract.read(),
};
// Call the Oracle contract, for a spot entry
let output: PragmaPricesResponse = oracle_dispatcher
.get_data_median(DataType::SpotEntry(asset_id));
return output.price;
}
The get_asset_price function is responsible for retrieving the price of the asset specified by the asset_id argument from Pragma Oracle. The get_data_median method is called from the IPragmaDispatcher instance by passing the DataType::SpotEntry(asset_id) as an argument and its output is assigned to a variable named output of type PragmaPricesResponse. Finally, the function returns the price of the requested asset as a u128.
Example Application Using Pragma Price Feed
#[starknet::contract]
mod PriceFeedExample {
use starknet::storage::{StoragePointerReadAccess, StoragePointerWriteAccess};
use super::{ContractAddress, IPriceFeedExample};
use pragma_lib::abi::{IPragmaABIDispatcher, IPragmaABIDispatcherTrait};
use pragma_lib::types::{DataType, PragmaPricesResponse};
use openzeppelin::token::erc20::interface::{ERC20ABIDispatcher, ERC20ABIDispatcherTrait};
use starknet::contract_address::contract_address_const;
use starknet::get_caller_address;
const ETH_USD: felt252 = 19514442401534788;
const EIGHT_DECIMAL_FACTOR: u256 = 100000000;
#[storage]
struct Storage {
pragma_contract: ContractAddress,
product_price_in_usd: u256,
}
#[constructor]
fn constructor(ref self: ContractState, pragma_contract: ContractAddress) {
self.pragma_contract.write(pragma_contract);
self.product_price_in_usd.write(100);
}
#[abi(embed_v0)]
impl PriceFeedExampleImpl of IPriceFeedExample<ContractState> {
fn buy_item(ref self: ContractState) {
let caller_address = get_caller_address();
let eth_price = self.get_asset_price(ETH_USD).into();
let product_price = self.product_price_in_usd.read();
// Calculate the amount of ETH needed
let eth_needed = product_price * EIGHT_DECIMAL_FACTOR / eth_price;
let eth_dispatcher = ERC20ABIDispatcher {
contract_address: contract_address_const::<
0x049d36570d4e46f48e99674bd3fcc84644ddd6b96f7c741b1562b82f9e004dc7,
>() // ETH Contract Address
};
// Transfer the ETH to the caller
eth_dispatcher
.transfer_from(
caller_address,
contract_address_const::<
0x0237726d12d3c7581156e141c1b132f2db9acf788296a0e6e4e9d0ef27d092a2,
>(),
eth_needed,
);
}
fn get_asset_price(self: @ContractState, asset_id: felt252) -> u128 {
// Retrieve the oracle dispatcher
let oracle_dispatcher = IPragmaABIDispatcher {
contract_address: self.pragma_contract.read(),
};
// Call the Oracle contract, for a spot entry
let output: PragmaPricesResponse = oracle_dispatcher
.get_data_median(DataType::SpotEntry(asset_id));
return output.price;
}
}
}
Note: Pragma returns the value of different token pairs using the decimal factor of 6 or 8. You can convert the value to the required decimal factor by dividing the value by \( {10^{n}} \), where
nis the decimal factor.
The code above is an example implementation of an applications consuming a price feed from the Pragma oracle. The contract imports necessary modules and interfaces, including the IPragmaABIDispatcher for interacting with the Pragma oracle contract and the ERC20ABIDispatcher for interacting with the ETH ERC20 token contract.
The contract has a const that stores the token pair ID of ETH/USD, and a Storage struct that holds two fields pragma_contract and product_price_in_usd. The constructor function initializes the pragma_contract address and sets the product_price_in_usd to 100.
The buy_item function is the main entry point for a user to purchase an item. It retrieves the caller's address. It calls the get_asset_price function to get the current price of ETH in USD using the ETH_USD asset ID. It calculates the amount of ETH needed to buy the product based on the product price in USD at the corresponding ETH price. It then checks if the caller has enough ETH by calling the balance_of method on the ERC20 ETH contract. If the caller has enough ETH, it calls the transfer_from method of the eth_dispatcher instance to transfer the required amount of ETH from the caller to another contract address.
The get_asset_price function is the entry point to interact with the Pragma oracle and has been explained in the section above.
You can get a detailed guide on consuming data using Pragma price feeds on their documentation.
Randomness
Since all blockchains are fundamentally deterministic and most are public ledgers, generating truly unpredictatable randomness on-chain presents a challenge. This randomness is crucial for fair outcomes in gaming, lotteries, and unique generation of NFTs. To address this, verifiable random functions (VRFs) provided by oracles offer a solution. VRFs guarantee that the randomness can't be predicted or tampered with, ensuring trust and transparency in these applications.
Overview on VRFs
VRFs use a secret key and a nonce (a unique input) to generate an output that appears random. While technically 'pseudo-random', it's practically impossible for another party to predict the outcome without knowing the secret key.
VRFs produce not only the random number but also a proof that anyone can use to independently verify that the result was generated correctly according to the function's parameters.
Generating Randomness with Pragma
Pragma, an oracle on Starknet provides a solution for generating random numbers using VRFs. Let's dive into how to use Pragma VRF to generate a random number in a simple dice game contract.
Add Pragma as a Dependency
Edit your cairo project's Scarb.toml file to include the path to use Pragma.
[dependencies]
pragma_lib = { git = "https://github.com/astraly-labs/pragma-lib" }
Define the Contract Interface
use starknet::ContractAddress;
#[starknet::interface]
pub trait IPragmaVRF<TContractState> {
fn get_last_random_number(self: @TContractState) -> felt252;
fn request_randomness_from_pragma(
ref self: TContractState,
seed: u64,
callback_address: ContractAddress,
callback_fee_limit: u128,
publish_delay: u64,
num_words: u64,
calldata: Array<felt252>,
);
fn receive_random_words(
ref self: TContractState,
requester_address: ContractAddress,
request_id: u64,
random_words: Span<felt252>,
calldata: Array<felt252>,
);
fn withdraw_extra_fee_fund(ref self: TContractState, receiver: ContractAddress);
}
#[starknet::interface]
pub trait IDiceGame<TContractState> {
fn guess(ref self: TContractState, guess: u8);
fn toggle_play_window(ref self: TContractState);
fn get_game_window(self: @TContractState) -> bool;
fn process_game_winners(ref self: TContractState);
}
Listing 17-5 shows a contract interfaces for Pragma VRF and a simple dice game.
Description of Key IPragmaVRF Entrypoints and Their Inputs
The function request_randomness_from_pragma initiates a request for verifiable randomness from the Pragma oracle. It does this by emitting an event that triggers the following actions off-chain:
- Randomness generation: The oracle generates random values and a corresponding proof.
- On-chain submission: The oracle submits the generated randomness and proof back to the blockchain via the
receive_random_wordscallback function.
request_randomness_from_pragma Inputs
seed: A value used to initialize the randomness generation process. This should be unique to ensure unpredictable results.callback_address: The contract address where thereceive_random_wordsfunction will be called to deliver the generated randomness. It is typically the address of your deployed contract implementing Pragma VRF.callback_fee_limit: The maximum amount of gas you're willing to spend on executing thereceive_random_wordscallback function.publish_delay: The minimum delay (in blocks) between requesting randomness and the oracle fulfilling the request.num_words: The number of random values (each represented as afelt252) you want to receive in a single callback.calldata: Additional data you want to pass to thereceive_random_wordscallback function.
receive_randomn_words Inputs
requester_address: The contract address that initiated the randomness request.request_id: A unique identifier assigned to the randomness request.random_words: An array (span) of the generated random values (represented asfelt252).calldata: Additional data passed along with the initial randomness request.
Dice Game Contract
This dice game contract allows players to guess a number between 1 & 6 during an active game window. The contract owner then has the ability to toggle the game window to disable new guesses from players. To determine the winning number, the contract owner calls the request_randomness_from_pragma function to request a random number from the Pragma VRF oracle. Once the random number is received through the receive_random_words callback function, it is stored in the last_random_number storage variable. Each player has to call process_game_winners function to determine if they have won or lost. The last_random_number generated is then reduced to a number between 1 & 6, and compared to the guesses of the players stored in the user_guesses mapping, which leads to the emission of an event GameWinner or GameLost.
#[starknet::contract]
mod DiceGame {
use starknet::storage::{
Map, StoragePathEntry, StoragePointerReadAccess, StoragePointerWriteAccess,
};
use starknet::{
ContractAddress, contract_address_const, get_block_number, get_caller_address,
get_contract_address,
};
use pragma_lib::abi::{IRandomnessDispatcher, IRandomnessDispatcherTrait};
use openzeppelin::token::erc20::interface::{ERC20ABIDispatcher, ERC20ABIDispatcherTrait};
use openzeppelin::access::ownable::OwnableComponent;
component!(path: OwnableComponent, storage: ownable, event: OwnableEvent);
#[abi(embed_v0)]
impl OwnableImpl = OwnableComponent::OwnableImpl<ContractState>;
impl InternalImpl = OwnableComponent::InternalImpl<ContractState>;
#[storage]
struct Storage {
user_guesses: Map<ContractAddress, u8>,
pragma_vrf_contract_address: ContractAddress,
game_window: bool,
min_block_number_storage: u64,
last_random_number: felt252,
#[substorage(v0)]
ownable: OwnableComponent::Storage,
}
#[event]
#[derive(Drop, starknet::Event)]
enum Event {
GameWinner: ResultAnnouncement,
GameLost: ResultAnnouncement,
#[flat]
OwnableEvent: OwnableComponent::Event,
}
#[derive(Drop, starknet::Event)]
struct ResultAnnouncement {
caller: ContractAddress,
guess: u8,
random_number: u256,
}
#[constructor]
fn constructor(
ref self: ContractState,
pragma_vrf_contract_address: ContractAddress,
owner: ContractAddress,
) {
self.ownable.initializer(owner);
self.pragma_vrf_contract_address.write(pragma_vrf_contract_address);
self.game_window.write(true);
}
#[abi(embed_v0)]
impl DiceGame of super::IDiceGame<ContractState> {
fn guess(ref self: ContractState, guess: u8) {
assert(self.game_window.read(), 'GAME_INACTIVE');
assert(guess >= 1 && guess <= 6, 'INVALID_GUESS');
let caller = get_caller_address();
self.user_guesses.entry(caller).write(guess);
}
fn toggle_play_window(ref self: ContractState) {
self.ownable.assert_only_owner();
let current: bool = self.game_window.read();
self.game_window.write(!current);
}
fn get_game_window(self: @ContractState) -> bool {
self.game_window.read()
}
fn process_game_winners(ref self: ContractState) {
assert(!self.game_window.read(), 'GAME_ACTIVE');
assert(self.last_random_number.read() != 0, 'NO_RANDOM_NUMBER_YET');
let caller = get_caller_address();
let user_guess: u8 = self.user_guesses.entry(caller).read();
let reduced_random_number: u256 = self.last_random_number.read().into() % 6 + 1;
if user_guess == reduced_random_number.try_into().unwrap() {
self
.emit(
Event::GameWinner(
ResultAnnouncement {
caller: caller,
guess: user_guess,
random_number: reduced_random_number,
},
),
);
} else {
self
.emit(
Event::GameLost(
ResultAnnouncement {
caller: caller,
guess: user_guess,
random_number: reduced_random_number,
},
),
);
}
}
}
#[abi(embed_v0)]
impl PragmaVRFOracle of super::IPragmaVRF<ContractState> {
fn get_last_random_number(self: @ContractState) -> felt252 {
let last_random = self.last_random_number.read();
last_random
}
fn request_randomness_from_pragma(
ref self: ContractState,
seed: u64,
callback_address: ContractAddress,
callback_fee_limit: u128,
publish_delay: u64,
num_words: u64,
calldata: Array<felt252>,
) {
self.ownable.assert_only_owner();
let randomness_contract_address = self.pragma_vrf_contract_address.read();
let randomness_dispatcher = IRandomnessDispatcher {
contract_address: randomness_contract_address,
};
// Approve the randomness contract to transfer the callback fee
// You would need to send some ETH to this contract first to cover the fees
let eth_dispatcher = ERC20ABIDispatcher {
contract_address: contract_address_const::<
0x049d36570d4e46f48e99674bd3fcc84644ddd6b96f7c741b1562b82f9e004dc7,
>() // ETH Contract Address
};
eth_dispatcher
.approve(
randomness_contract_address,
(callback_fee_limit + callback_fee_limit / 5).into(),
);
// Request the randomness
randomness_dispatcher
.request_random(
seed, callback_address, callback_fee_limit, publish_delay, num_words, calldata,
);
let current_block_number = get_block_number();
self.min_block_number_storage.write(current_block_number + publish_delay);
}
fn receive_random_words(
ref self: ContractState,
requester_address: ContractAddress,
request_id: u64,
random_words: Span<felt252>,
calldata: Array<felt252>,
) {
// Have to make sure that the caller is the Pragma Randomness Oracle contract
let caller_address = get_caller_address();
assert(
caller_address == self.pragma_vrf_contract_address.read(),
'caller not randomness contract',
);
// and that the current block is within publish_delay of the request block
let current_block_number = get_block_number();
let min_block_number = self.min_block_number_storage.read();
assert(min_block_number <= current_block_number, 'block number issue');
let random_word = *random_words.at(0);
self.last_random_number.write(random_word);
}
fn withdraw_extra_fee_fund(ref self: ContractState, receiver: ContractAddress) {
self.ownable.assert_only_owner();
let eth_dispatcher = ERC20ABIDispatcher {
contract_address: contract_address_const::<
0x049d36570d4e46f48e99674bd3fcc84644ddd6b96f7c741b1562b82f9e004dc7,
>() // ETH Contract Address
};
let balance = eth_dispatcher.balance_of(get_contract_address());
eth_dispatcher.transfer(receiver, balance);
}
}
}
Listing 17-6: Simple Dice Game Contract using Pragma VRF.
NB: Fund Your Contract After Deployment to Utilize Pragma VRF
After deploying your contract that includes Pragma VRF functionalities, ensure it holds sufficient ETH to cover the expenses related to requesting random values. Pragma VRF requires payment for both generating the random numbers and executing the callback function defined in your contract.
For more information, please refer to the Pragma docs.
Other Examples
This section contains additional examples of Starknet smart contracts, utilizing various features of the Cairo programming language. Your contributions are welcome and encouraged, as we aim to gather as many diverse examples as possible.
Deploying and Interacting with a Voting contract
The Vote contract in Starknet begins by registering voters through the contract's constructor. Three voters are initialized at this stage, and their addresses are passed to an internal function _register_voters. This function adds the voters to the contract's state, marking them as registered and eligible to vote.
Within the contract, the constants YES and NO are defined to represent the voting options (1 and 0, respectively). These constants facilitate the voting process by standardizing the input values.
Once registered, a voter is able to cast a vote using the vote function, selecting either the 1 (YES) or 0 (NO) as their vote. When voting, the state of the contract is updated, recording the vote and marking the voter as having voted. This ensures that the voter is not able to cast a vote again within the same proposal. The casting of a vote triggers the VoteCast event, logging the action.
The contract also monitors unauthorized voting attempts. If an unauthorized action is detected, such as a non-registered user attempting to vote or a user trying to vote again, the UnauthorizedAttempt event is emitted.
Together, these functions, states, constants, and events create a structured voting system, managing the lifecycle of a vote from registration to casting, event logging, and result retrieval within the Starknet environment. Constants like YES and NO help streamline the voting process, while events play a vital role in ensuring transparency and traceability.
Listing 17-7 shows the Vote contract in detail:
/// Core Library Imports for the Traits outside the Starknet Contract
use starknet::ContractAddress;
/// Trait defining the functions that can be implemented or called by the Starknet Contract
#[starknet::interface]
trait VoteTrait<T> {
/// Returns the current vote status
fn get_vote_status(self: @T) -> (u8, u8, u8, u8);
/// Checks if the user at the specified address is allowed to vote
fn voter_can_vote(self: @T, user_address: ContractAddress) -> bool;
/// Checks if the specified address is registered as a voter
fn is_voter_registered(self: @T, address: ContractAddress) -> bool;
/// Allows a user to vote
fn vote(ref self: T, vote: u8);
}
/// Starknet Contract allowing three registered voters to vote on a proposal
#[starknet::contract]
mod Vote {
use starknet::ContractAddress;
use starknet::get_caller_address;
use starknet::storage::{
StoragePointerReadAccess, StoragePointerWriteAccess, StorageMapReadAccess,
StorageMapWriteAccess, Map,
};
const YES: u8 = 1_u8;
const NO: u8 = 0_u8;
#[storage]
struct Storage {
yes_votes: u8,
no_votes: u8,
can_vote: Map::<ContractAddress, bool>,
registered_voter: Map::<ContractAddress, bool>,
}
#[constructor]
fn constructor(
ref self: ContractState,
voter_1: ContractAddress,
voter_2: ContractAddress,
voter_3: ContractAddress,
) {
self._register_voters(voter_1, voter_2, voter_3);
self.yes_votes.write(0_u8);
self.no_votes.write(0_u8);
}
#[event]
#[derive(Drop, starknet::Event)]
enum Event {
VoteCast: VoteCast,
UnauthorizedAttempt: UnauthorizedAttempt,
}
#[derive(Drop, starknet::Event)]
struct VoteCast {
voter: ContractAddress,
vote: u8,
}
#[derive(Drop, starknet::Event)]
struct UnauthorizedAttempt {
unauthorized_address: ContractAddress,
}
#[abi(embed_v0)]
impl VoteImpl of super::VoteTrait<ContractState> {
fn get_vote_status(self: @ContractState) -> (u8, u8, u8, u8) {
let (n_yes, n_no) = self._get_voting_result();
let (yes_percentage, no_percentage) = self._get_voting_result_in_percentage();
(n_yes, n_no, yes_percentage, no_percentage)
}
fn voter_can_vote(self: @ContractState, user_address: ContractAddress) -> bool {
self.can_vote.read(user_address)
}
fn is_voter_registered(self: @ContractState, address: ContractAddress) -> bool {
self.registered_voter.read(address)
}
fn vote(ref self: ContractState, vote: u8) {
assert!(vote == NO || vote == YES, "VOTE_0_OR_1");
let caller: ContractAddress = get_caller_address();
self._assert_allowed(caller);
self.can_vote.write(caller, false);
if (vote == NO) {
self.no_votes.write(self.no_votes.read() + 1_u8);
}
if (vote == YES) {
self.yes_votes.write(self.yes_votes.read() + 1_u8);
}
self.emit(VoteCast { voter: caller, vote: vote });
}
}
#[generate_trait]
impl InternalFunctions of InternalFunctionsTrait {
fn _register_voters(
ref self: ContractState,
voter_1: ContractAddress,
voter_2: ContractAddress,
voter_3: ContractAddress,
) {
self.registered_voter.write(voter_1, true);
self.can_vote.write(voter_1, true);
self.registered_voter.write(voter_2, true);
self.can_vote.write(voter_2, true);
self.registered_voter.write(voter_3, true);
self.can_vote.write(voter_3, true);
}
}
#[generate_trait]
impl AssertsImpl of AssertsTrait {
fn _assert_allowed(ref self: ContractState, address: ContractAddress) {
let is_voter: bool = self.registered_voter.read((address));
let can_vote: bool = self.can_vote.read((address));
if (!can_vote) {
self.emit(UnauthorizedAttempt { unauthorized_address: address });
}
assert!(is_voter, "USER_NOT_REGISTERED");
assert!(can_vote, "USER_ALREADY_VOTED");
}
}
#[generate_trait]
impl VoteResultFunctionsImpl of VoteResultFunctionsTrait {
fn _get_voting_result(self: @ContractState) -> (u8, u8) {
let n_yes: u8 = self.yes_votes.read();
let n_no: u8 = self.no_votes.read();
(n_yes, n_no)
}
fn _get_voting_result_in_percentage(self: @ContractState) -> (u8, u8) {
let n_yes: u8 = self.yes_votes.read();
let n_no: u8 = self.no_votes.read();
let total_votes: u8 = n_yes + n_no;
if (total_votes == 0_u8) {
return (0, 0);
}
let yes_percentage: u8 = (n_yes * 100_u8) / (total_votes);
let no_percentage: u8 = (n_no * 100_u8) / (total_votes);
(yes_percentage, no_percentage)
}
}
}
Listing 17-7: A voting smart contract
Deploying, Calling and Invoking the Voting Contract
Part of the Starknet experience is deploying and interacting with smart contracts.
Once the contract is deployed, we can interact with it by calling and invoking its functions:
- Calling contracts: Interacting with external functions that only read from the state. These functions do not alter the state of the network, so they don't require fees or signing.
- Invoking contracts: Interacting with external functions that can write to the state. These functions do alter the state of the network and require fees and signing.
We will setup a local development node using katana to deploy the voting contract. Then, we'll interact with the contract by calling and invoking its functions. You can also use the Goerli Testnet instead of katana. However, we recommend using katana for local development and testing. You can find the complete tutorial for katana in the "Using a development network" chapter of the Starknet Docs.
The katana Local Starknet Node
katana is designed to support local development by the Dojo team. It will allow you to do everything you need to do with Starknet, but locally. It is a great tool for development and testing.
To install katana from the source code, please refer to the "Using Katana" chapter of the Dojo Engine.
Note: Please verify that the version of
katanamatch the specified version provided below.$ katana --version katana 1.0.9-dev (38b3c2a6)To upgrade
katanaversion, refer to the "Using Katana" chapter of the Dojo Engine.
Once you have katana installed, you can start the local Starknet node with:
katana
This command will start a local Starknet node with predeployed accounts. We will use these accounts to deploy and interact with the voting contract:
...
PREFUNDED ACCOUNTS
==================
| Account address | 0x03ee9e18edc71a6df30ac3aca2e0b02a198fbce19b7480a63a0d71cbd76652e0
| Private key | 0x0300001800000000300000180000000000030000000000003006001800006600
| Public key | 0x01b7b37a580d91bc3ad4f9933ed61f3a395e0e51c9dd5553323b8ca3942bb44e
| Account address | 0x033c627a3e5213790e246a917770ce23d7e562baa5b4d2917c23b1be6d91961c
| Private key | 0x0333803103001800039980190300d206608b0070db0012135bd1fb5f6282170b
| Public key | 0x04486e2308ef3513531042acb8ead377b887af16bd4cdd8149812dfef1ba924d
| Account address | 0x01d98d835e43b032254ffbef0f150c5606fa9c5c9310b1fae370ab956a7919f5
| Private key | 0x07ca856005bee0329def368d34a6711b2d95b09ef9740ebf2c7c7e3b16c1ca9c
| Public key | 0x07006c42b1cfc8bd45710646a0bb3534b182e83c313c7bc88ecf33b53ba4bcbc
...
Before we can interact with the voting contract, we need to prepare the voter and admin accounts on Starknet. Each voter account must be registered and sufficiently funded for voting. For a more detailed understanding of how accounts operate with Account Abstraction, refer to the "Account Abstraction" chapter of the Starknet Docs.
Smart Wallets for Voting
Aside from Scarb you will need to have Starkli installed. Starkli is a command line tool that allows you to interact with Starknet. You can find the installation instructions in the "Setting up Starkli" chapter of the Starknet Docs.
Note: Please verify that the version of
starklimatch the specified version provided below.$ starkli --version 0.3.6 (8d6db8c)To upgrade
starklito0.3.6, use thestarkliup -v 0.3.6command, or simplystarkliupwhich installed the latest stable version.
You can retrieve the smart wallet class hash (it will be the same for all your smart wallets) with the following command. Notice the use of the --rpc flag and the RPC endpoint provided by katana:
starkli class-hash-at <SMART_WALLET_ADDRESS> --rpc http://0.0.0.0:5050
Contract Deployment
Before deploying, we need to declare the contract. We can do this with the starkli declare command:
starkli declare target/dev/listing_99_12_vote_contract_Vote.contract_class.json --rpc http://0.0.0.0:5050 --account katana-0
If the compiler version you're using is older than the one used by Starkli and you encounter a compiler-version error while using the command above, you can specify a compiler version to use in the command by adding the --compiler-version x.y.z flag.
If you're still encountering issues with the compiler version, try upgrading Starkli using the command: starkliup to make sure you're using the latest version of starkli.
The class hash of the contract is: 0x06974677a079b7edfadcd70aa4d12aac0263a4cda379009fca125e0ab1a9ba52. You can declare this contract on Sepolia testnet and see that the class hash will correspond.
The --rpc flag specifies the RPC endpoint to use (the one provided by katana). The --account flag specifies the account to use for signing the transaction.
Since we are using a local node, the transaction will achieve finality immediately. If you are using the Goerli Testnet, you will need to wait for the transaction to be final, which usually takes a few seconds.
The following command deploys the voting contract and registers voter_0, voter_1, and voter_2 as eligible voters. These are the constructor arguments, so add a voter account that you can later vote with.
starkli deploy <class_hash_of_the_contract_to_be_deployed> <voter_0_address> <voter_1_address> <voter_2_address> --rpc http://0.0.0.0:5050 --account katana-0
An example command:
starkli deploy 0x06974677a079b7edfadcd70aa4d12aac0263a4cda379009fca125e0ab1a9ba52 0x03ee9e18edc71a6df30ac3aca2e0b02a198fbce19b7480a63a0d71cbd76652e0 0x033c627a3e5213790e246a917770ce23d7e562baa5b4d2917c23b1be6d91961c 0x01d98d835e43b032254ffbef0f150c5606fa9c5c9310b1fae370ab956a7919f5 --rpc http://0.0.0.0:5050 --account katana-0
In this case, the contract has been deployed at an specific address: 0x05ea3a690be71c7fcd83945517f82e8861a97d42fca8ec9a2c46831d11f33349. This address will be different for you. We will use this address to interact with the contract.
Voter Eligibility Verification
In our voting contract, we have two functions to validate voter eligibility, voter_can_vote and is_voter_registered. These are external read functions, which mean they don't alter the state of the contract but only read the current state.
The is_voter_registered function checks whether a particular address is registered as an eligible voter in the contract. The voter_can_vote function, on the other hand, checks whether the voter at a specific address is currently eligible to vote, i.e., they are registered and haven't voted already.
You can call these functions using the starkli call command. Note that the call command is used for read functions, while the invoke command is used for functions that can also write to storage. The call command does not require signing, while the invoke command does.
starkli call 0x05ea3a690be71c7fcd83945517f82e8861a97d42fca8ec9a2c46831d11f33349 voter_can_vote 0x03ee9e18edc71a6df30ac3aca2e0b02a198fbce19b7480a63a0d71cbd76652e0 --rpc http://0.0.0.0:5050
First we added the address of the contract, then the function we want to call, and finally the input for the function. In this case, we are checking whether the voter at the address 0x03ee9e18edc71a6df30ac3aca2e0b02a198fbce19b7480a63a0d71cbd76652e0 can vote.
Since we provided a registered voter address as an input, the result is 1 (boolean true), indicating the voter is eligible to vote.
Next, let's call the is_voter_registered function using an unregistered account address to observe the output:
starkli call 0x05ea3a690be71c7fcd83945517f82e8861a97d42fca8ec9a2c46831d11f33349 is_voter_registered 0x44444444444444444 --rpc http://0.0.0.0:5050
With an unregistered account address, the terminal output is 0 (i.e., false), confirming that the account is not eligible to vote.
Casting a Vote
Now that we have established how to verify voter eligibility, we can vote! To vote, we interact with the vote function, which is flagged as external, necessitating the use of the starknet invoke command.
The invoke command syntax resembles the call command, but for voting, we submit either 1 (for Yes) or 0 (for No) as our input. When we invoke the vote function, we are charged a fee, and the transaction must be signed by the voter; we are writing to the contract's storage.
//Voting Yes
starkli invoke 0x05ea3a690be71c7fcd83945517f82e8861a97d42fca8ec9a2c46831d11f33349 vote 1 --rpc http://0.0.0.0:5050 --account katana-0
//Voting No
starkli invoke 0x05ea3a690be71c7fcd83945517f82e8861a97d42fca8ec9a2c46831d11f33349 vote 0 --rpc http://0.0.0.0:5050 --account katana-0
You will be prompted to enter the password for the signer. Once you enter the password, the transaction will be signed and submitted to the Starknet network. You will receive the transaction hash as output. With the starkli transaction command, you can get more details about the transaction:
starkli transaction <TRANSACTION_HASH> --rpc http://0.0.0.0:5050
This returns:
{
"transaction_hash": "0x5604a97922b6811060e70ed0b40959ea9e20c726220b526ec690de8923907fd",
"max_fee": "0x430e81",
"version": "0x1",
"signature": [
"0x75e5e4880d7a8301b35ff4a1ed1e3d72fffefa64bb6c306c314496e6e402d57",
"0xbb6c459b395a535dcd00d8ab13d7ed71273da4a8e9c1f4afe9b9f4254a6f51"
],
"nonce": "0x3",
"type": "INVOKE",
"sender_address": "0x3ee9e18edc71a6df30ac3aca2e0b02a198fbce19b7480a63a0d71cbd76652e0",
"calldata": [
"0x1",
"0x5ea3a690be71c7fcd83945517f82e8861a97d42fca8ec9a2c46831d11f33349",
"0x132bdf85fc8aa10ac3c22f02317f8f53d4b4f52235ed1eabb3a4cbbe08b5c41",
"0x0",
"0x1",
"0x1",
"0x1"
]
}
If you try to vote twice with the same signer you will get an error:
Error: code=ContractError, message="Contract error"
The error is not very informative, but you can get more details when looking at the output in the terminal where you started katana (our local Starknet node):
...
Transaction execution error: "Error in the called contract (0x03ee9e18edc71a6df30ac3aca2e0b02a198fbce19b7480a63a0d71cbd76652e0):
Error at pc=0:81:
Got an exception while executing a hint: Custom Hint Error: Execution failed. Failure reason: \"USER_ALREADY_VOTED\".
...
The key for the error is USER_ALREADY_VOTED.
assert!(can_vote, "USER_ALREADY_VOTED");
We can repeat the process to create Signers and Account Descriptors for the accounts we want to use for voting. Remember that each Signer must be created from a private key, and each Account Descriptor must be created from a public key, a smart wallet address, and the smart wallet class hash (which is the same for each voter).
starkli invoke 0x05ea3a690be71c7fcd83945517f82e8861a97d42fca8ec9a2c46831d11f33349 vote 0 --rpc http://0.0.0.0:5050 --account katana-0
starkli invoke 0x05ea3a690be71c7fcd83945517f82e8861a97d42fca8ec9a2c46831d11f33349 vote 1 --rpc http://0.0.0.0:5050 --account katana-0
Visualizing Vote Outcomes
To examine the voting results, we invoke the get_vote_status function, another view function, through the starknet call command.
starkli call 0x05ea3a690be71c7fcd83945517f82e8861a97d42fca8ec9a2c46831d11f33349 get_vote_status --rpc http://0.0.0.0:5050
The output reveals the tally of "Yes" and "No" votes along with their relative percentages.
Starknet Smart Contracts Security
General Recommendations
When developing software, ensuring it functions as intended is usually straightforward. However, preventing unintended usage and vulnerabilities can be more challenging.
In smart contract development, security is very important. A single error can result in the loss of valuable assets or the improper functioning of certain features.
Smart contracts are executed in a public environment where anyone can examine the code and interact with it. Any errors or vulnerabilities in the code can be exploited by malicious actors.
This chapter presents general recommendations for writing secure smart contracts. By incorporating these concepts during development, you can create robust and reliable smart contracts. This reduces the chance of unexpected behavior or vulnerabilities.
Disclaimer
This chapter does not provide an exhaustive list of all possible security issues, and it does not guarantee that your contracts will be completely secure.
If you are developing smart contracts for production use, it is highly recommended to conduct external audits performed by security experts.
Mindset
Cairo is a highly safe language inspired by Rust. It is designed in a way that forces you to cover all possible cases. Security issues on Starknet mostly arise from the way smart contract flows are designed, not much from the language itself.
Adopting a security mindset is the initial step in writing secure smart contracts. Try to always consider all possible scenarios when writing code.
Viewing Smart Contracts as Finite State Machines
Transactions in smart contracts are atomic, meaning they either succeed or fail without making any changes.
Think of smart contracts as state machines: they have a set of initial states defined by the constructor constraints, and external functions represent a set of possible state transitions. A transaction is nothing more than a state transition.
The assert! or panic! macros can be used to validate conditions before performing specific actions. You can learn more about these on the Unrecoverable Errors with panic page.
These validations can include:
- Inputs provided by the caller
- Execution requirements
- Invariants (conditions that must always be true)
- Return values from other function calls
For example, you could use the assert! macro to validate that a user has enough funds to perform a withdraw transaction. If the condition is not met, the transaction will fail and the state of the contract will not change.
impl Contract of IContract<ContractState> {
fn withdraw(ref self: ContractState, amount: u256) {
let current_balance = self.balance.read();
assert!(self.balance.read() >= amount, "Insufficient funds");
self.balance.write(current_balance - amount);
}
Using these functions to check conditions adds constraints that help clearly define the boundaries of possible state transitions for each function in your smart contract. These checks ensure that the behavior of the contract stays within the expected limits.
Recommendations
Checks Effects Interactions Pattern
The Checks Effects Interactions pattern is a common design pattern used to prevent reentrancy attacks on Ethereum. While reentrancy is harder to achieve in Starknet, it is still recommended to use this pattern in your smart contracts.
The pattern consists of following a specific order of operations in your functions:
- Checks: Validate all conditions and inputs before performing any state changes.
- Effects: Perform all state changes.
- Interactions: All external calls to other contracts should be made at the end of the function.
Access Control
Access control is the process of restricting access to certain features or resources. It is a common security mechanism used to prevent unauthorized access to sensitive information or actions. In smart contracts, some functions may often be restricted to specific users or roles.
You can implement the access control pattern to easily manage permissions. This pattern consists of defining a set of roles and assigning them to specific users. Each function can then be restricted to specific roles.
#[starknet::contract]
mod access_control_contract {
use starknet::storage::{
StoragePointerReadAccess, StoragePointerWriteAccess, StorageMapReadAccess,
StorageMapWriteAccess, Map,
};
use starknet::ContractAddress;
use starknet::get_caller_address;
trait IContract<TContractState> {
fn is_owner(self: @TContractState) -> bool;
fn is_role_a(self: @TContractState) -> bool;
fn only_owner(self: @TContractState);
fn only_role_a(self: @TContractState);
fn only_allowed(self: @TContractState);
fn set_role_a(ref self: TContractState, _target: ContractAddress, _active: bool);
fn role_a_action(ref self: ContractState);
fn allowed_action(ref self: ContractState);
}
#[storage]
struct Storage {
// Role 'owner': only one address
owner: ContractAddress,
// Role 'role_a': a set of addresses
role_a: Map::<ContractAddress, bool>,
}
#[constructor]
fn constructor(ref self: ContractState) {
self.owner.write(get_caller_address());
}
// Guard functions to check roles
impl Contract of IContract<ContractState> {
#[inline(always)]
fn is_owner(self: @ContractState) -> bool {
self.owner.read() == get_caller_address()
}
#[inline(always)]
fn is_role_a(self: @ContractState) -> bool {
self.role_a.read(get_caller_address())
}
#[inline(always)]
fn only_owner(self: @ContractState) {
assert!(Self::is_owner(self), "Not owner");
}
#[inline(always)]
fn only_role_a(self: @ContractState) {
assert!(Self::is_role_a(self), "Not role A");
}
// You can easily combine guards to perform complex checks
fn only_allowed(self: @ContractState) {
assert!(Self::is_owner(self) || Contract::is_role_a(self), "Not allowed");
}
// Functions to manage roles
fn set_role_a(ref self: ContractState, _target: ContractAddress, _active: bool) {
Self::only_owner(@self);
self.role_a.write(_target, _active);
}
// You can now focus on the business logic of your contract
// and reduce the complexity of your code by using guard functions
fn role_a_action(ref self: ContractState) {
Self::only_role_a(@self);
// ...
}
fn allowed_action(ref self: ContractState) {
Self::only_allowed(@self);
// ...
}
}
}
Testing Smart Contracts
Testing smart contracts is a critical part of the development process. It is important to ensure that smart contracts behave as expected and that they are secure.
In a previous section of the Cairo Book, we learned how to write and structure our tests for Cairo programs. We demonstrated how these tests could be run using the scarb command-line tool.
While this approach is useful for testing standalone Cairo programs and functions, it lacks functionality for testing smart contracts that require control over the contract state and execution context. Therefore, in this section, we will introduce how to use Starknet Foundry, a smart contract development toolchain for Starknet, to test your Cairo contracts.
Throughout this chapter, we will be using as an example the PizzaFactory contract in Listing 18-1 to demonstrate how to write tests with Starknet Foundry.
use starknet::ContractAddress;
#[starknet::interface]
pub trait IPizzaFactory<TContractState> {
fn increase_pepperoni(ref self: TContractState, amount: u32);
fn increase_pineapple(ref self: TContractState, amount: u32);
fn get_owner(self: @TContractState) -> ContractAddress;
fn change_owner(ref self: TContractState, new_owner: ContractAddress);
fn make_pizza(ref self: TContractState);
fn count_pizza(self: @TContractState) -> u32;
}
#[starknet::contract]
pub mod PizzaFactory {
use super::IPizzaFactory;
use starknet::{ContractAddress, get_caller_address};
use starknet::storage::{StoragePointerReadAccess, StoragePointerWriteAccess};
#[storage]
pub struct Storage {
pepperoni: u32,
pineapple: u32,
pub owner: ContractAddress,
pizzas: u32,
}
#[constructor]
fn constructor(ref self: ContractState, owner: ContractAddress) {
self.pepperoni.write(10);
self.pineapple.write(10);
self.owner.write(owner);
}
#[event]
#[derive(Drop, starknet::Event)]
pub enum Event {
PizzaEmission: PizzaEmission,
}
#[derive(Drop, starknet::Event)]
pub struct PizzaEmission {
pub counter: u32,
}
#[abi(embed_v0)]
impl PizzaFactoryimpl of super::IPizzaFactory<ContractState> {
fn increase_pepperoni(ref self: ContractState, amount: u32) {
assert!(amount != 0, "Amount cannot be 0");
self.pepperoni.write(self.pepperoni.read() + amount);
}
fn increase_pineapple(ref self: ContractState, amount: u32) {
assert!(amount != 0, "Amount cannot be 0");
self.pineapple.write(self.pineapple.read() + amount);
}
fn make_pizza(ref self: ContractState) {
assert!(self.pepperoni.read() > 0, "Not enough pepperoni");
assert!(self.pineapple.read() > 0, "Not enough pineapple");
let caller: ContractAddress = get_caller_address();
let owner: ContractAddress = self.get_owner();
assert!(caller == owner, "Only the owner can make pizza");
self.pepperoni.write(self.pepperoni.read() - 1);
self.pineapple.write(self.pineapple.read() - 1);
self.pizzas.write(self.pizzas.read() + 1);
self.emit(PizzaEmission { counter: self.pizzas.read() });
}
fn get_owner(self: @ContractState) -> ContractAddress {
self.owner.read()
}
fn change_owner(ref self: ContractState, new_owner: ContractAddress) {
self.set_owner(new_owner);
}
fn count_pizza(self: @ContractState) -> u32 {
self.pizzas.read()
}
}
#[generate_trait]
pub impl InternalImpl of InternalTrait {
fn set_owner(ref self: ContractState, new_owner: ContractAddress) {
let caller: ContractAddress = get_caller_address();
assert!(caller == self.get_owner(), "Only the owner can set ownership");
self.owner.write(new_owner);
}
}
}
Listing 18-1: A pizza factory that needs to be tested
Configuring your Scarb project with Starknet Foundry
The settings of your Scarb project can be configured in the Scarb.toml file. To use Starknet Foundry as your testing tool, you will need to add it as a dev dependency in your Scarb.toml file. At the time of writing, the latest version of Starknet Foundry is v0.39.0 - but you should use the latest version.
[dev-dependencies]
snforge_std = "0.39.0"
[scripts]
test = "snforge test"
[tool.scarb]
allow-prebuilt-plugins = ["snforge_std"]
The scarb test command is configured to execute scarb cairo-test by default. In our settings, we have configured it to execute snforge test instead. This will allow us to run our tests using Starknet Foundry when we run the scarb test command.
Once your project is configured, you will need to install Starknet Foundry by following the installation guide from the Starknet Foundry Documentation. As usual, we recommend to use asdf to manage versions of your development tools.
Testing Smart Contracts with Starknet Foundry
The usual command to run your tests using Starknet Foundry is snforge test. However, when we configured our projects, we defined that the scarb test command will run the snforge test command. Therefore, during the rest of this chapter, consider that the scarb test command will be using snforge test under the hood.
The usual testing flow of a contract is as follows:
- Declare the class of the contract to test, identified by its name
- Serialize the constructor calldata into an array
- Deploy the contract and retrieve its address
- Interact with the contract's entrypoint to test various scenarios
Deploying the Contract to Test
In Listing 18-2, we wrote a function that deploys the PizzaFactory contract and sets up the dispatcher for interactions.
use crate::pizza::{
IPizzaFactoryDispatcher, IPizzaFactoryDispatcherTrait, PizzaFactory,
PizzaFactory::{Event as PizzaEvents, PizzaEmission},
};
use crate::pizza::PizzaFactory::{InternalTrait};
use starknet::{ContractAddress, contract_address_const};
use starknet::storage::StoragePointerReadAccess;
use snforge_std::{
declare, ContractClassTrait, DeclareResultTrait, start_cheat_caller_address,
stop_cheat_caller_address, EventSpyAssertionsTrait, spy_events, load,
};
fn owner() -> ContractAddress {
contract_address_const::<'owner'>()
}
fn deploy_pizza_factory() -> (IPizzaFactoryDispatcher, ContractAddress) {
let contract = declare("PizzaFactory").unwrap().contract_class();
let owner: ContractAddress = contract_address_const::<'owner'>();
let constructor_calldata = array![owner.into()];
let (contract_address, _) = contract.deploy(@constructor_calldata).unwrap();
let dispatcher = IPizzaFactoryDispatcher { contract_address };
(dispatcher, contract_address)
}
#[test]
fn test_constructor() {
let (pizza_factory, pizza_factory_address) = deploy_pizza_factory();
let pepperoni_count = load(pizza_factory_address, selector!("pepperoni"), 1);
let pineapple_count = load(pizza_factory_address, selector!("pineapple"), 1);
assert_eq!(pepperoni_count, array![10]);
assert_eq!(pineapple_count, array![10]);
assert_eq!(pizza_factory.get_owner(), owner());
}
#[test]
fn test_change_owner_should_change_owner() {
let (pizza_factory, pizza_factory_address) = deploy_pizza_factory();
let new_owner: ContractAddress = contract_address_const::<'new_owner'>();
assert_eq!(pizza_factory.get_owner(), owner());
start_cheat_caller_address(pizza_factory_address, owner());
pizza_factory.change_owner(new_owner);
assert_eq!(pizza_factory.get_owner(), new_owner);
}
#[test]
#[should_panic(expected: "Only the owner can set ownership")]
fn test_change_owner_should_panic_when_not_owner() {
let (pizza_factory, pizza_factory_address) = deploy_pizza_factory();
let not_owner = contract_address_const::<'not_owner'>();
start_cheat_caller_address(pizza_factory_address, not_owner);
pizza_factory.change_owner(not_owner);
stop_cheat_caller_address(pizza_factory_address);
}
#[test]
#[should_panic(expected: "Only the owner can make pizza")]
fn test_make_pizza_should_panic_when_not_owner() {
let (pizza_factory, pizza_factory_address) = deploy_pizza_factory();
let not_owner = contract_address_const::<'not_owner'>();
start_cheat_caller_address(pizza_factory_address, not_owner);
pizza_factory.make_pizza();
}
#[test]
fn test_make_pizza_should_increment_pizza_counter() {
// Setup
let (pizza_factory, pizza_factory_address) = deploy_pizza_factory();
start_cheat_caller_address(pizza_factory_address, owner());
let mut spy = spy_events();
// When
pizza_factory.make_pizza();
// Then
let expected_event = PizzaEvents::PizzaEmission(PizzaEmission { counter: 1 });
assert_eq!(pizza_factory.count_pizza(), 1);
spy.assert_emitted(@array![(pizza_factory_address, expected_event)]);
}
#[test]
fn test_set_as_new_owner_direct() {
let mut state = PizzaFactory::contract_state_for_testing();
let owner: ContractAddress = contract_address_const::<'owner'>();
state.set_owner(owner);
assert_eq!(state.owner.read(), owner);
}
Listing 18-2 Deploying the contract to test
Testing our Contract
Determining the behavior that your contract should respect is the first step in writing tests. In the PizzaFactory contract, we determined that the contract should have the following behavior:
- Upon deployment, the contract owner should be set to the address provided in the constructor, and the factory should have 10 units of pepperoni and pineapple, and no pizzas created.
- If someone tries to make a pizza and they are not the owner, the operation should fail. Otherwise, the pizza count should be incremented, and an event should be emitted.
- If someone tries to take ownership of the contract and they are not the owner, the operation should fail. Otherwise, the owner should be updated.
Accessing Storage Variables with load
use crate::pizza::{
IPizzaFactoryDispatcher, IPizzaFactoryDispatcherTrait, PizzaFactory,
PizzaFactory::{Event as PizzaEvents, PizzaEmission},
};
use crate::pizza::PizzaFactory::{InternalTrait};
use starknet::{ContractAddress, contract_address_const};
use starknet::storage::StoragePointerReadAccess;
use snforge_std::{
declare, ContractClassTrait, DeclareResultTrait, start_cheat_caller_address,
stop_cheat_caller_address, EventSpyAssertionsTrait, spy_events, load,
};
fn owner() -> ContractAddress {
contract_address_const::<'owner'>()
}
fn deploy_pizza_factory() -> (IPizzaFactoryDispatcher, ContractAddress) {
let contract = declare("PizzaFactory").unwrap().contract_class();
let owner: ContractAddress = contract_address_const::<'owner'>();
let constructor_calldata = array![owner.into()];
let (contract_address, _) = contract.deploy(@constructor_calldata).unwrap();
let dispatcher = IPizzaFactoryDispatcher { contract_address };
(dispatcher, contract_address)
}
#[test]
fn test_constructor() {
let (pizza_factory, pizza_factory_address) = deploy_pizza_factory();
let pepperoni_count = load(pizza_factory_address, selector!("pepperoni"), 1);
let pineapple_count = load(pizza_factory_address, selector!("pineapple"), 1);
assert_eq!(pepperoni_count, array![10]);
assert_eq!(pineapple_count, array![10]);
assert_eq!(pizza_factory.get_owner(), owner());
}
#[test]
fn test_change_owner_should_change_owner() {
let (pizza_factory, pizza_factory_address) = deploy_pizza_factory();
let new_owner: ContractAddress = contract_address_const::<'new_owner'>();
assert_eq!(pizza_factory.get_owner(), owner());
start_cheat_caller_address(pizza_factory_address, owner());
pizza_factory.change_owner(new_owner);
assert_eq!(pizza_factory.get_owner(), new_owner);
}
#[test]
#[should_panic(expected: "Only the owner can set ownership")]
fn test_change_owner_should_panic_when_not_owner() {
let (pizza_factory, pizza_factory_address) = deploy_pizza_factory();
let not_owner = contract_address_const::<'not_owner'>();
start_cheat_caller_address(pizza_factory_address, not_owner);
pizza_factory.change_owner(not_owner);
stop_cheat_caller_address(pizza_factory_address);
}
#[test]
#[should_panic(expected: "Only the owner can make pizza")]
fn test_make_pizza_should_panic_when_not_owner() {
let (pizza_factory, pizza_factory_address) = deploy_pizza_factory();
let not_owner = contract_address_const::<'not_owner'>();
start_cheat_caller_address(pizza_factory_address, not_owner);
pizza_factory.make_pizza();
}
#[test]
fn test_make_pizza_should_increment_pizza_counter() {
// Setup
let (pizza_factory, pizza_factory_address) = deploy_pizza_factory();
start_cheat_caller_address(pizza_factory_address, owner());
let mut spy = spy_events();
// When
pizza_factory.make_pizza();
// Then
let expected_event = PizzaEvents::PizzaEmission(PizzaEmission { counter: 1 });
assert_eq!(pizza_factory.count_pizza(), 1);
spy.assert_emitted(@array![(pizza_factory_address, expected_event)]);
}
#[test]
fn test_set_as_new_owner_direct() {
let mut state = PizzaFactory::contract_state_for_testing();
let owner: ContractAddress = contract_address_const::<'owner'>();
state.set_owner(owner);
assert_eq!(state.owner.read(), owner);
}
Listing 18-3: Testing the initial state by loading storage variables
Once our contract is deployed, we want to assert that the initial values are set as expected. If our contract has an entrypoint that returns the value of a storage variable, we can call this entrypoint. Otherwise, we can use the load function from snforge to load the value of a storage variable inside our contract, even if not exposed by an entrypoint.
Mocking the Caller Address with start_cheat_caller_address
The security of our factory relies on the owner being the only one able to make pizzas and transfer ownership. To test this, we can use the start_cheat_caller_address function to mock the caller address and assert that the contract behaves as expected.
use crate::pizza::{
IPizzaFactoryDispatcher, IPizzaFactoryDispatcherTrait, PizzaFactory,
PizzaFactory::{Event as PizzaEvents, PizzaEmission},
};
use crate::pizza::PizzaFactory::{InternalTrait};
use starknet::{ContractAddress, contract_address_const};
use starknet::storage::StoragePointerReadAccess;
use snforge_std::{
declare, ContractClassTrait, DeclareResultTrait, start_cheat_caller_address,
stop_cheat_caller_address, EventSpyAssertionsTrait, spy_events, load,
};
fn owner() -> ContractAddress {
contract_address_const::<'owner'>()
}
fn deploy_pizza_factory() -> (IPizzaFactoryDispatcher, ContractAddress) {
let contract = declare("PizzaFactory").unwrap().contract_class();
let owner: ContractAddress = contract_address_const::<'owner'>();
let constructor_calldata = array![owner.into()];
let (contract_address, _) = contract.deploy(@constructor_calldata).unwrap();
let dispatcher = IPizzaFactoryDispatcher { contract_address };
(dispatcher, contract_address)
}
#[test]
fn test_constructor() {
let (pizza_factory, pizza_factory_address) = deploy_pizza_factory();
let pepperoni_count = load(pizza_factory_address, selector!("pepperoni"), 1);
let pineapple_count = load(pizza_factory_address, selector!("pineapple"), 1);
assert_eq!(pepperoni_count, array![10]);
assert_eq!(pineapple_count, array![10]);
assert_eq!(pizza_factory.get_owner(), owner());
}
#[test]
fn test_change_owner_should_change_owner() {
let (pizza_factory, pizza_factory_address) = deploy_pizza_factory();
let new_owner: ContractAddress = contract_address_const::<'new_owner'>();
assert_eq!(pizza_factory.get_owner(), owner());
start_cheat_caller_address(pizza_factory_address, owner());
pizza_factory.change_owner(new_owner);
assert_eq!(pizza_factory.get_owner(), new_owner);
}
#[test]
#[should_panic(expected: "Only the owner can set ownership")]
fn test_change_owner_should_panic_when_not_owner() {
let (pizza_factory, pizza_factory_address) = deploy_pizza_factory();
let not_owner = contract_address_const::<'not_owner'>();
start_cheat_caller_address(pizza_factory_address, not_owner);
pizza_factory.change_owner(not_owner);
stop_cheat_caller_address(pizza_factory_address);
}
#[test]
#[should_panic(expected: "Only the owner can make pizza")]
fn test_make_pizza_should_panic_when_not_owner() {
let (pizza_factory, pizza_factory_address) = deploy_pizza_factory();
let not_owner = contract_address_const::<'not_owner'>();
start_cheat_caller_address(pizza_factory_address, not_owner);
pizza_factory.make_pizza();
}
#[test]
fn test_make_pizza_should_increment_pizza_counter() {
// Setup
let (pizza_factory, pizza_factory_address) = deploy_pizza_factory();
start_cheat_caller_address(pizza_factory_address, owner());
let mut spy = spy_events();
// When
pizza_factory.make_pizza();
// Then
let expected_event = PizzaEvents::PizzaEmission(PizzaEmission { counter: 1 });
assert_eq!(pizza_factory.count_pizza(), 1);
spy.assert_emitted(@array![(pizza_factory_address, expected_event)]);
}
#[test]
fn test_set_as_new_owner_direct() {
let mut state = PizzaFactory::contract_state_for_testing();
let owner: ContractAddress = contract_address_const::<'owner'>();
state.set_owner(owner);
assert_eq!(state.owner.read(), owner);
}
Listing 18-4: Testing ownership of the contract by mocking the caller address
Using start_cheat_caller_address, we call the change_owner function first as the owner, and then as a different address. We assert that the operation fails when the caller is not the owner, and that the owner is updated when the caller is the owner.
Capturing Events with spy_events
When a pizza is created, the contract emits an event. To test this, we can use the spy_events function to capture the emitted events and assert that the event was emitted with the expected parameters. Naturally, we can also assert that the pizza count was incremented, and that only the owner can make a pizza.
use crate::pizza::{
IPizzaFactoryDispatcher, IPizzaFactoryDispatcherTrait, PizzaFactory,
PizzaFactory::{Event as PizzaEvents, PizzaEmission},
};
use crate::pizza::PizzaFactory::{InternalTrait};
use starknet::{ContractAddress, contract_address_const};
use starknet::storage::StoragePointerReadAccess;
use snforge_std::{
declare, ContractClassTrait, DeclareResultTrait, start_cheat_caller_address,
stop_cheat_caller_address, EventSpyAssertionsTrait, spy_events, load,
};
fn owner() -> ContractAddress {
contract_address_const::<'owner'>()
}
fn deploy_pizza_factory() -> (IPizzaFactoryDispatcher, ContractAddress) {
let contract = declare("PizzaFactory").unwrap().contract_class();
let owner: ContractAddress = contract_address_const::<'owner'>();
let constructor_calldata = array![owner.into()];
let (contract_address, _) = contract.deploy(@constructor_calldata).unwrap();
let dispatcher = IPizzaFactoryDispatcher { contract_address };
(dispatcher, contract_address)
}
#[test]
fn test_constructor() {
let (pizza_factory, pizza_factory_address) = deploy_pizza_factory();
let pepperoni_count = load(pizza_factory_address, selector!("pepperoni"), 1);
let pineapple_count = load(pizza_factory_address, selector!("pineapple"), 1);
assert_eq!(pepperoni_count, array![10]);
assert_eq!(pineapple_count, array![10]);
assert_eq!(pizza_factory.get_owner(), owner());
}
#[test]
fn test_change_owner_should_change_owner() {
let (pizza_factory, pizza_factory_address) = deploy_pizza_factory();
let new_owner: ContractAddress = contract_address_const::<'new_owner'>();
assert_eq!(pizza_factory.get_owner(), owner());
start_cheat_caller_address(pizza_factory_address, owner());
pizza_factory.change_owner(new_owner);
assert_eq!(pizza_factory.get_owner(), new_owner);
}
#[test]
#[should_panic(expected: "Only the owner can set ownership")]
fn test_change_owner_should_panic_when_not_owner() {
let (pizza_factory, pizza_factory_address) = deploy_pizza_factory();
let not_owner = contract_address_const::<'not_owner'>();
start_cheat_caller_address(pizza_factory_address, not_owner);
pizza_factory.change_owner(not_owner);
stop_cheat_caller_address(pizza_factory_address);
}
#[test]
#[should_panic(expected: "Only the owner can make pizza")]
fn test_make_pizza_should_panic_when_not_owner() {
let (pizza_factory, pizza_factory_address) = deploy_pizza_factory();
let not_owner = contract_address_const::<'not_owner'>();
start_cheat_caller_address(pizza_factory_address, not_owner);
pizza_factory.make_pizza();
}
#[test]
fn test_make_pizza_should_increment_pizza_counter() {
// Setup
let (pizza_factory, pizza_factory_address) = deploy_pizza_factory();
start_cheat_caller_address(pizza_factory_address, owner());
let mut spy = spy_events();
// When
pizza_factory.make_pizza();
// Then
let expected_event = PizzaEvents::PizzaEmission(PizzaEmission { counter: 1 });
assert_eq!(pizza_factory.count_pizza(), 1);
spy.assert_emitted(@array![(pizza_factory_address, expected_event)]);
}
#[test]
fn test_set_as_new_owner_direct() {
let mut state = PizzaFactory::contract_state_for_testing();
let owner: ContractAddress = contract_address_const::<'owner'>();
state.set_owner(owner);
assert_eq!(state.owner.read(), owner);
}
Listing 18-5: Testing the events emitted when a pizza is created
Accessing Internal Functions with contract_state_for_testing
All the tests we have seen so far have been using a workflow that involves deploying the contract and interacting with the contract's entrypoints. However, sometimes we may want to test the internals of the contract directly, without deploying the contract. How could this be done, if we were reasoning in purely Cairo terms?
Recall the struct ContractState, which is used as a parameter to all the entrypoints of a contract. To make it short, this struct contains zero-sized fields, corresponding to the storage variables of the contract. The only purpose of these fields is to allow the Cairo compiler to generate the correct code for accessing the storage variables. If we could create an instance of this struct, we could access these storage variables directly, without deploying the contract...
...and this is exactly what the contract_state_for_testing function does! It creates an instance of the ContractState struct, allowing us to call any function that takes as parameter a ContractState struct, without deploying the contract. To interact with the storage variables properly, we need to manually import the traits that define access to the storage variables.
use crate::pizza::{
IPizzaFactoryDispatcher, IPizzaFactoryDispatcherTrait, PizzaFactory,
PizzaFactory::{Event as PizzaEvents, PizzaEmission},
};
use crate::pizza::PizzaFactory::{InternalTrait};
use starknet::{ContractAddress, contract_address_const};
use starknet::storage::StoragePointerReadAccess;
use snforge_std::{
declare, ContractClassTrait, DeclareResultTrait, start_cheat_caller_address,
stop_cheat_caller_address, EventSpyAssertionsTrait, spy_events, load,
};
fn owner() -> ContractAddress {
contract_address_const::<'owner'>()
}
fn deploy_pizza_factory() -> (IPizzaFactoryDispatcher, ContractAddress) {
let contract = declare("PizzaFactory").unwrap().contract_class();
let owner: ContractAddress = contract_address_const::<'owner'>();
let constructor_calldata = array![owner.into()];
let (contract_address, _) = contract.deploy(@constructor_calldata).unwrap();
let dispatcher = IPizzaFactoryDispatcher { contract_address };
(dispatcher, contract_address)
}
#[test]
fn test_constructor() {
let (pizza_factory, pizza_factory_address) = deploy_pizza_factory();
let pepperoni_count = load(pizza_factory_address, selector!("pepperoni"), 1);
let pineapple_count = load(pizza_factory_address, selector!("pineapple"), 1);
assert_eq!(pepperoni_count, array![10]);
assert_eq!(pineapple_count, array![10]);
assert_eq!(pizza_factory.get_owner(), owner());
}
#[test]
fn test_change_owner_should_change_owner() {
let (pizza_factory, pizza_factory_address) = deploy_pizza_factory();
let new_owner: ContractAddress = contract_address_const::<'new_owner'>();
assert_eq!(pizza_factory.get_owner(), owner());
start_cheat_caller_address(pizza_factory_address, owner());
pizza_factory.change_owner(new_owner);
assert_eq!(pizza_factory.get_owner(), new_owner);
}
#[test]
#[should_panic(expected: "Only the owner can set ownership")]
fn test_change_owner_should_panic_when_not_owner() {
let (pizza_factory, pizza_factory_address) = deploy_pizza_factory();
let not_owner = contract_address_const::<'not_owner'>();
start_cheat_caller_address(pizza_factory_address, not_owner);
pizza_factory.change_owner(not_owner);
stop_cheat_caller_address(pizza_factory_address);
}
#[test]
#[should_panic(expected: "Only the owner can make pizza")]
fn test_make_pizza_should_panic_when_not_owner() {
let (pizza_factory, pizza_factory_address) = deploy_pizza_factory();
let not_owner = contract_address_const::<'not_owner'>();
start_cheat_caller_address(pizza_factory_address, not_owner);
pizza_factory.make_pizza();
}
#[test]
fn test_make_pizza_should_increment_pizza_counter() {
// Setup
let (pizza_factory, pizza_factory_address) = deploy_pizza_factory();
start_cheat_caller_address(pizza_factory_address, owner());
let mut spy = spy_events();
// When
pizza_factory.make_pizza();
// Then
let expected_event = PizzaEvents::PizzaEmission(PizzaEmission { counter: 1 });
assert_eq!(pizza_factory.count_pizza(), 1);
spy.assert_emitted(@array![(pizza_factory_address, expected_event)]);
}
#[test]
fn test_set_as_new_owner_direct() {
let mut state = PizzaFactory::contract_state_for_testing();
let owner: ContractAddress = contract_address_const::<'owner'>();
state.set_owner(owner);
assert_eq!(state.owner.read(), owner);
}
Listing 18-6: Unit testing our contract without deployment
These imports give us access to our internal functions (notably, set_owner), as well as the
read/write access to the owner storage variable. Once we have these, we can interact with the
contract directly, changing the address of the owner by calling the set_owner method, accessible
through InternalTrait, and reading the owner storage variable.
Note: Both approaches cannot be used at the same time. If you decide to deploy the contract, you interact with it using the dispatcher. If you decide to test the internal functions, you interact with the
ContractStateobject directly.
$ scarb test
Running test listing_02_pizza_factory_snfoundry (snforge test)
Compiling snforge_scarb_plugin v0.31.0 (git+https://github.com/foundry-rs/starknet-foundry.git?tag=v0.31.0#72ea785ca354e9e506de3e5d687da9fb2c1b3c67)
Finished `release` profile [optimized] target(s) in 0.99s
Compiling test(listings/ch17-starknet-smart-contracts-security/listing_02_pizza_factory_snfoundry/Scarb.toml)
Finished `dev` profile target(s) in 7 seconds
Collected 6 test(s) from listing_02_pizza_factory_snfoundry package
Running 6 test(s) from src/
[PASS] listing_02_pizza_factory_snfoundry::tests::foundry_test::test_set_as_new_owner_direct (gas: ~130)
[PASS] listing_02_pizza_factory_snfoundry::tests::foundry_test::test_change_owner_should_panic_when_not_owner (gas: ~298)
[PASS] listing_02_pizza_factory_snfoundry::tests::foundry_test::test_constructor (gas: ~297)
[PASS] listing_02_pizza_factory_snfoundry::tests::foundry_test::test_make_pizza_should_panic_when_not_owner (gas: ~298)
[PASS] listing_02_pizza_factory_snfoundry::tests::foundry_test::test_make_pizza_should_increment_pizza_counter (gas: ~368)
[PASS] listing_02_pizza_factory_snfoundry::tests::foundry_test::test_change_owner_should_change_owner (gas: ~303)
Tests: 6 passed, 0 failed, 0 skipped, 0 ignored, 0 filtered out
The output of the tests shows that all the tests passed successfully, along with an estimation of the gas consumed by each test.
Summary
In this chapter, we learned how to test smart contracts using Starknet Foundry. We demonstrated how to deploy a contract and interact with it using the dispatcher. We also showed how to test the contract's behavior by mocking the caller address and capturing events. Finally, we demonstrated how to test the internal functions of the contract directly, without deploying the contract.
To learn more about Starknet Foundry, refer to the Starknet Foundry documentation.
Static Analysis Tools
Static analysis refers to the process of examining code without its execution, focusing on its structure, syntax, and properties. It involves analyzing the source code to identify potential issues, vulnerabilities, or violations of specified rules.
By defining rules, such as coding conventions or security guidelines, developers can utilize static analysis tools to automatically check the code against these standards.
Reference:
Appendix
The following sections contain reference material you may find useful in your Starknet journey.
Appendix A - System Calls
This chapter is based on the Starknet documentation available at Starknet Docs.
Writing smart contracts requires various associated operations, such as calling another contract or accessing the contract’s storage, that standalone programs do not require.
The Starknet contract language supports these operations by using system calls. System calls enable a contract to require services from the Starknet OS. You can use system calls in a function to get information that depends on the broader state of Starknet, which would otherwise be inaccessible, rather than local variables that appear in the function’s scope.
Here is a list of the system calls available in Cairo 1.0:
- get_block_hash
- get_execution_info
- call_contract
- deploy
- emit_event
- library_call
- send_message_to_L1
- get_class_hash_at
- replace_class
- storage_read
- storage_write
- keccak
- sha256_process_block
get_block_hash
Syntax
pub extern fn get_block_hash_syscall(
block_number: u64,
) -> SyscallResult<felt252> implicits(GasBuiltin, System) nopanic;
Description
Gets the hash of a specific Starknet block within the range of [first_v0_12_0_block, current_block - 10].
Return Values
Returns the hash of the given block.
Error Messages
Block number out of range:block_numberis greater thancurrent_block- 10.0:block_numberis less than the first block number of v0.12.0.
Common Library
get_execution_info
Syntax
pub extern fn get_execution_info_syscall() -> SyscallResult<
Box<starknet::info::ExecutionInfo>,
> implicits(GasBuiltin, System) nopanic;
Description
Gets information about the original transaction.
In Cairo 1.0, all block/transaction/execution context getters are batched into this single system call.
Arguments
None.
Return Values
Returns a struct containing the execution info.
Common Library
call_contract
Syntax
pub extern fn call_contract_syscall(
address: ContractAddress, entry_point_selector: felt252, calldata: Span<felt252>,
) -> SyscallResult<Span<felt252>> implicits(GasBuiltin, System) nopanic;
Description
Calls a given contract. This system call expects the address of the called contract, a selector for a function within that contract, and call arguments.
Note:
An internal call can’t return Err(_) as this is not handled by the sequencer and the Starknet OS.
If call_contract_syscall fails, this can’t be caught and will therefore result in the entire transaction being reverted.
Arguments
address: The address of the contract you want to call.entry_point_selector: A selector for a function within that contract, can be computed with theselector!macro.calldata: The calldata array.
Return Values
The call response, of type SyscallResult<Span<felt252>>.
Common Library
Note: This is considered a lower-level syntax for calling contracts. If the interface of the called contract is available, then you can use a more straightforward syntax.
deploy
Syntax
pub extern fn deploy_syscall(
class_hash: ClassHash,
contract_address_salt: felt252,
calldata: Span<felt252>,
deploy_from_zero: bool,
) -> SyscallResult<(ContractAddress, Span<felt252>)> implicits(GasBuiltin, System) nopanic;
Description
Deploys a new instance of a previously declared class.
Arguments
class_hash: The class hash of the contract to be deployed.contract_address_salt: The salt, an arbitrary value provided by the sender. It is used in the computation of the contract’s address.calldata: The constructor’s calldata. An array of felts.deploy_from_zero: A flag used for the contract address computation. If not set, the caller address will be used as the new contract’s deployer address, otherwise 0 is used.
Return Values
A tuple wrapped with SyscallResult where:
-
The first element is the address of the deployed contract, of type
ContractAddress. -
The second element is the response array from the contract’s constructor, of type
Span::<felt252>.
Common Library
emit_event
Syntax
pub extern fn emit_event_syscall(
keys: Span<felt252>, data: Span<felt252>,
) -> SyscallResult<()> implicits(GasBuiltin, System) nopanic;
Description
Emits an event with a given set of keys and data.
For more information and a higher-level syntax for emitting events, see Starknet events.
Arguments
-
keys: The event’s keys. These are analogous to Ethereum’s event topics, you can use the starknet_getEvents method to filter by these keys. -
data: The event’s data.
Return Values
None.
Example
The following example emits an event with two keys, the strings status and deposit and three data elements: 1, 2, and 3.
let keys = ArrayTrait::new();
keys.append('key');
keys.append('deposit');
let values = ArrayTrait::new();
values.append(1);
values.append(2);
values.append(3);
emit_event_syscall(keys, values).unwrap_syscall();
Common Library
library_call
Syntax
pub extern fn library_call_syscall(
class_hash: ClassHash, function_selector: felt252, calldata: Span<felt252>,
) -> SyscallResult<Span<felt252>> implicits(GasBuiltin, System) nopanic;
Description
Calls the requested function in any previously declared class. The class is only used for its logic.
This system call replaces the known delegate call functionality from Ethereum, with the important difference that there is only one contract involved.
Arguments
-
class_hash: The hash of the class you want to use. -
function_selector: A selector for a function within that class, can be computed with theselector!macro. -
calldata: The calldata.
Return Values
The call response, of type SyscallResult<Span<felt252>>.
Common Library
send_message_to_L1
Syntax
pub extern fn send_message_to_l1_syscall(
to_address: felt252, payload: Span<felt252>,
) -> SyscallResult<()> implicits(GasBuiltin, System) nopanic;
Description
Sends a message to L1.
This system call includes the message parameters as part of the proof’s output and exposes these parameters to the StarknetCore contract on L1 once the state update, including the transaction, is received.
For more information, see Starknet’s messaging mechanism.
Arguments
-
to_address: The recipient’s L1 address. -
payload: The array containing the message payload.
Return Values
None.
Example
The following example sends a message whose content is (1,2) to the L1 contract whose address is 3423542542364363.
let payload = ArrayTrait::new();
payload.append(1);
payload.append(2);
send_message_to_l1_syscall(payload).unwrap_syscall();
Common Library
get_class_hash_at
Syntax
pub extern fn get_class_hash_at_syscall(
contract_address: ContractAddress,
) -> SyscallResult<ClassHash> implicits(GasBuiltin, System) nopanic;
Description
Gets the class hash of the contract at the given address.
Arguments
contract_address: The address of the deployed contract.
Return Values
The class hash of the contract's originating code.
Common Library
replace_class
Syntax
pub extern fn replace_class_syscall(
class_hash: ClassHash,
) -> SyscallResult<()> implicits(GasBuiltin, System) nopanic;
Description
Once replace_class is called, the class of the calling contract (i.e. the contract whose address is returned by get_contract_address at the time the syscall is called) will be replaced by the class whose hash is given by the class_hash argument.
Note:
After calling
replace_class, the code currently executing from the old class will finish running.The new class will be used from the next transaction onwards or if the contract is called via the
call_contractsyscall in the same transaction (after the replacement).
Arguments
class_hash: The hash of the class you want to use as a replacement.
Return Values
None.
Common Library
storage_read
Syntax
pub extern fn storage_read_syscall(
address_domain: u32, address: StorageAddress,
) -> SyscallResult<felt252> implicits(GasBuiltin, System) nopanic;
Description
Gets the value of a key in the storage of the calling contract.
This system call provides direct access to any possible key in storage, in contrast with var.read(), which enables you to read storage variables that are defined explicitly in the contract.
For information on accessing storage by using the storage variables, see storage variables.
Arguments
-
address_domain: The domain of the key, used to separate between different data availability modes. This separation is used in Starknet to offer different data availability modes. Currently, only the onchain mode (where all updates go to L1), indicated by domain0, is supported. Other address domains which will be introduced in the future will behave differently in terms of publication (in particular, they will not be posted on L1, creating a tradeoff between cost and security). -
address: The requested storage address.
Return Values
The value of the key, of type SyscallResult<felt252>.
Example
use starknet::storage_access::storage_base_address_from_felt252;
...
let storage_address = storage_base_address_from_felt252(3534535754756246375475423547453)
storage_read_syscall(0, storage_address).unwrap_syscall()
Common Library
storage_write
Syntax
pub extern fn storage_write_syscall(
address_domain: u32, address: StorageAddress, value: felt252,
) -> SyscallResult<()> implicits(GasBuiltin, System) nopanic;
Description
Sets the value of a key in the storage of the calling contract.
This system call provides direct access to any possible key in storage, in contrast with var.write(), which enables you to write to storage variables that are defined explicitly in the contract.
For information on accessing storage by using the storage variables, see storage variables.
Arguments
-
address_domain: The domain of the key, used to separate between different data availability modes. This separation is used in Starknet to offer different data availability modes. Currently, only the onchain mode (where all updates go to L1), indicated by domain0, is supported. Other address domains which will be introduced in the future will behave differently in terms of publication (in particular, they will not be posted on L1, creating a tradeoff between cost and security). -
address: The requested storage address. -
value: The value to write to the key.
Return Values
None.
Common Library
keccak
Syntax
pub extern fn keccak_syscall(
input: Span<u64>,
) -> SyscallResult<u256> implicits(GasBuiltin, System) nopanic;
Description
Computes the Keccak-256 hash of a given input.
Arguments
input: ASpan<u64>Keccak-256 input.
Return Values
Returns the hash result as a u256.
Common Library
sha256_process_block
Syntax
pub extern fn sha256_process_block_syscall(
state: core::sha256::Sha256StateHandle, input: Box<[u32; 16]>
) -> SyscallResult<core::sha256::Sha256StateHandle> implicits(GasBuiltin, System) nopanic;
Description
Computes the next SHA-256 state of the input with the given state.
This syscall computes the next SHA-256 state by combining the current state with a 512-bit block of input data.
Arguments
state: The current SHA-256 state.input: The value to be processed into SHA-256.
Return Values
Returns a new SHA-256 state of the input data.
Common Library
Introduction
Ever wondered how your Cairo programs were executed?
First, they are compiled by the Cairo Compiler, then executed by the Cairo Virtual Machine, or Cairo VM for short, which generates a trace of execution, used by the Prover to generate a STARK proof of that execution. This proof can later be verified by a Verifier.
The following chapters will go deep inside the inner workings of the Cairo VM. We'll cover its architecture, its memory model, and its execution model. Next, we'll explore builtins and hints, their purpose, and how they work. Finally, we'll look at the runner, which orchestrates the execution of a Cairo program.
But first, what do we mean by "virtual machine"?
Virtual Machine
Virtual Machines (VMs) are software emulations of physical computers. They provide a complete programming environment through an API which includes everything required for the correct execution of programs above it.
Every virtual machine API includes an instruction set architecture (ISA) in which to express programs. It could be the same instruction set as some physical machine (e.g. RISC-V), or a dedicated one implemented in the VM (e.g. Cairo assembly, CASM).
Those that emulate an OS are called System Virtual Machines, such as Xen and VMWare. We're not interested in them here.
The other ones we're interested in are Process Virtual Machines. They provide the environment needed by a single user-level process.
The most well-known process VM might be the Java Virtual Machine (JVM).
- Given a Java program
prgm.java, it is compiled into a classprgm.class, containing Java bytecode (JVM instructions and metadata). - The JVM verifies that the bytecode is safe to run.
- The bytecode is either interpreted (slow) or compiled to machine code just in time (JIT, fast).
- If using JIT, the bytecode is translated to machine code while executing the program.
- Java programs could also be directly compiled to a specific CPU architecture (read machine code) through a process called ahead-of-time compilation (AOT).
The Cairo VM is also a process VM, similar to the JVM, with one significant difference: Java and its JVM are designed for (platform-independent) general-purpose computing, while Cairo and its Cairo VM are specifically designed for (platform-independent) provable general-purpose computing.
- A Cairo program
prgm.cairois compiled into compilation artifactsprgm.json, containing Cairo bytecode (encoded CASM, the Cairo instruction set, and extra data). - As seen in the introduction, Cairo Zero directly compiles to CASM while Cairo first compiles to Sierra and then to a safe subset of CASM.
- The Cairo VM interprets the provided CASM and generates a trace of the program execution.
- The obtained trace data can be fed to the Cairo Prover in order to generate a STARK proof, allowing to prove the correct execution of the program. Creating this validity proof is the main purpose of Cairo.
Here is a high-level flow diagram showing how a Java program and a Cairo one are executed with their respective compiler and VM. The proof generation of a Cairo program is included.
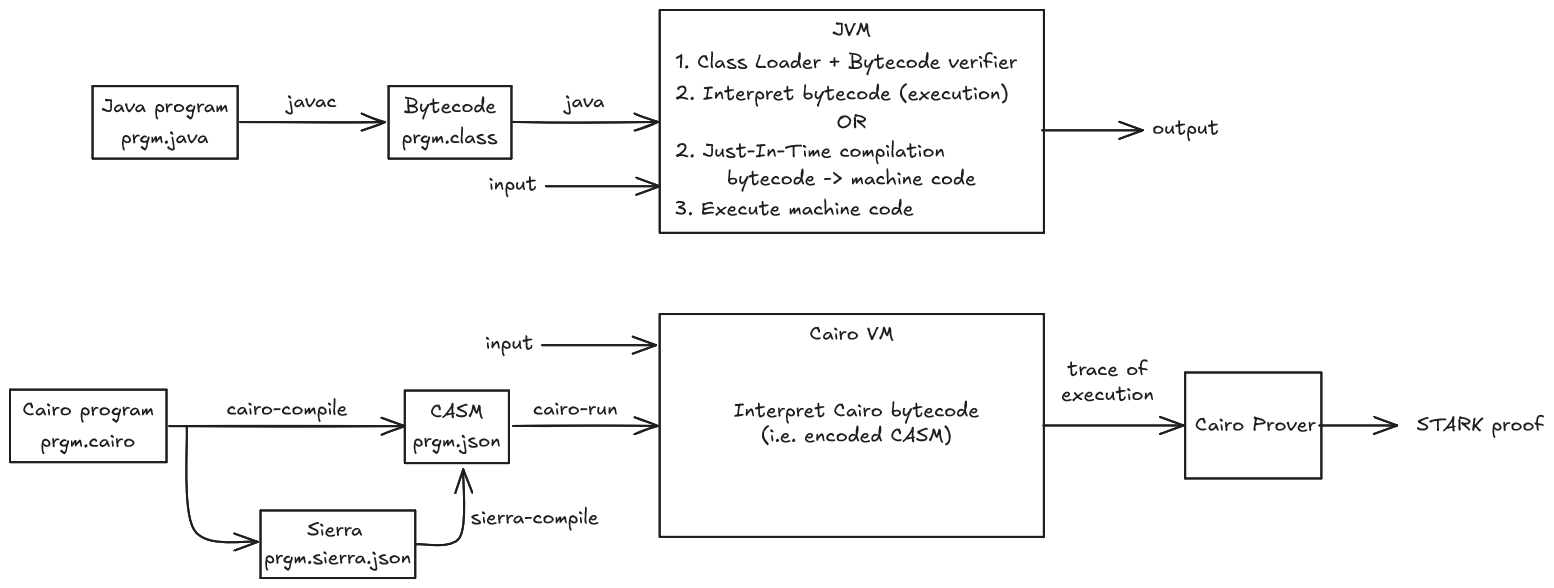
An ongoing project, Cairo Native works on providing Sierra to machine code compilation, including JIT and AOT, for executing Cairo programs.
Even though the high-level flow of both VMs is similar, their actual architectures are extremely different: the instruction set, the memory model, Cairo's non-determinism and the output.
References
Michael L. Scott, in Programming Language Pragmatics, 2015
Architecture
Cairo is a STARK-friendly Von Neumann architecture capable of generating validity proofs for arbitrary computations. Being STARK-friendly means that Cairo's design is optimized for the STARK proof system, while remaining compatible with other proof system backends. It implements a Turing-complete process virtual machine.
Cairo consists of three main components:
- The Cairo compiler
- The Cairo Virtual Machine (CairoVM)
- The Cairo prover and verifier
The Cairo compiler transforms Cairo source code into Cairo bytecode (encoded instructions and metadata). The compiler's output is commonly referred to as the compilation artifacts.
The CairoVM implements the theoretical Cairo machine, processing the compilation artifacts and executing the instructions to produce two key outputs required for proof generation and verification: the AIR (Arithmetic Intermediate Representation) private input (witness) and AIR public input:
- The AIR private input comprises the execution trace (or simply "trace") and the memory.
- The AIR public input includes the initial and final states (first and last entries of the trace), the public memory (a subset of the memory), and configuration data (e.g., layout) of the execution.
The prover takes the AIR's private and public inputs to generate a proof of the corresponding program execution. The verifier can then verify the proof's correctness asynchronously, given the proof and the AIR public input.
What are AIRs, though?
Arithmetic Intermediate Representation - AIR
AIR stands for Arithmetic Intermediate Representation, which is an arithmetization technique. Arithmetization is the foundation of every proof system: STARK uses AIRs, while other proof systems might rely on different techniques (e.g., R1CS, PLONKish arithmetization). It allows converting a computational statement into a set of polynomial equations. These polynomial equations then represent the constraints of your system: if they all hold while following the proof system protocol, then the proof is valid; otherwise, it's invalid.
At its core, Cairo is a set of AIRs that represent a Turing-complete machine for the Cairo ISA: the Cairo machine. This enables proving any statement (i.e., arbitrary code) through the Cairo machine.
The Cairo machine abstracts away the need to write AIRs for the program you would like to prove, and Cairo, as a language, provides a human-readable interface to use the Cairo machine.
Each component of the Cairo machine has its corresponding AIR: the CPU, the Memory, the Builtins...
Good AIRs are critical to the performance of proof generation and verification. While there can be many ways to express a computational statement into polynomials, not all are equally efficient. Writing optimal AIRs is a strong factor of performance.
We won't go any further on AIRs here, but it's good to know that the CairoVM's purpose is to provide the required inputs to the Cairo prover for it to generate proof of the given Cairo program. In a nutshell, the Cairo prover and verifier job is to verify that the constraints defined by the Cairo AIR holds for the CairoVM outputs.
Cairo Machine
The Cairo machine is the theoretical model that defines the Von Neumann architecture to prove arbitrary computation.
The machine is defined by two core models:
- CPU, or Execution model - The Instruction Set Architecture (ISA)
- Memory model - Non-deterministic Read-only Memory
The Execution model specifies the ISA through three key components:
- The instruction set
- The registers (
pc,ap,fp) - The state transition algorithm
Unlike general-purpose ISAs such as RISC-V, Cairo implements its own ISA specifically optimized for proof generation and verification—a custom zero-knowledge ISA (ZK-ISA). The Memory model defines how the CPU interacts with the memory. Following Von Neumann architecture principles, a single memory stores both program and instruction data.
The Cairo machine exists in two versions:
- The deterministic machine (used by the prover)
- The non-deterministic machine (used by the verifier)
Why are there two versions of the Cairo machine, one for the prover and one for the verifier?
Deterministic and Non-deterministic Cairo Machine
The deterministic machine takes a trace (a sequence of states) and the whole memory
(a memory function), and verifies that the transition between two consecutive states is valid.
It returns accept if all state transitions are valid and reject otherwise.
This machine does not perform any computation, it only asserts the validity of a trace
and its memory.
The non-deterministic machine relies on the deterministic one: it only takes the initial
state, the final state, and a partial memory function (i.e. the public memory)
and returns accept if there exists a sequence of states (a trace)
with the same initial and final states and a memory function that extends the partial memory
(a whole memory that includes the public-memory) which is accepted by the deterministic machine.
The deterministic machine allows the prover to generate a proof, while the non-deterministic machine allows the verifier to verify the proof succinctly in a zero-knowledge way (some data can be kept private from the verifier).
The CairoVM is the implementation of this theoretical machine, including some functionalities to benefit from its design (builtins & hints). Among the various implementations of the CairoVM, what we call the Cairo Runner is the entrypoint for running a Cairo program and generating the AIR inputs needed for proof.
When a Cairo program is executed by the CairoVM, we could view the memory model as a Write-Once one.
Recap - Differences between the two Cairo machines
We could recap in a table the key differences between the deterministic Cairo machine, and the non-deterministic one.
| Deterministic Cairo Machine | Non-Deterministic Cairo Machine | |
|---|---|---|
| Usage | Prover | Verifier |
| Hints | Executed | Not aware of them |
| Memory | Complete memory | Public memory only |
| Trace | Full execution trace | Initial & Final states only |
Cairo Virtual Machine Architecture Diagram
The following diagram represent the architecture of the CairoVM, to generate the AIR inputs for the proof system.
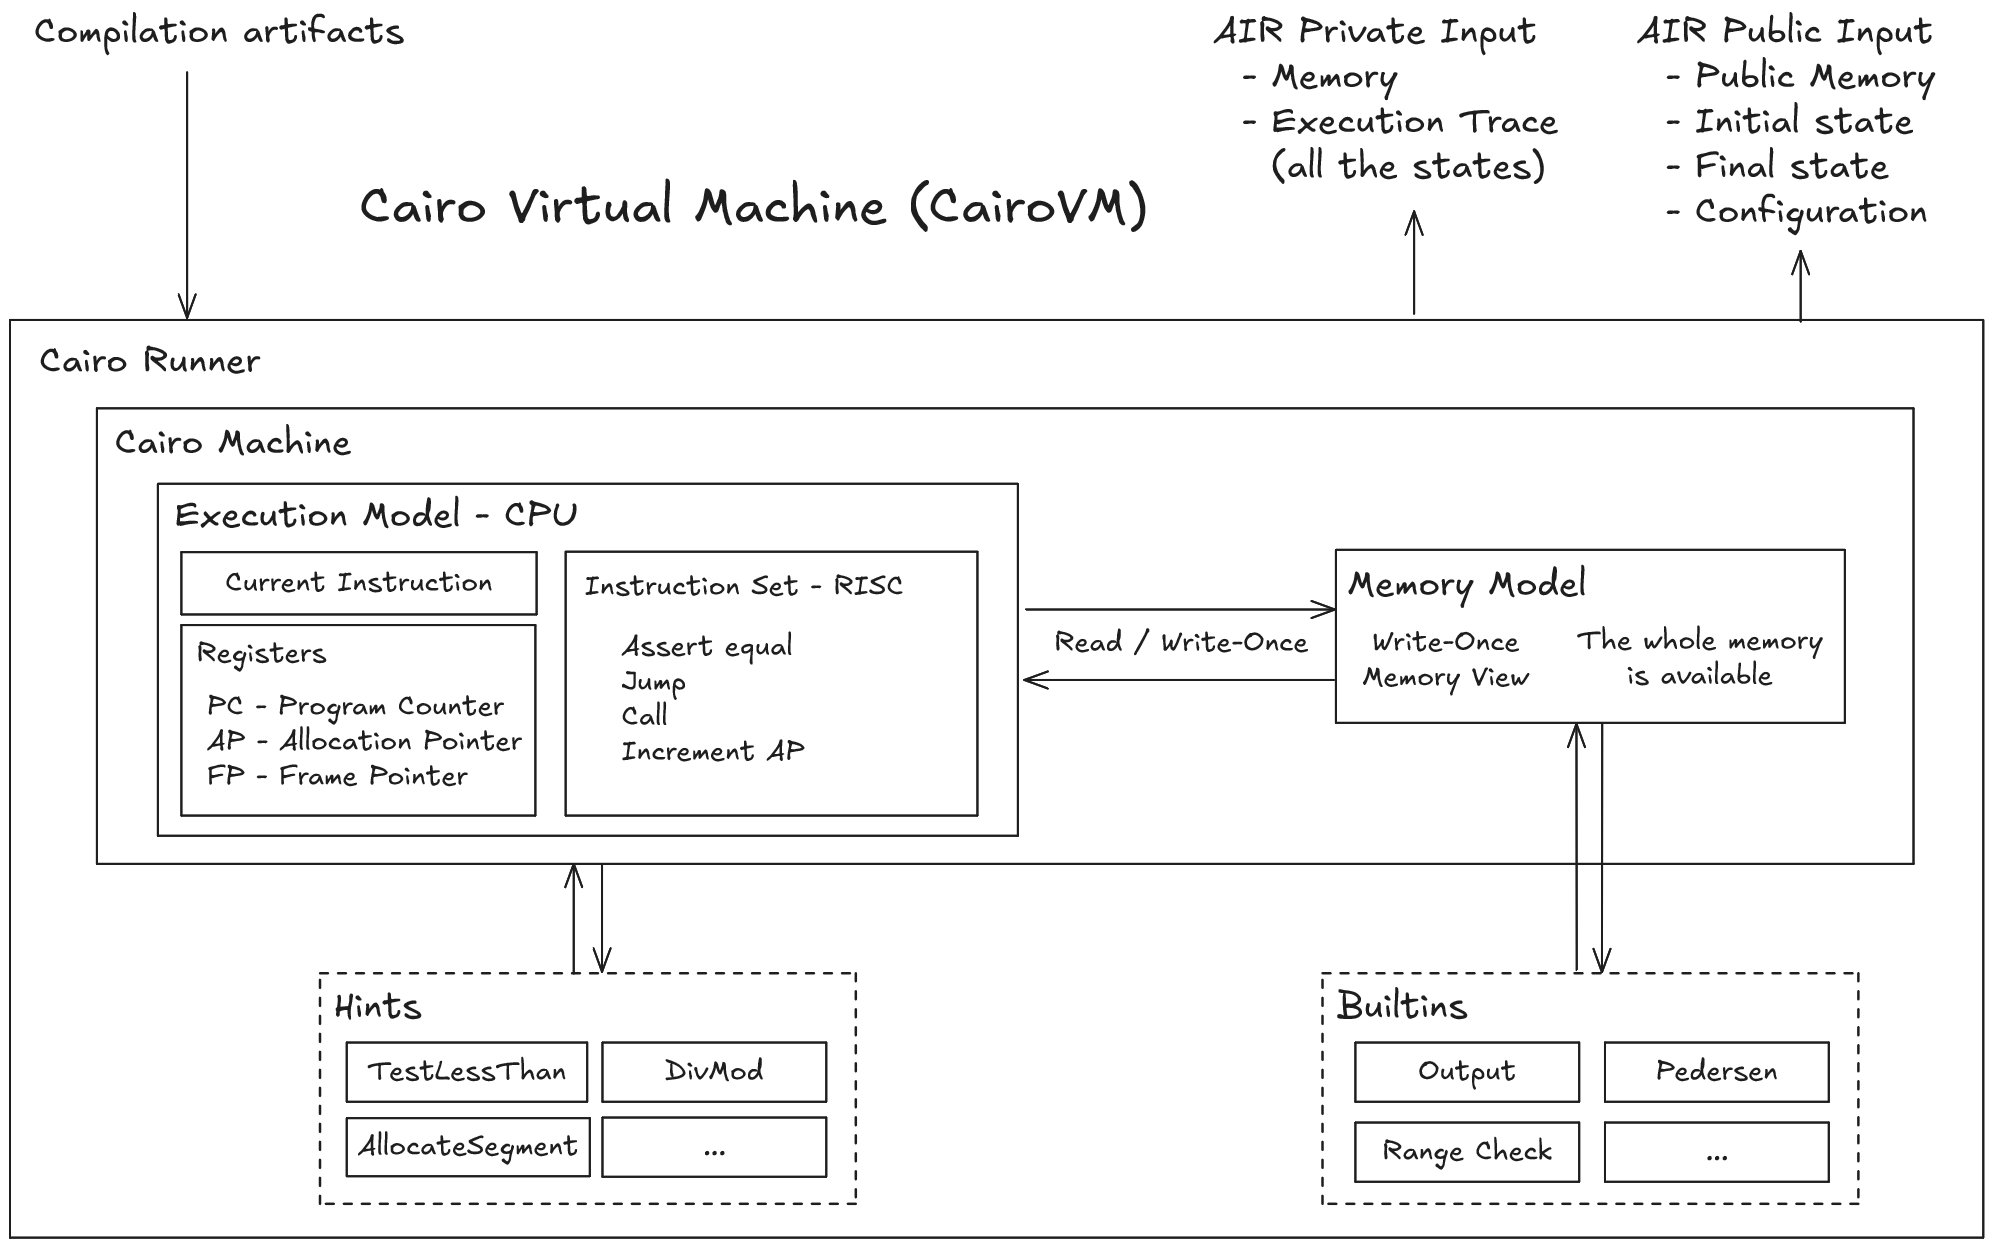
Memory
In most computing systems, memory is primarily used to store temporary values during program execution. However, in CairoVM, the memory model also plays a crucial role in proof generation by defining how memory accesses are recorded in trace cells. To optimize proof generation, Cairo's memory model is designed to efficiently represent memory values, streamlining the STARK proving process.
In this chapter, we will explore Cairo's unique memory model and examine how its structure enhances proof generation process.
Non-Deterministic Read-only Memory
From the Cairo whitepaper, it states that Cairo uses a non-deterministic read-only memory model.
Let's break down the two core properties:
- Non-determinism
- In Cairo, non-determinism refers to the idea that the memory addresses and their values are not determined by a typical memory management system. Instead, the prover asserts the location and the values that are stored at those addresses. For example, instead of manually writing and reading a value at a particular address as in traditional read-write memory models, the prover asserts that at memory address x, the value 7 is stored. This way, we do not need to explicitly check whether the value 7 exists at address x.
- Read-only
- This means that when a Cairo program runs, the value in memory does not change.
These two properties effectively make the memory model a write-once memory model. Once a value is assigned to a memory address, it cannot be overwritten. Subsequent operations are limited to reading or verifying the value at that address. Moreover, the memory address space is contiguous, meaning if the program accesses memory address x and y, it cannot skip an address in between.
This approach differs significantly from other virtual machines, like the Ethereum Virtual Machine (EVM), which uses a read-write memory model. In contrast, Cairo's memory model prioritizes efficiency in proof generation. As a result, it requires only 5 trace cells per memory access.
Another way to think about this is that the effective cost of using Cairo's memory is from the number of memory accesses, rather than the number of memory addresses used. Consequently, rewriting to an existing memory cell incurs a similar cost to writing to a new one.
Introduction to Segments
Cairo ensures that allocated memory remains immutable after being written to, while allowing dynamic expansion of memory segments at runtime. All this is possible with organizing memory addresses into segments.
The process of organizing memory addresses into segments is as follows:
-
During runtime, It groups allocated memory addresses into segments with a unique segment identifier and an offset to indicate the continuation of the memory addresses belonging to each segment,
<segment_id>:<offset>. This temporary value that we are marking to each memory address is called a relocatable value. -
At the end of execution, the relocatable values are transformed into a single, contiguous memory address space and a separate relocation table is created to give context to the linear memory address space.
Segment Values
Cairo's memory model contains the following segments:
- Program Segment = Stores the bytecode of Cairo program. Another way to say is it stores the instructions of a cairo program. Program Counter,
pcstarts at the beginning of this segment. - Execution Segment = Stores any data while executing a Cairo program (temporary variables, function call frames, and pointers). Allocation pointer,
apand frame pointer,fpstarts on this segment. - Builtin Segment = Stores builtins that is actively used by the Cairo program. Each Cairo builtin has its own dedicated segment, allocated dynamically based on the builtins used in the program. Check out Builtin Section to learn more about individual builtins.
- User Segment = Stores program outputs, arrays, and dynamically allocated data structures.
Every segment except Program Segment has a dynamic address space which means that the length of the allocated memory address space is unknown until the program has finished executing. The Program Segment is an exception as it is used to store the bytecode of the Cairo program which has a fixed size during execution.
Segment Layout
The layout of Cairo memory is ordered by segments in the following order:
- Segment 0 = Program Segment
- Segment 1 = Execution Segment
- Segment 2 to x = Builtin Segments
- Segment x + 1 to y = User Segments
The number of builtin and user segments are dynamic and depends on the type of program.
Relocation
To understand the overall process of how memory is handled throughout the execution of a Cairo program, we will be looking at an example of Cairo Zero program and how its segments are defined during runtime with relocatable values and how the memory addresses are relocated to one contiguous memory address space at the end of execution.
Cairo Zero program:
%builtins output
func main(output_ptr: felt*) -> (output_ptr: felt*) {
// We are allocating three different values to segment 1.
[ap] = 10, ap++;
[ap] = 100, ap++;
[ap] = [ap - 2] + [ap - 1], ap++;
// We set value of output_ptr to the address of where the output will be stored.
// This is part of the output builtin requirement.
[ap] = output_ptr, ap++;
// Asserts that output_ptr equals to 110.
assert [output_ptr] = 110;
// Returns the output_ptr + 1 as the next unused memory address.
return (output_ptr=output_ptr + 1);
}
The output builtin allows the final output to be stored in a new segment.
The Cairo Zero program stores three values which are 10, 100 and 110(addition of 10 and 100) and these values are stored in three different memory addresses under Segment 1.
Using the output builtin, the final output is stored in a new segment in Segment 2.
The relocatable values are :
Addr Value
-----------
// Segment 0
0:0 5189976364521848832
0:1 10
0:2 5189976364521848832
0:3 100
0:4 5201798304953696256
0:5 5191102247248822272
0:6 5189976364521848832
0:7 110
0:8 4612389708016484351
0:9 5198983563776458752
0:10 1
0:11 2345108766317314046
⋮
// Segment 1
1:0 2:0
1:1 3:0
1:2 4:0
1:3 10
1:4 100
1:5 110
1:6 2:0
1:7 110
1:8 2:1
⋮
// Segment 2
2:0 110
Once the program is finished executing,the relocatable values turn into one contiguous memory address space with the help of the relocation table to give context to the linear memory address space.
From relocation value to one contiguous memory address space:
Addr Value
-----------
1 5189976364521848832
2 10
3 5189976364521848832
4 100
5 5201798304953696256
6 5191102247248822272
7 5189976364521848832
8 110
9 4612389708016484351
10 5198983563776458752
11 1
12 2345108766317314046
13 22
14 23
15 23
16 10
17 100
18 110
19 22
20 110
21 23
22 110
Relocation table:
segment_id starting_index
----------------------------
0 1
1 13
2 22
3 23
4 23
The relocation table gives context for the prover on which index a new segment starts by labeling the segment identifier with its own starting index.
Builtins
The Cairo whitepaper defines builtins as "predefined optimized low-level execution units".
In other words, builtins are logic blocks embedded in the Cairo architecture to significantly enhance performance compared to defining the same logic using Cairo's instruction set.
Builtins can be compared to Ethereum precompiles, primitive operations implemented in the client's implementation language rather than using EVM opcodes.
The Cairo architecture does not specify a specific set of builtins, they can be added or removed depending on our needs, which is why different layouts exist. Builtins are adding constraints to the CPU AIR, which will increase the verification time.
In this chapter, we'll see how builtins work, the builtins that exist and their purposes.
How Builtins Work
A builtin enforces some constraints on the Cairo memory to perform specific tasks, such as computing a hash.
Each builtin works on a dedicated memory segment, which represents in the end a fixed address range. This communication method is called memory-mapped I/O: specific ranges of memory addresses dedicated to builtins.
For a Cairo program to interact with a builtin, it simply needs to read or write to the corresponding memory cells.
There are two main types of builtin constraints that we'll refer as validation property and deduction property. The builtins with a deduction property are usually split in block of cells where some cells are constrained by a validation property
If the defined property doesn't hold, then the Cairo VM will panic.
Validation Property
A validation property defines constraints a value must hold for it to be written to a builtin memory cell.
For example, the Range Check builtin only accepts felts and verify
that such a felt is within the range [0, 2**128).
A program can write a value to the Range Check builtin
only if those two constraints hold. Those two constraints
represent the validation property of the Range Check builtin.
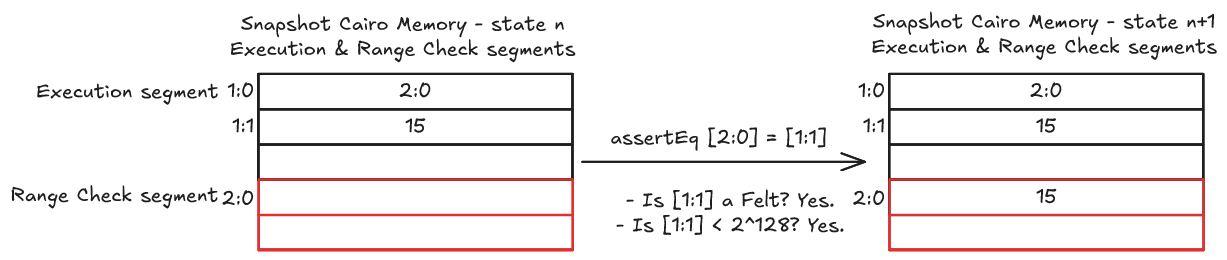
Deduction Property
A deduction property defines constraints on a block of cells, when reading or writing to a cell.
A block of cells has two categories of cells:
- Input cells - cells the program can write to, their constraints are similar to a validation property.
- Output cells - cells the program must read, and their value is computed based on the deduction property and the input cells value.
A program that only writes to the input cells, without ever reading the output cell, is valid as long as the constraints on those cells hold. Though, it is useless.
For example, the Pedersen builtin works with triplets of cells:
- Two input cells to store two felts,
aandb. - One output cell which will store
Pedersen(a, b).
To compute the Pedersen hash of a and b, the program must:
- Write
ato the first cell - Write
bto the second cell - Read the third cell, which will compute and write `Pedersen(a, b) to it.
In the following diagram, the Pedersen builtin is used,
highlighting its deduction property: the output cell 2:2
being read when writing its value to the cell 1:5.
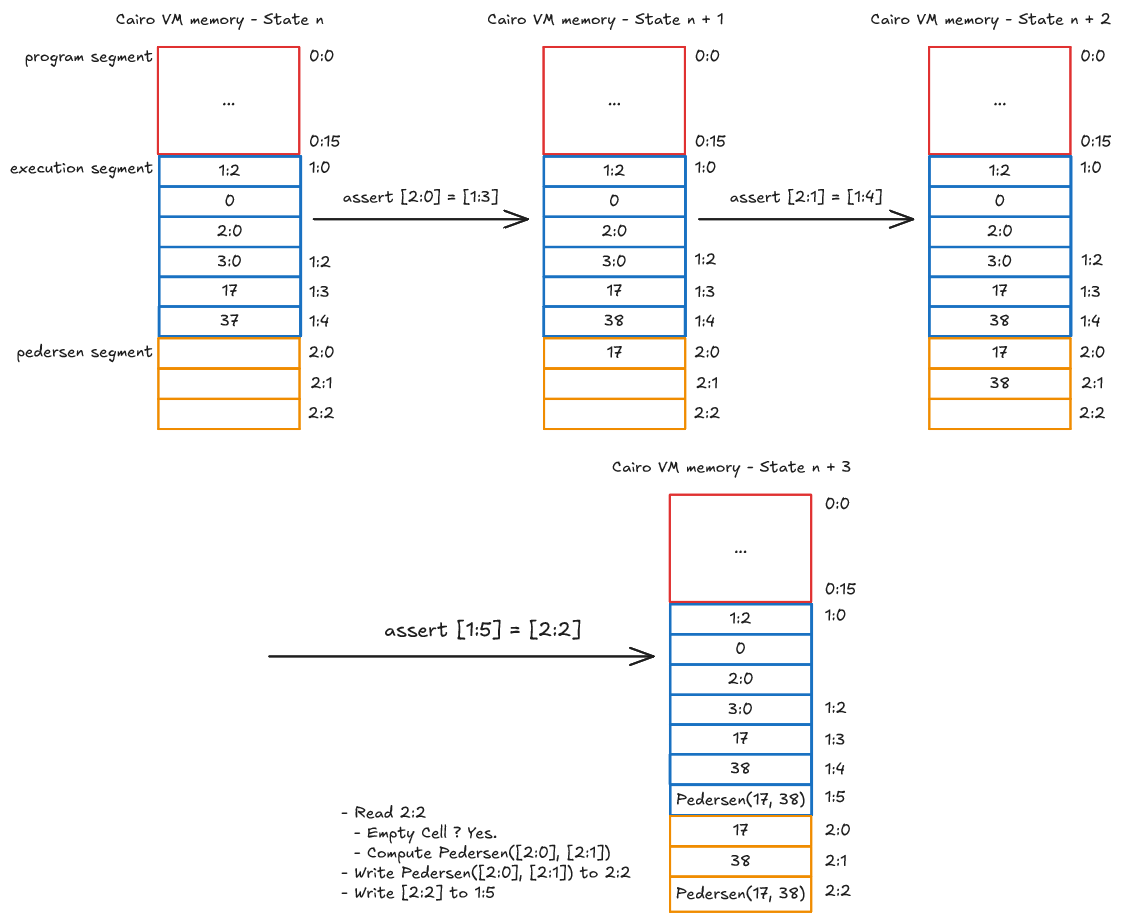
Builtins List
The following table lists the different builtins implemented in the Cairo VM and gives a brief description of their purpose. For each builtin, a specific section details how it works, its cells organization if any, and references their actual implementation in different implementations of the Cairo VM.
Additional resources related to the operation performed by the builtin are provided if relevant.
| Builtin | Description |
|---|---|
| Output | Stores all the public memory needed to generate a STARK proof (input & output values, builtin pointers...) |
| Pedersen | Computes the Pedersen hash h of two felts a and b. h = Pedersen(a, b) |
| Range Check | Verify that a felt x is within the bounds [0, 2**128). |
| ECDSA | Verify that the ECDSA signature of a given public key pub on a message m equals sig, previously stored. Only used by Cairo Zero. |
| Bitwise | Computes the bitwise AND, XOR and OR of two felts a and b. a & b, a ^ b and a | b. |
| EC OP | Performs Elliptic Curve OPerations - For two points on the STARK curve P, Q and a scalar m, computes R = P + mQ. |
| Keccak | Computes the new state s' after applying the 24 rounds of the keccak-f1600 block permutation on a given state s. |
| Poseidon | Computes the new state s' after applying the 91 rounds of the hades block permutation on a given state s. |
| Range Check96 | Verify that a felt x is within the bounds [0, 2**96). |
| AddMod | Arithmetic Circuit Support - Computes the modular addition c of two felts a, b by batches. c ≡ a + b mod(p) |
| MulMod | Arithmetic Circuit Support - Computes the modular multiplication c of two felts a, b by batches. c ≡ a * b mod(p) |
| Segment Arena | Manages the Cairo dictionaries Not used in Cairo Zero. |
| Gas | Manages the available gas during the run. Used by Starknet to handle its gas usage and avoid DoS. |
| System | Manages the Starknet syscalls & cheatcodes. |
Output Builtin
In the Cairo Virtual Machine (VM), the Output Builtin is a built-in component that manages the output segment of the memory via the output_ptr. It's used as a bridge between a Cairo program's execution and the external world, using public memory to produce verifiable outputs.
Represented by the output_ptr, the output builtin handles a dedicated memory region where a program writes its outputs. Its primary role is to store any value that must be made available in the proof system for verification, in what we call public memory. This segment grows as the program writes values.
Memory Organization
The output segment is a contiguous block of cells starting at a base address. All cells in the output segment are inherently public, accessible to verifiers. It's interactions are quite simple: it can be written to, and read from, without any specific requirements.
Role in STARK Proofs
The Output Builtin’s integration with public memory is required for STARK proof construction and verification:
- Public Commitment: Values written to
output_ptrbecome part of the public memory, committing the program to those outputs in the proof. - Proof Structure: The output segment is included in the public input of a trace, with its boundaries tracked (e.g.,
begin_addrandstop_ptr) for verification. - Verification Process: The verifier extracts and hashes the output segment. Typically, all cells in the output segment are hashed together, creating a commitment which allows efficient verification without re-execution.
Implementation References
These implementation references of the Output Builtin in various Cairo VM implementations:
Pedersen Builtin
The Pedersen builtin is dedicated to computing the Pedersen hash of two field elements (felts). It provides an efficient, native implementation of this cryptographic hash function within the Cairo VM. For a guide on using hashes in Cairo programs, see section 11.4 Working with Hashes.
Cells Organization
The Pedersen builtin has its own dedicated segment during a Cairo VM run. It follows a deduction property pattern and is organized in triplets of cells - two input cells and one output cell:
- Input cells: Must store field elements (felts); relocatable values (pointers) are forbidden. This restriction makes sense because computing the hash of a memory address is not well-defined in this context.
- Output cell: The value is deduced from the input cells. When an instruction tries to read this cell, the VM computes the Pedersen hash of the two input cells and writes the result to the output cell.
Let's examine two snapshots of a Pedersen segment during the execution of a program by the Cairo VM:
In the first snapshot, we see two triplets in different states:
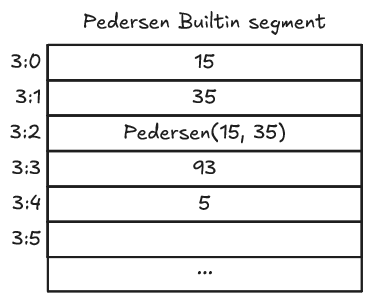
- First triplet (cells 3:0, 3:1, 3:2): All three cells contain felts. The value in cell 3:2 (output) has been computed because this cell has been read during program execution, which triggered the Pedersen hash computation of inputs 15 and 35.
- Second triplet (cells 3:3, 3:4, 3:5): Only the input cells have been filled with values 93 and 5. The output cell 3:5 remains empty because it hasn't been read yet, so the Pedersen hash of 93 and 5 hasn't been computed yet.
In the second snapshot, we see two cases that would cause errors when attempting to read the output cell:
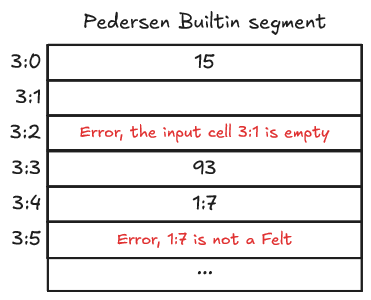
-
First triplet: Reading cell 3:2 would throw an error because one of the input cells (3:0) is empty. The VM cannot compute a hash with missing input data.
-
Second triplet: Reading cell 3:5 would throw an error because one of the input cells (3:4) contains a relocatable value pointing to cell 1:7. The Pedersen builtin can only hash field elements, not memory addresses.
Note that these errors only manifest when the output cell is read. For the second case, a more robust implementation could validate the input cells when they're written, rejecting relocatable values immediately rather than waiting until the hash computation is attempted.
Implementation References
These implementation references of the Pedersen builtin in various Cairo VM implementations:
- TypeScript Pedersen Builtin
- Python Pedersen Builtin
- Rust Pedersen Builtin
- Go Pedersen Builtin
- Zig Pedersen Builtin
Resources on Pedersen Hash
If you're interested in the Pedersen hash function and its applications in cryptography:
- StarkNet, Hash Functions - Pedersen Hash
- nccgroup, Breaking Pedersen Hashes in Practice, 2023, March 22
- Ryan S., Pedersen Hash Function Overview, 2024, May 07
Range Check Builtin
The Range Check builtin verifies that field elements fall within a specific range. This builtin is fundamental to Cairo's integer types and comparisons, ensuring that values satisfy bounded constraints.
Two variants of this builtin exist:
- Standard Range Check: Verifies values in the range \([0, 2^{128}-1]\)
- Range Check 96: Verifies values in the range \([0, 2^{96}-1]\)
This section focuses on the standard variant, though the same principles apply to both.
Purpose and Importance
While it's possible to implement range checking using pure Cairo code (for example, by decomposing a number into its binary representation and verifying each bit), using the builtin is significantly more efficient. A pure Cairo implementation would require at least 384 instructions to verify a single range check, whereas the builtin achieves the same result with computational cost equivalent to about 1.5 instructions. This efficiency makes the Range Check builtin essential for the implementation of bounded integer arithmetic and other operations that require value range verification.
Cells Organization
The Range Check builtin operates on a dedicated memory segment with a validation property pattern:
| Characteristic | Description |
|---|---|
| Valid values | Field elements in range \([0, 2^{128}-1]\) |
| Error conditions | Values ≥ 2^128 or relocatable addresses |
| Validation timing | Immediate (upon cell write) |
Unlike builtins with deduction properties, the Range Check builtin validates values at write time rather than read time. This immediate validation provides early error detection for out-of-range values.
Valid Operation Example
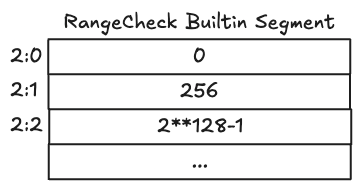
In this example, a program successfully writes three values to the Range Check segment:
0: The minimum allowed value256: A typical small integer value2^128-1: The maximum allowed value
All three values fall within the permitted range \([0, 2^{128}-1]\), so the operations succeed.
Out-of-Range Error Example
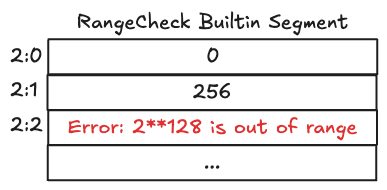
In this example, the program attempts to write 2^128 to cell 2:2, which exceeds the maximum allowed value. The VM immediately throws an out-of-range error and aborts execution.
Invalid Type Error Example
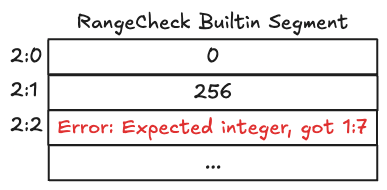
In this example, the program attempts to write a relocatable address (pointer to cell 1:7) to the Range Check segment. Since the builtin only accepts field elements, the VM throws an error and aborts execution.
Implementation References
These implementation references of the Range Check builtin in various Cairo VM implementations:
- TypeScript Range Check Builtin
- Python Range Check Builtin
- Rust Range Check Builtin
- Go Range Check Builtin
- Zig Range Check Builtin
Resources on Range Check
If you're interested in how the Range Check builtin works and its usage in the Cairo VM:
- Starknet, CairoZero documentation, Range Checks section of Builtins and implicit arguments
- Lior G., Shahar P., Michael R., Cairo Whitepaper, Sections 2.8 and 8
- StarkWare Range Check implementation
ECDSA Builtin
The ECDSA (Elliptic Curve Digital Signature Algorithm) builtin verifies cryptographic signatures on the STARK curve. This builtin is primarily used to validate that a message hash was signed by the holder of a specific private key.
Memory Organization
The ECDSA builtin has a unique memory structure with two interconnected components:
- Memory Segment: A dedicated segment that stores public keys and message hashes as field elements
- Signature Dictionary: A mapping that associates public key offsets with their corresponding signatures
Cell Layout in the Memory Segment
The ECDSA segment arranges cells in pairs:
- Even offsets (0, 2, 4, ...) store public keys
- Odd offsets (1, 3, 5, ...) store message hashes
Each public key at offset 2n is associated with a message hash at offset 2n+1. For example, public key at offset 0 pairs with the hash at offset 1.
Signature Verification Process
Before using the ECDSA builtin, signatures must be explicitly registered in the signature dictionary. The VM performs signature verification when the program writes values to the ECDSA segment:
- When a public key is written at offset
2n, the VM checks if it matches the key used to create the signature registered at that offset - When a message hash is written at offset
2n+1, the VM verifies that it matches the hash that was signed
If either check fails, the VM throws an error immediately - this is different from some other builtins that defer validation until output access.
Valid Usage Example

In this example:
- Public key_0 at offset 0 and hash_0 at offset 1 are verified against the signature stored at dictionary key 0
- Public key_1 at offset 2 and hash_1 at offset 3 are verified against the signature stored at dictionary key 2
- All verifications pass because the public keys and hashes match what was originally signed
Error Conditions
Invalid Hash Error
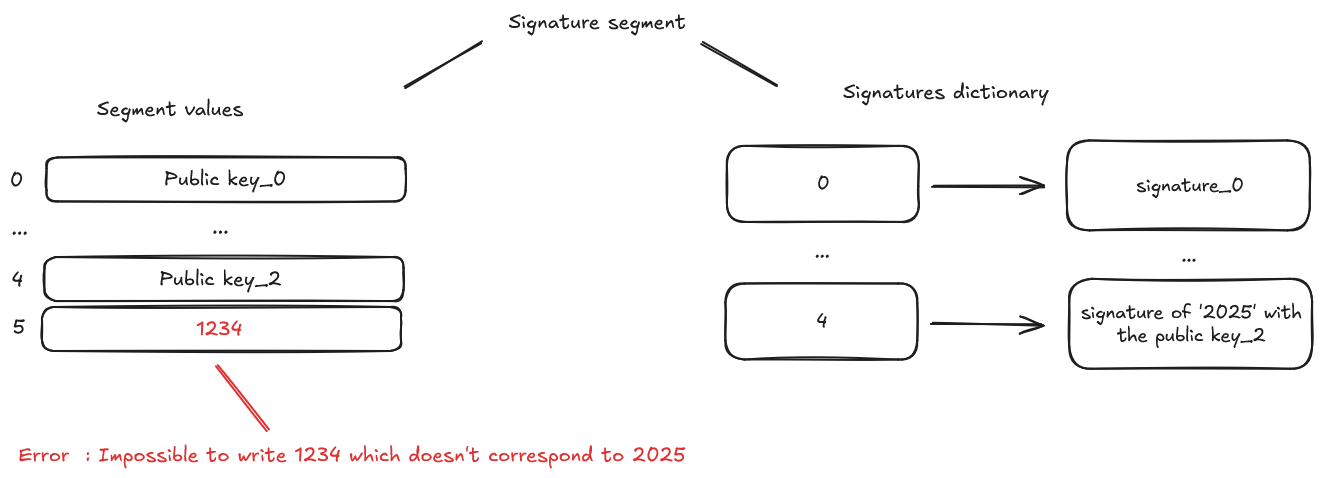
When a program writes hash "1324" at offset 5, but the signature at dictionary key 4 was created for hash "2025", the VM throws an error because the hash doesn't match what was originally signed with that public key.
Invalid Public Key Error
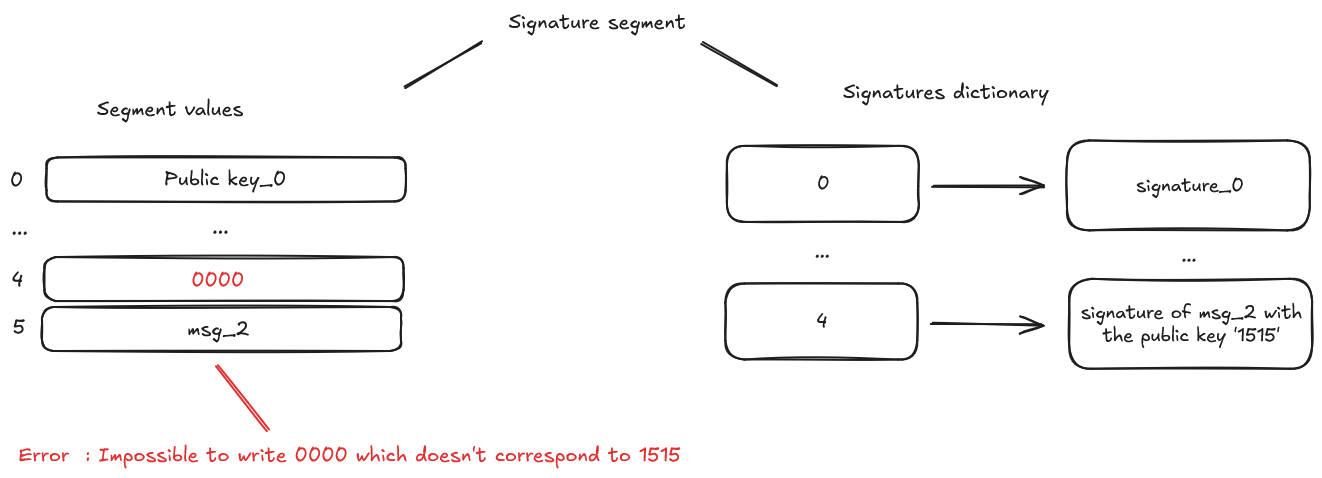
When a program writes public key "0000" at offset 4, but the signature at dictionary key 4 was created using public key "1515", the VM throws an error because the public key doesn't match the one used to create the signature.
Implementation References
These implementation references of the ecdsa builtin might not be exhaustive.
- TypeScript Signature Builtin
- Python Signature Builtin
- Rust Signature Builtin
- Go Signature Builtin
- Zig Signature Builtin
Resources on ECDSA signature
If you're interested about the ecdsa signature and its use, take a look at those references:
- StarkNet, STARK curve
- Svetlin Nakov, ECDSA: Elliptic Curve Signatures, 2020
Bitwise Builtin
In the Cairo VM, the Bitwise Builtin enables bitwise operations—specifically AND (&), XOR (^), and OR (|)—on field elements. As a builtin, it’s an integral part of the VM’s architecture, designed to support specific tasks where bit-level manipulation is needed. In Cairo, these bitwise operations complement the base instruction set of the VM by making it easier to perform tasks like bit masking or combining values in particular use cases.
How It Works
The Bitwise builtin operates on a dedicated memory segment. Each operation uses a block of 5 cells:
| Offset | Description | Role |
|---|---|---|
| 0 | x value | Input |
| 1 | y value | Input |
| 2 | x & y result | Output |
| 3 | x ^ y result | Output |
| 4 | x | y result | Output |
For instance, if x = 5 (binary 101) and y = 3 (binary 011), the outputs are:
5 & 3 = 1(binary001)5 ^ 3 = 6(binary110)5 | 3 = 7(binary111)
This structure ensures efficient, native computation of bitwise operations when needed, with strict validation to prevent errors (e.g., inputs exceeding the bit limit).
Example Usage
Here’s a simple Cairo function using the Bitwise Builtin. We demonstrate it using Cairo Zero, which is closer to machine code, and allows visual representation of the low-level operations.
from starkware.cairo.common.cairo_builtins import BitwiseBuiltin
func bitwise_ops{bitwise_ptr: BitwiseBuiltin*}(x: felt, y: felt) -> (and: felt, xor: felt, or: felt) {
assert [bitwise_ptr] = x; // Input x
assert [bitwise_ptr + 1] = y; // Input y
let and = [bitwise_ptr + 2]; // x & y
let xor = [bitwise_ptr + 3]; // x ^ y
let or = [bitwise_ptr + 4]; // x | y
let bitwise_ptr = bitwise_ptr + 5;
return (and, xor, or);
}
Implementation References
These implementation references of the Bitwise Builtin in various Cairo VM implementations:
EC OP Builtin
The EC OP (Elliptic Curve OPeration) builtin performs elliptic curve operations on the STARK curve. Specifically, it computes R = P + mQ, where P and Q are points on the curve and m is a scalar multiplier. Each point (P, Q and R) is represented by a pair of field elements for its x and y coordinates.
This builtin enables efficient implementation of cryptographic algorithms that require elliptic curve arithmetic, providing significant performance advantages over implementing these operations directly in Cairo code.
Cells Organization
The EC OP builtin has its own dedicated segment during a Cairo VM run. Each operation is represented by a block of 7 cells:
| Offset | Description | Role |
|---|---|---|
| 0 | P.x coordinate | Input |
| 1 | P.y coordinate | Input |
| 2 | Q.x coordinate | Input |
| 3 | Q.y coordinate | Input |
| 4 | m scalar value | Input |
| 5 | R.x coordinate | Output |
| 6 | R.y coordinate | Output |
The first five cells are inputs that must be written by the program, while the last two cells are outputs that will be computed by the VM when read.
Valid Operation Example
In this example, we can see a correctly configured EC OP builtin operation:
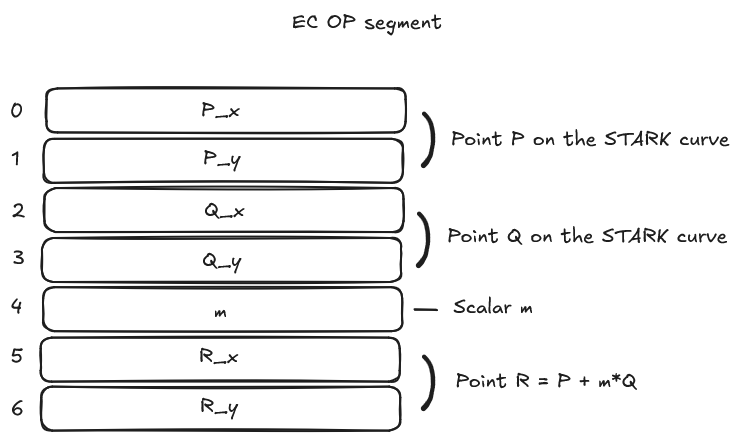
The program has properly set:
- Point P coordinates
- Point Q coordinates
- Scalar m value
When the program reads cells at offsets 5 and 6, the VM computes R = P + mQ and returns the result coordinates.
Error Condition Example
In this example, we see an error condition when trying to read the result with incomplete inputs:
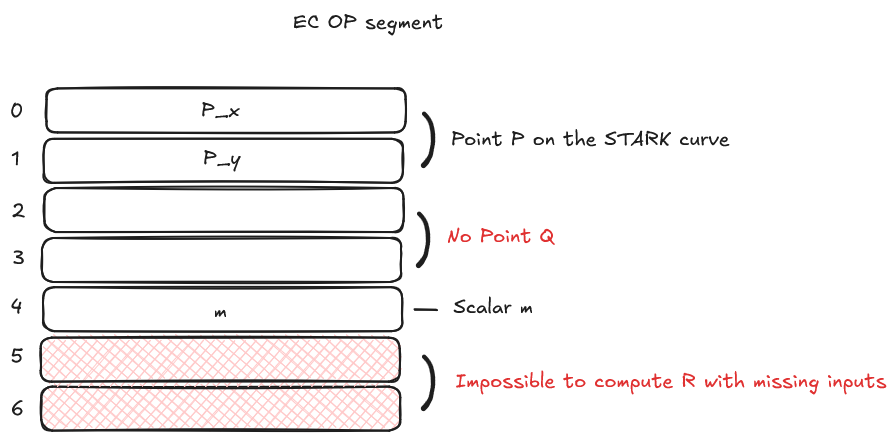
The program attempts to read the output cells at offsets 5 and 6, but the VM cannot compute R = P + mQ because:
- Point P coordinates are properly set
- Point Q coordinates are missing (both cells are empty)
- Scalar m value is set
Since the coordinates of point Q are missing, the VM cannot perform the calculation and will throw an error when attempting to read the output cells.
If any input value is invalid (not a field element) or missing, the EC OP builtin will fail when its output is accessed. All five input cells must contain valid field elements before reading the output.
Implementation References
These implementation references of the EC OP builtin might not be exhaustive:
Resources on Elliptic Curve Operations
If you're interested in elliptic curve operations and their cryptographic applications:
- StarkNet, STARK Curve
- Andrea Corbellini, Elliptic Curve Cryptography: a gentle introduction
Keccak Builtin
The Keccak builtin implements the core functionality of the SHA-3 family of hash functions. It computes the new state s' by applying the 24 rounds of the keccak-f1600 permutation to an input state s. This builtin is particularly important for Ethereum compatibility, as Ethereum uses Keccak-256 for various cryptographic operations.
Cells Organization
The Keccak builtin uses a dedicated memory segment organized in blocks of 16 consecutive cells:
| Cell Range | Purpose | Description |
|---|---|---|
| First 8 cells | Input state s | Each cell stores 200 bits of the 1600-bit input state |
| Next 8 cells | Output state s' | Each cell stores 200 bits of the 1600-bit output state |
The builtin processes each block independently, applying the following rules:
- Input validation: Each input cell must contain a valid field element not exceeding 200 bits (0 ≤ value < 2^200)
- Lazy computation: The output state is only computed when any output cell is accessed
- Caching: Once computed, results are cached to avoid redundant calculations if other output cells from the same block are accessed
Example Operation
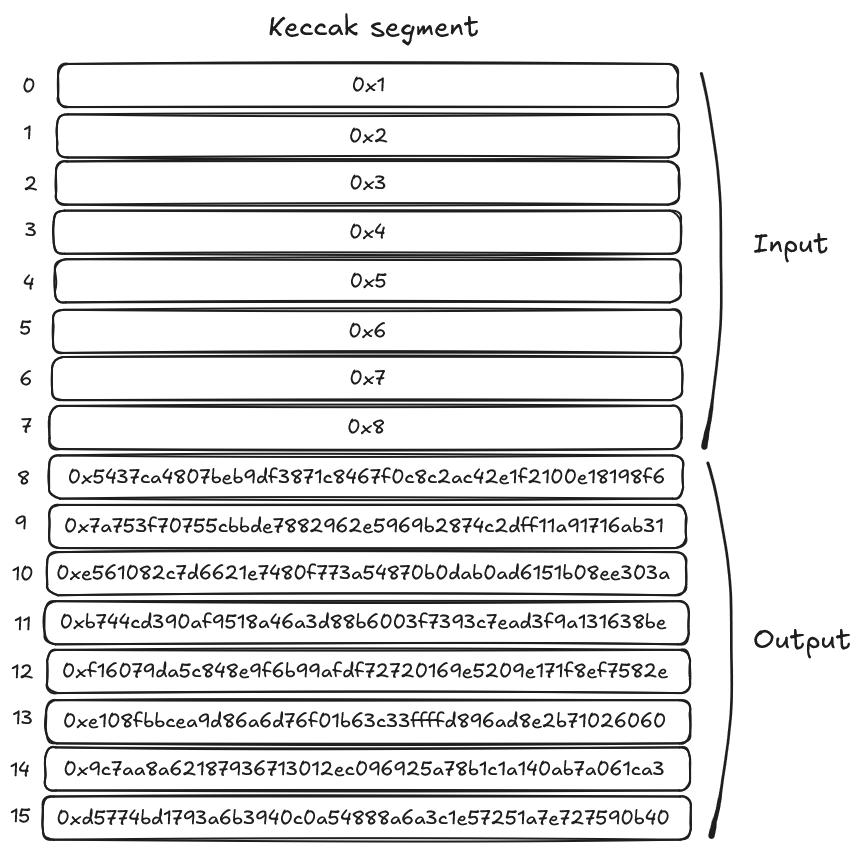
In this example:
- The program has written input values [0x1, 0x2, 0x3, 0x4, 0x5, 0x6, 0x7, 0x8] to the first 8 cells
- Upon reading any of the output cells, the VM computes the keccak-f1600 permutation on the entire state
- The resulting output state is stored in the next 8 cells
- The computation happens only once per block and is cached
Error Conditions
The Keccak builtin will throw an error in the following scenarios:
- If any input cell contains a value that exceeds 200 bits (≥ 2^200)
- If any input cell contains a relocatable value (pointer) instead of a field element
- If an output cell is read before all eight input cells have been initialized
Implementation References
These implementation references of the Keccak builtin in various Cairo VM implementations:
- TypeScript Keccak Builtin
- Python Keccak Builtin
- Rust Keccak Builtin
- Go Keccak Builtin
- Zig Keccak Builtin
Resources on Keccak Hash
If you're interested in the Keccak hash function and its applications:
- StarkNet, Hash Functions - Starknet Keccak
- NIST, SHA-3 Standard: Permutation-Based Hash and Extendable-Output Functions
- Wikipedia, SHA-3 (Secure Hash Algorithm 3)
- Keccak Team, Keccak Reference
Poseidon Builtin
The Poseidon builtin computes cryptographic hashes using the Poseidon hash function, which is specifically optimized for zero-knowledge proofs and efficient computation in algebraic circuits. As a core component in Cairo's cryptographic operations, it uses the Hades permutation strategy that combines full rounds and partial rounds to achieve both security and performance within STARK proofs.
Poseidon is particularly important for Cairo applications because it offers:
- Better performance than Pedersen for multiple inputs
- ZK-friendly design (optimized for constraints in ZK proof systems)
- Strong cryptographic security properties
Cells Organization
The Poseidon builtin operates with a dedicated memory segment and follows a deduction property pattern:
| Cells | Purpose |
|---|---|
| Input cells [0-2] | Store input state for Hades permutation |
| Output cells [3-5] | Store computed permutation results |
Each operation works with 6 consecutive cells - a block of 3 inputs followed by 3 outputs. When a program reads any output cell, the VM applies the Hades permutation to the input cells and populates all three output cells with the results.
Single Value Hashing Example
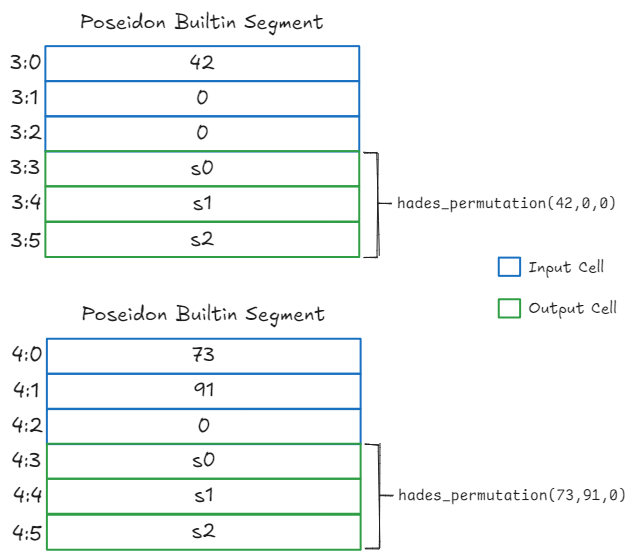
For hashing a single value (42) in the first instance:
- The program writes the value to the first input cell (position 3:0)
- The other input cells remain at their default value (0)
- When reading the output cell (3:3), the VM:
- Takes the initial state (42, 0, 0)
- Applies padding: (42+1, 0, 0) = (43, 0, 0)
- Computes the Hades permutation
- Stores the result in output cell 3:3
The permutation result's first component becomes the hash output when hashing a single value.
Sequence Hashing Example
For hashing a sequence of values (73, 91) in the second instance:
- The program writes values to the first two input cells (positions 3:6 and 3:7)
- Upon reading any output cell, the VM:
- Takes the state (73, 91, 0)
- Applies appropriate padding: (73, 91+1, 0)
- Computes the Hades permutation
- Stores all three results in the output cells (3:9, 3:10, 3:11)
When hashing sequences, all three output state components may be used for further computation or chaining in multi-round hashing.
Error Condition
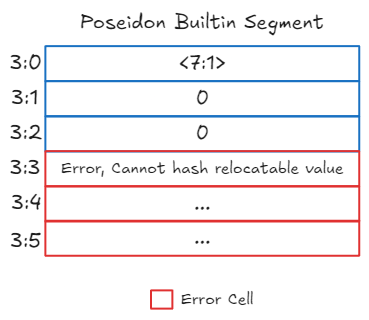
In this error example:
- The program attempts to write a relocatable value (pointer to cell 7:1) to input cell 3:0
- When trying to read output cell 3:3, the VM throws an error
- The error occurs because the Poseidon builtin can only operate on field elements, not memory addresses
Input validation occurs at the time the output is read, rather than when inputs are written, which is consistent with the deduction property pattern.
Implementation References
These implementation references of the Poseidon builtin in various Cairo VM implementations:
- TypeScript Poseidon Builtin
- Python Poseidon Builtin
- Rust Poseidon Builtin
- Go Poseidon Builtin
- Zig Poseidon Builtin
Resources on Poseidon Hash
If you're interested in the Poseidon hash function and its applications:
- StarkNet - Hash Functions: Poseidon Hash
- StarkWare - Poseidon Implementation
- Poseidon: A New Hash Function for Zero-Knowledge Proof Systems (original paper)
- Poseidon: ZK-friendly Hashing
- Poseidon Journal
Mod Builtin
In the Cairo Virtual Machine (VM), the Mod Builtin is a specialized builtin to handle modular arithmetic operations—specifically addition and multiplication—on field elements, or felts, within a given modulus. It’s built to compute expressions like a + b (mod p) and a * b (mod p) efficiently.
To do this, it comes in two derivations: AddModBuiltin for addition and MulModBuiltin for multiplication.
This builtin is a requirement for tasks like cryptographic applications or computations heavy with modular arithmetic, especially when dealing with large integers like UInt384.
Why We Need It
Modular arithmetic is at the heart of many cryptographic protocols and zero-knowledge proof systems. If you tried to implement these operations in pure Cairo code, you’d quickly run into a wall of computational overhead—repeated divisions and remainder checks considerably increasing the step count. The Mod Builtin offers an optimized solution for handling these operations efficiently. In practice, when manipulating Arithmetic Circuits, you're using the Mod Builtin under the hood.
How It’s Structured
Every instance starts with seven input cells. Four of them—p0, p1, p2, and p3—define the modulus p as a multi-word integer, typically split into four 96-bit chunks for UInt384 compatibility. Then, the operands and results are stored in the values_ptr, and offsets_ptr points to another table that tells the builtin where to read or write those values, relative to the values_ptr. Finally, n specifies how many operations to perform, and it needs to be a multiple of the batch size.
The builtin’s core trick is deduction. Give it two parts of the triplet—like a and b—and it figures out the third, c, based on the operation and modulus. Or, if you provide c and one operand, it can solve for the other. It processes these triplets in batches (often just one at a time), ensuring that op(a, b) = c + k * p holds true, where k is a quotient within a specific bound—small for addition, larger for multiplication. In practice, you set this up with the run_mod_p_circuit function, which ties it all together. The values table often overlaps with the range_check96_ptr segment to keep each word under 2^96, and offsets are defined as program literals using dw directives.
Putting It to Work: Modular Addition
Let’s walk through an example of using the AddMod builtin to compute x + y (mod p) for two UInt384 values. This Cairo Zero code shows how the Mod Builtin fits into a real program.
from starkware.cairo.common.cairo_builtins import UInt384, ModBuiltin
from starkware.cairo.common.modulo import run_mod_p_circuit
from starkware.cairo.lang.compiler.lib.registers import get_fp_and_pc
func add{range_check96_ptr: felt*, add_mod_ptr: ModBuiltin*, mul_mod_ptr: ModBuiltin*}(
x: UInt384*, y: UInt384*, p: UInt384*
) -> UInt384* {
let (_, pc) = get_fp_and_pc();
// Define pointers to the offsets tables, which come later in the code
pc_label:
let add_mod_offsets_ptr = pc + (add_offsets - pc_label);
let mul_mod_offsets_ptr = pc + (mul_offsets - pc_label);
// Load x and y into the range_check96 segment, which doubles as our values table
// x takes slots 0-3, y takes 4-7—each UInt384 is 4 words of 96 bits
assert [range_check96_ptr + 0] = x.d0;
assert [range_check96_ptr + 1] = x.d1;
assert [range_check96_ptr + 2] = x.d2;
assert [range_check96_ptr + 3] = x.d3;
assert [range_check96_ptr + 4] = y.d0;
assert [range_check96_ptr + 5] = y.d1;
assert [range_check96_ptr + 6] = y.d2;
assert [range_check96_ptr + 7] = y.d3;
// Fire up the modular circuit: 1 addition, no multiplications
// The builtin deduces c = x + y (mod p) and writes it to offsets 8-11
run_mod_p_circuit(
p=[p],
values_ptr=cast(range_check96_ptr, UInt384*),
add_mod_offsets_ptr=add_mod_offsets_ptr,
add_mod_n=1,
mul_mod_offsets_ptr=mul_mod_offsets_ptr,
mul_mod_n=0,
);
// Bump the range_check96_ptr forward: 8 input words + 4 output words = 12 total
let range_check96_ptr = range_check96_ptr + 12;
// Return a pointer to the result, sitting in the last 4 words
return cast(range_check96_ptr - 4, UInt384*);
// Offsets for AddMod: point to x (0), y (4), and the result (8)
add_offsets:
dw 0; // x starts at offset 0
dw 4; // y starts at offset 4
dw 8; // result c starts at offset 8
// No offsets needed for MulMod here
mul_offsets:
}
In this function, we take two UInt384 values, x and y, and a modulus p. We write x and y into the values table starting at range_check96_ptr, then use offsets—[0, 4, 8]—to tell the builtin where x, y, and the result c live. The run_mod_p_circuit call triggers the AddMod builtin to compute x + y (mod p) and store the result at offset 8. After adjusting the pointer, we return a pointer to that result. It's a straightforward setup, but the builtin handles the modular reduction for us, saving a ton of manual work.
Imagine a simple case with n_words = 1 and batch_size = 1. If p = 5, x = 3, and y = 4, the values table might hold [3, 4, 2]. The offsets [0, 1, 2] point to a = 3, b = 4, and c = 2. The builtin checks: 3 + 4 = 7, and 7 mod 5 = 2, which matches c. Everything checks out.
If things go wrong—say x is missing a word—the builtin flags a MissingOperand error. For MulMod, if b and p aren't coprime and a is unknown, you'll get a ZeroDivisor error. And if any word exceeds 2^96, the range check fails. These safeguards keep the operation reliable.
Under the Hood
Let’s take a closer look at how the Mod Builtin is designed and why it’s built the way it is. The goal here is efficiency—making modular arithmetic fast and reliable in Cairo’s virtual machine—while keeping it practical for real-world use, like cryptographic programs. To understand that, we’ll explore a few key pieces of its structure and the thinking behind them.
First, why does it break numbers into 96-bit chunks, typically four of them for a UInt384? That’s not an arbitrary choice. The Cairo VM already has a built-in system for checking that numbers stay within certain bounds, called range_check96, which works with 96-bit values. By aligning the Mod Builtin’s word size with that system, it can lean on the VM’s existing machinery to ensure each chunk of a number stays below 2^96. For a UInt384, four 96-bit words add up to 384 bits, which is big enough for most cryptographic applications.
Now, consider the difference between AddMod and MulMod. When you add two numbers close to the modulus p, the result tops out at 2p - 2. That’s why AddMod limits its quotient k—the number of times p gets subtracted to wrap the result—to just 2. If a + b is, say, 1.5p, then k = 1 and c = a + b - p keeps everything in check. It’s a tight constraint because addition doesn’t produce wildly large numbers. Multiplication, though, is different. With MulMod, a * b could be enormous—think p * p or more—so the default quotient bound is set way higher, up to 2^384. This ensures it can handle even the biggest products without running out of room to adjust.
The real cleverness comes in how the builtin figures out missing values, a process called deduction. Instead of always starting from scratch, it works with what’s already in memory. For AddMod, if you give it a and b, it computes c = a + b (mod p). If you give it c and b, it solves a + b = c + k * p to find a, testing k = 0 or 1.
For MulMod, it’s trickier—multiplication isn’t as straightforward to reverse. Here, it uses a mathematical tool called the extended GCD algorithm to solve a * b = c (mod p). If b and p share factors (their greatest common divisor isn’t 1), there’s no unique solution, and it flags a ZeroDivisor error. Otherwise, it finds the smallest a that fits.
Another design choice is the batch size, which is often just 1 in practice. The builtin can process multiple operations at once—batch_size triplets of a, b, and c—but keeping it at 1 simplifies things for most cases. It’s like handling one addition or multiplication at a time, which is plenty for many programs, though the option to scale up is there if you need it.
Why tie the values table to range_check96_ptr? It’s about efficiency again. The VM’s range-checking system is already set up to monitor that segment, so using it for the builtin’s values—like a, b, and c—means those numbers get validated automatically.
Implementation References
These implementation references of the Mod Builtin in various Cairo VM implementations:
Segment Arena Builtin
The Segment Arena extends Cairo VM's memory handling by tracking segment endpoints. This approach simplifies memory operations where segments need to be allocated and finalized.
Cells Organization
Each Segment Arena builtin instance works with blocks of 3 cells that maintain the state of dictionaries:
- First cell: Contains the base address of the info pointer
- Second cell: Contains the current number of allocated segments
- Third cell: Contains the current number of squashed/finalized segments
This structure works in close conjunction with an Info segment, which is also organized in blocks of 3 cells:
- First cell: Base address of the segment
- Second cell: End address of the segment (when squashed)
- Third cell: Current number of squashed segments (squashing index)

Let's take a look at two snapshots of a Segment Arena segment, during the execution of a dummy program by the Cairo VM.
In the first snapshot, Let's look at first case when a dictionary is allocated:
info_ptrpoints to new info segmentn_dictsincrements to 1- Info segment created with three cells
- Dictionary gets new segment
<3:0>
Now, In the second case one more dictionary is allocated:
- Info segment grows by three cells per dictionary
- Squashed dictionaries have end addresses set
- Squashing indices assigned sequentially
- Unfinished dictionaries have
0end address
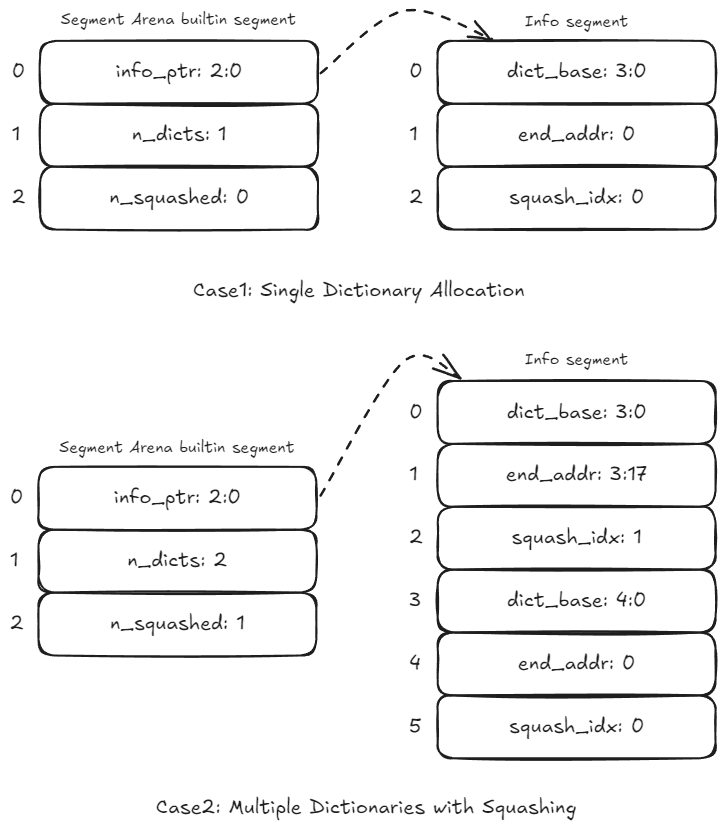
The second snapshot shows two error conditions. In the first case, an invalid state occurs when info_ptr contains the non-relocatable value ABC. The error is triggered when accessing the info segment. In the second case, the error occurs when there's an inconsistent state as shown in the snapshot, n_squashed is greater than n_segments.
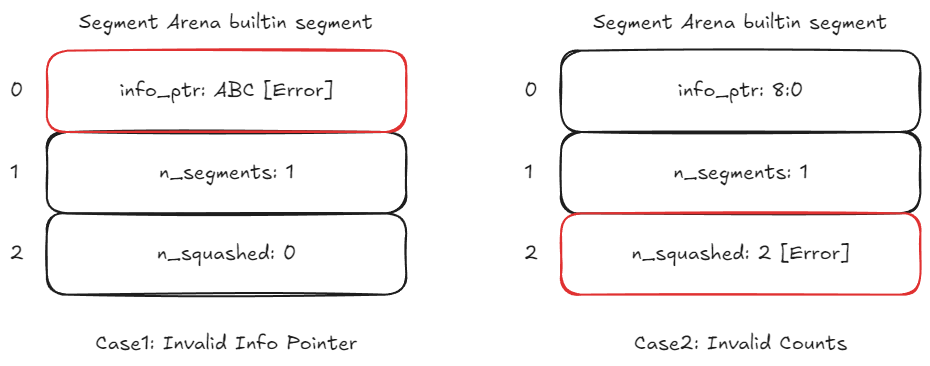
Key Validation Rules
The builtin enforces several rules:
- Each segment must be allocated and finalized exactly once
- All cell values must be valid field elements
- Segment sizes must be non-negative
- Squashing operations must maintain sequential order
- Info segment entries must correspond to segment allocations
Implementation References
These implementation references of the Segment Arena builtin might not be exhaustive.